2021 NISSAN KICKS lights
[x] Cancel search: lightsPage 171 of 500
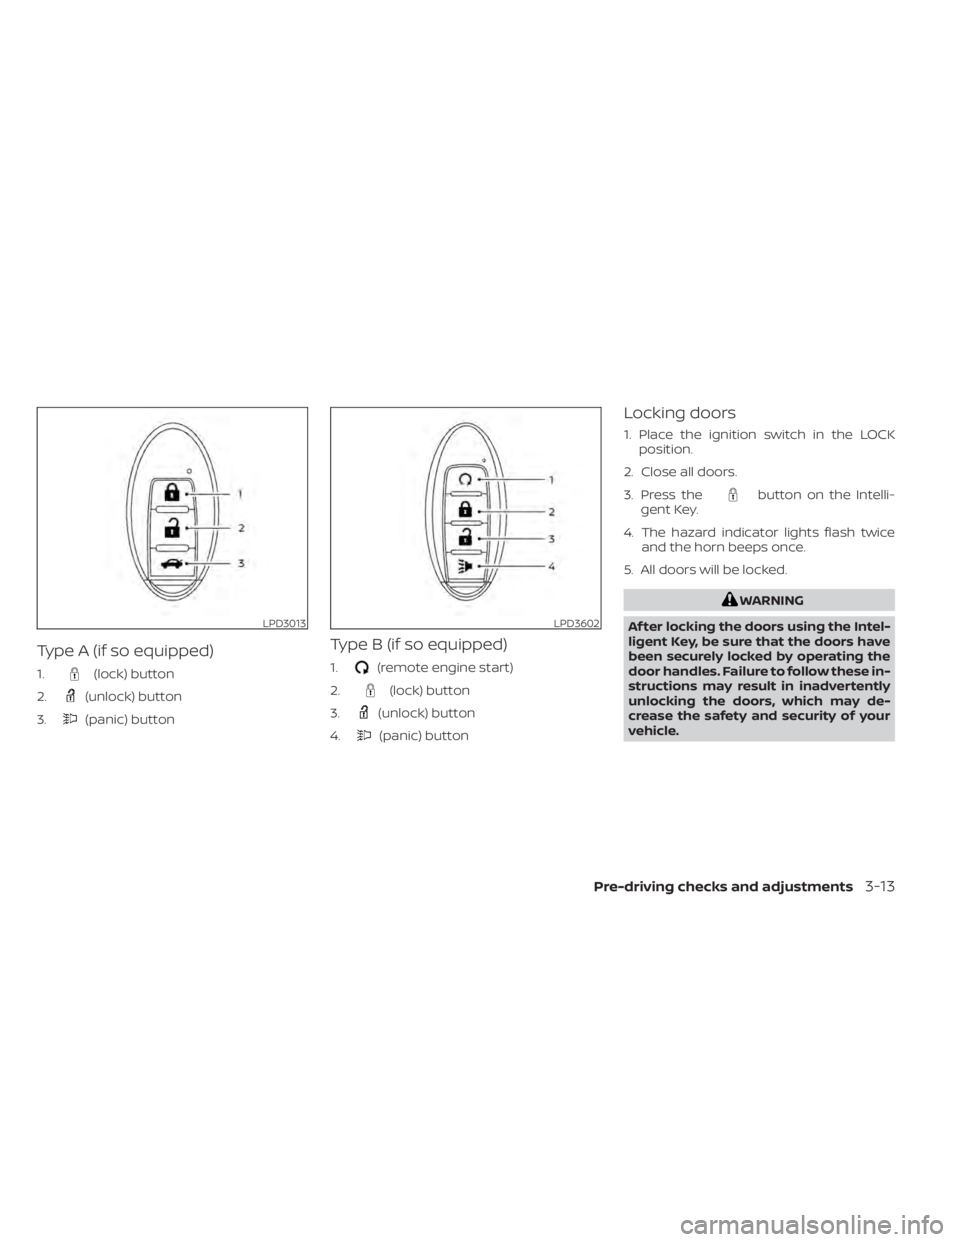
Type A (if so equipped)
1.(lock) button
2.
(unlock) button
3.
(panic) button
Type B (if so equipped)
1.(remote engine start)
2.
(lock) button
3.
(unlock) button
4.
(panic) button
Locking doors
1. Place the ignition switch in the LOCK position.
2. Close all doors.
3. Press the
button on the Intelli-
gent Key.
4. The hazard indicator lights flash twice and the horn beeps once.
5. All doors will be locked.
LPD3602
Page 172 of 500
Unlocking doors
1. Press thebutton on the Intelligent
Key.
2. The hazard warning lights flash once.
3. Press the
button again within 30
seconds to unlock all doors and the
lif tgate.
NOTE:
If Selective Unlock is turned off in “Ve-
hicle Settings” of the vehicle informa-
tion display (if so equipped), all doors
will unlock upon the first
press of
the key fob. For additional informa-
tion, refer to "Vehicle information dis-
play" in the "Instruments and con-
trols" section of this manual.
All doors and the lif tgate will be locked au-
tomatically unless one of the following op-
erations is performed within 30 seconds
af ter pressing the
button.
• Opening any doors or the lif tgate.
• Engaging the ignition switch from the lock position.
The interior light illuminates for a period of
time when a door is unlocked and the
room light switch is in the DOOR position. The light can be turned off without waiting
by performing one of the following opera-
tions.
• Placing the ignition switch in the ON po-
sition.
• Locking the doors with the remote con- trol.
• Switching the room light switch in the OFF position.
Using the panic alarm
If you are near your vehicle and feel threat-
ened, you may activate the panic alarm to
call attention by pressing and holding the
button on the Intelligent Key for lon-
ger than 0.5 seconds.
The panic alarm and headlights will stay on
for a period of time.
The panic alarm stops when:
• It has run for a period of time, or
• Any button is pressed on the Intelligent Key.
• The request switch on the driver or pas- senger door is pushed and the Intelligent
Key is in range of the door handle.Intelligent Key button operation
light
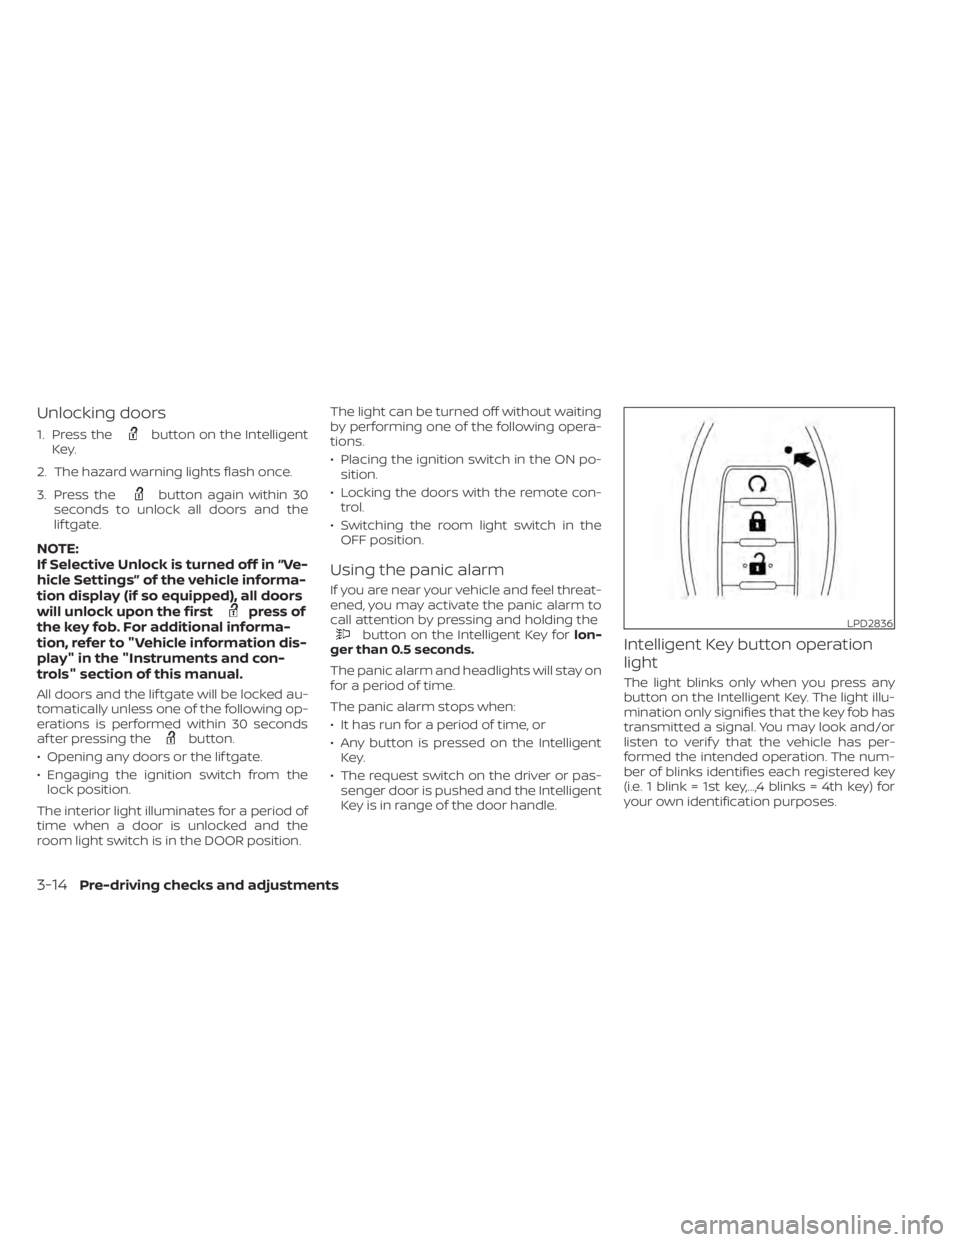
The light blinks only when you press any
button on the Intelligent Key. The light illu-
mination only signifies that the key fob has
transmitted a signal. You may look and/or
listen to verif y that the vehicle has per-
formed the intended operation. The num-
ber of blinks identifies each registered key
(i.e. 1 blink = 1st key,...,4 blinks = 4th key) for
your own identification purposes.
LPD2836
3-14Pre-driving checks and adjustments
Page 176 of 500
Thebutton will be on the NISSAN
Intelligent Key® if the vehicle has Remote
Engine Start. This feature allows the engine
to start from outside the vehicle.
The following features may be affected
when the Remote Engine Start feature is
used:
• Vehicles with a manual climate control system (if so equipped) will default to the
last used heating or cooling mode. •
Vehicles with an automatic climate control
system (if so equipped) will default to either
heating or cooling mode. For additional in-
formation, refer to “Remote Engine Start with
Intelligent Climate Control” in the “Monitor,
climate, audio, phone and voice recognition
systems” section of this manual.
Laws in some local communities may re-
strict the use of remote starters. For ex-
ample, some laws require a person using
Remote Engine Start to have the vehicle in
view. Check local regulations for any re-
quirements.
Other conditions may affect the function of
the Remote Engine Start feature. For addi-
tional information, refer to “Conditions the
Remote Engine Start will not work” in this
section.
Other conditions can affect the perfor-
mance of the Intelligent Key transmitter.
For additional information, refer to “NISSAN
Intelligent Key®” in this section.
CONDITIONS THE REMOTE ENGINE
START WILL NOT WORK
The Remote Engine Start will not operate if
any of the following conditions are present:
• The ignition switch is placed in the ON position. • The hood is not securely closed.
• The hazard indicator lights are on.
• The engine is still running. The engine
must be completely stopped. Wait at
least 6 seconds if the engine goes from
running to off. This is not applicable when
extending engine run time.
• The
button is not pressed and held
for at least 2 seconds.
• The
button is not pressed and held
within 5 seconds of pressing the lock but-
ton.
• The brake is pressed.
• The doors are not closed and locked.
• The lif tgate is open.
• The I–Key System Error warning shows in the vehicle information display (if so
equipped).
• The alarm sounds due to illegal entry into the vehicle.
• Two Remote Engine Starts, or a single Remote Engine Start with an extension,
have already been used.
• The vehicle is not in P (Park).
• There is a detected registered key already inside of the vehicle.
LPD2995
REMOTE ENGINE START (if so
equipped)
Page 177 of 500
• The Remote Engine Start function hasbeen switched to the OFF position in “Ve-
hicle Settings” of the vehicle information
display (if so equipped). For additional in-
formation, refer to “Vehicle information
display” in the “Instruments and controls”
section of this manual.
The Remote Engine Start may display a
warning or indicator in the vehicle informa-
tion display (if so equipped). For additional
information, refer to “Vehicle information
display” in the “Instruments and controls”
section of this manual.
REMOTE ENGINE START
OPERATING RANGE
CAUTION
When the Intelligent Key battery is dis-
charged or other strong radio wave
sources are present near the operating
location, the Intelligent Key operating
range becomes narrower, and the Intel-
ligent Key may not function properly.
The Remote Engine Start function can only
be used when the Intelligent Key is within
the specified operating range from the ve-
hicle.
The Remote Engine Start operating range
is approximately 197 f t (60 m) from the ve-
hicle.
REMOTE STARTING THE VEHICLE
To use the Remote Engine Start feature
perform the following:
1. Aim the Intelligent Key at the vehicle.
2. Press the
button to lock all doors.
3. Within 5 seconds press and hold the
button until the turn signal lights
flash and the tail lamps turn on. If the
vehicle is not within view press and hold
the
button for at least 2 seconds. The following events will occur when the
engine starts:
• The parking lights will turn on and remain
on as long as the engine is running.
• The doors will be locked and the climate control system may come on.
• The engine will continue to run for 10 min- utes. Repeat the steps to extend the time
for an additional 10 minutes. For addi-
tional information, refer to “Extending en-
gine run time” in this section.
Press and hold the brake pedal while
switching the ignition to the ON position
before driving. For additional information,
refer to “Driving the vehicle” in the “Starting
and driving” section of this manual.
EXTENDING ENGINE RUN TIME
The Remote Engine Start feature can be
extended one time by performing the
steps listed in “Remote starting the vehicle”
in this section. Run time will be calculated
as follows:
• The first 10 minute run time will start when the Remote Engine Start function is
performed.
Pre-driving checks and adjustments3-19
Page 178 of 500
• The second 10 minutes will start immedi-ately when the Remote Engine Start
function is performed again. For example,
if the engine has been running for 5 min-
utes, and 10 minutes are added, the en-
gine will run for a total of 15 minutes.
• Extending engine run time will bring you to the two Remote Engine Start limit.
A maximum of two Remote Engine Starts,
or a single Remote Engine Start with an
extension, are allowed between ignition
cycles. The ignition switch must be cycled
to the ON position and then back to the
OFF position before the Remote Engine
Start procedure can be used again.
CANCELING A REMOTE ENGINE
START
To cancel a Remote Engine Start, perform
one of the following:
• Aim the Intelligent Key at the vehicle and press
until the parking lights turn off.
• Turn on the hazard warning flashers.
• Cycle the ignition switch on and then off.
• The extended engine run time has ex- pired.
• The first 10 minute timer has expired.
• Opening the engine hood.
• Shif ting the vehicle out of P (Park). • The alarm sounds due to illegal entry into
the vehicle.
• Pushing the ignition switch without the Intelligent Key in the vehicle.
• Not pressing the brake pedal while press- ing the ignition switch with the Intelligent
Key in the vehicle.
CONDITIONS THE REMOTE ENGINE
START WILL NOT WORK
The Remote Engine Start will not operate if
any of the following conditions are present:
• The ignition switch is placed in the ONposition.
• The hood is not securely closed.
• The hazard indicator lights are on.
• The engine is still running. The engine must be completely stopped. Wait at
least 6 seconds if the engine goes from
running to off. This is not applicable when
extending engine run time.
• The
button is not pressed and held
for at least 2 seconds.
• The
button is not pressed and held
within 5 seconds of pressing the lock but-
ton.
• The brake is pressed.
• The doors are not closed and locked. • The lif tgate is open.
• The I–Key System Error warning shows in
the vehicle information display (if so
equipped).
• The alarm sounds due to illegal entry into the vehicle.
• Two Remote Engine Starts, or a single Remote Engine Start with an extension,
have already been used.
• The vehicle is not in P (Park).
• There is a detected registered key already inside of the vehicle.
• The Remote Engine Start function has been switched to the OFF position in “Ve-
hicle Settings” of the vehicle information
display (if so equipped). For additional in-
formation, refer to “Vehicle information
display” in the “Instruments and controls”
section of this manual.
The Remote Engine Start may display a
warning or indicator in the vehicle informa-
tion display (if so equipped). For additional
information, refer to “Vehicle information
display” in the “Instruments and controls”
section of this manual.
3-20Pre-driving checks and adjustments
Page 186 of 500
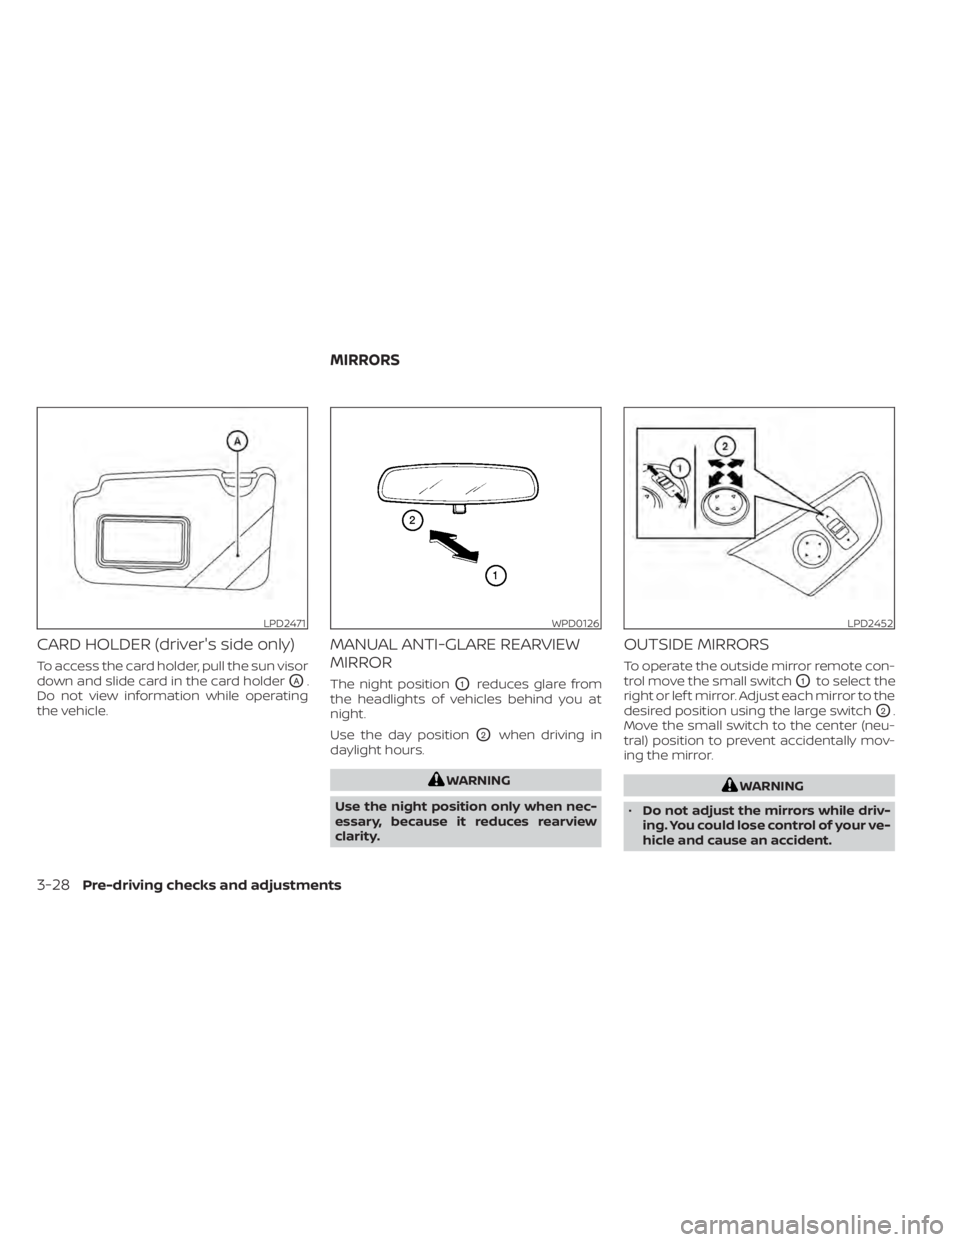
CARD HOLDER (driver's side only)
To access the card holder, pull the sun visor
down and slide card in the card holder
OA.
Do not view information while operating
the vehicle.
MANUAL ANTI-GLARE REARVIEW
MIRROR
The night positionO1reduces glare from
the headlights of vehicles behind you at
night.
Use the day position
O2when driving in
daylight hours.
WPD0126LPD2452
MIRRORS
Page 233 of 500
Reception conditions will constantly
change because of vehicle movement.
Buildings, terrain, signal distance and inter-
ference from other vehicles can work
against ideal reception. Described below
are some of the factors that can affect your
radio reception.
Some cellular phones or other devices may
cause interference or a buzzing noise to
come from the audio system speakers.
Storing the device in a different location
may reduce or eliminate the noise.
FM RADIO RECEPTION
Range: FM range is normally limited to 25 –
30 mi (40 – 48 km), with monaural (single
channel) FM having slightly more range
than stereo FM. External influences may
sometimes interfere with FM station re-
ception even if the FM station is within 25
mi (40 km). The strength of the FM signal is
directly related to the distance between
the transmitter and receiver. FM signals fol-
low a line-of-sight path, exhibiting many of
the same characteristics as light. For ex-
ample, they will reflect off objects.
Fade and drif t: As your vehicle moves away
from a station transmitter, the signals will
tend to fade and/or drif t.Static and flutter: During signal interfer-
ence from buildings, large hills or due to
antenna position (usually in conjunction
with increased distance from the station
transmitter), static or flutter can be heard.
This can be reduced by adjusting the treble
control to reduce treble response.
Multipath reception: Because of the reflec-
tive characteristics of FM signals, direct and
reflected signals reach the receiver at the
same time. The signals may cancel each
other, resulting in momentary flutter or loss
of sound.AM RADIO RECEPTION
AM signals, because of their low frequency,
can bend around objects and skip along
the ground. In addition, the signals can be
bounced off the ionosphere and bent back
to earth. Because of these characteristics,
AM signals are also subject to interference
as they travel from transmitter to receiver.
Fading: Occurs while the vehicle is passing
through freeway underpasses or in areas
with many tall buildings. It can also occur
for several seconds during ionospheric tur-
bulence even in areas where no obstacles
exist.
Static: Caused by thunderstorms, electrical
power lines, electric signs and even traffic
lights.
AUDIO OPERATION PRECAUTIONS
MP3 or WMA terms
• MP3 — MP3 is short for Moving Pictures
Experts Group Audio Layer 3. MP3 is the
most well-known compressed digital au-
dio file format. This format allows for near
“CD quality” sound, but at a fraction of the
size of normal audio files. MP3 conversion
of an audio track from CD-ROM can re-
duce the file size by approximately a 10:1
ratio with virtually no perceptible loss in
quality. MP3 compression removes the
redundant and irrelevant parts of a
sound signal that the human ear doesn’t
hear.
• WMA — Windows Media Audio (WMA)* is a compressed audio format created by Mi-
crosof t as an alternative to MP3. The WMA
codec offers greater file compression
than the MP3 codec, enabling storage of
more digital audio tracks in the same
amount of space when compared to
MP3s at the same level of quality.
Monitor, climate, audio, phone and voice recognition systems4-45
Page 287 of 500
If the no start condition re-occurs, NISSAN
recommends placing the registered key on
a separate key ring to avoid interference
from other devices.• Make sure the area around the vehicle is
clear.
• Check fluid levels such as engine oil, cool- ant, brake fluid, and windshield-washer
fluid as frequently as possible, or at least
whenever you refuel.
• Check that all windows and lights are clean.
• Visually inspect tires for their appearance and condition. Also check tires for proper
inflation.
• Lock all doors.
• Position seat and adjust headrests/head restraints.
• Adjust inside and outside mirrors.
• Fasten seat belts and ask all passengers to do likewise.
• Check the operation of warning lights when the ignition switch is pushed to the
ON position. For additional information,
refer to “Warning lights, indicator lights
and audible reminders” in the “Instru-
ments and controls” section of this
manual. 1. Apply the parking brake.
2. Move the shif t lever to P (Park) or N (Neu-
tral). P (Park) is recommended.
The shif t lever cannot be moved out of
P (Park) and into any of the other gear
positions if the ignition switch is
placed in the OFF position.
The starter is designed not to operate
if the shif t lever is in any of the driving
positions.
3. Push the ignition switch to the ON posi- tion. Depress the brake pedal and push
the ignition switch to start the engine.
To start the engine immediately, push
and release the ignition switch while de-
pressing the brake pedal with the igni-
tion switch in any position.
• If the engine is very hard to start in extremely cold weather or when re-
starting, depress the accelerator
pedal a little (approximately 1/3 to the
floor) and while holding, crank the en-
gine. Release the accelerator pedal
when the engine starts.
BEFORE STARTING THE ENGINE STARTING THE ENGINE
Starting and driving5-15