2021 NISSAN KICKS ECO mode
[x] Cancel search: ECO modePage 108 of 500
The OK,andbuttons also
control audio and control panel functions
in some conditions. Most screens and
menus offer instruction prompts of the
steering switch buttons to indicate how to
control the vehicle information display.
Dots on the lef t side of the vehicle informa-
tion display will appear if there is more than
one page of menu items. The OK button
changes the audio source and the
buttons also control voice recognition
manual mode. For additional information,
refer to the separate NissanConnect®
Owner’s Manual.
STARTUP DISPLAY
When the vehicle in placed in the ON posi-
tion the screens that display in the vehicle
information display include:
• Gauges
• Audio
• Fuel Economy
• Drive Computer
• Warning Review
• Settings
For additional information on warnings
and indicators, refer to “Vehicle information
display warnings and indicators” in this
section.
To control what items display in the vehicle
information display, refer to “Customize
display” in this section.
SETTINGS
The setting mode allows you to change the
information displayed in the vehicle infor-
mation display as well as the model for
several vehicle functions:
• VDC Setting
• Driver Assistance
• Customize Display
• Vehicle Settings
• TPMS Settings
• Maintenance
• Clock
• Unit/Language
• Factory Reset
2-24Instruments and controls
Page 119 of 500
• Blind Spot Warning (BSW)
• Rear Cross Traffic Alert (RCTA)
If one or more of these warning appears,
have the system checked. It is recom-
mended that you visit a NISSAN dealer for
this service.
Shipping Mode On Push Storage Fuse
This warning may appear if the extended
storage switch is not pushed in. When this
warning appears, push in the extended
storage switch to turn off the warning. For
additional information, refer to “Extended
storage switch” in this section.
CVT Error: See Owner's Manual
This warning illuminates when there is a
problem with the CVT system. If this warn-
ing comes on, have the system checked. It
is recommended that you visit a NISSAN
dealer for this service.
Steering lock release malfunction
indicator (if so equipped)
This indicator appears when the steering
lock cannot be released.
If this indicator appears, push the ignition
switch while lightly turning the steering
wheel right and lef t.
Illumination indicator
This indicator shows the illumination ad-
justment of the instrument panel. For addi-
tional information, refer to “Instrument
brightness control” in this section.
Transmission Shif t Position indicator
(if so equipped)
This indicator shows the transmission shif t
position.
High Coolant Temp: See Owner’s
Manual
This warning appears when the tempera-
ture of the engine coolant is too high. Stop
the vehicle in a safe location as soon as
possible. Avoid quick starting or abrupt ac-
celeration. When the warning turns off, the
vehicle can be driven.
If the warning appears again soon af ter it
turns off, have the vehicle checked. It is rec-
ommended that you visit a NISSAN dealer
for this service.
Outside Temperature Display
The outside temperature display appears
in the center region of the vehicle informa-
tion display.
Low Outside Temperature
This warning appears if the outside tem-
perature is below 37°F (3°C). The tempera-
ture can be changed to display in Celsius or
Fahrenheit. For additional information, re-
fer to “Settings” in this section.
Oil and Filter
This indicator appears when the customer
set distance comes for changing the en-
gine oil and filter. You can set or reset the
distance for checking or replacing these
items. For scheduled maintenance items
and intervals, refer to the “Maintenance and
schedules” section of this manual.
Tire
This indicator appears when the customer
set distance is reached for replacing tires.
You can set or reset the distance for replac-
ing tires.
Instruments and controls2-35
Page 120 of 500
WARNING
The tire replacement indicator is not a
substitute for regular tire checks, in-
cluding tire pressure checks. For addi-
tional information, refer to “Changing
wheels and tires” in the “Do-it-yourself ”
section of this manual. Many factors in-
cluding tire inflation, alignment, driving
habits and road conditions affect tire
wear and when tires should be re-
placed. Setting the tire replacement in-
dicator for a certain driving distance
does not mean your tires will last that
long. Use the tire replacement indicator
as a guide only and always perform
regular tire checks. Failure to perform
regular tire checks, including tire pres-
sure checks could result in tire failure.
Serious vehicle damage could occur
and may lead to a collision, which could
result in serious personal injury or
death.
Other
This indicator appears when the customer
set distance is reached for checking or re-
placing maintenance items other than the
engine oil, oil filter and tires. Other mainte-
nance items can include such things as air filter or tire rotation. The distance for
checking or replacing the items can be set
or reset.
Front Radar Obstruction (if so
equipped)
This warning appears when there is a radar
obstruction detected. For additional infor-
mation, refer to “Automatic Emergency
Braking (AEB)” and “Automatic Emergency
Braking (AEB) with Pedestrian Detection” in
the “Starting and driving” section of this
manual.
Side Radar Obstruction (if so
equipped)
This message appears when the Blind
Spot Warning (BSW) or Rear Cross Traffic
Alert (RCTA) systems become unavailable
because a radar blockage is detected. For
additional information, refer to “Blind Spot
Warning (BSW)” or “Rear Cross Traffic Alert
(RCTA)” in the “Starting and driving” section
of this manual.
Drive Sport mode indicator (if so
equipped)
A small “S” appears to the right of the Trans-
mission Shif t Position indicator in the ve-
hicle information display when the Drive
Sport mode is engaged.Activate the Drive Sport mode by pressing
the switch on the shif t lever while the shif t
lever is in the D (Drive) position.
For additional information, refer to “Driving
the vehicle” in the “Starting and driving” sec-
tion of this manual.
Rear Door Alert is activated (if so
equipped)
When the system is enabled, this message
appears when the Rear Door Alert system
is active and can remind the driver to check
the back seat.
• Using the steering wheel switch, a driver
can select “Dismiss Message” to clear the
display for a period of time. If no selection
is made, this message automatically
turns off af ter a period of time.
• Using the steering wheel switch, a driver can select “Disable Alert” to disable the
horn alert for the remainder of the cur-
rent trip.
2-36Instruments and controls
Page 176 of 500
Thebutton will be on the NISSAN
Intelligent Key® if the vehicle has Remote
Engine Start. This feature allows the engine
to start from outside the vehicle.
The following features may be affected
when the Remote Engine Start feature is
used:
• Vehicles with a manual climate control system (if so equipped) will default to the
last used heating or cooling mode. •
Vehicles with an automatic climate control
system (if so equipped) will default to either
heating or cooling mode. For additional in-
formation, refer to “Remote Engine Start with
Intelligent Climate Control” in the “Monitor,
climate, audio, phone and voice recognition
systems” section of this manual.
Laws in some local communities may re-
strict the use of remote starters. For ex-
ample, some laws require a person using
Remote Engine Start to have the vehicle in
view. Check local regulations for any re-
quirements.
Other conditions may affect the function of
the Remote Engine Start feature. For addi-
tional information, refer to “Conditions the
Remote Engine Start will not work” in this
section.
Other conditions can affect the perfor-
mance of the Intelligent Key transmitter.
For additional information, refer to “NISSAN
Intelligent Key®” in this section.
CONDITIONS THE REMOTE ENGINE
START WILL NOT WORK
The Remote Engine Start will not operate if
any of the following conditions are present:
• The ignition switch is placed in the ON position. • The hood is not securely closed.
• The hazard indicator lights are on.
• The engine is still running. The engine
must be completely stopped. Wait at
least 6 seconds if the engine goes from
running to off. This is not applicable when
extending engine run time.
• The
button is not pressed and held
for at least 2 seconds.
• The
button is not pressed and held
within 5 seconds of pressing the lock but-
ton.
• The brake is pressed.
• The doors are not closed and locked.
• The lif tgate is open.
• The I–Key System Error warning shows in the vehicle information display (if so
equipped).
• The alarm sounds due to illegal entry into the vehicle.
• Two Remote Engine Starts, or a single Remote Engine Start with an extension,
have already been used.
• The vehicle is not in P (Park).
• There is a detected registered key already inside of the vehicle.
LPD2995
REMOTE ENGINE START (if so
equipped)
Page 194 of 500
Touch-screen maintenance
If you clean the display screen, use a dry,
sof t cloth. If additional cleaning is neces-
sary, use a small amount of neutral deter-
gent with a sof t cloth. Never spray the
screen with water or detergent. Dampen
the cloth first and then wipe the screen.
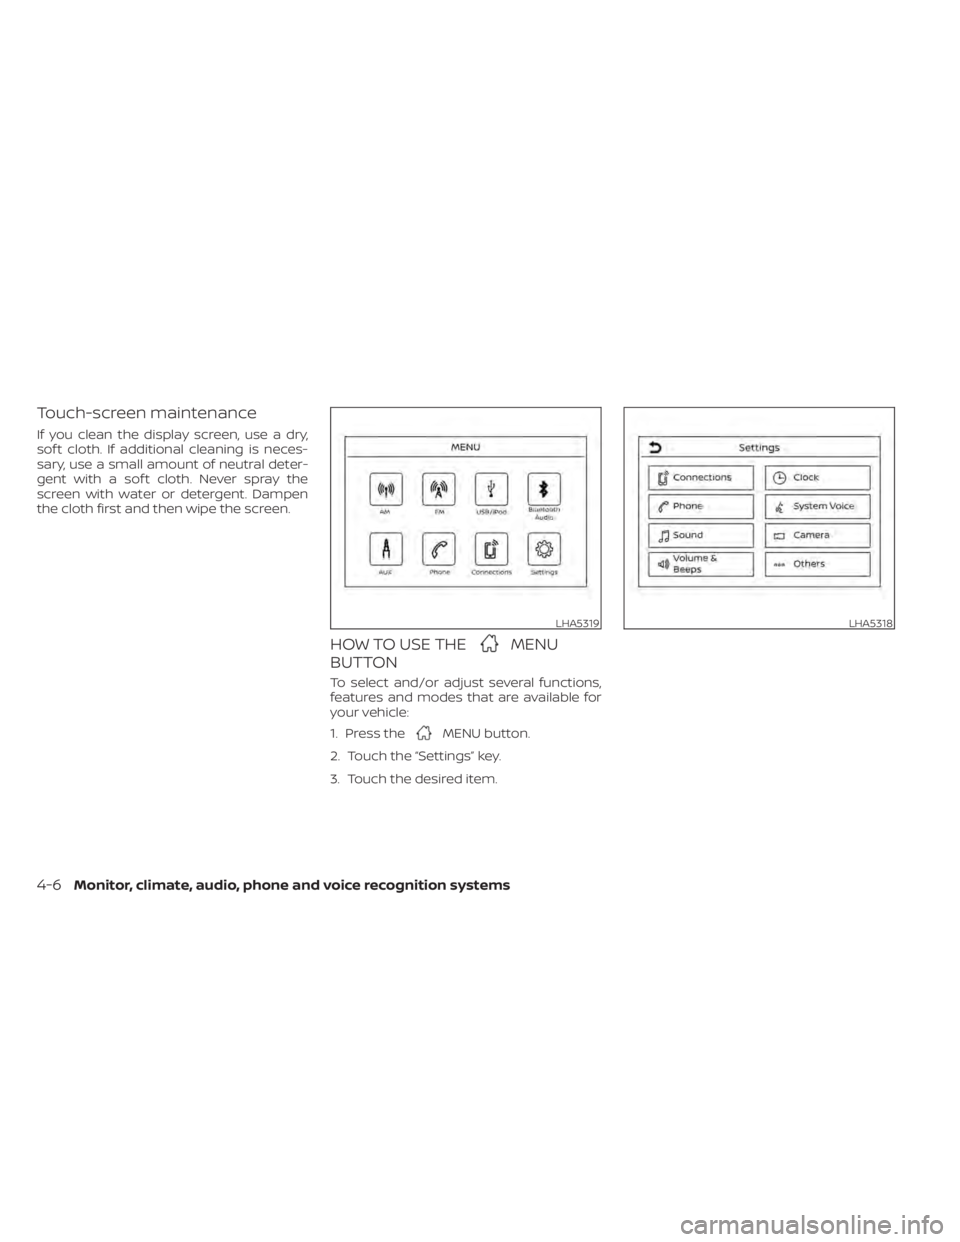
HOW TO USE THEMENU
BUTTON
To select and/or adjust several functions,
features and modes that are available for
your vehicle:
1. Press the
MENU button.
2. Touch the “Settings” key.
3. Touch the desired item.
LHA5319LHA5318
4-6Monitor, climate, audio, phone and voice recognition systems
Page 223 of 500
Fresh air intake
Press thefresh air intake button to
draw outside air into the passenger com-
partment.
Air recirculation
Press theair recirculation button to
recirculate interior air inside the vehicle.
The air recirculation cannot be activated
when the air conditioner is in the
front
defrosting mode.
A/C (air conditioner) button
Start the engine, turn thefan speed
control dial to the desired position and
press the
button to turn on the air
conditioner. To turn off the air conditioner,
press the
button again.
The air conditioner cooling function op-
erates only when the engine is running.
Rear window defroster switch
For additional information, refer to “Rear
window and/or outside mirror defroster
switch (if so equipped)” in the “Instruments
and controls” section of this manual.
HEATER OPERATION
Heating
This mode is used to direct heated air to
the foot outlets. Some air also flows from
the defrost outlets.
1. Press the
button for normal heat-
ing. The indicator light on thebut-
ton will go off.
2. Turn the airflow control dial to the
position.
3. Turn the
fan speed control dial to
the desired position.
4. Turn the temperature control dial to the desired position between the middle
and the hot position.
Ventilation
This mode directs outside air to the side
and center vents.
1. Press the
button. The indicator light
on thebutton will go off.
2. Turn the air flow control dial to the
position.
3. Turn the
fan speed control dial to
the desired position. 4. Turn the temperature control dial to the
desired position.
Defrosting or defogging
This mode directs the air to the defrost
outlets to defrost/defog the windows.
1. Turn the air flow control dial to the
position.
2. Turn the
fan speed control dial to
the desired position.
3. Turn the temperature control dial to the desired position between the middle
and the hot position.
• To quickly remove ice or fog from the win- dows, turn the
fan speed control dial
to the right and the temperature control
to the full HOT position.
Bi-level heating
The bi-level mode directs warmed air to
the side and center vents and to the foot
outlets.
1. Press the
button. The indicator light
on thebutton will go off.
2. Turn the airflow control dial to the
position.
Monitor, climate, audio, phone and voice recognition systems4-35
Page 224 of 500
3. Turn thefan speed control dial to
the desired position.
4. Turn the temperature control dial to the desired position.
Heating and defogging
This mode heats the interior and defogs
the windshield.
1. Turn the air flow control dial to the
position.
2. Turn the
fan speed control dial to
the desired position.
3. Turn the temperature control dial to the desired position between the middle
and the hot position.
•Ifinthe
mode for more than 1
minute, the air conditioning system will
continue to operate until the vehicle is
shut off. This dehumidifies the air which
helps defog the windshield. The
mode automatically turns off, allowing
outside air to be drawn into the passen-
ger compartment to further improve the
defogging performance.
Operating tips
Clear snow and ice from the wiper blades
and air inlet in front of the windshield.
This improves heater operation.
AIR CONDITIONER OPERATION
Start the engine, turn thefan speed
control dial to the desired position, and
press the
button to activate the air
conditioner. When the air conditioner is on,
cooling and dehumidif ying functions are
added to the heater operation.
The air conditioner cooling function op-
erates only when the engine is running.
Cooling
This mode is used to cool and dehumidif y
the air.
1. Press the
button.
2. Turn the air flow control dial to the
position.
3. Turn the
fan speed control dial to
the desired position. 4. Press the
button.
5. Turn the temperature control dial to the desired position.
• For quick cooling when the outside tem- perature is high, press the
button.
The indicator light on thebutton will
come on. Press thebutton for nor-
mal cooling. The indicator light on the
button will go off.
Dehumidified heating
This mode is used to heat and dehumidif y
the air.
1. Press the
button. The indicator light
on thebutton will go off.
2. Turn the air flow control dial to the
position.
3. Turn the
fan speed control dial to
the desired position.
4. Press the
button on.
5. Turn the temperature control dial to the desired position.
4-36Monitor, climate, audio, phone and voice recognition systems
Page 225 of 500
Dehumidified defogging
This mode is used to defog the windows
and dehumidif y the air.
1. Turn the air flow control dial to the
position.
2. Turn the
fan speed control dial to
the desired position.
3. Press the
button. The indicator
light comes on.
When the
,or positions in be-
tween are selected, the air conditioner au-
tomatically turns on. The air conditioning
system will continue to operate until the
fan speed control dial is turned to OFF or
the vehicle is shut off, even if the air flow
control dial is turned to a position other
than the
position. This dehumidifies
the air which helps defog the windshield.
The
mode automatically turns off, al-
lowing outside air to be drawn into the pas-
senger compartment to further improve
the defogging performance.
4. Turn the temperature control dial to the desired position.
Operating tips
• Keep the windows closed while the airconditioner is in operation.
• Af ter parking in the sun, drive for two or three minutes with the windows open to
vent hot air from the passenger com-
partment. Then, close the windows. This
allows the air conditioner to cool the inte-
rior more quickly.
• The air conditioning system should be
operated for approximately ten min-
utes at least once a month. This helps
prevent damage to the system due to
lack of lubrication.
• A visible mist may be seen coming from the ventilators in hot, humid conditions
as the air is cooled rapidly. This does not
indicate a malfunction.
• If the high temperature warning light
illuminates in red indicating en-
gine coolant temperature is over the
normal range, turn the air conditioner
off. For additional information, refer to
“If your vehicle overheats” in the “In
case of emergency ” section of this
manual.
AIR FLOW CHARTS
The following charts show the button and
dial positions for MAXIMUM AND QUICK
heating, cooling or defrosting. The
air
recirculation button should always be in
the OFF position for heating and defrost-
ing.
Monitor, climate, audio, phone and voice recognition systems4-37