2021 NISSAN ARMADA buttons
[x] Cancel search: buttonsPage 248 of 603
4-24Monitor, heater, air conditioner, audio, phone and voice recognition systems
WARNING
Failure to follow the warnings and
instructions for proper use of the
sonar function as outlined in this
section could result in serious injury
or death.
.The sonar is a convenience fea-
ture. It is not a substitute for
proper parking.
. This function is designed as an
aid to the driver in detecting large
stationary objects to help avoid
damaging the vehicle.
. The driver is always responsible
for safety during parking and
other maneuvers.
. Always look around and check
that it is safe to move before
parking.
. Read and understand the limita-
tions of the sonar as contained in
this section.
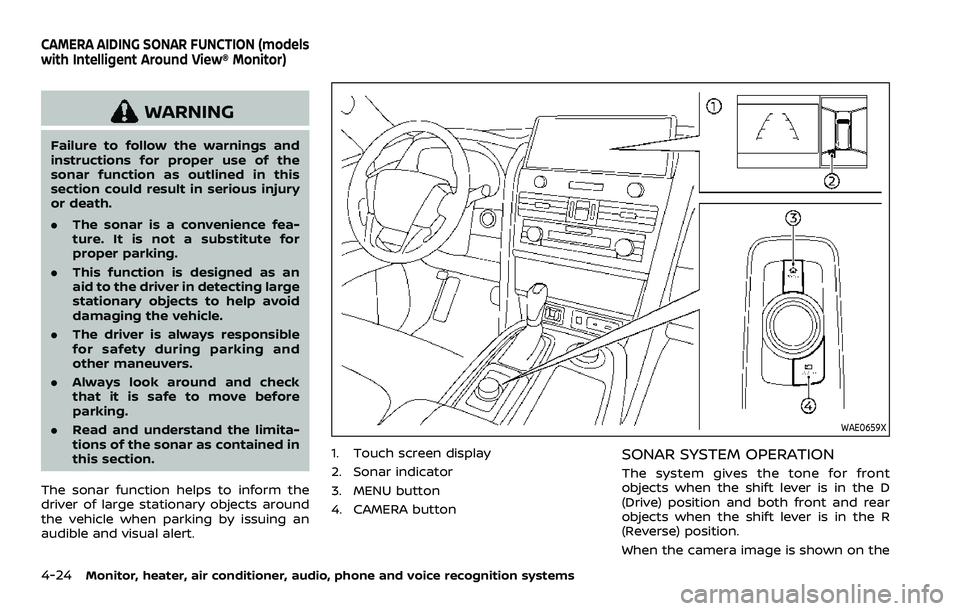
The sonar function helps to inform the
driver of large stationary objects around
the vehicle when parking by issuing an
audible and visual alert.
WAE0659X
1. Touch screen display
2. Sonar indicator
3. MENU button
4. CAMERA buttonSONAR SYSTEM OPERATION
The system gives the tone for front
objects when the shift lever is in the D
(Drive) position and both front and rear
objects when the shift lever is in the R
(Reverse) position.
When the camera image is shown on the
CAMERA AIDING SONAR FUNCTION (models
with Intelligent Around View® Monitor)
Page 260 of 603
4-36Monitor, heater, air conditioner, audio, phone and voice recognition systems
WAE0650X
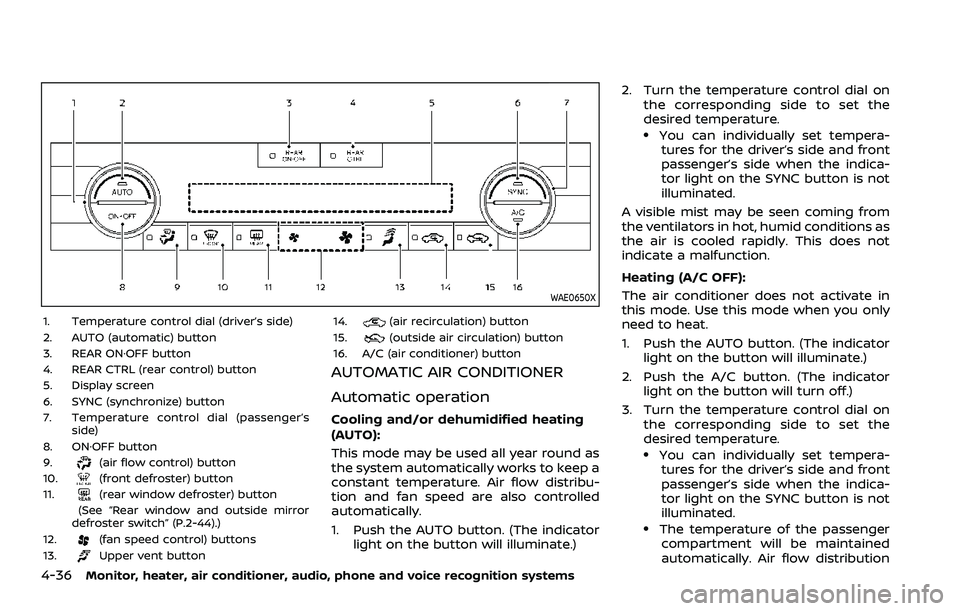
1. Temperature control dial (driver’s side)
2. AUTO (automatic) button
3. REAR ON·OFF button
4. REAR CTRL (rear control) button
5. Display screen
6. SYNC (synchronize) button
7. Temperature control dial (passenger’sside)
8. ON·OFF button
9.
(air flow control) button
10.(front defroster) button
11.(rear window defroster) button
(See “Rear window and outside mirror
defroster switch” (P.2-44).)
12.
(fan speed control) buttons
13.Upper vent button 14.
(air recirculation) button
15.(outside air circulation) button
16. A/C (air conditioner) button
AUTOMATIC AIR CONDITIONER
Automatic operation
Cooling and/or dehumidified heating
(AUTO):
This mode may be used all year round as
the system automatically works to keep a
constant temperature. Air flow distribu-
tion and fan speed are also controlled
automatically.
1. Push the AUTO button. (The indicator light on the button will illuminate.) 2. Turn the temperature control dial on
the corresponding side to set the
desired temperature.
.You can individually set tempera-tures for the driver’s side and front
passenger’s side when the indica-
tor light on the SYNC button is not
illuminated.
A visible mist may be seen coming from
the ventilators in hot, humid conditions as
the air is cooled rapidly. This does not
indicate a malfunction.
Heating (A/C OFF):
The air conditioner does not activate in
this mode. Use this mode when you only
need to heat.
1. Push the AUTO button. (The indicator light on the button will illuminate.)
2. Push the A/C button. (The indicator light on the button will turn off.)
3. Turn the temperature control dial on the corresponding side to set the
desired temperature.
.You can individually set tempera-tures for the driver’s side and front
passenger’s side when the indica-
tor light on the SYNC button is not
illuminated.
.The temperature of the passengercompartment will be maintained
automatically. Air flow distribution
Page 261 of 603
and fan speed are also controlled
automatically.
NOTE:
. Do not set the temperature lower
than the outside air temperature or
the system may not work properly.
. Not recommended if windows fog
up.
Dehumidified defrosting or defogging:
1. Push the
button. (The indicator
light on the button will illuminate.)
2. Turn the temperature control dial on the corresponding side to set the
desired temperature.
.To quickly remove ice from theoutside of the windows, use the
button to set the fan speed to
maximum.
.As soon as possible after the wind- shield is cleared, push the AUTO
button to return to the automatic
mode.
Manual operation
Fan speed control:
Push the
buttons to manually control
the fan speed.
Air intake control:
. Push the
button to recirculate
interior air inside the vehicle. (The
indicator light on the button will
illuminate.)
. Push the
button to draw outside
air into the passenger compartment.
(The indicator light on the button will
illuminate.)
. To control the air intake automatically,
push and hold either the
button
or thebutton. The indicator light
will blink, and then the air intake will
switch to automatic control. When the
automatic control is set, the system
automatically alternates between the
outside air circulation and the air
recirculation modes. (The indicator
light of the active mode will illumi-
nate.)
Air flow control:
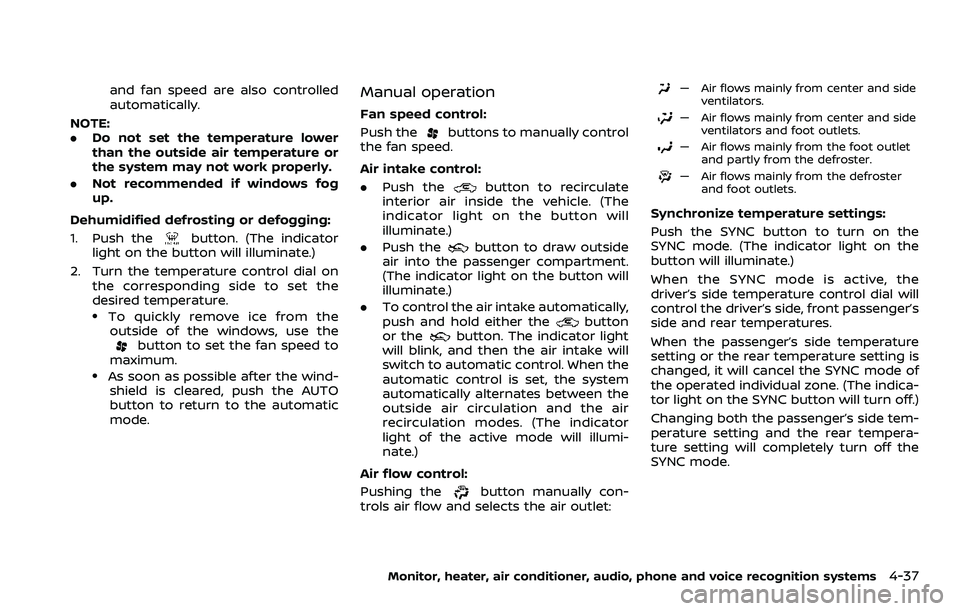
Pushing the
button manually con-
trols air flow and selects the air outlet:
— Air flows mainly from center and side ventilators.
— Air flows mainly from center and sideventilators and foot outlets.
— Air flows mainly from the foot outletand partly from the defroster.
— Air flows mainly from the defrosterand foot outlets.
Synchronize temperature settings:
Push the SYNC button to turn on the
SYNC mode. (The indicator light on the
button will illuminate.)
When the SYNC mode is active, the
driver’s side temperature control dial will
control the driver’s side, front passenger’s
side and rear temperatures.
When the passenger’s side temperature
setting or the rear temperature setting is
changed, it will cancel the SYNC mode of
the operated individual zone. (The indica-
tor light on the SYNC button will turn off.)
Changing both the passenger’s side tem-
perature setting and the rear tempera-
ture setting will completely turn off the
SYNC mode.
Monitor, heater, air conditioner, audio, phone and voice recognition systems4-37
Page 264 of 603
4-40Monitor, heater, air conditioner, audio, phone and voice recognition systems
Rear air conditioner control panel
operation
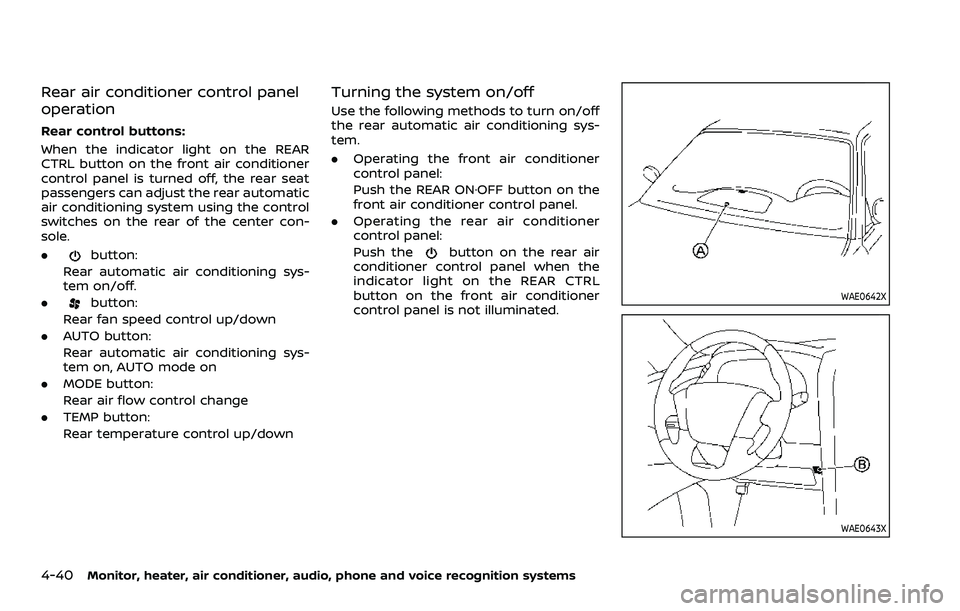
Rear control buttons:
When the indicator light on the REAR
CTRL button on the front air conditioner
control panel is turned off, the rear seat
passengers can adjust the rear automatic
air conditioning system using the control
switches on the rear of the center con-
sole.
.
button:
Rear automatic air conditioning sys-
tem on/off.
.
button:
Rear fan speed control up/down
. AUTO button:
Rear automatic air conditioning sys-
tem on, AUTO mode on
. MODE button:
Rear air flow control change
. TEMP button:
Rear temperature control up/down
Turning the system on/off
Use the following methods to turn on/off
the rear automatic air conditioning sys-
tem.
.Operating the front air conditioner
control panel:
Push the REAR ON·OFF button on the
front air conditioner control panel.
. Operating the rear air conditioner
control panel:
Push the
button on the rear air
conditioner control panel when the
indicator light on the REAR CTRL
button on the front air conditioner
control panel is not illuminated.
WAE0642X
WAE0643X
Page 468 of 603

8-22Do-it-yourself
SDI2451
Replace the battery as follows:
1. Release the lock knob at the back ofthe Intelligent Key and remove the
mechanical key.
2. Insert a small screwdriver into the slit of the corner and twist it to separate
the upper part from the lower part. Use a cloth to protect the casing.
3. Replace the battery with a new one. Recommended battery: CR2025 or
equivalent.
.Do not touch the internal circuitand electric terminals as it could
cause a malfunction.
.Hold the battery by the edges.
Holding the battery across the
contact points will seriously deplete
the storage capacity.
.Make sure that the + side faces the bottom of the case.
SDI2452
4. Align the tips of the upper and lower
parts, and then push them together
until it is securely closed.
5. Push the buttons two or three times to check its operation.
If you need any assistance for replace-
ment, it is recommended you visit a
NISSAN dealer for this service.
FCC Notice:
For USA:
This device complies with Part 15 of the
FCC Rules. Operation is subject to the
following two conditions: (1) This device
may not cause harmful interference,
and (2) this device must accept any
interference received, including inter-
Page 570 of 603
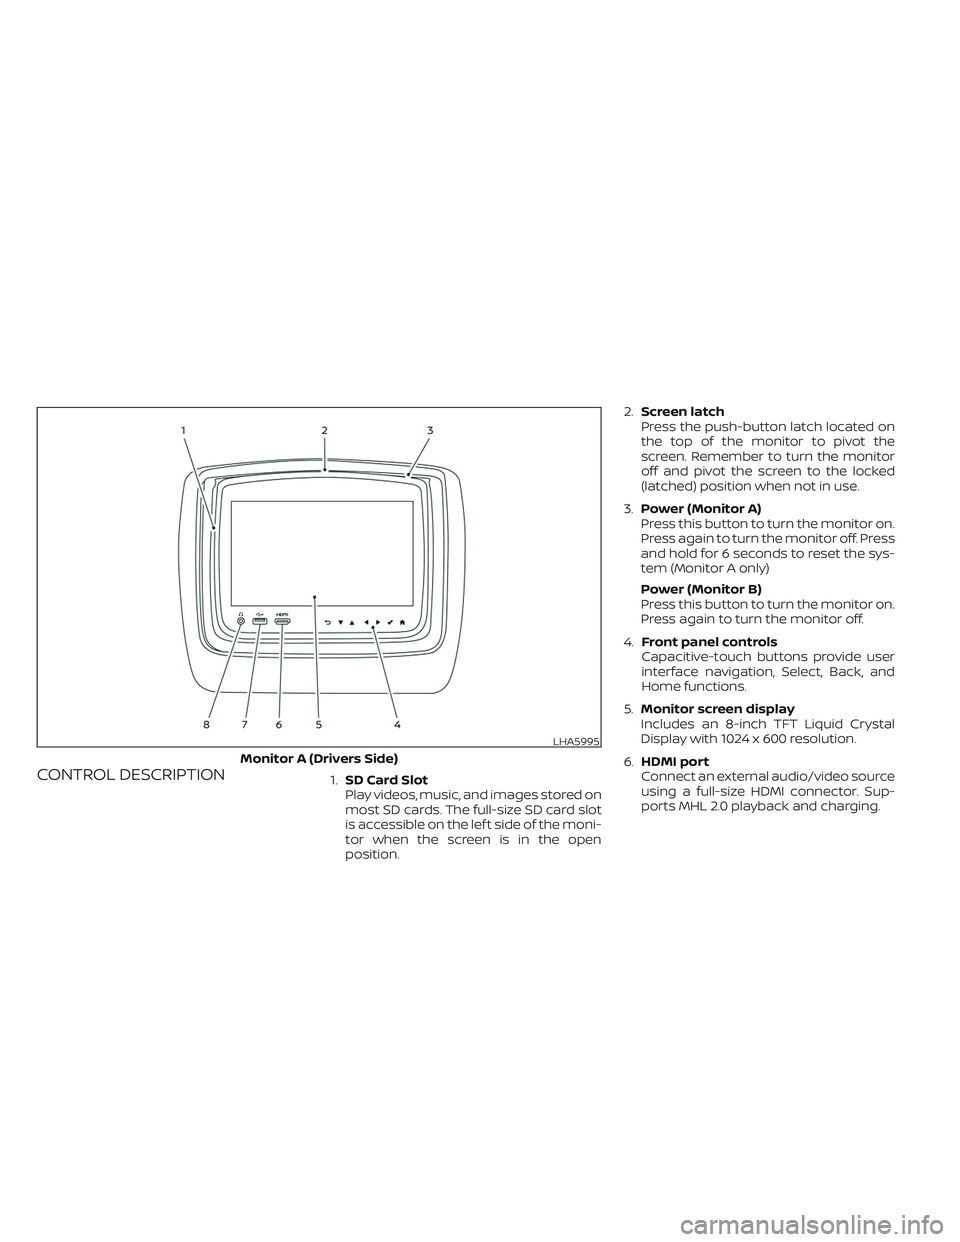
CONTROL DESCRIPTION1.SD Card Slot
Play videos, music, and images stored on
most SD cards. The full-size SD card slot
is accessible on the lef t side of the moni-
tor when the screen is in the open
position.2.Screen latch
Press the push-button latch located on
the top of the monitor to pivot the
screen. Remember to turn the monitor
off and pivot the screen to the locked
(latched) position when not in use.
3.Power (Monitor A)
Press this button to turn the monitor on.
Press again to turn the monitor off. Press
and hold for 6 seconds to reset the sys-
tem (Monitor A only)
Power (Monitor B)
Press this button to turn the monitor on.
Press again to turn the monitor off.
4.Front panel controls
Capacitive-touch buttons provide user
interface navigation, Select, Back, and
Home functions.
5.Monitor screen display
Includes an 8-inch TFT Liquid Crystal
Display with 1024 x 600 resolution.
6.HDMI port
Connect an external audio/video source
using a full-size HDMI connector. Sup-
ports MHL 2.0 playback and charging.
LHA5995
Monitor A (Drivers Side)
Page 573 of 603
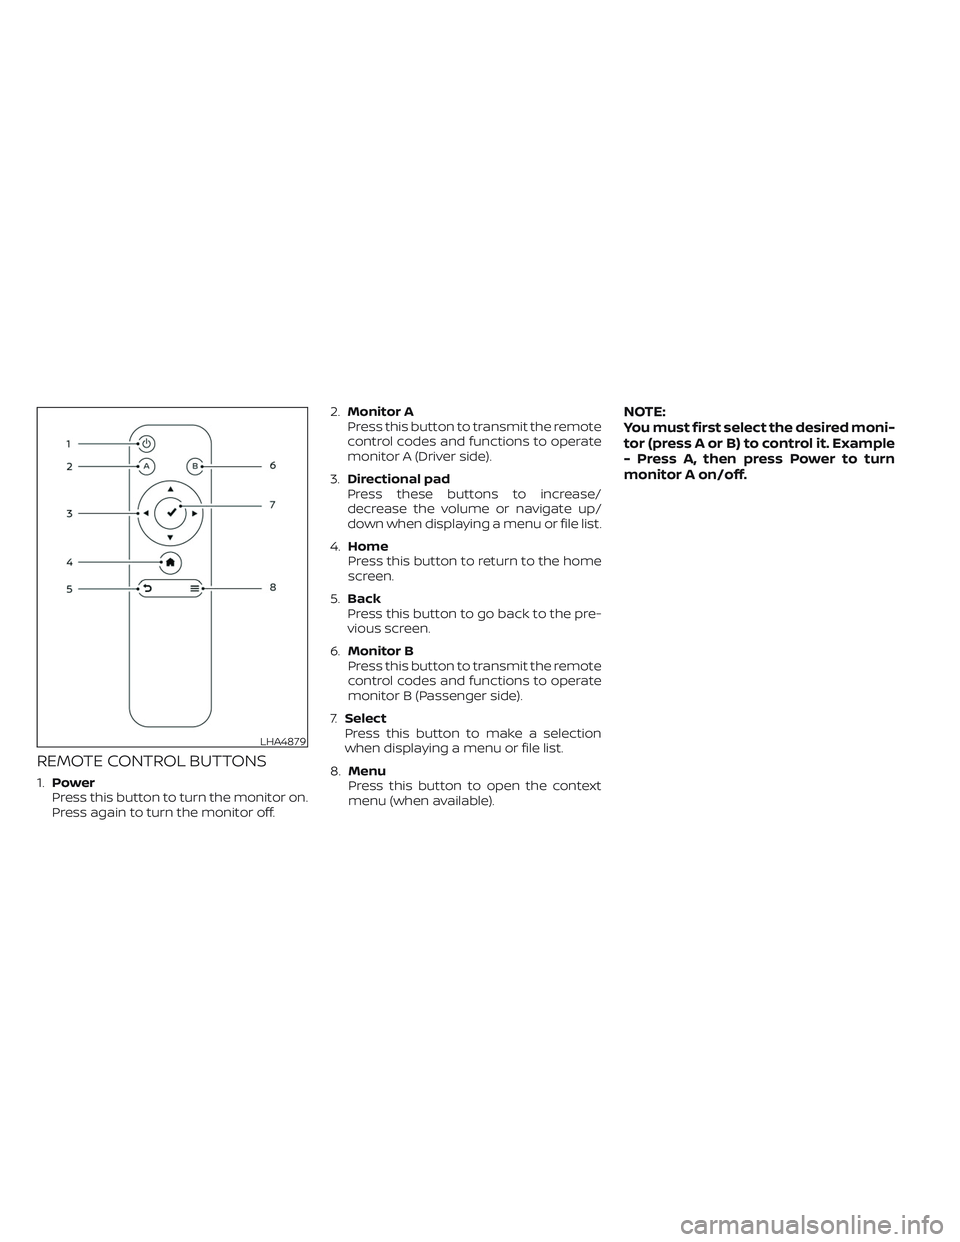
REMOTE CONTROL BUTTONS
1.Power
Press this button to turn the monitor on.
Press again to turn the monitor off.2.Monitor A
Press this button to transmit the remote
control codes and functions to operate
monitor A (Driver side).
3.Directional pad
Press these buttons to increase/
decrease the volume or navigate up/
down when displaying a menu or file list.
4.Home
Press this button to return to the home
screen.
5.Back
Press this button to go back to the pre-
vious screen.
6.Monitor B
Press this button to transmit the remote
control codes and functions to operate
monitor B (Passenger side).
7.Select
Press this button to make a selection
when displaying a menu or file list.
8.Menu
Press this button to open the context
menu (when available).
NOTE:
You must first select the desired moni-
tor (press A or B) to control it. Example
- Press A, then press Power to turn
monitor A on/off.
LHA4879