2021 NISSAN ARMADA clock
[x] Cancel search: clockPage 423 of 603

SCE0876
2. Loosen each wheel nut one or twoturns by turning counterclockwise
with the wheel nut wrench. Do not
remove the wheel nuts until the tire
is off the ground.
NCE130
3. Install the assembled jack rod into the
jack as shown.
4. Carefully raise the vehicle until the clearance between the tire and
ground is achieved.
5. To lift the vehicle, securely hold the jack lever and rod with both hands
and turn the jack lever.
NOTE:
Before jacking up the vehicle, make
sure the ignition switch is placed in
the OFF position. If the vehicle is lifted
up with the engine running, the auto-
leveling suspension will become dis-
abled after 120 seconds. To reset the
auto-leveling suspension, cycle the
In case of emergency6-9
Page 436 of 603

6-22In case of emergency
CAUTION
The connector must be fastened
securely. Not doing so may result in
damage to the connector due to
interference with other parts.
SCE0961
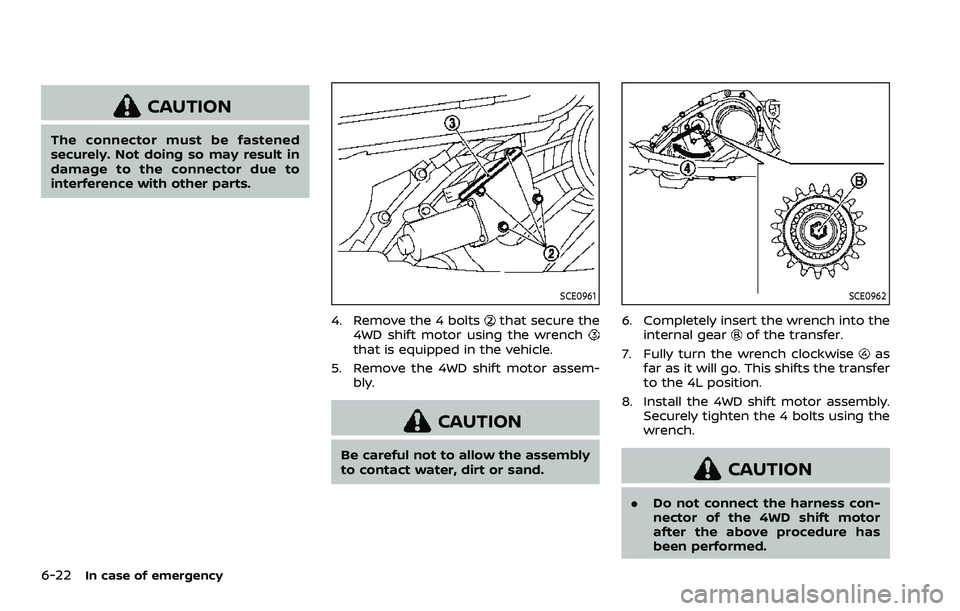
4. Remove the 4 boltsthat secure the
4WD shift motor using the wrench
that is equipped in the vehicle.
5. Remove the 4WD shift motor assem- bly.
CAUTION
Be careful not to allow the assembly
to contact water, dirt or sand.
SCE0962
6. Completely insert the wrench into the
internal gearof the transfer.
7. Fully turn the wrench clockwise
as
far as it will go. This shifts the transfer
to the 4L position.
8. Install the 4WD shift motor assembly. Securely tighten the 4 bolts using the
wrench.
CAUTION
.Do not connect the harness con-
nector of the 4WD shift motor
after the above procedure has
been performed.
Page 453 of 603

SDI2528
Engine oil and filter
1. Place a large drain pan under thedrain plug.
2. Remove the oil filler cap.
3. Remove the drain plug
with a
wrench and completely drain the oil.
CAUTION
Be careful not to burn yourself, as
the engine oil is hot.
.Waste oil must be disposed of properly.
.Check your local regulations.
4. (Perform steps 4 to 7 only when the engine oil filter change is needed.)
Loosen the oil filter
with an oil filter
wrench. Remove the oil filter by turn-
ing it by hand.
5. Wipe the engine oil filter mounting surface with a clean rag.
CAUTION
Be sure to remove any old rubber
gasket remaining on the mounting
surface of the engine. Failure to do
so could lead to engine damage.
6. Coat the gasket on the new filter with clean engine oil.
7. Screw in the oil filter clockwise until a slight resistance is felt, then tighten
additionally more than 2/3 turn.
Oil filter tightening torque:11 to 15 ft-lb
(15 to 21 N·m)
8. Clean and re-install the drain plug with a new washer. Securely tighten
the drain plug with a wrench.
Drain plug tightening torque:22 to 29 ft-lb
(29 to 39 N·m) Do not use excessive force.
9. Refill engine with recommended oil and install the oil filler cap securely.
CAUTION
The dipstick must be inserted in
place to prevent oil spillage from
the dipstick hole while filling the
engine with oil.
See “Capacities and recommended
fluids/lubricants” (P.10-2) for drain
and refill capacity. The drain and refill
capacity depends on the oil tempera-
ture and drain time. Use these speci-
fications for reference only. Always
use the dipstick to determine the
proper amount of oil in the engine.
10. Start the engine and check for leak- age around the drain plug and the oil
filter. Correct as required.
11. Turn the engine off and wait more than 15 minutes. Check the oil level
with the dipstick. Add engine oil if
necessary.
Do-it-yourself8-7
Page 552 of 603

11-2
Circuit breaker, Fusible link ................................. 8-19
Cleaning exterior and interior ................... 7-2, 7-5
Climate control.............................................................. 4-35
Clock ........................................................................\
.............. 2-38
Coat hooks ....................................................................... 2-70
Cockpit ........................................................................\
............. 2-3
Cold weather driving ............................................. 5-146
Console box ..................................................................... 2-69
Console light ................................................................... 2-79
CoolantCapacities and
recommended fluids/lubricants............... 10-2
Changing engine coolant ................................. 8-5
Checking engine coolant level...................... 8-5
Corrosion protection .................................................... 7-7
Cruise control Fixed speed cruise control (on
ICC system)................................................................ 5-92
Intelligent Cruise Control (ICC) ................. 5-74
Cruise indicator............................................................. 2-32
Cup holders...................................................................... 2-66
Current fuel consumption.................................... 2-36
D
Daytime running light system........................... 2-50
Dimensions .................................................................... 10-10
Drive belts...................................................................\
....... 8-13
Drive positioner............................................................. 3-40
Driver and front passenger supplemental
knee air bag..................................................................... 1-68
Driving Cold weather driving ..................................... 5-146
Driving with
automatic transmission .................................. 5-18
On-pavement and off-road driving .......... 5-9 Precautions when starting
and driving.................................................................... 5-4
Safety precautions .............................................. 5-10
E
Economy, Fuel............................................................. 5-124
Elapsed time.................................................................... 2-36
Elapsed time and trip odometer..................... 2-36
Emergency Call (SOS) button ............................ 2-64
Emission control information label............ 10-12
Emission control system warranty ............ 10-37
Engine
Before starting the engine............................ 5-16
Break-in schedule ............................................ 5-123
Capacities and
recommended fluids/lubricants............... 10-2
Changing engine coolant ................................. 8-5
Changing engine oil and filter ...................... 8-6
Checking engine coolant level...................... 8-5
Checking engine oil level................................... 8-6
Coolant temperature gauge .......................... 2-7
Emergency engine shut off.......................... 5-15
Engine block heater ....................................... 5-148
Engine compartment
check locations ......................................................... 8-3
Engine cooling system ........................................ 8-4
Engine oil.....................................................................\
... 8-6
Engine oil and oil
filter recommendation ..................................... 10-6
Engine oil viscosity .............................................. 10-7
Engine serial number .................................... 10-12
Engine specifications......................................... 10-8
Engine start operation indicator.............. 2-29
If your vehicle overheats ................................ 6-14
Oil pressure gauge ................................................. 2-8
Protection mode ................................................... 5-17 Starting the engine............................................. 5-16
Entry/exit function, memory seat .................. 3-40
Event Data Recorders (EDR)............................. 10-39
Exhaust gas (carbon monoxide) ......................... 5-4
Explanation of scheduled
maintenance items ........................................................ 9-5
Extended storage switch ...................................... 8-21
F
F.M.V.S.S./C.M.V.S.S. certification label ...... 10-12
Filter Air cleaner housing filter ................................ 8-15
Changing engine oil and filter ...................... 8-6
Flashers (See hazard warning
flasher switch).................................................................... 6-2
Flat tire........................................................................\
............. 6-3
Flat towing..................................................................... 10-35
Flexible seating.............................................................. 1-12
Floor mat cleaning ......................................................... 7-5
Fluid Automatic Transmission Fluid (ATF) ........ 8-8
Brake fluid ..................................................................... 8-9
Capacities and
recommended fluids/lubricants............... 10-2
Engine coolant........................................................... 8-4
Engine oil.....................................................................\
... 8-6
Power steering fluid .............................................. 8-8
Window washer fluid ......................................... 8-10
Fog light switch ............................................................ 2-52
Four-Wheel Drive (4WD) NISSAN all-mode 4WD®................................ 5-124
Front and rear sonar system.......................... 5-135
Front passenger air bag and
status light........................................................................\
1-62
Front power seat adjustment ............................... 1-4
Page 572 of 603

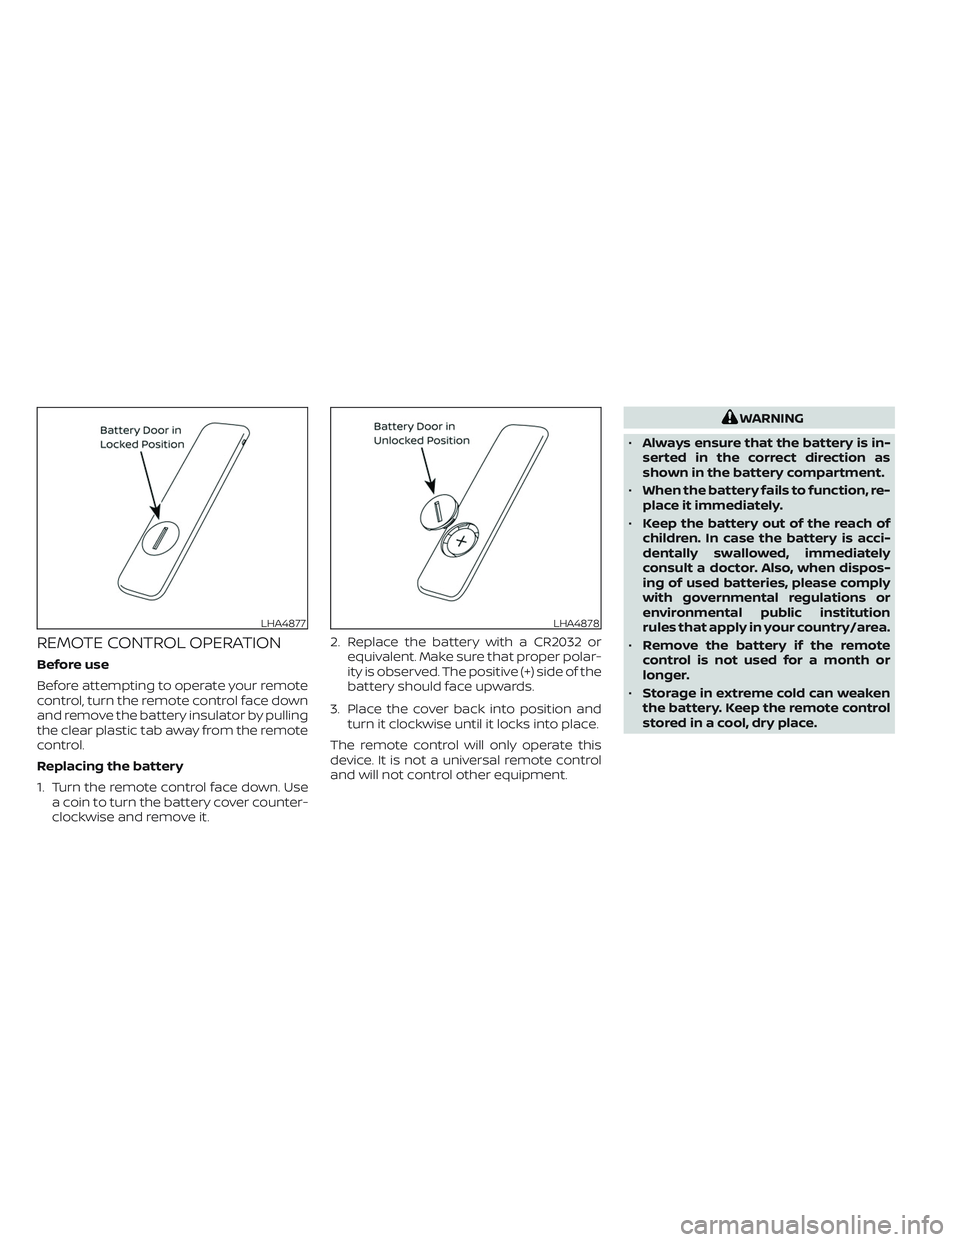
REMOTE CONTROL OPERATION
Before use
Before attempting to operate your remote
control, turn the remote control face down
and remove the battery insulator by pulling
the clear plastic tab away from the remote
control.
Replacing the battery
1. Turn the remote control face down. Use
a coin to turn the battery cover counter-
clockwise and remove it.2. Replace the battery with a CR2032 or
equivalent. Make sure that proper polar-
ity is observed. The positive (+) side of the
battery should face upwards.
3. Place the cover back into position and
turn it clockwise until it locks into place.
The remote control will only operate this
device. It is not a universal remote control
and will not control other equipment.
WARNING
•Always ensure that the battery is in-
serted in the correct direction as
shown in the battery compartment.
•When the battery fails to function, re-
place it immediately.
•Keep the battery out of the reach of
children. In case the battery is acci-
dentally swallowed, immediately
consult a doctor. Also, when dispos-
ing of used batteries, please comply
with governmental regulations or
environmental public institution
rules that apply in your country/area.
•Remove the battery if the remote
control is not used for a month or
longer.
•Storage in extreme cold can weaken
the battery. Keep the remote control
stored in a cool, dry place.
LHA4877LHA4878