Page 448 of 603

8-2Do-it-yourself
When performing any inspection or main-
tenance work on your vehicle, always
take care to prevent serious accidental
injury to yourself or damage to the
vehicle. The following are general precau-
tions which should be closely observed.
WARNING
.Park the vehicle on a level sur-
face, apply the parking brake
securely and block the wheels to
prevent the vehicle from moving.
Move the shift lever to P (Park).
. Be sure the ignition switch is in
the OFF or LOCK position when
performing any parts replace-
ment or repairs.
. Never connect or disconnect the
battery or any transistorized
component while the ignition
switch is in the ON position.
. Never leave the engine or auto-
matic transmission related com-
ponent harnesses disconnected
while the ignition switch is in the
ON position.
. If you must work with the engine
running, keep your hands, cloth-
ing, hair and tools away from
moving fans, belts and any other moving parts.
. It is advisable to secure or re-
move any loose clothing and
remove any jewelry, such as
rings, watches, etc. before work-
ing on your vehicle.
. Always wear eye protection
whenever you work on your ve-
hicle.
. If you must run the engine in an
enclosed space such as a garage,
be sure there is proper ventilation
for exhaust gases to escape.
. Never get under the vehicle while
it is supported only by a jack. If it
is necessary to work under the
vehicle, support it with safety
stands.
. Keep smoking materials, flame
and sparks away from fuel tank
and the battery.
. Your vehicle is equipped with an
automatic engine cooling fan. It
may come on at any time without
warning, even if the ignition key is
in the OFF position and the en-
gine is not running. To avoid
injury, always disconnect the ne-
gative battery cable before work-
ing near the fan. .
Because the fuel lines are under
high pressure even when the
engine is off, it is recommended
you visit a NISSAN dealer for
service of the fuel filter or fuel
lines.
CAUTION
.Do not work under the hood while
the engine is hot. Turn the engine
off and wait until it cools down.
. Avoid direct contact with used
engine oil and coolant. Impro-
perly disposed engine oil, coolant,
and/or other vehicle fluids can
damage the environment. Always
conform to local regulations for
disposal of vehicle fluid.
This “8. Do-it-yourself” section gives in-
structions regarding only those items
which are relatively easy for an owner to
perform.
A genuine NISSAN Service Manual is also
available. (See “Owner’s Manual/Service
Manual order information” (P.10-40).)
You should be aware that incomplete or
improper servicing may result in operat-
ing difficulties or excessive emissions, and
MAINTENANCE PRECAUTIONS
Page 453 of 603

SDI2528
Engine oil and filter
1. Place a large drain pan under thedrain plug.
2. Remove the oil filler cap.
3. Remove the drain plug
with a
wrench and completely drain the oil.
CAUTION
Be careful not to burn yourself, as
the engine oil is hot.
.Waste oil must be disposed of properly.
.Check your local regulations.
4. (Perform steps 4 to 7 only when the engine oil filter change is needed.)
Loosen the oil filter
with an oil filter
wrench. Remove the oil filter by turn-
ing it by hand.
5. Wipe the engine oil filter mounting surface with a clean rag.
CAUTION
Be sure to remove any old rubber
gasket remaining on the mounting
surface of the engine. Failure to do
so could lead to engine damage.
6. Coat the gasket on the new filter with clean engine oil.
7. Screw in the oil filter clockwise until a slight resistance is felt, then tighten
additionally more than 2/3 turn.
Oil filter tightening torque:11 to 15 ft-lb
(15 to 21 N·m)
8. Clean and re-install the drain plug with a new washer. Securely tighten
the drain plug with a wrench.
Drain plug tightening torque:22 to 29 ft-lb
(29 to 39 N·m) Do not use excessive force.
9. Refill engine with recommended oil and install the oil filler cap securely.
CAUTION
The dipstick must be inserted in
place to prevent oil spillage from
the dipstick hole while filling the
engine with oil.
See “Capacities and recommended
fluids/lubricants” (P.10-2) for drain
and refill capacity. The drain and refill
capacity depends on the oil tempera-
ture and drain time. Use these speci-
fications for reference only. Always
use the dipstick to determine the
proper amount of oil in the engine.
10. Start the engine and check for leak- age around the drain plug and the oil
filter. Correct as required.
11. Turn the engine off and wait more than 15 minutes. Check the oil level
with the dipstick. Add engine oil if
necessary.
Do-it-yourself8-7
Page 456 of 603

8-10Do-it-yourself
SDI2513
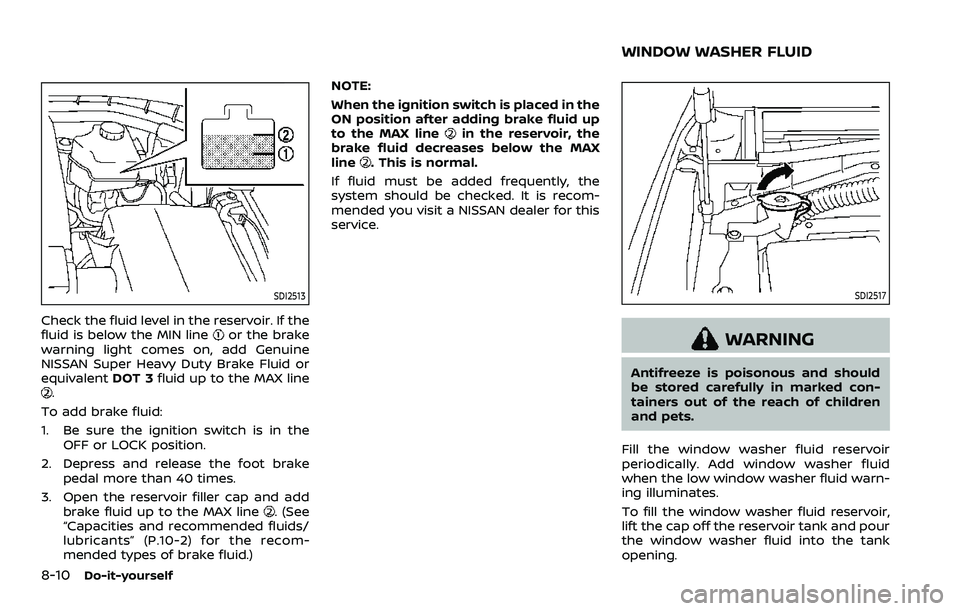
Check the fluid level in the reservoir. If the
fluid is below the MIN lineor the brake
warning light comes on, add Genuine
NISSAN Super Heavy Duty Brake Fluid or
equivalent DOT 3fluid up to the MAX line
.
To add brake fluid:
1. Be sure the ignition switch is in the OFF or LOCK position.
2. Depress and release the foot brake pedal more than 40 times.
3. Open the reservoir filler cap and add brake fluid up to the MAX line
. (See
“Capacities and recommended fluids/
lubricants” (P.10-2) for the recom-
mended types of brake fluid.) NOTE:
When the ignition switch is placed in the
ON position after adding brake fluid up
to the MAX line
in the reservoir, the
brake fluid decreases below the MAX
line
. This is normal.
If fluid must be added frequently, the
system should be checked. It is recom-
mended you visit a NISSAN dealer for this
service.
SDI2517
WARNING
Antifreeze is poisonous and should
be stored carefully in marked con-
tainers out of the reach of children
and pets.
Fill the window washer fluid reservoir
periodically. Add window washer fluid
when the low window washer fluid warn-
ing illuminates.
To fill the window washer fluid reservoir,
lift the cap off the reservoir tank and pour
the window washer fluid into the tank
opening.
WINDOW WASHER FLUID
Page 459 of 603

JUMP STARTING
If jump starting is necessary, see “Jump
starting” (P.6-12). If the engine does not
start by jump starting, the battery may
have to be replaced. It is recommended
you visit a NISSAN dealer for this service.CAUTION
.Do not ground accessories di-
rectly to the battery terminal.
Doing so will bypass the variable
voltage control system and the
vehicle battery may not charge
completely.
. Use electrical accessories with
the engine running to avoid dis-
charging the vehicle battery.
The variable voltage control system mea-
sures the amount of electrical discharge
from the battery and controls voltage
generated by the generator.
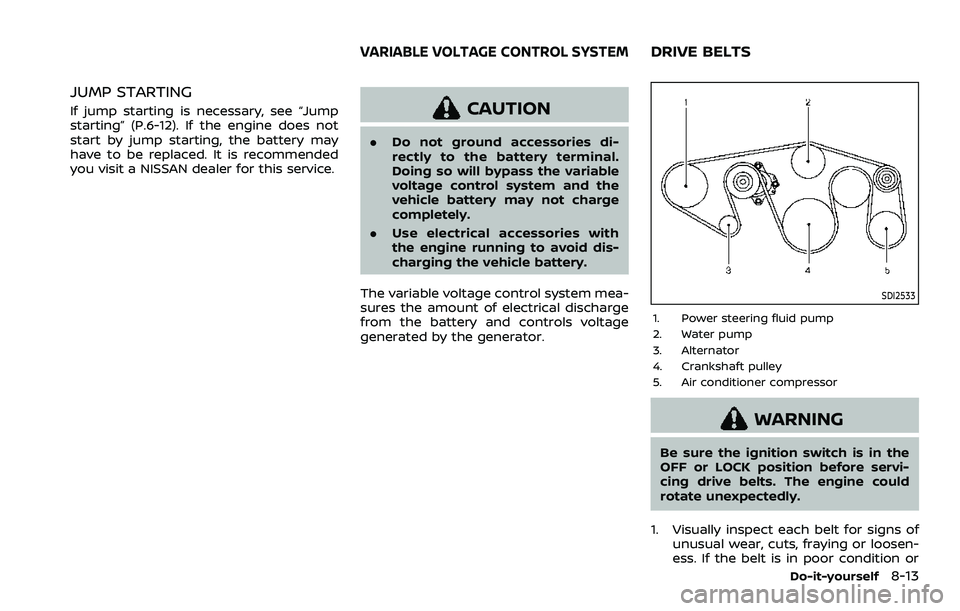
SDI2533
1. Power steering fluid pump
2. Water pump
3. Alternator
4. Crankshaft pulley
5. Air conditioner compressor
WARNING
Be sure the ignition switch is in the
OFF or LOCK position before servi-
cing drive belts. The engine could
rotate unexpectedly.
1. Visually inspect each belt for signs of unusual wear, cuts, fraying or loosen-
ess. If the belt is in poor condition or
Do-it-yourself8-13
VARIABLE VOLTAGE CONTROL SYSTEMDRIVE BELTS
Page 461 of 603
SDI2515
To remove the filter, release the lock pinsand pull the unit upward.
The filter element should not be cleaned
and reused. Replace it according to the
maintenance schedule shown in the “9.
Maintenance and schedules” section.
When replacing the filter, wipe the inside
of the air cleaner housing and the cover
with a damp cloth.
WARNING
. Operating the engine with the air
cleaner removed can cause you
or others to be burned. The air
cleaner not only cleans the air, it stops flame if the engine back-
fires. If it isn’t there, and the
engine backfires, you could be
burned. Do not drive with the air
cleaner removed, and be careful
when working on the engine with
the air cleaner removed.
. Never pour fuel into the throttle
body or attempt to start the
engine with the air cleaner re-
moved. Doing so could result in
serious injury.
Do-it-yourself8-15
AIR CLEANER
Page 464 of 603
8-18Do-it-yourself
each depression as the hydraulic
pressure decreases.
If the brakes do not operate properly,
have the brakes checked. It is recom-
mended that you visit a NISSAN dealer for
repair.
SDI2518
SDI2532
ENGINE COMPARTMENT
WARNING
Never use a fuse of a higher or lower
amperage rating than that specified
on the fuse box cover. This could
damage the electrical system or
electronic control units or cause a
fire.
If any electrical equipment does not
operate, check for an open fuse.
1. Be sure the ignition switch is pushed to the OFF or LOCK position and the
headlight switch is turned to OFF.
2. Open the engine hood and remove the cover on the battery.
3. Remove the fuse/fusible link holder cover
,or.
4. Remove the fuse with the fuse puller.
FUSES
Page 466 of 603
8-20Do-it-yourself
JVM0200X
PASSENGER COMPARTMENT
WARNING
Never use a fuse of a higher or lower
amperage rating than that specified
on the fuse box cover. This could
damage the electrical system or
electronic control units or cause a
fire.
If any electrical equipment does not
operate, check for an open fuse.
1. Be sure the ignition switch is pushed to the OFF or LOCK position and the headlight switch is turned to OFF.
2. Open the fuse box lid.
3. Remove the fuse with the fuse puller
.
SDI1754
4. If the fuse is open, replace it with a new fuse.
5. If a new fuse also opens, have the electrical system checked and re-
paired. It is recommended you visit a
NISSAN dealer for this service. Spare
fuses are stored in the fuse box.
Page 467 of 603

SDI2704
Extended storage fuse switch (if so
equipped)
To reduce battery drain, the extended
storage fuse switch comes from the
factory switched off. Prior to delivery of
your vehicle, the switch is pushed in
(switched on) and should always remain
on.
If the extended storage fuse switch is not
pushed in (switched on), the “Shipping
Mode On, Push Storage Fuse” warning
may appear on the vehicle information
display (if so equipped). See “Vehicle
information display” (P.2-19).
If any electrical equipment does not
operate, remove the extended storagefuse switch and check for an open fuse.
NOTE:
If the extended storage fuse switch
malfunctions or if the fuse is open, it is
not necessary to replace the switch. In
this case, remove the extended storage
fuse switch and replace it with a new
fuse of the same rating.
How to remove the extended storage
fuse switch:
1. To remove the extended storage fuse
switch, be sure the ignition switch is in
the OFF or LOCK position.
2. Be sure the headlight switch is in the OFF position.
3. Remove the fuse box cover.
4. Pinch the locking tabsfound on
each side of the storage fuse switch.
5. Pull the storage fuse switch straight out from the fuse box
.
CAUTION
Be careful not to allow children to
swallow the battery and removed
parts.
Do-it-yourself8-21
INTELLIGENT KEY BATTERY REPLACEMENT