2021 NISSAN ARMADA display
[x] Cancel search: displayPage 262 of 603
4-38Monitor, heater, air conditioner, audio, phone and voice recognition systems
Turning the system on/off
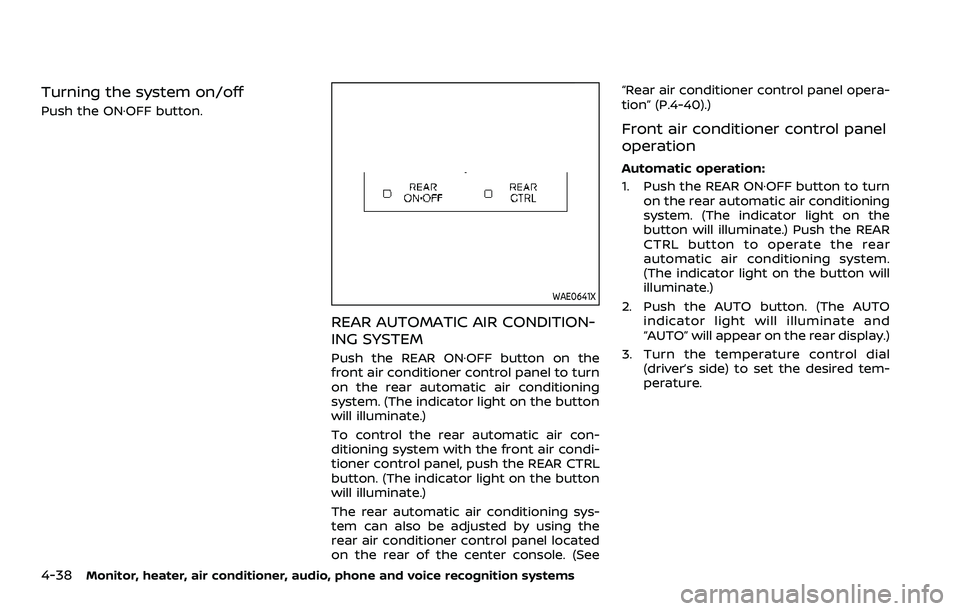
Push the ON·OFF button.
WAE0641X
REAR AUTOMATIC AIR CONDITION-
ING SYSTEM
Push the REAR ON·OFF button on the
front air conditioner control panel to turn
on the rear automatic air conditioning
system. (The indicator light on the button
will illuminate.)
To control the rear automatic air con-
ditioning system with the front air condi-
tioner control panel, push the REAR CTRL
button. (The indicator light on the button
will illuminate.)
The rear automatic air conditioning sys-
tem can also be adjusted by using the
rear air conditioner control panel located
on the rear of the center console. (See“Rear air conditioner control panel opera-
tion” (P.4-40).)
Front air conditioner control panel
operation
Automatic operation:
1. Push the REAR ON·OFF button to turn
on the rear automatic air conditioning
system. (The indicator light on the
button will illuminate.) Push the REAR
CTRL button to operate the rear
automatic air conditioning system.
(The indicator light on the button will
illuminate.)
2. Push the AUTO button. (The AUTO indicator light will illuminate and
“AUTO” will appear on the rear display.)
3. Turn the temperature control dial (driver’s side) to set the desired tem-
perature.
Page 263 of 603
Cooling and dehumidified heating:
1. Push the REAR ON·OFF button to turnon the rear automatic air conditioning
system. (The indicator light on the
button will illuminate.) Push the REAR
CTRL button to operate the rear
automatic air conditioning system.
(The indicator light on the button will
illuminate.)
2. Turn the temperature control dial (driver’s side) to set the desired tem-
perature.
3. Switch the air flow mode to
by
pushing thebutton.
4. Push the A/C button. (The indicator light on the button will illuminate.)
NOTE:
When the front air conditioner is off, the
rear automatic air conditioning system
only operates the fan. When you would
like to use the air conditioner, be sure to
push the A/C button on the front air
conditioner control panel to turn on the
A/C indicator light.
Manual operation:
Perform the following when the indicator
lights on the REAR ON·OFF button and the
REAR CTRL button are illuminated.
. Temperature control
Turn the temperature control dial (driver’s side) to set the desired tem-
perature.
. Fan speed control
Push the fan speed control
but-
tons to manually control the fan
speed.
. Air flow control
Push the
button to change the air
flow mode.
: The air outlet is fixed at foot level.
: The air outlet is fixed at both the head and foot levels.
: The air outlet is fixed at the head level.
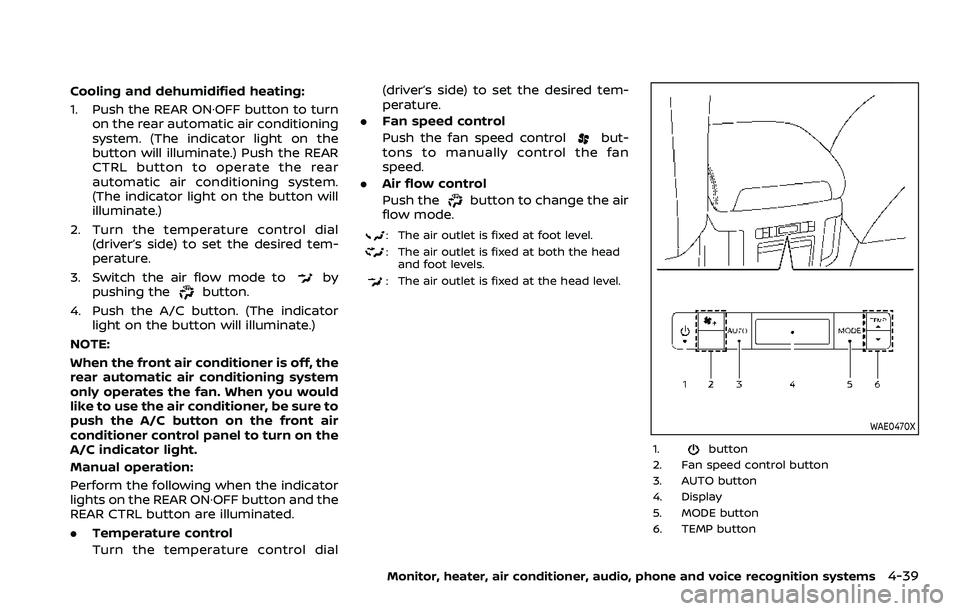
WAE0470X
1.button
2. Fan speed control button
3. AUTO button
4. Display
5. MODE button
6. TEMP button
Monitor, heater, air conditioner, audio, phone and voice recognition systems4-39
Page 272 of 603
5-6Starting and driving
Additional information
.Since the spare tire is not equipped
with the TPMS, the TPMS does not
monitor the tire pressure of the spare
tire.
. The TPMS will activate only when the
vehicle is driven at speeds above 16
MPH (25 km/h). Also, this system may
not detect a sudden drop in tire
pressure (for example, a flat tire while
driving).
. The low tire pressure warning light
does not automatically turn off when
the tire pressure is adjusted. After the
tire is inflated to the recommended
pressure, the vehicle must be driven at
speeds above 16 MPH (25 km/h) to
activate the TPMS and turn off the low
tire pressure warning light. Use a tire
pressure gauge to check the tire
pressure.
. The “Tire Pressure Low Add Air” warn-
ing appears in the vehicle information
display when the low tire pressure
warning light is illuminated and low
tire pressure is detected. The “Tire
Pressure Low Add Air” warning turns
off when the low tire pressure warn-
ing light turns off.
The “Tire Pressure Low Add Air” warn-
ing appears each time the ignition
switch is placed in the ON position as long as the low tire pressure warning
light remains illuminated.
The “Tire Pressure Low Add Air” warn-
ing does not appear if the low tire
pressure warning light illuminates to
indicate a TPMS malfunction.
. Tire pressure rises and falls depending
on the heat caused by the vehicle’s
operation and the outside tempera-
ture. Do not reduce the tire pressure
after driving because the tire pressure
rises after driving. Low outside tem-
perature can lower the temperature
of the air inside the tire which can
cause a lower tire inflation pressure.
This may cause the low tire pressure
warning light to illuminate. If the
warning light illuminates in low ambi-
ent temperature, check the tire pres-
sure for all four tires.
. You can also check the pressure of all
tires (except the spare tire) on the
vehicle information display. (See “10.
Tire pressures” (P.2-37).)
For additional information, see “Low tire
pressure warning light” (P.2-15) and “Tire
Pressure Monitoring System (TPMS) ” (P.6-
3).WARNING
. If the low tire pressure warning
light illuminates or Low Pressure
information is displayed on the
monitor screen while driving,
avoid sudden steering maneu-
vers or abrupt braking, reduce
vehicle speed, pull off the road
to a safe location and stop the
vehicle as soon as possible. Driv-
ing with under-inflated tires may
permanently damage the tires
and increase the likelihood of tire
failure. Serious vehicle damage
could occur and may lead to an
accident and could result in ser-
ious personal injury. Check the
tire pressure for all four tires.
Adjust the tire pressure to the
recommended COLD tire pressure
shown on the Tire and Loading
Information label to turn the low
tire pressure warning light OFF. If
the light still illuminates while
driving after adjusting the tire
pressure, a tire may be flat or
the TPMS may be malfunctioning.
If you have a flat tire, replace it
with a spare tire as soon as
possible. If no tire is flat and all
tires are properly inflated, it is
Page 280 of 603
5-14Starting and driving
moved to the P (Park) position.
When the ignition switch cannot be
pushed toward the LOCK position, pro-
ceed as follows:
1. Move the shift lever into the P (Park)position.
2. Push the ignition switch to the OFF position. The ignition switch position
indicator will not illuminate.
3. Open the door. The ignition switch will change to the LOCK position.
The shift lever can be moved from the P
(Park) position if the ignition switch is in
the ON position and the brake pedal is
depressed.
If the battery of the vehicle is dis-
charged, the push-button ignition
switch cannot be turned from the LOCK
position.
Some indicators and warnings for opera-
tion are displayed on the vehicle informa-
tion display between the speedometer
and tachometer. (See “Vehicle informa-
tion display” (P.2-19).)PUSH-BUTTON IGNITION SWITCH
POSITIONS
LOCK (Normal parking position)
The ignition switch can only be locked in
this position.
The ignition switch will be unlocked when
it is pushed to the ACC position while
carrying the Intelligent Key.
ACC (Accessories)
This position activates electrical acces-
sories such as the radio, when the engine
is not running.
ACC has a battery saver feature that will
turn the ignition switch to the OFF posi-
tion after a period of time under the
following conditions:
. all doors are closed.
. shift lever is in P (Park).
. turn signal/hazard indicator lights are
not flashing.
The battery saver feature will be can-
celled if any of the following occur:
. any door is opened.
. shift lever is moved out of P (Park).
. ignition switch changes position.
ON (Normal operating position)
This position turns on the ignition system
and electrical accessories.
ON has a battery saver feature that will
turn the ignition switch to the OFF posi-
tion, if the vehicle is not running, after
some time under the following condi-
tions:
. all doors are closed.
. shift lever is in P (Park).
. turn signal/hazard indicator lights are
not flashing.
The battery saver feature will be can-
celled if any of the following occur:
. any door is opened.
. shift lever is moved out of P (Park).
. ignition switch changes position.
OFF
The engine can be turned off in the
position.
The ignition lock is designed so that the
ignition switch cannot be switched to the
LOCK position until the shift lever is
moved to the P (Park) position.
Page 281 of 603

CAUTION
Do not leave the vehicle with the
push-button ignition switch in ACC or
ON positions when the engine is not
running for an extended period. This
can discharge the battery.
ACC (Accessories) delay timer
function
When the ignition switch is placed in the
OFF position, the ACC (Accessories) delay
timer function is activated. This function
keeps the power supply to the electrical
accessories for up to 10 minutes. When
the driver’s door is opened, this function is
canceled and the electrical power supply
is stopped. The ACC (Accessories) delay
time function can be enabled or disabled.
(See “Vehicle settings” (P.2-23).)
EMERGENCY ENGINE SHUT OFF
To shut off the engine in an emergency
situation while driving, perform the fol-
lowing procedure:
.Rapidly push the push-button ignition
switch 3 consecutive times in less
than 1.5 seconds, or
. Push and hold the push-button igni-
tion switch for more than 2 seconds.
JVS0404X
INTELLIGENT KEY BATTERY DIS-
CHARGE
If the battery of the Intelligent Key is
discharged, or environmental conditions
interfere with the Intelligent Key opera-
tion, start the engine according to the
following procedure:
1. Move the shift lever to the P (Park)
position.
2. Firmly apply the foot brake.
3. Touch the ignition switch with the Intelligent Key as illustrated. (A chime
will sound.)
4. Push the ignition switch while depres- sing the brake pedal within 10 sec- onds after the chime sounds. The
engine will start.
After step 3 is performed, when the
ignition switch is pushed without depres-
sing the brake pedal, the ignition switch
position will change to ACC.
NOTE:
. When the ignition switch is pushed
to the ACC or ON position or the
engine is started by the above pro-
cedures, the Key Battery Low mes-
sage appears on the vehicle
information display even if the In-
telligent Key is inside the vehicle.
This is not a malfunction. To turn off
the Intelligent Key battery discharge
indicator, touch the ignition switch
with the Intelligent Key again.
. If the Key Battery Low message
appears, replace the battery as soon
as possible. (See “Battery” (P.8-11).)
Starting and driving5-15
Page 286 of 603
5-20Starting and driving
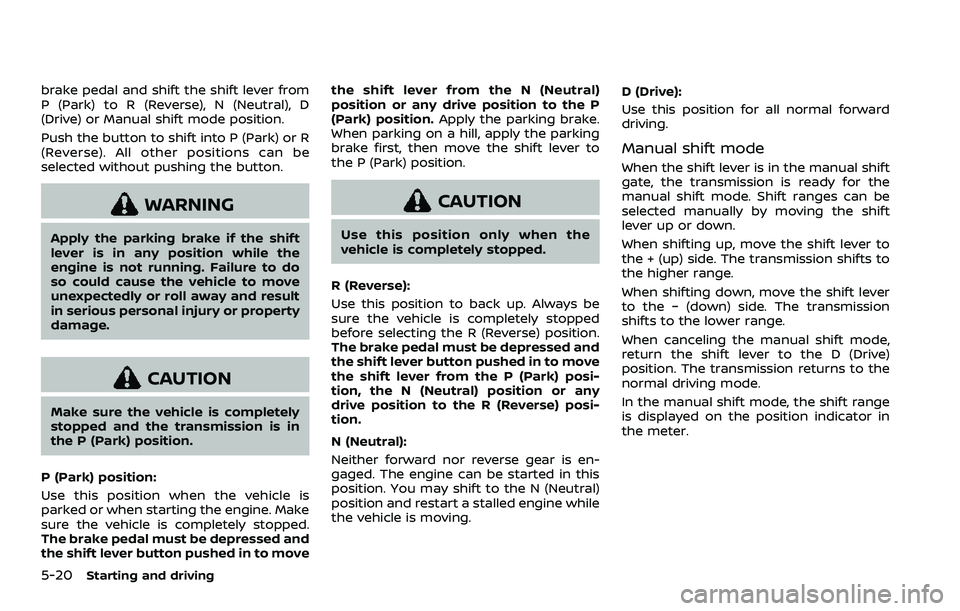
brake pedal and shift the shift lever from
P (Park) to R (Reverse), N (Neutral), D
(Drive) or Manual shift mode position.
Push the button to shift into P (Park) or R
(Reverse). All other positions can be
selected without pushing the button.
WARNING
Apply the parking brake if the shift
lever is in any position while the
engine is not running. Failure to do
so could cause the vehicle to move
unexpectedly or roll away and result
in serious personal injury or property
damage.
CAUTION
Make sure the vehicle is completely
stopped and the transmission is in
the P (Park) position.
P (Park) position:
Use this position when the vehicle is
parked or when starting the engine. Make
sure the vehicle is completely stopped.
The brake pedal must be depressed and
the shift lever button pushed in to move the shift lever from the N (Neutral)
position or any drive position to the P
(Park) position.
Apply the parking brake.
When parking on a hill, apply the parking
brake first, then move the shift lever to
the P (Park) position.
CAUTION
Use this position only when the
vehicle is completely stopped.
R (Reverse):
Use this position to back up. Always be
sure the vehicle is completely stopped
before selecting the R (Reverse) position.
The brake pedal must be depressed and
the shift lever button pushed in to move
the shift lever from the P (Park) posi-
tion, the N (Neutral) position or any
drive position to the R (Reverse) posi-
tion.
N (Neutral):
Neither forward nor reverse gear is en-
gaged. The engine can be started in this
position. You may shift to the N (Neutral)
position and restart a stalled engine while
the vehicle is moving. D (Drive):
Use this position for all normal forward
driving.
Manual shift mode
When the shift lever is in the manual shift
gate, the transmission is ready for the
manual shift mode. Shift ranges can be
selected manually by moving the shift
lever up or down.
When shifting up, move the shift lever to
the + (up) side. The transmission shifts to
the higher range.
When shifting down, move the shift lever
to the − (down) side. The transmission
shifts to the lower range.
When canceling the manual shift mode,
return the shift lever to the D (Drive)
position. The transmission returns to the
normal driving mode.
In the manual shift mode, the shift range
is displayed on the position indicator in
the meter.
Page 287 of 603
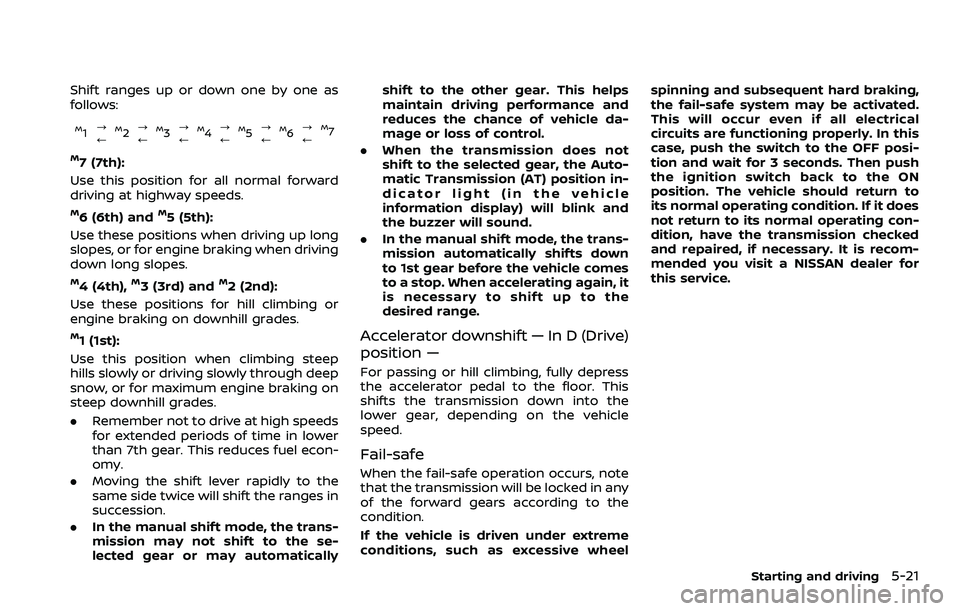
Shift ranges up or down one by one as
follows:
M1?
/M2 ?
/M3 ?
/M4 ?
/M5?
/M6 ?
/M7
M7 (7th):
Use this position for all normal forward
driving at highway speeds.
M6 (6th) andM5 (5th):
Use these positions when driving up long
slopes, or for engine braking when driving
down long slopes.
M4 (4th),M3 (3rd) andM2 (2nd):
Use these positions for hill climbing or
engine braking on downhill grades.
M1 (1st):
Use this position when climbing steep
hills slowly or driving slowly through deep
snow, or for maximum engine braking on
steep downhill grades.
. Remember not to drive at high speeds
for extended periods of time in lower
than 7th gear. This reduces fuel econ-
omy.
. Moving the shift lever rapidly to the
same side twice will shift the ranges in
succession.
. In the manual shift mode, the trans-
mission may not shift to the se-
lected gear or may automatically shift to the other gear. This helps
maintain driving performance and
reduces the chance of vehicle da-
mage or loss of control.
. When the transmission does not
shift to the selected gear, the Auto-
matic Transmission (AT) position in-
dicator light (in the vehicle
information display) will blink and
the buzzer will sound.
. In the manual shift mode, the trans-
mission automatically shifts down
to 1st gear before the vehicle comes
to a stop. When accelerating again, it
is necessary to shift up to the
desired range.
Accelerator downshift — In D (Drive)
position —
For passing or hill climbing, fully depress
the accelerator pedal to the floor. This
shifts the transmission down into the
lower gear, depending on the vehicle
speed.
Fail-safe
When the fail-safe operation occurs, note
that the transmission will be locked in any
of the forward gears according to the
condition.
If the vehicle is driven under extreme
conditions, such as excessive wheel spinning and subsequent hard braking,
the fail-safe system may be activated.
This will occur even if all electrical
circuits are functioning properly. In this
case, push the switch to the OFF posi-
tion and wait for 3 seconds. Then push
the ignition switch back to the ON
position. The vehicle should return to
its normal operating condition. If it does
not return to its normal operating con-
dition, have the transmission checked
and repaired, if necessary. It is recom-
mended you visit a NISSAN dealer for
this service.
Starting and driving5-21
Page 289 of 603
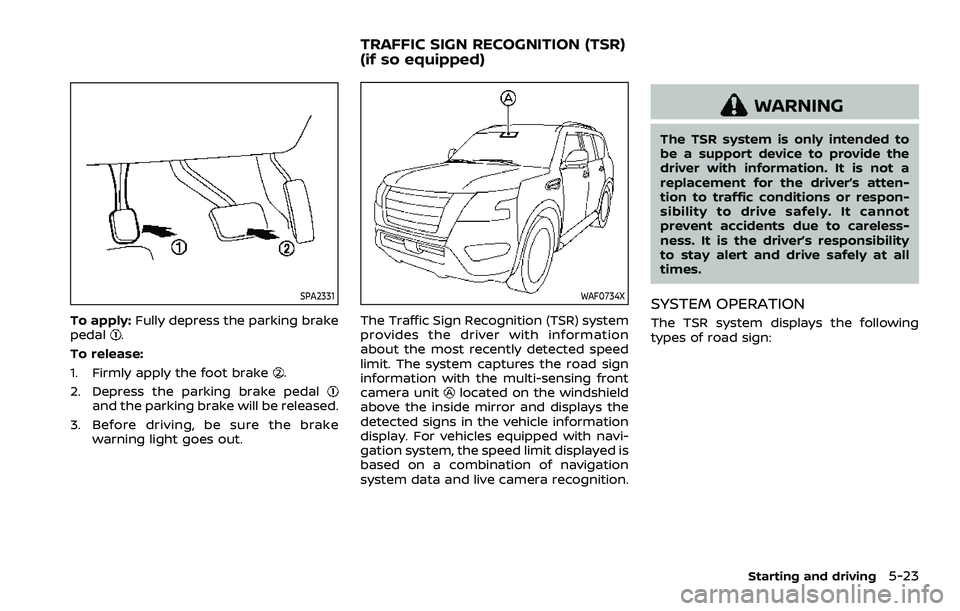
SPA2331
To apply:Fully depress the parking brake
pedal.
To release:
1. Firmly apply the foot brake
.
2. Depress the parking brake pedal
and the parking brake will be released.
3. Before driving, be sure the brake warning light goes out.
WAF0734X
The Traffic Sign Recognition (TSR) system
provides the driver with information
about the most recently detected speed
limit. The system captures the road sign
information with the multi-sensing front
camera unit
located on the windshield
above the inside mirror and displays the
detected signs in the vehicle information
display. For vehicles equipped with navi-
gation system, the speed limit displayed is
based on a combination of navigation
system data and live camera recognition.
WARNING
The TSR system is only intended to
be a support device to provide the
driver with information. It is not a
replacement for the driver’s atten-
tion to traffic conditions or respon-
sibility to drive safely. It cannot
prevent accidents due to careless-
ness. It is the driver’s responsibility
to stay alert and drive safely at all
times.
SYSTEM OPERATION
The TSR system displays the following
types of road sign:
Starting and driving5-23
TRAFFIC SIGN RECOGNITION (TSR)
(if so equipped)