Page 169 of 559

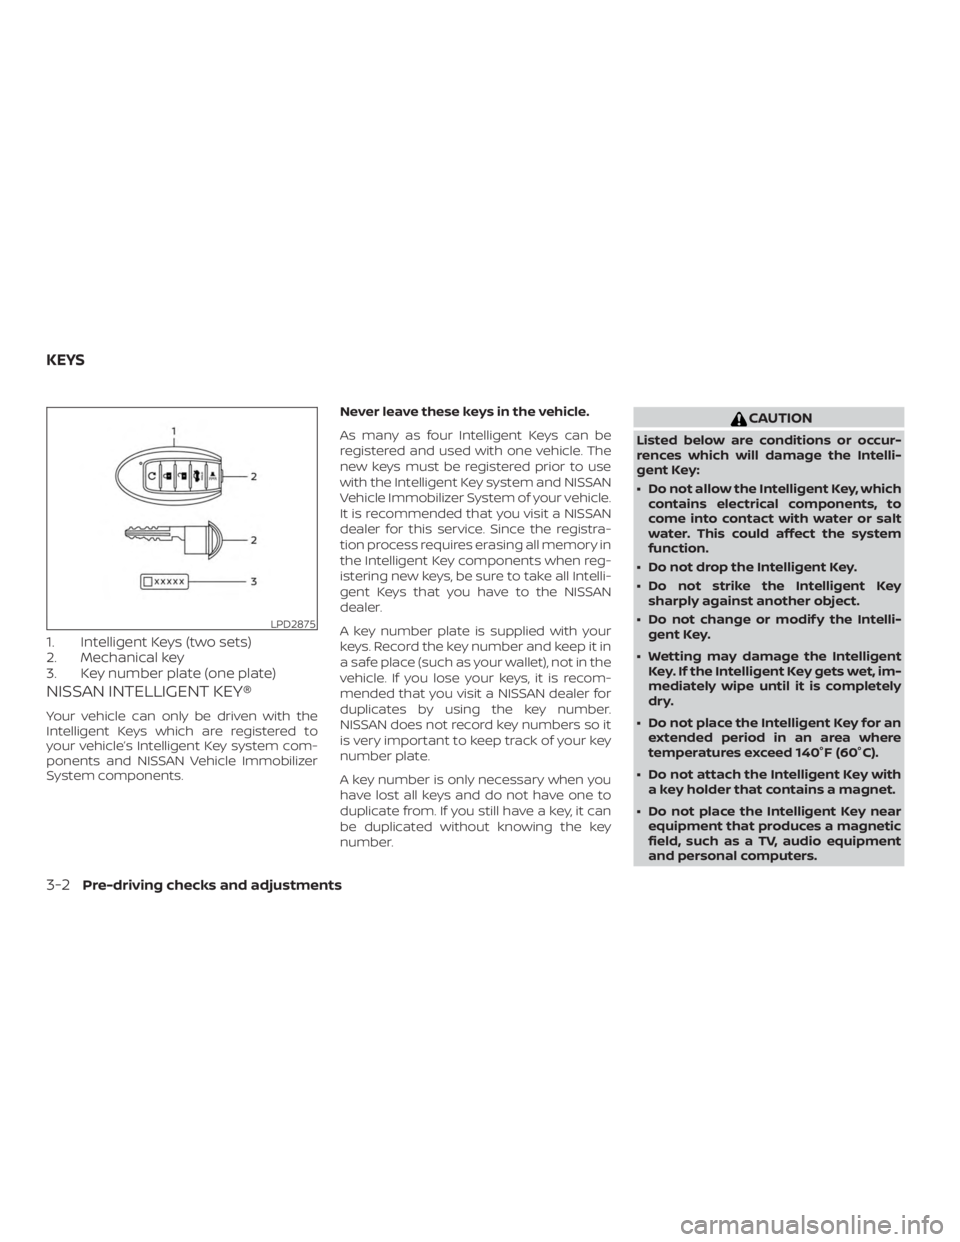
1. Intelligent Keys (two sets)
2. Mechanical key
3. Key number plate (one plate)
NISSAN INTELLIGENT KEY®
Your vehicle can only be driven with the
Intelligent Keys which are registered to
your vehicle’s Intelligent Key system com-
ponents and NISSAN Vehicle Immobilizer
System components.Never leave these keys in the vehicle.
As many as four Intelligent Keys can be
registered and used with one vehicle. The
new keys must be registered prior to use
with the Intelligent Key system and NISSAN
Vehicle Immobilizer System of your vehicle.
It is recommended that you visit a NISSAN
dealer for this service. Since the registra-
tion process requires erasing all memory in
the Intelligent Key components when reg-
istering new keys, be sure to take all Intelli-
gent Keys that you have to the NISSAN
dealer.
A key number plate is supplied with your
keys. Record the key number and keep it in
a safe place (such as your wallet), not in the
vehicle. If you lose your keys, it is recom-
mended that you visit a NISSAN dealer for
duplicates by using the key number.
NISSAN does not record key numbers so it
is very important to keep track of your key
number plate.
A key number is only necessary when you
have lost all keys and do not have one to
duplicate from. If you still have a key, it can
be duplicated without knowing the key
number.
Page 170 of 559
If an Intelligent Key is lost or stolen, NISSAN
recommends erasing the ID code of that
Intelligent Key from the vehicle. This may
prevent the unauthorized use of the Intelli-
gent Key to operate the vehicle. For infor-
mation regarding the erasing procedure, it
is recommended that you visit a NISSAN
dealer.
Mechanical key
The Intelligent Key contains the mechani-
cal key.
To remove the mechanical key, release the
lock knob on the back of the Intelligent Key.
To install the mechanical key, firmly insert it
into the Intelligent Key until the lock knob
returns to the lock position.
Use the mechanical key to lock or unlock
the doors and glove box.
For additional information, refer to “Doors”
in this section and “Storage” in the “Instru-
ments and controls” section of this manual.
Page 225 of 559
When the “[X]” icon is displayed on the
screen, the camera image may be receiv-
ing temporary electronic disturbances
from surrounding devices. This will not hin-
der normal driving operation but the sys-
tem should be inspected if it occurs fre-
quently. It is recommended that you visit a
NISSAN dealer for this service.SYSTEM MAINTENANCE
Page 230 of 559
If the icon light continues to illuminate
orange, have the MOD system checked. It
is recommended that you visit a NISSAN
dealer for this service.
SYSTEM MAINTENANCE
Page 246 of 559
CAUTION
∙ Keep the antenna as far away as pos-sible from the electronic control
modules.
∙ Keep the antenna wire more than 8 in (20 cm) away from the electronic con-
trol system harnesses. Do not route
the antenna wire next to any harness.
∙ Adjust the antenna standing-wave ratio as recommended by the
manufacturer.
∙ Connect the ground wire from the CB radio chassis to the body.
∙ For additional information, it is rec- ommended that you visit a NISSAN
dealer for servicing.
Monitor, climate, audio, phone and voice recognition systems4-43
Page 254 of 559

∙ If the low tire pressure warning lightilluminates while driving, avoid sud-
den steering maneuvers or abrupt
braking, reduce vehicle speed, pull off
the road to a safe location and stop
the vehicle as soon as possible. Driv-
ing with underinflated tires may per-
manently damage the tires and in-
crease the likelihood of tire failure.
Serious vehicle damage could occur
and may lead to an accident and could
result in serious personal injury.
Check the tire pressure for all four
tires. Adjust the tire pressure to the
recommended COLD tire pressure
shown on the Tire and Loading Infor-
mation label to turn the low tire pres-
sure warning light off. If you have a flat
tire, replace it with a spare tire as soon
as possible. (For additional informa-
tion, refer to “Flat tire” in the “In case of
emergency ” section for changing a
flat tire.) ∙ When replacing a wheel without the
TPMS such as the spare tire, when a
spare tire is mounted or a wheel is
replaced, tire pressure will not be indi-
cated, the TPMS will not function and
the low tire pressure warning light will
flash for approximately 1 minute. The
light will remain on af ter 1 minute. It is
recommended that you visit a NISSAN
dealer for tire replacement and/or
system resetting.
∙ Replacing tires with those not origi- nally specified by NISSAN could affect
the proper operation of the TPMS.
∙ Do not inject any tire liquid or aerosol tire sealant into the tires, as this may
cause a malfunction of the tire pres-
sure sensors.
Page 264 of 559

∙ Make sure the area around the vehicle isclear.
∙ Check fluid levels such as engine oil, coolant, brake fluid, and windshield-
washer fluid as frequently as possible,
or at least whenever you refuel.
∙ Check that all windows and lights are clean.
∙ Visually inspect tires for their appear- ance and condition. Also check tires for
proper inflation.
∙ Lock all doors.
∙ Position seat and adjust headrests/head restraints.
∙ Adjust inside and outside mirrors.
∙ Fasten seat belts and ask all passen- gers to do likewise.
∙ Check the operation of warning lights when the ignition switch is pushed to
the ON position. For additional informa-
tion, refer to “Warning lights, indicator
lights and audible reminders” in the “In-
struments and controls” section of this
manual. 1. Apply the parking brake.
2. Move the shif t lever to P (Park) or N
(Neutral). P (Park) is recommended.
The starter is designed not to oper-
ate if the shif t lever is in any of the
driving positions.
3. Push the ignition switch to the ON po- sition. Depress the brake pedal and
push the ignition switch to start the
engine.
To start the engine immediately, push
and release the ignition switch while
depressing the brake pedal with the
ignition switch in any position.
∙ If the engine is very hard to start in extremely cold weather or when re-
starting, depress the accelerator
pedal a little (approximately 1/3 to the
floor) and while holding, crank the en-
gine. Release the accelerator pedal
when the engine starts.
∙ If the engine is very hard to start be- cause it is flooded, depress the accel-
erator pedal all the way to the floor
and hold it. Push the ignition switch
to the ON position to start cranking
the engine. Af ter 5 or 6 seconds, stop
cranking by pushing the ignition switch to the LOCK position. Af ter
cranking the engine, release the ac-
celerator pedal. Crank the engine
with your foot off the accelerator
pedal by depressing the brake pedal
and pushing the ignition switch to
start the engine. If the engine starts,
but fails to run, repeat the above pro-
cedure.
Page 286 of 559
∙ Do not place reflective materials, suchas white paper or a mirror, on the instru-
ment panel. The reflection of sunlight
may adversely affect the camera unit’s
capability of detecting the lane mark-
ers.
∙ Do not strike or damage the areas around the camera unit. Do not touch
the camera lens or remove the screw
located on the camera unit. If the cam-
era unit is damaged due to an accident,
it is recommended that you visit a
NISSAN dealer.