Plas
Plastic hub cap
tic hub cap #
T
To r
o r emov
emov e:
e:turn the centre co ver of the hub
cap anti-clockwise and remo vethe hub cap. #
T To o �/t:
�/t: make sure that the centre co ver of the
hub cap is turned anti-clockwise. #
Position the hub cap and turn the centre co ver
clockwise until the hub cap engages ph ysically
and audibl y.
Aluminium hub cap
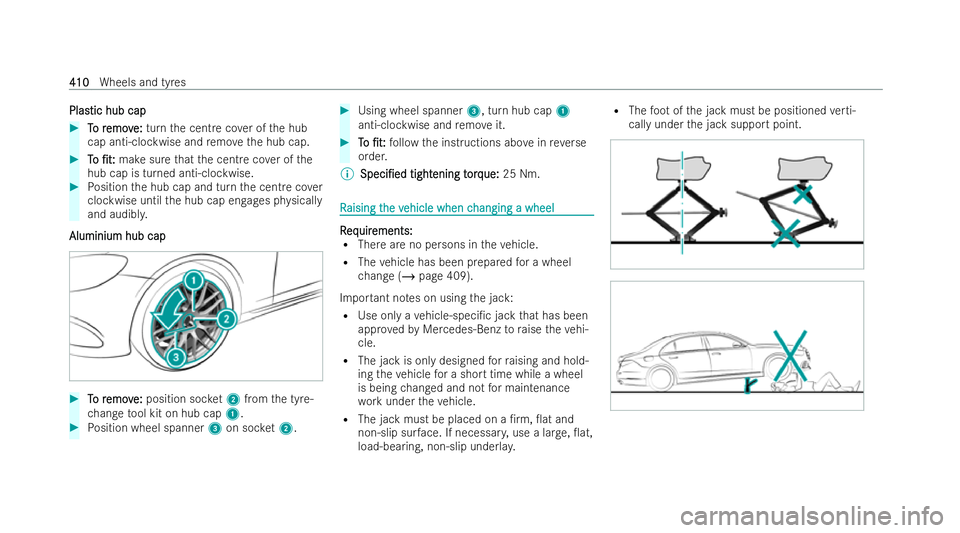
Aluminium hub cap #
T
To r
o r emov
emov e:
e:position soc ket2 from the tyre-
ch ange tool kit on hub cap 1.#
Position wheel spanner 3on soc ket2. #
Using wheel spanner 3, turn hub cap1
anti-clockwise and remo veit. #
T
T o
o �/t:
�/t: follow the inst ructions abo veinreve rse
order.
% Speci�/ed
Speci�/ed tight
tightening t
ening t orq
orque:ue: 25 Nm. R
R
aising t
aising t he v
he vehicle when c
ehicle when c hanging a wheel
hanging a wheel R
R
eq
eq uir
uir ements:
ements:
R There are no persons in theve hicle.
R The vehicle has been prepared for a wheel
ch ange (/ page 409).
Impor tant no tes on using the jack:
R Use only a vehicle-speci�/c jack that has been
appr ovedby Mercedes-Benz toraise theve hi-
cle.
R The jack is only designed forra ising and hold-
ing theve hicle for a short time while a wheel
is being changed and not for maintenance
wo rkunder theve hicle.
R The jack must be placed on a �/rm, �0at and
non-slip sur face. If necessar y,use a lar ge, �0at,
load-bearing, non-slip underla y.R
The foot ofthe jack must be positioned verti-
cally under the jack support point. 410
410
Wheels and tyres
#
Position support 2of jack 4on jack sup-
port point 1. #
Turn ratchet ring spanner 3clockwise until
jack support 2sits comple tely on jacking
point 1and the base of the jack lies evenly
on thegr ound. #
Continue toturn ratchet ring spanner 3until
th e tyre is raised a maximum of 3 cm o�. the
gr ound. #
Loosen and remo vethe wheel (/ page 412).
Mer
Mer cedes-Ma
cedes-Ma ybac
ybach v
h vehicles:
ehicles: R
R
eq
eq uir
uir ements:
ements:
R The running boa rds are retracted (/ page 90) R
The stone chipping pr otective co vers are
re mo ved (/ page 409) #
Position support 2of jack 4on jack sup-
port point 1. #
Turn ratchet ring spanner 3clockwise until
jack 2sits comple tely on jacking point 1
and the base of the jack lies evenly on the
gr ound. #
Continue toturn ratchet ring spanner 3until
th e tyre is raised a maximum of 3 cm o�. the
gr ound. #
Loosen and remo vethe wheel (/ page 412). R
R
emo
emo ving a wheel
ving a wheel R
R
eq
eq uir
uir ements:
ements:
R The vehicle is raised (/ page 410).
* NO
NOTE
TEMercedes-AMG vehicles #
Obser vethe no tes in the Supplement.
Yo u could otherwise failto recognise
dangers. 412
412
Wheels and tyres
Low
Low
er
ering t
ing t he v
he vehicle
ehicle a�Ter
a�Tera wheel c
a wheel c hange
hange R R
eq eq uir
uir ements:
ements:
R The new wheel has been �/t ted (/page 413).
Obser vethe information on tyre pressure
(/ page 401). #
Place thera tchet ring spanner onto the he xa-
gon nut of the jack so that the lettering "AB" is
visible. #
T
To low
o low er t
er the v
he v ehicle:
ehicle: turnthera tchet ring
spanner of the jack anti-clockwise. #
Tighten the wheel bolts evenly in a diagonal
pattern in the order indicated 1to5 with a
maximum of 80 Nm. #
Then tighten the wheel bolts evenly in a diago-
nal pattern in the order indicated 1to5 to
th e speci�/ed tightening torque of 150 Nm. &
W
WARNING
ARNING Risk of inju rythro ugh incor rect
tightening torque
The wheels could come loose if the wheel
bolts or wheel nuts are not tightened tothe
prescribed tightening torque. #
Makesure the wheel bolts or wheel nuts
are tightened tothe prescribed tighten-
ing torque. #
Ifyo u are not sure, do not mo vetheve hi-
cle. Consult a quali�/ed specialist work-
shop and ha vethe tightening torque
ch ecked immediatel y. #
Check the tyre pressure of the ne wlymounted
wheel and adjust according ly.%
The following does not apply if the new wheel
is an emer gency spa rewheel. #
V
Vehicles wit
ehicles wit h a tyr
h a tyre pr
e pr essur
essur e monit
e monit or
oring sy
ing sy s-
s-
t
t em:
em: restart the tyre pressure monitoring sys-
te m (/ page 404). Emerg
Emerg
ency spar
ency spar e wheel
e wheel N
No
ot
tes on t
es on t he emerg
he emerg ency spar
ency spar e wheel
e wheel &
W
WARNING
ARNING Risk of accident caused by
incor rect wheel and tyre dimensions
The wheel or tyre size and the tyre type of the
emer gency spa rewheel or spare wheel and
th e wheel tobe replaced may di�.er. The emer-
ge ncy spa rewheel or spare wheel can signi�/-
cantly impair driving characteristics of the
ve hicle.
To prev ent hazardous situations: #
Drive carefull y. #
Never �/t more than one emer gency
spa rewheel or spare wheel that di�.ers
in size. 414
414
Wheels and tyres