2021 MERCEDES-BENZ GLE SUV roof rack
[x] Cancel search: roof rackPage 25 of 545
Pr
otection of the environment
* NO
TEPlug-in hybrid #
Obser vethe no tes in the Supplement.
Yo u could otherwise failto recognise
dangers. +
ENVI
RONMENTAL NOTEEnvironmental
dama gedue tooperating conditions and
personal driving style The pollutant emission of
theve hicle is
directly related tothewa yyo u operate the
ve hicle.
Operate your vehicle in an environmentally
re sponsible manner tohelp pr otect the envi‐
ro nment. Please obser vethefo llowing rec‐
ommendations on ope rating conditions and
pe rsonal driving style.
Operating conditions: #
Make sure that the tyre pressure is cor‐
re ct. #
Do not car ryany unnecessary weight
(e.g. roof luggage rack s once you no
lon ger need them). #
Adhere tothe service inter vals.
A regularly serviced vehicle will contri b‐
ute toenvironmen tal pr otection. #
Alw ays ha vemaintenance workcar ried
out at a qualified specialist workshop.
Pe rsonal driving style: #
Do not depress the accelera tor pedal
when starting the engine. #
Do not warm upthe engine while the
ve hicle is stationar y. #
Drive carefully and maintain a suitable
dist ance from theve hicle in front. #
Avoid frequent, sudden acceleration
and braking. #
Change gear in good time and use each
ge ar on lyup to00C3 of its maximum
engine speed. #
Switch off the engine in stationary traf‐
fi c, e.g. byusing the ECO start/ stop
function. #
Drive in a fuel-ef ficient manne r.
Obser vethe ECO display for an eco‐
nomical driving style. Ta
ke -back of end-of-life vehicles
EU countries onl y:
Mercedes-Benz will take back your end-of-life
ve hicle for environment-friendly disposal in
accordance with the European Union(EU) End-
of-Life Vehicles Directive.
A network of vehicle take -ba ckpoints and dis‐
mantlers has been es tablished foryo uto return
yo ur vehicle. You can lea veit at any of these
points free of charge . This makes an impor tant
contribution toclosing there cycling circle and
conse rving resources.
Fo r fur ther information about there cycling and
disposal of end-of-life vehicles, and theta ke- 22
General no tes
Page 97 of 545
#
Do not allow anything toprotru de from
th e sliding sunroof. *
NO
TEImpo rtant points toremember
when a roof luggage rack isfitted When a
roof luggage rack isfitted, raising or
opening the sliding sunroof may be limited. #
Check whe ther the sliding sunroof can
be raised or opened when a roof lug‐
ga ge rack isfitted. #
If in doubt, do not raise or open the
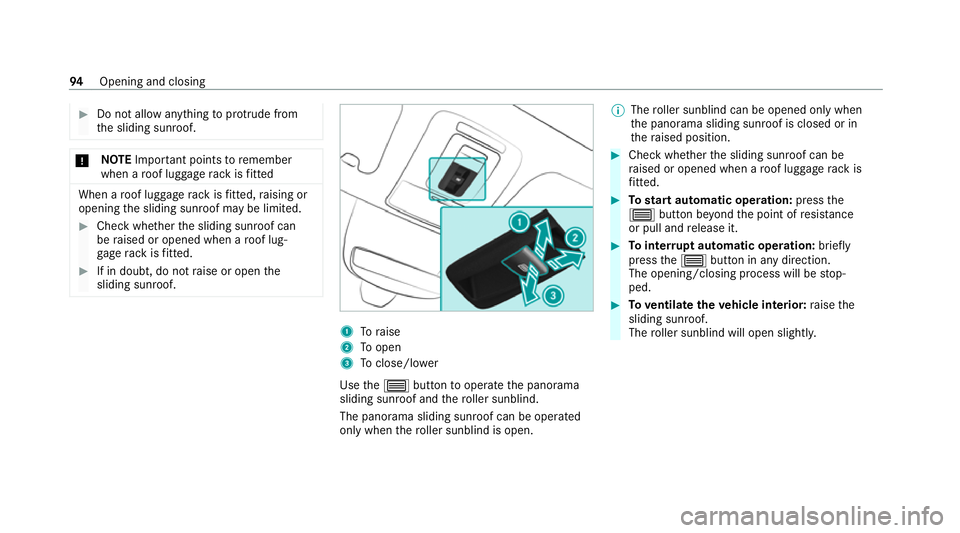
sliding sunroof. 1
Toraise
2 Toopen
3 Toclose/l ower
Use the0057 button tooperate the panorama
sliding sunroof and thero ller sunblind.
The panorama sliding sunroof can be operated
only when thero ller sunblind is open. %
The roller sunblind can be opened only when
th e panorama sliding sunroof is closed or in
th era ised position. #
Check whe ther the sliding sunroof can be
ra ised or opened when a roof luggage rack is
fi tted. #
Tostart automatic operation: pressthe
0057 button be yond the point of resis tance
or pull and release it. #
Tointer rupt automatic operation: briefly
press the0057 button in any direction.
The opening/closing process will be stop‐
ped. #
Toventilate theve hicle interior: raise the
sliding sunroof.
The roller sunblind will open slightly. 94
Opening and closing
Page 137 of 545
#
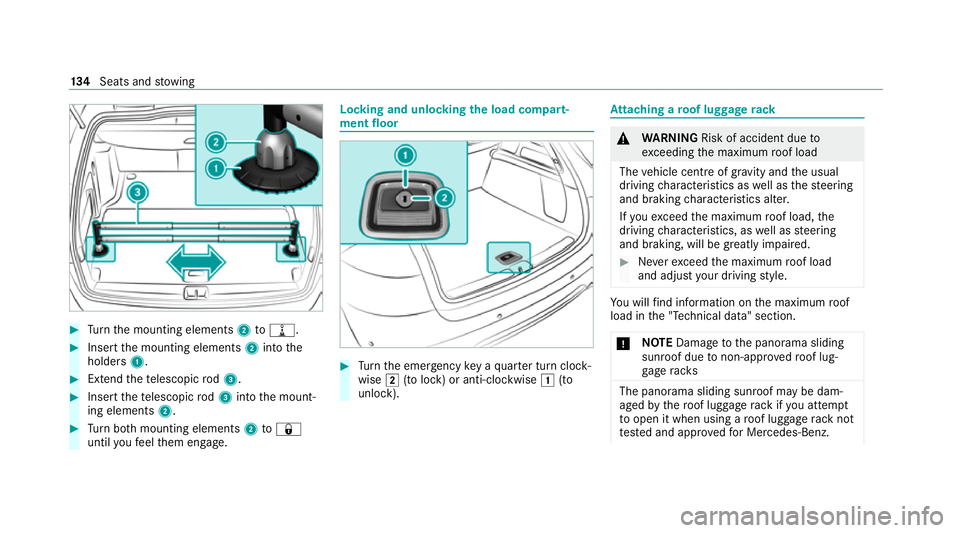
Turn the mounting elements 2to006E . #
Insert the mounting elements 2into the
holders 1. #
Extend thete lescopic rod3. #
Insert thete lescopic rod3 into the mount‐
ing elements 2.#
Turn both mounting elements 2to0037
until youfe el them engage. Locking and unlocking
the load compa rt‐
ment floor #
Turn the emer gency key a quarter turn clock‐
wise 0048(to lock) or anti-clockwise 0047(to
unlock). At
taching a roof luggage rack &
WARNING Risk of accident due to
exc eeding the maximum roof load
The vehicle centre of gravity and the usual
driving characteristics as well as thesteering
and braking characteristics alter.
If yo uexc eed the maximum roof load, the
driving characteristics, as well as steering
and braking, will be greatly impaired. #
Neverexc eed the maximum roof load
and adjust your driving style. Yo
u will find information on the maximum roof
load in the "Technical data" section.
* NO
TEDama getothe panorama sliding
sunroof due tonon-app rove dro of lug‐
ga ge racks The panorama sliding sunroof may be dam‐
aged
bythero of luggage rack ifyo u attem pt
to open it when using a roof luggage rack not
te sted and appr ovedfo r Mercedes-Benz. 134
Seats and stowing
Page 138 of 545
#
When a roof luggage rack isfitted, open
th e panorama sliding sunroof only if this
has been tested and appr oved for
Mercedes-Benz.
The panorama sliding sunroof may be raised
to allow ventilation of theve hicle interior. #
Secure thero of rack tothero of railing. #
Obser vethe manufacturer's ins tallation
instructions. Cup holders
Switching
the cooling or heating function for
th etemp erature-cont rolled cup holder on or
off &
WARNING Risk of injury bytouching the
heating elements
The cup holder's heating elements may be
ve ry hot.
Yo u can burn yourself on them. #
Do not touch the cup holder's hot heat‐
ing elements. #
Ensure that no children can access the
cup holder's hot heating elements. #
Never lea vechildren unat tended in the
ve hicle. *
NO
TEDama getoobjects in thete mp era‐
ture-contro lled cupholder If
yo u place objects into thete mp erature-
controlled cup holder, they may become
dama ged. #
Do not place objects into thete mp era‐
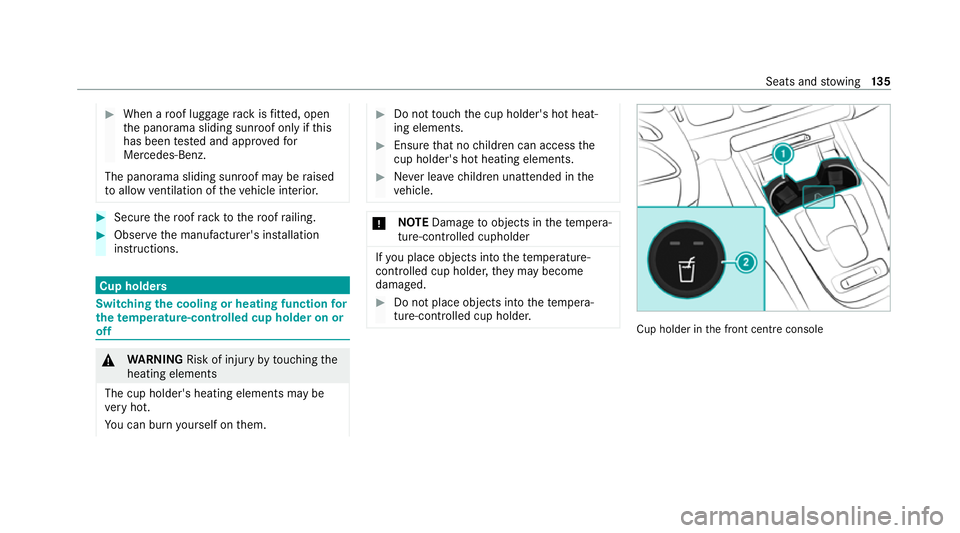
ture-contro lled cup holder. Cup holder in
the front cent reconsole Seats and
stowing 13 5
Page 183 of 545
*
NO
TEDama getothe driv etra in and
engine when pulling away #
Do not warm upthe engine while the
ve hicle is stationar y.Pull away immedi‐
atel y. #
Avoid high engine speeds and driving at
full thro ttle until the engine has reached
its operating temp erature. *
NO
TEDama getothe catalytic con verter
due tonon-combu sted fuel The engine is not
running smo othly and is
misfiring.
Non-combus ted fuel may get into the cata‐
lytic con verter. #
Only depress the accelera tor pedal
slightl y. #
Have the cause rectified immediately at
a qu alified specialist workshop. *
NO
TEReduced battery life due tofre‐
qu ent short-dis tance trips The
12V battery may not be suf ficiently
ch arge d when theve hicle is used only for
short-dis tance trips. This reduces the life of
th e batter y. #
Drive longer di stances regular lyto
ch arge the batter y. Note
s on driving with a roof load, trailer or
ful lyladen vehicle
When driving with a loaded roof luggage rack or
trailer as well as with a fully laden or fully occu‐
pied vehicle, theve hicle's driving and steering
ch aracteristics change.
Yo u should bear thefo llowing in mind:
R Do not exceed the permissible roof load and
to wing capacity. Also obser vethete ch nical
da ta inthe printed Owner's Manual.
R Evenly distribute thero of load, and place
heavy objects at the bottom. Also comply
with the no tes on loading theve hicle
(/ page 119). R
Drive attentivel y,and avoid suddenly pulling
aw ay, braking and steering as well as rapid
cornering.
Note s on driving on salt-treated roads
The braking ef fect is limited on salt-trea ted
ro ads.
Therefore, obse rveth efo llowing no tes:
R due tosalt build-up on the brake disks and
brakepads, the braking dis tance can increase
conside rably or result in braking only on one
side
R maintain a much greater safe dis tance tothe
ve hicle in front
To remo vesalt build-up:
R brake occasionally while paying attention to
th e tra ffic conditions
R carefully depress the brake pedal at the end
of the journey and when starting the next
journey 18 0
Driving and pa rking
Page 293 of 545
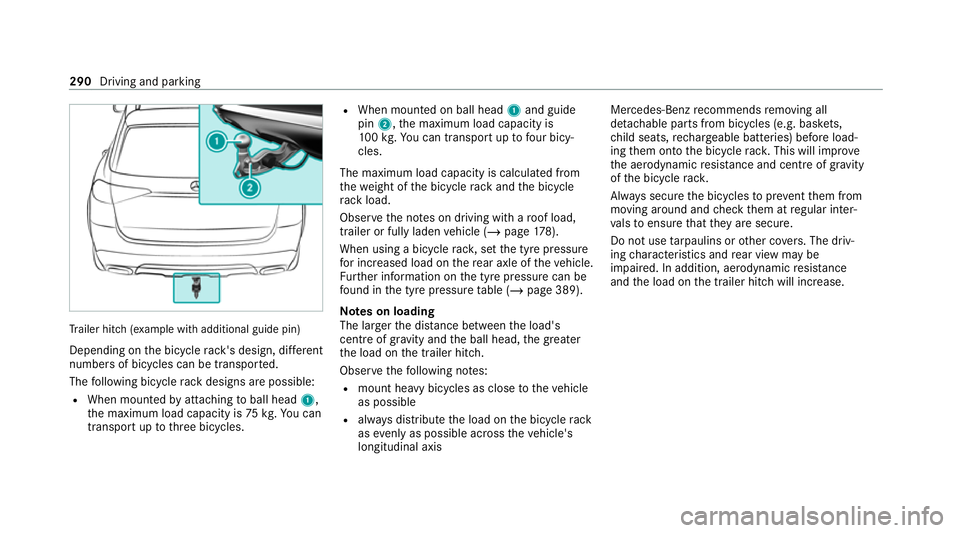
Tr
ailer hit ch(examp le with additional guide pin)
Depending on the bicycle rack 's design, dif fere nt
numbe rsof bicycles can be transpor ted.
The following bicycle rack designs are possible:
R When mounted byattaching toball head 1,
th e maximum load capacity is 75kg.Yo u can
transport up tothre e bicycles. R
When mounted on ball head 1and guide
pin 2, the maximum load capacity is
10 0kg .Yo u can transpo rtup tofour bicy‐
cles.
The maximum load capacity is calculated from
th ewe ight of the bicycle rack and the bicycle
ra ck load.
Obser vethe no tes on driving with a roof load,
trailer or fully laden vehicle (/ page178).
When using a bicycle rack , set the tyre pressure
fo r increased load on there ar axle of theve hicle.
Fu rther information on the tyre pressure can be
fo und in the tyre pressure table (/ page 389).
Note s on loading
The larger the dis tance between the load's
cent reof gr avity and the ball head, the greater
th e load on the trailer hitch.
Obser vethefo llowing no tes:
R mount heavy bicycles as close totheve hicle
as possible
R always distribute the load on the bicycle rack
as eve nly as possible across theve hicle's
longitudinal axis Mercedes-Benz
recommends removing all
de tach able parts from bicycles (e.g. bask ets,
ch ild seats, rech arge able bat teries) before load‐
ing them onto the bicycle rack . This will impr ove
th e aerodynamic resis tance and centre of gr avity
of the bicycle rack.
Alw ays secure the bicycles toprev ent them from
moving around and check them at regular inter‐
va ls to ensure that they are secure.
Do not use tarp aulins or other co vers. The driv‐
ing characteristics and rear view may be
impaired. In addition, aerodynamic resis tance
and the load on the trailer hitch will increase. 290
Driving and parking
Page 531 of 545
Re
versege ar
Engaging................................................ 19 3
Re versing camera
Care....................................................... 361
Fu nction................................................ 264
Opening the camera co ver (360°
Camera)................................................ 270
Switching au tomatic operation
on/off (360° Camera)........................... 270
Rims (care)................................................. 361
RO AD SUR FACE SCAN
Multifunction camera............................ 259
RO AD SUR FACE SCAN
see Camera
Ro llaw ay protection
see HOLD function
Ro ller sunblind
Side windo ws(elect ric)............................ 97
Sliding sunroof........................................ 93
Ro of lining (care) ...................................... .363
Ro of load .................................................... 420
Ro of load display
In fo rm ation............................................ 189Ro
of luggage rack
Loading.................................................. 13 4
Secu ring................................................ 13 4
Ro ute
Calculating............................................. 316
Selecting options................................... 316
Ro ute guidance with augmented real‐
ity
Activating............................................... 316
Displ aying stre et names and house
numbe rs................................................ 316
Ro ute-based speed adaptation
Fu nction................................................ 230
Setting................................................... 231
Ru n-flat characteristics
MOExtended tyres................................. 368
Ru nning boards (care)............................... 361
Ru nning-in no tes........................................ 176 S
Saf ety sy stems
see Driving saf ety sy stem
Saf etyve st................................................. 365 Sear
chlight
Swit ching on/off with hand mo ve‐
ments.................................................... 306
Seat 4-waylumbar suppor t........................... 105
adjusting (electrically)............................1 01
Au tomatic seat adjust ment.................... 111
Con figuring the settings......................... 111
Cor rect driver's seat position................ 101
Fo lding back the backrest on the
th ird row of seats.................................. 12 6
Fo lding the backrest (rear) back............ 12 5
Fo lding the backrest (rear) forw ards
to get in................................................. 106
Fo lding the backrest forw ards (rear)...... 12 3
Fo lding the backrest on theth ird row
of seats forw ards................................... 12 6
Massage programme overview. ............. 11 2
Operating the memory function.............1 19
Pa nel heating......................................... 11 5
Re ar (adjusting electrically).................. .105
Re ar (seat com fort).............................. .105
Re setting the settings............................1 13
Setting options........................................ 14
Wo rkout programme overview............... 11 2528
Index