2021 MERCEDES-BENZ GLE SUV maintenance
[x] Cancel search: maintenancePage 25 of 545
Pr
otection of the environment
* NO
TEPlug-in hybrid #
Obser vethe no tes in the Supplement.
Yo u could otherwise failto recognise
dangers. +
ENVI
RONMENTAL NOTEEnvironmental
dama gedue tooperating conditions and
personal driving style The pollutant emission of
theve hicle is
directly related tothewa yyo u operate the
ve hicle.
Operate your vehicle in an environmentally
re sponsible manner tohelp pr otect the envi‐
ro nment. Please obser vethefo llowing rec‐
ommendations on ope rating conditions and
pe rsonal driving style.
Operating conditions: #
Make sure that the tyre pressure is cor‐
re ct. #
Do not car ryany unnecessary weight
(e.g. roof luggage rack s once you no
lon ger need them). #
Adhere tothe service inter vals.
A regularly serviced vehicle will contri b‐
ute toenvironmen tal pr otection. #
Alw ays ha vemaintenance workcar ried
out at a qualified specialist workshop.
Pe rsonal driving style: #
Do not depress the accelera tor pedal
when starting the engine. #
Do not warm upthe engine while the
ve hicle is stationar y. #
Drive carefully and maintain a suitable
dist ance from theve hicle in front. #
Avoid frequent, sudden acceleration
and braking. #
Change gear in good time and use each
ge ar on lyup to00C3 of its maximum
engine speed. #
Switch off the engine in stationary traf‐
fi c, e.g. byusing the ECO start/ stop
function. #
Drive in a fuel-ef ficient manne r.
Obser vethe ECO display for an eco‐
nomical driving style. Ta
ke -back of end-of-life vehicles
EU countries onl y:
Mercedes-Benz will take back your end-of-life
ve hicle for environment-friendly disposal in
accordance with the European Union(EU) End-
of-Life Vehicles Directive.
A network of vehicle take -ba ckpoints and dis‐
mantlers has been es tablished foryo uto return
yo ur vehicle. You can lea veit at any of these
points free of charge . This makes an impor tant
contribution toclosing there cycling circle and
conse rving resources.
Fo r fur ther information about there cycling and
disposal of end-of-life vehicles, and theta ke- 22
General no tes
Page 27 of 545
This is
the case in thefo llowing situations:
R The vehicle type is dif fere nt from that for
which theve hicle's general operating pe rmit
wa s granted.
R Other road users could be endangered.
R The exhaust gas or noise le velge ts wo rse.
Alw ays specify theve hicle identification number
(VIN) (/ page 408) when ordering Mercedes-
Benz GenuineParts. Owner's Manual
This Owner's Manual describes all models and
all standard and optional equipment available for
yo ur vehicle at the time of this Owner's Manual
going topress. Countr y-specific dif fere nces are
possible. No tethat your vehicle may not be fit‐
te d with all features desc ribed. This is also the
case for sy stems and functions releva nt to
saf ety. Therefore, the equipment on your vehicle
may dif fer from that in the descriptions and illus‐
trations. The original pur
chase agreement foryo ur vehicle
contains a list of all of the sy stems in your vehi‐
cle.
Should you ha veany questions concerning
equipment and operation, please consult a
Mercedes-Benz Service Centre.
The Owner's Manual and Service Booklet are
impor tant documents and should be kept inthe
ve hicle. Operating saf
ety
* NO
TEPlug-in hybrid #
Obser vethe no tes in the Supplement.
Yo u could otherwise failto recognise
dangers. &
WARNING Risk of injury duetomalfunc‐
tions or sy stem failure
In order toavo id malfunctions or sy stem fail‐
ures: #
Alw ays ha vethe specified service/
maintenance workas well as any nec‐ essary
repairs car ried out at a qualified
specialist workshop. &
WARNING Risk of accident or inju rydue
to improper modifications toelectronic
components
Modifications toelectronic components,
th eir software or wiring can impair their func‐
tionality and/or the functionality of other
networ ked components or saf ety-re leva nt
sy stems.
This can endanger theve hicle's operating
saf ety. #
You must not tamp er with wiring, elec‐
tronic components, or their software. #
Alw ays ha vewo rkon electrical and
electronic devices car ried out at a quali‐
fi ed specialist workshop. If
yo u modify the on-board electronics, thege n‐
eral operating perm it isrende red in valid.
Obser vethe "On-board electronics" section in
"Technical data". 24
General no tes
Page 35 of 545
th
e scope of repair and maintenance workor for
re ading out vehicle data bya specialist work‐
shop. Diagnostic devices should therefore only
be connected byaqu alified specialist workshop. &
WARNING Risk of accident due tocon‐
necting devices tothe diagnostics con‐
nection
If yo u connect devices tothe diagnostics
connection of theve hicle, the function of
ve hicle sy stems and operating saf ety may be
impaired. #
For saf etyre asons, werecommend that
yo u on lyuse and connect products
appr ovedby yo ur Mercedes-Benz
service centre. &
WARNING Risk of accident due to
objects in the driver's foot we ll
Objects in the driver's foot we ll may impede
pedal tr avel or block a depressed pedal.
This jeopardises the operating and road
saf ety of theve hicle. #
Stow all objects in theve hicle securely
so that they cannot getinto the driver's
fo ot we ll. #
Alw aysfit th efloor mats securely and
as prescribed in order toensure that
th ere is alw ays suf ficient room forthe
pedals. #
Do not use loose floor mats and do not
place floor mats on top of one ano ther. *
NO
TEBattery discharging from using
devices connected tothe diagnostics
connection Using devices at
the diagnostics connection
drains the batter y. #
Check thech arge leve l of the batter y. #
Ifth ech arge leve l is lo w,charge the
batter y,e.g. bydriving a considerable
dis tance. Please also no
tethe information about the12 V
battery and short-dis tance trips in the "Driving
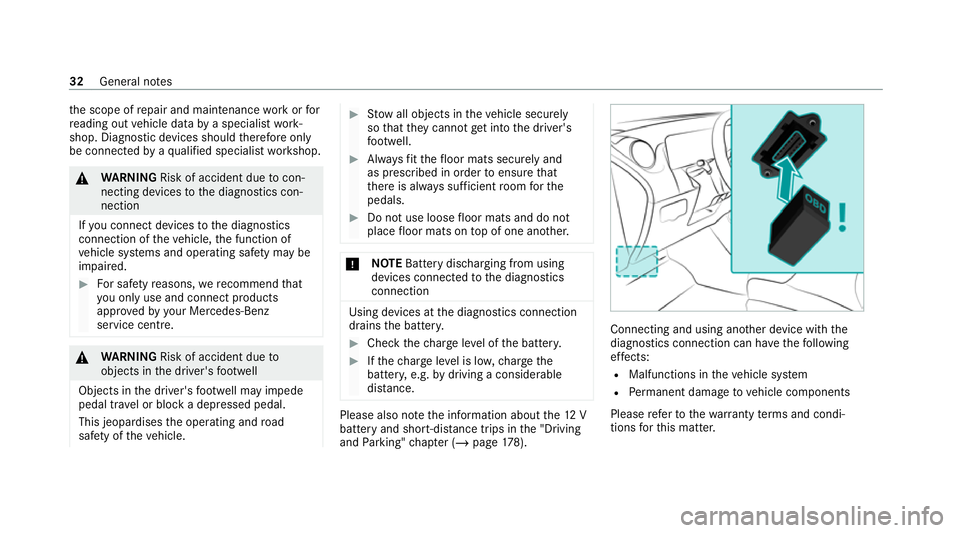
and Parking" chap ter (/ page178). Connecting and using ano
ther device with the
diagnostics connection can ha vethefo llowing
ef fects:
R Malfunctions in theve hicle sy stem
R Perm anent damage tovehicle components
Please referto thewa rranty term s and condi‐
tions forth is matter. 32
General no tes
Page 36 of 545
Moreo
ver,connecting equipment tothe diagnos‐
tics connection can lead toemissions monitor‐
ing information being reset, forex ample. This
may lead totheve hicle failing tomeet the
re qu irements of the next emissions inspection
during the main inspection. Qualified specialist
workshop
* NO
TEPlug-in hybrid #
Obser vethe no tes in the Supplement.
Yo u could otherwise failto recognise
dangers. A
qu alified specialist workshop has the neces‐
sary special skills, tools and qualifications to
cor rectly car ryout any necessary workon your
ve hicle. This particularly applies tosaf ety-re le‐
va nt wo rks.
Alw ays ha vethefo llowing workcar ried out on
yo ur vehicle at a qualified specialist workshop:
R Safety-re leva nt wo rks
R Service and maintenance work R
Repair work
R Modifications as well as ins tallations and
con versions
R Workon electronic components
R Vehicles with 48 V on-board electrical
sy stem (EQ boost technology): workon
high voltage components of the 48 V on-
board electrical sy stem
Mercedes‑Benz recommends a Mercedes‑Benz
service centre. Ve
hicle registration
Mercedes-Benz may ask its service centres to
car ryout tech nical inspections on cer tain vehi‐
cles. The quality or saf ety of theve hicle is
impr oved as a result of the inspection.
Mercedes-Benz can only inform you about vehi‐
cle checks if Mercedes-Benz has your registra‐
tion data. It is possible
that your vehicle has not yet been
re gis tere d in your name in thefo llowing cases:
R ifyo ur vehicle was not pur chased at an
authorised specialist dealer.
R ifyo ur vehicle has not yet been examined at
a Mercedes-Benz service centre.
It is advisable toregis teryo ur vehicle with a
Mercedes-Benz service centre.
Inform Mercedes-Benz as soon as possible
about any change in address or vehicle owner‐
ship. You can do this at a Mercedes-Benz service
centre, forex ample. Cor
rect use of theve hicle
If yo ure mo veany warning sticke rs,yo u or others
could failto recognise cer tain dangers. Lea ve
wa rning sticke rs in position.
Obser vethefo llowing information in particular
when driving your vehicle:
R the saf ety no tes in this manual and respec‐
tive Supplements
R tech nical da taforth eve hicle General no
tes33
Page 37 of 545
R
traf fic ru les and regulations
R laws and saf etyst andards per taining to
mo torve hicles Information on
the REACH regulation
EU and EFTA countries onl y:
th e REA CHregulation (Regulation (EC) No.
19 07 /2006, Article 33) stipulates a duty tosup‐
ply information about subs tances of very high
concern (SVHCs).
Mercedes‑Benz AGacts tothe best of its know l‐
edge topreve ntthese SVHCs from being used
and toenable cus tomers tosafely handle these
subs tances. The reare SVHCs known to
Mercedes‑Benz AG, according tosupplier infor‐
mation and internal product information, found
in individual co mponents of this vehicle in quan‐
tities of over 0.1 percent byweight.
Fu rther information can be obtained at thefo l‐
lowing addresses:
R https://reach.daimler.com/de/home/
R https://reach.daimler.com/en/home/ Note
sfo r persons with electronic medical
aids
* NO
TEPlug-in hybrid #
Obser vethe no tes in the Supplement.
Yo u could otherwise failto recognise
dangers. Mercedes-Benz
AGcannot, despite carefully
de veloping vehicle sy stems, comple tely rule out
th e interaction of vehicle sy stems with electronic
medical aids such as cardiac pacemakers.
In addition, there are components ins talled in
th eve hicle that, rega rdless of the operating sta‐
tus of theve hicle, can generate magnetic fields
on a par with permanent magnets. These fields
can be found, forex ample, in the area around
th e multimedia and sound sy stem or also in the
area of the seats, depending on theve hicle
equipment.
Fo rth is reason, thefo llowing can occur in isola‐
te d cases, depending on the aids used:
R Medical aids malfunctioning
R Adverse health ef fects Obser
vethe no tes and warnings of the manufac‐
turer of the medical aids; if in doubt, conta ctthe
device manufacturer and/or your doc tor.If th ere
is continuing uncer tainty concerning the possi‐
bility of medical aids malfunctioning, Mercedes-
Benz AGrecommends using only few electrical
ve hicle sy stems and/or maintaining a dis tance
from the components.
Only ha verepairs and maintenance workinthe
area of thefo llowing components car ried out by
a qu alified specialist workshop:
R vehicle components car rying live voltage
R transmission aerials
R multimedia sy stem and sound sy stem
If yo u ha veany queries or suggestions, consult a
qu alified specialist workshop. 34
General no tes
Page 39 of 545
ernmen
tal entities, upon request and tothe
ex tent requ ired, data stored bythe manufac‐
turer. Forex ample, this may be the case during
th e in vestigation of a criminal of fence.
Go vernmental entities are themselves, in individ‐
ual cases and within the applicable legal frame‐
wo rk, authorised toread out data from theve hi‐
cle. In the case of an accident, information that
can help with an in vestigation can, therefore, be
ta ke n from the airbag control unit, forex ample.
Operational data in theve hicle
This is data rega rding the operation of theve hi‐
cle, which ha vebeen processed bycontrol units.
This includes thefo llowing data, forex ample:
R vehicle status information such as the speed,
longitudinal acceleration, lateral accelera‐
tion, number of wheel revo lutions or thefa s‐
te ned seat belts displ ay
R ambient conditions, such as temp erature,
ra in sensor or dis tance sensor
General ly,th e use of these data is temp orar y;
th ey will not be stored be yond the period of
operation and will only be processed within theve
hicle itself. Control units of ten contain da ta
memories forve hicle keys,fo rex ample. Their
use permits thete mp orary or permanent docu‐
mentation of tech nical information about the
ve hicle's operating state, component loads,
main tenance requ irements and tech nical events
or faults.
Depending on theve hicle equipment, thefo llow‐
ing data are stored:
R operating status of sy stem components,
such as fill le vels, tyre pressure or battery
st atus
R malfunctions or faults in impor tant sy stem
components, such as lights or brakes
R system reactions in special driving situations,
such as airbag deployment or the inter ven‐
tion of stability control sy stems
R information on events leading tovehicle
damage
In cer tain cases, it may be requiredtostore data
th at wo uld ha veotherwise been used only tem‐
porarily. This may be the case if theve hicle has
de tected a malfunction, forex ample. If
yo u use services, such as repair services and
maintenance work,st ored operational data as
we ll as theve hicle identification number can be
re ad out and used. They can be read out by
service network emplo yees, such as workshops
and manufacturers or third parties, such as
breakdown services. The same is true in the
case of warranty claims and quality assurance
measures.
In general, there adout is per form ed via the
legally prescribed port forth e diagnostics con‐
nection in theve hicle. The operational data that
are read out document tech nical states of the
ve hicle or of individual components and assist in
th e diagnosis of malfunctions, compliance with
wa rranty obligations and quality impr ovement.
To that end, these data, in particular information
about component loads, tech nical events, mal‐
functions and other faults may be transmit ted
along with theve hicle identification number to
th e manufacturer. Furthermore, the manufac‐
turer is subject toproduct liability. Forth is rea‐
son the manufacturer also uses operational data
from theve hicle, forex ample, forre calls. These 36
General no tes
Page 40 of 545
data can also be used
toexamine the cus tom‐
er's warranty and guarantee claims.
Fa ult memories in theve hicle can be reset by a
service outlet or at your requ est as part of repair
or maintenance work.
Con venience and inf otainment functions
Yo u can store con venience settings and individ‐
ual settings in theve hicle and change or reset
th em at any time.
Depending on theve hicle equipment, this
includes thefo llowing settings, forex ample:
R seat and steering wheel positions
R suspension and climate control settings
R individual settings, such as interior lighting
Depending on the selected equipment, you can
import data into vehicle inf otainment functions
yo urself.
Depending on theve hicle equipment, this
includes thefo llowing data, forex ample:
R multimedia data, such as music, films or pho‐
to sfo r playback in an integrated multimedia
sy stem R
address book data for use in connection with
an integrated hands-free sy stem or an inte‐
grated navigation sy stem
R entered navigation destinations
R data about the use of Internet services
These data for con venience and inf otainment
functions may be sa ved locally in theve hicle or
th ey may be located on a device which you ha ve
connected totheve hicle, such as a smartphone,
USB flash drive or MP3 pla yer.If yo u ha ve
entered these data yourself, you can dele tethem
at any time.
This data is transmit ted from theve hicle tothird
parties only at your requ est. This applies, in par‐
ticular, when you use online services in accord‐
ance with the settings that you ha veselected.
Smartphone integ ration (e.g. Android Autoor
Apple CarPlay ®
)
If yo ur vehicle is accordingly equipped, you can
connect your smartphone or ano ther mobile end
device totheve hicle. You can then control them
by means of the control elements integrated in
th eve hicle. Images and audio from the smart‐ phone can be output via
the multimedia sy stem.
Cer tain information is simultaneously transfer‐
re dto yo ur smartphone. Depending on the type
and integration, this includes position data, day/
night mode and other general vehicle statuses.
Fo r more information please consult the Owner's
Manual of theve hicle/inf otainment sy stem.
This integration allo wsthe use of selected
smartphone apps, such as navigation or music
pla yer apps. There is no fur ther interaction
between the smartphone and theve hicle; in par‐
ticular, vehicle data is not directly accessible.
The type of additional data processing is de ter‐
mined bythe pr ovider of the app being used.
Which settings you can make, if an y,depends on
th e specific app and the operating sy stem of
yo ur smartphone. Online services
Wi
reless network connection
If yo ur vehicle has a wireless network connec‐
tion, it enables data tobe exc hanged between
yo ur vehicle and additional sy stems. The wire‐
less network connection is made possible bythe Gene
ral no tes 37
Page 157 of 545
Fi
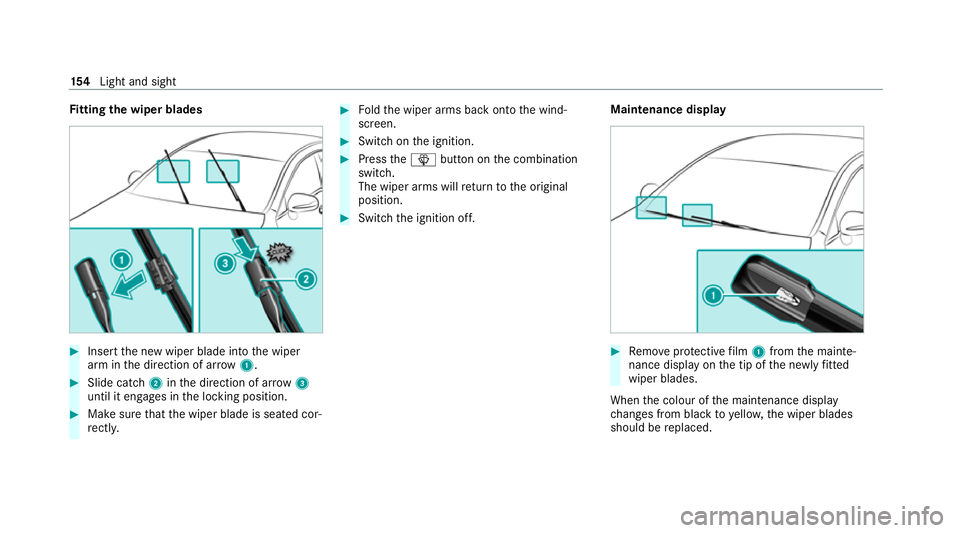
tting the wiper blades #
Inse rtthe new wiper blade into the wiper
arm in the direction of ar row1. #
Slide catch 2inthe direction of ar row 3
until it engages in the locking position. #
Make sure that the wiper blade is seated cor‐
re ctly. #
Foldthe wiper arms back onto the wind‐
screen. #
Switch on the ignition. #
Press the00D4 button on the combination
switch.
The wiper arms will return tothe original
position. #
Switch the ignition off. Maintenance display #
Remo veprotective film 1 from the mainte‐
nance display on the tip of the newly fitted
wiper blades.
When the colour of the maintenance display
ch anges from black to yellow, the wiper blades
should be replaced. 15 4
Light and sight