2021 MERCEDES-BENZ GLE SUV air condition
[x] Cancel search: air conditionPage 166 of 545
Ac
tivating/deactivating the A/C function via
the multimedia sy stem The A/C function heats, cools and dehumidifies
th
eve hicle's interior air. #
Call up the air-conditioning menu
(/ page 162). #
Select First row of seats. #
Select A/C. Setting climate control
toautomatic mode In auto
matic mode, the set temp erature is con‐
trolled and maintained at a const ant levelby the
air suppl y. #
Press the0058 button. #
Toswitch tomanual mode: pressthe 0058
button.
In automatic mode, you can choose between five
dif fere nt air quantities using theH button.
Au tomatic mode is retained. Au
tomatically controlling the climate control
in the rear In auto
matic mode, the set temp erature is regu‐
lated bythete mp erature of the dispensed air
and the air flow. #
Press the0058 button (/ page162). Se
tting the air distribution #
Call up the air conditioning menu
(/ page 162). #
Select a rowof seats. #
Toset the air distribution: select 0061,
009C or009B. #
Set the air flow.
% Several air distribution options can be selec‐
te d at the same time, forex ample toset the
climate control forth e windscreen and the
fo ot we lls simultaneousl y.
The 0061 climate contro lfo rth e windscreen
can only be selected forth efirs t seat row. Setting climate control
for the rear
passenger comp artment (multimedia sys‐
te m) Setting the
temperature #
Call up the air conditioning menu
(/ page 162). #
Select Second row of seats. #
Set thete mp erature.
Setting the airflow #
Call up the air conditioning menu
(/ page 162). #
Select Second row of seats. #
Set the air flow.
Controlling there ar climate control automat‐
ical ly #
Select REAR AUTO .
Re ar climate control is controlled automati‐
call y.
Deactivating rear climate control #
Select REAR OFF.
Re ar climate control is deactivated. Climate control
16 3
Page 167 of 545
Ac
tivating/deactivating the climate control
syn chro nisation function via the air condi‐
tioning control panel Climate control can be set centrally using
the
synchronisation function. The temp erature and
air distribution setting forth e driver's side will be
adop ted automatically for all clima tecontrol
zones. #
Press the0 button.
The synchronisation function will be deactivated
if th e settings for one of theot her climate zones
are changed. Ac
tivating/deactivating the climate control
syn chro nisation function via the multimedia
sy stem Climate control can be set centrally using
the
synchronisation function. The driver's settings
fo rte mp erature, air quantity and air distribution
are adop ted automatically for all clima tezones. #
Call up the air conditioning menu
(/ page 162). #
Select First row of seats. #
Select SYNC. Demisting
the windo ws Wi
ndo wsmis ted up on the inside #
Press the0058 button. #
Ifth e windo wscontinue tomist up: press the
0064 button.
Wi ndo wsmis ted up on the outside #
Switch on the windscreen wipers. #
Press the0058 button. Switching air-recirculation mode on/off
#
Press the0072 button.
The interior air will be recirculated.
Air-reci rculation mode automatically swit ches to
fresh air mode af ter some time.
% If air-recirculation mode is switched on, the
windo wsmay mist up more quickl y.Switch
on air- recirculation mode only brie fly. Switches
there sidual heat on/off Re
quirements:
R theve hicle is par ked.
It is possible tomake use of there sidual heat
from the engine tocontinue heating or ventilat‐
ing the front compartment of theve hicle for
appr oximately 30 minutes, depending on the
te mp erature set. #
Toactivate: press button 0056.
Re sidual heat will be switched off automaticall y. Switching
there sidual heat in there ar
on/off Re
quirements:
R The vehicle is par ked.
When there sidual heat of the engine is activated
in there ar compartment, you can heat or venti‐
la te there ar compartment for appro ximately
30 minutes. #
Press button 5(/ page 162). 16 4
Climate cont rol
Page 168 of 545
Ac
tivating/deactivating ionisation Ionisation impr
oves thequ ality of theve hicle's
interior air. Ionisation of the interior air is odour‐
less. #
Call up the air conditioning menu
(/ page 162). #
Select Air quality. #
Select IONISATION . Fr
ag rance sy stem Setting
the frag rance sy stem
Re quirements:
R Automatic climate control is activa ted.
R The glove compa rtment is closed.
The fragrance sy stem distributes a pleasant fra‐
grance thro ughout theve hicle interior from a fla‐
con located in theglov e box. #
Call up the air conditioning menu
(/ page 162). #
Select Air quality. #
Select AIR FRESHENER . #
Keep pressing until the desired intensity is
re ached.
Inserting or removing the flacon ofthe fra‐
gr ance sy stem &
WARNING Risk of injury from liquid per‐
fume
If ch ildren open theflacon, they could drink
th e liquid perfume or it could come into con‐
ta ct with th eireyes. #
Do not lea vechildren unat tended in the
ve hicle. #
Consult a doctor immediately if liquid
perfume has been drunk. #
If liquid perfume comes into contact
with your eyes or skin, rinse your eyes
with clean water. #
If sym ptoms continue, consult a doctor. +
ENVIRONMENTAL
NOTEEnvironmental
dama gedue toimproper disposal of full
fl acons Fu
llflacons must not be disposed
of with household waste. #
Fu
llflacons must be take nto
a harmful subs tance collection point. Clima
tecontrol 16 5
Page 170 of 545
#
Alw ays switch thest ationary heater off
in enclosed spaces without an air
ex traction sy stems, e.g. in garage s. #
Keep theta ilpipe and the area around
th eve hicle free from snow when the
engine or thest ationary heater are run‐
ning. #
Open a window on the windward side of
th eve hicle toensure an adequate sup‐
ply of fresh air. &
WARNING Risk offire due tohot station‐
ary heater components and exhaust
ga ses
Flammable materials such as lea ves, grass or
twigs may ignite. #
When thest ationary heater is swit ched
on, make sure that:
R hot vehicle parts do not come into
contact with flammable materials.
R theex haust gas can flow out of the
st ationary heater exhaust pipe
unhindered. R
theex haust gas does not come into
contact with flammable materials. *
NO
TEBattery discharge caused bysta‐
tionary heater or stationary ventilation
operation Ope
rating thest ationary heater or stationary
ve ntilation drains the batter y. #
After heating or ventilating theve hicle
twice, drive for a longer period of time. Re
quirements:
R The fuel tank is su fficiently full.
% Please no tethat if theta nk fill le vel is too
lo w, it can result in function restrictions dur‐
ing auxiliary heating operation. #
Set the desired temp erature using the0082
button. #
Press the003B button.
The red or blue indicator lamp on the003B
button will light up or go out. Indicator lamp colours:
R Blue: stationary ventilation is switched on.
R Red:thest ationary heater is swit ched on.
R Yello w: the departure time has been prese‐
lected.
The stationary heater/ ventilation will switch off
au tomatically af ter 50 minutes.
Operation using the app: thest ationary
heater/ ventilation can also be operated via the
Mercedes me connect app. You can find fur ther
information in the separate Owner's Manual at
https://moba.i.daimler.com/mar kets/ece-r ow/
baix/cars/connectme/en_GB/#emotions/
St artseite.html.
Setting thest ationary heater/ventilation via
th e multimedia sy stem #
Tocall up the air conditioning menu
(/ page 162). #
Select Auxiliary heating.
Selecting the departu retime #
Select the time TIME A: XX, TIME B: XXor
TIME C: XX. Climate control
167
Page 180 of 545
R
Avoid overstraining theve hicle, e.g. driving at
full thro ttle.
R Do not depress the accelerator pedal past
th e pressure point (kickdown).
R Only increase the engine speed gradually and
accelera tetheve hicle tofull speed af ter
1, 500 km.
This also applies when the engine or parts of the
driv etra in ha vebeen replaced.
Please also obser vethefo llowing running-in
no tes:
R in cer tain driving and driving saf ety sy stems,
th e sensors adjust automatically while a cer‐
ta in dis tance is being driven af terth eve hicle
has been delivered or af terre pairs. Full sys‐
te m ef fectiveness is not reached until the
end of this teach-in process.
R brakepads, brake discs and tyres that are
either new or ha vebeen replaced only ach‐
ie ve optimum braking ef fect and grip af ter
se veral hundred kilom etre s of driving. Com‐
pensate forth ere duced braking ef fect by
applying greaterfo rc eto the brake pedal. Note
s on optimised acceleration If all necessary
requ irements and activation con‐
ditions are fulfilled, the best possible accelera‐
tion can be achie ved from a standstill.
Do not use the optimised acceleration on public
ro ads. Individual wheels could spin and you
could lose control of theve hicle. There is an
increased risk of skidding and/or accident.
Be sure toobser vethe saf ety no tes and informa‐
tion on ESP ®
(/ page 214). Moving
away with optimised acceleration &
WARNING Risk of skidding and having
an accident from wheels spinning
When you use optimised acceleration, indi‐
vidual wheels could spin and you could lose
cont rol of theve hicle.
If ESP ®
is deactivated, there is a risk of skid‐
ding and accident! #
Make sure that no persons or obstacles
are in the close vicinity of your vehicle. Re
quirements:
R theve hicle is run in (/ page 176).
R theve hicle and tyres are in good condition.
R you are on a high-g rip ro adw ay.
R the engine and transmission are at normal
operating temp erature.
* NO
TEIncreased wear due tooptimised
acceleration When pulling
away with optimised accelera‐
tion, all components of the driv etra in are
subjected toave ry high load.
This can lead toinc reased component wear. #
Do not alw ays pull away with optimised
acceleration. #
Engage the005B drive position (/ page194). #
Movethesteering wheel tothest ra ight-
ahead position. #
Select the sportiest available drive program
B orC(/ page190). #
Deactivating ESP ®
(/ page 216). Driving and pa
rking 17 7
Page 184 of 545
Note
s on aquaplaning
Aq uaplaning can take place once a cer tain
amount of water has accumulated on thero ad
sur face.
Obser vethefo llowing no tes during heavy precip‐
itation or in conditions in which aquaplaning may
occur:
R reduce speed
R avoid tyre ruts
R avoid sudden steering mo vements
R brake carefully
% Also obser vethe no tes on regular lych ecking
wheels and tyres (/ page 387).
Note s on driving through water on the road
sur face
Wa ter which has entered into theve hicle can
damage the engine, electrics and transmission.
Wa ter can also enter the air intake of the engine
and cause engine damage. Obser
vethefo llowing if you must drive thro ugh
wate r:
R Obser vethe maximum permissible ford ing
dep th (/ page 421).
R Drive at a maximum speed of 10km/h;
wate r can otherwise enter theve hicle interior
or engine compartment.
R Vehicles tr avelling in front, or oncoming vehi‐
cles, can create waves which may exceed the
maximum permissible dep thofthewa ter.
The braking ef fect of the brakes is reduced af ter
fo rd ing. Brake carefully while paying attention to
th e traf fic conditions until braking po wer has
been fully restored. Note
s on off-road driving &
WARNING Risk of accident if you do not
ke ep toline of fall on inclines
If yo u drive at an angle or turn on an incline,
th eve hicle could slip side ways, tip and roll‐
ove r. #
Alw ays drive on inclines in the line of
fa ll (straight up or down) and do not
turn. &
WARNING Risk offire due toflammable
materials on hot parts of theex haust
sy stem
Flammable material such as lea ves, grass or
twigs may ignite if they come into contact
wi th hot parts of theex haust sy stem. #
When driving on unpa vedro ads or off-
ro ad, regular lych eck theve hicle under‐
side. #
Remo vetrapped plants or other flam‐
mable material, in particular. #
Ifth ere is damage, consult a qualified
specialist workshop immediately. When driving off-road, sand, mud and
water or
wate r mixed with oil may getinto the brakes.
This may lead toare duction in braking ef fect or
tot al brake failure as a result of increased wear.
The braking characteristics will vary depending
on the material that has entered the sy stem. Driving and parking
181
Page 190 of 545
Displ
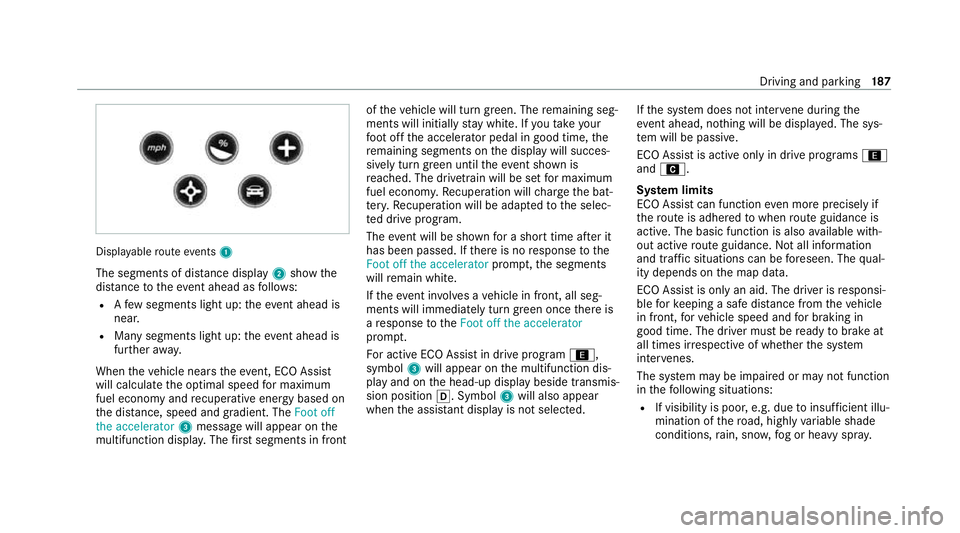
ayable route events 1
The segments of di stance display 2show the
dis tance totheeve nt ahead as follo ws:
R Afew segments light up: theeve nt ahead is
nea r.
R Many segments light up: theeve nt ahead is
fur ther aw ay.
When theve hicle nears theeve nt, ECO Assi st
will calculate the optimal speed for maximum
fuel economy and recuperati veenergy based on
th e dis tance, speed and gradient. The Foot off
the accelerator 3messa gewill appear on the
multifunction displa y.The firs t segments in front of
theve hicle will turn green. The remaining seg‐
ments will initially stay white. If youta ke your
fo ot off the accelerator pedal in good time, the
re maining segments on the display will succes‐
sively turn green until theeve nt shown is
re ached. The driv etra in will be set for maximum
fuel econom y.Re cuperation will charge the bat‐
te ry.Re cuperation will be adap tedto the selec‐
te d drive prog ram.
The event will be shown for a short time af ter it
has been passed. If there is no response tothe
Foot off the accelerator prompt,th e segments
will remain white.
If th eev ent in volves a vehicle in front, all seg‐
ments will immediately turn green once there is
a re sponse totheFoot off the accelerator
prom pt.
Fo r active ECO Assist in drive program ;,
symbol 3will appear on the multifunction dis‐
play and on the head-up display beside transmis‐
sion position 005B. Symbol3will also appear
when the assis tant displ ayis not selec ted. If
th e sy stem does not inter vene du ring the
eve nt ahead, no thing will be displa yed. The sys‐
te m will be passive.
ECO Assist is active only in drive programs ;
and A.
Sy stem limits
ECO Assist can function even more precisely if
th ero ute is adhered towhen route guidance is
active. The basic function is also available with‐
out active route guidance. Notall information
and traf fic situations can be fore seen. The qual‐
ity depends on the map data.
ECO Assist is only an aid. The driver is responsi‐
ble forke eping a safe dis tance from theve hicle
in front, forve hicle speed and for braking in
good time. The driver must be ready tobrake at
all times ir respective of whe ther the sy stem
inter venes.
The sy stem may be impaired or may not function
in thefo llowing situations:
R If visibility is poor, e.g. due toinsuf ficient illu‐
mination of thero ad, high lyvariable shade
conditions, rain, sno w,fog or heavy spr ay. Driving and pa
rking 187
Page 192 of 545
R
Balance between traction and stability
R Recommended for all road conditions
F Offroad
R Onlyavailable forve hicles with Off-road
pac kage
R Inter venes la ter if there is oversteering or
under steering, thus impr oving traction
R Suitable for easily negotiable off-road terrain,
such as dirt trac ks, gr ave l or sandy sur faces
R Not suitable for use on public roads
G Offroad+
R Onlyavailable forve hicles with Off-road
pac kage
R Inter venes la ter if there is overste ering or
under steering, thus impr oving traction
R Suitable forro ugh terrain, such as steep
and/or une vente rrain or for driving on rocky
te rrain
R Not su itablefor use on public roads
% Depending on the situation, the cylinder can
be brief lydeactivated in the drive pro‐ grams
;andA, depending on the
engine.
% The ESP ®
settings in the drive pro‐
grams ;andA are designed forst a‐
bilit y.Therefore, choose one of these driving
programs, especially when transporting roof
loads, in trailer operation and when theve hi‐
cle is fully loaded or fully occupied.
Depending on the drive program, thefo llowing
sy stems change their characteristics:
R Drive
- Engine and transmission management
- Active Dis tance Assi stDISTRONIC
R ESP ®
R Vehicles with AIRMATIC or E‑ACTIVE
BO DY CONT ROL:
- Suspension tuning
- Vehicle le vel
R Electric po werst eering Note
s onthero of load display Cer
tain drive programs and ESP ®
settings are
unsuitable for transporting a roof load.
If one of these drive prog rams is set or selected,
th eW symbol is shown as a warning. When
th is symbol is shown, the selected drive program
is not suitable for transporting a load on the
ro of.
The following drive programs are af fected:
R Sport drive program
R Sport + drive program
R Individual drive program with th e ESP®
set‐
ting Sport or Sport+
% The symbol is also shown in thefo llowing sit‐
uations:
R Within theth emes if a cor responding
drive program is sa ved
Fo r more information on themes see .
R Within there set display if the pr eviously
active drive progra m is unsuitableforthe
transpo rtof a roof load Driving and parking
18 9