2021 MERCEDES-BENZ GLC SUV fold seats
[x] Cancel search: fold seatsPage 65 of 481
Fi
tting an ISOFIX or i‑Size child restra int sys‐
te m on the rear seat &
WARNING Risk of accident if there ar
ben chseat, rear seat and seat backrest
are not engaged
The rear ben chseat, rear seat and seat back‐
re st may fold forw ards, even while theve hi‐
cle is in motion.
R As a result, theve hicle occupant will be
pressed into the seat belt with increased
fo rc e. The seat belt will not be able to
pr otect as intended and could cause
additional injur y.
R Objects or loads in the boot or load com‐
partment cann otbe restra ined bythe
seat backrest. #
Make sure that there ar ben chseat, the
re ar seat and the seat backrest are
engaged before everytrip. If
th e left and right seat backrests are not
engaged and loc ked in place, this will be shown on
the multifunction display on the instrument
clus ter.
If th e cent reseat backrest is not engaged and
loc ked in place, there d lock verification indica‐
to r will be visible. &
WARNING Risk of injury or death ifthe
permissible gross mass of thech ild and
ch ild restra int sy stem toget her is excee‐
ded.
To o much load may be placed on the ISOFIX
or i‑Size child restra int sy stems and thech ild
may not be restra ined cor rectly in theeve nt
of an accident, forex ample. #
Ifth ech ild and thech ild restra int sys‐
te m toget her weigh more than 33 kg,
only use an ISOFIX or i‑Size child
re stra int sy stem with which thech ild is
secured with theve hicle seat belt. #
Also secure thech ild restra int sy stem
with theTo pTe ther belt, if available. Alw
ays comply with the information about the
mass of thech ild restra int sy stem:
R inthe manufacturer's ins tallation and operat‐
ing instructions forth ech ild restra int sy stem
used
R on a label on thech ild restra int sy stem, if
present
Re gular lych eck that the permissible gross mass
of thech ild and child restra int sy stem is still
complied with.
When fitting a child restra int sy stem, obser ve
th efo llowing:
O Alw
ays obser vethe cor rect use of the seats
and consider their suitability for attaching a
ch ild restra int sy stem.
ISOFIX child seat securing sy stem
(/ page 60)
or
i‑Size child seat securing sy stem
(/ page 61 ) 62
Occupant saf ety
Page 112 of 481
&
WARNING Risk of injury duetoobjects
being stowed incor rectly
If objects in theve hicle interior are stowed
incor rectly, they can slide or be thrown
around and hit vehicle occupants. In addi‐
tion, cup holders, open stowage spaces and
mobile phone brac kets cann otalw aysre tain
all objects they contain.
The reis a risk of injur y,particularly in the
ev ent of braking manoeuvres or abrupt
ch anges in direction. #
Alw aysstow objects so that they can‐
not be throw n around in su chsitua‐
tions. #
Alw ays make sure that objects do not
pr otru de from stowage spaces, luggage
nets or stowage nets. #
Close the loc kable stow age spaces
before starting a journe y. #
Stow and secure objects that are heavy,
hard, poin ted, sharp-edged, fragile or
to o lar geinthe load compartment. Ve
hicles with automatic front passenge r air‐
bag shu toff:objects trapped under the front
passenger seat may inter fere with the function
of the automatic front passenger airbag shutoff
or damage the sy stem. Please obser vethe no tes
on the function of the automatic front passenger
airbag shutoff (/ page47). &
WARNING ‑ Risk of accident or inju ry
when using the cup holder while the
ve hicle is in motion
The cup holder cannot hold a container
secure while theve hicle is in motion.
If yo u use a cup holder while theve hicle is in
motion, the conta iner may be flung around
and liquids could be spilled. The vehicle
occupants may come into contact with the
liquid and if it is hot, they could be scalded.
Yo u could be distracted from traf fic condi‐
tions and you may lose cont rol of theve hicle. #
Only use the cup holder when theve hi‐
cle is stationar y. #
Only use the cup holder for containers
of theright size. #
Alw ays close the conta iner, particularly
if th e liquid is hot. *
NO
TEDama getothe cup holder When
there ar armrest is folded back the cup
holder could become damaged. #
Only fold there ar armrest back when
th e cup holder is closed. *
NO
TEDama getothere ar armrest due to
body weight When
folded out, there ar armrest can be
damaged bybody weight. #
Do not sit or support yourself on the
re ar seat armrest. Seats and
stowing 109
Page 114 of 481
R
secure the load using the tie-down eyes and
distribute the load evenly. St
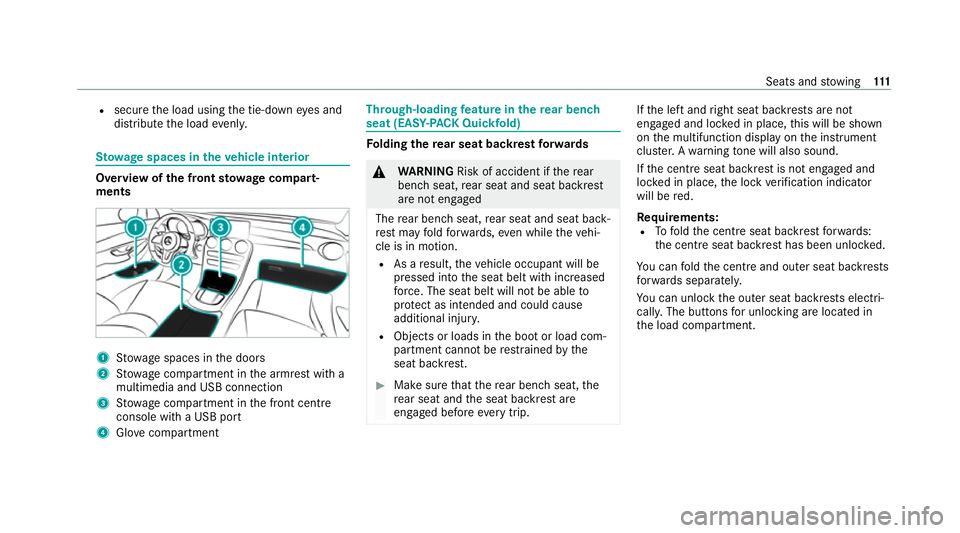
ow age spaces in theve hicle interior Overview of
the front stowage compa rt‐
ments 1
Stow age spaces in the doors
2 Stow age compartment in the armrest with a
multimedia and USB connection
3 Stow age compartment in the front cent re
console with a USB port
4 Glovecompa rtment Through-loading
feature in there ar ben ch
seat (EAS Y-PA CK Quickfold) Fo
lding there ar seat backrest forw ards &
WARNING Risk of accident if there ar
ben chseat, rear seat and seat backrest
are not engaged
The rear ben chseat, rear seat and seat back‐
re st may fold forw ards, even while theve hi‐
cle is in motion.
R As a result, theve hicle occupant will be
pressed into the seat belt with increased
fo rc e. The seat belt will not be able to
pr otect as intended and could cause
additional injur y.
R Objects or loads in the boot or load com‐
partment cann otbe restra ined bythe
seat backrest. #
Make sure that there ar ben chseat, the
re ar seat and the seat backrest are
engaged before everytrip. If
th e left and right seat backrests are not
engaged and loc ked in place, this will be shown
on the multifunction display on the instrument
clus ter.A wa rning tone will also sound.
If th e cent reseat backrest is not engaged and
loc ked in place, the lock verification indicator
will be red.
Re quirements:
R Tofold the cent reseat backrest forw ards:
th e cent reseat backrest has been unloc ked.
Yo u can fold the cent reand outer seat backrests
fo rw ards separatel y.
Yo u can unlo ckthe outer seat backrests electri‐
cally. The buttons for unlocking are located in
th e load compartment. Seats and
stowing 111
Page 115 of 481
#
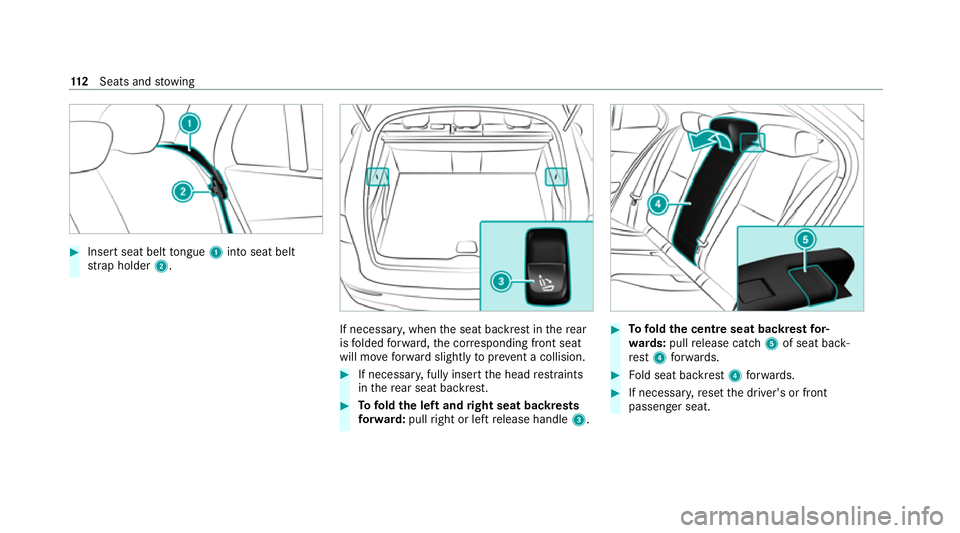
Insert seat belt tongue 1into seat belt
st ra p holder 2. If necessar
y,when the seat backrest in there ar
is folded forw ard, the cor responding front seat
will mo veforw ard slightly toprev ent a collision. #
If necessar y,fully insert the head restra ints
in there ar seat backrest. #
Tofold the left and right seat backrests
fo rw ard: pullright or left release handle 3. #
Tofold the centre seat backrest for‐
wa rds: pull release cat ch5 of seat back‐
re st 4 forw ards. #
Fold seat backrest 4forw ards. #
If necessar y,reset the driver's or front
passenger seat. 11 2
Seats and stowing
Page 116 of 481
Fo
lding back there ar seat backrest &
WARNING Risk of becoming trapped
when adjusting the seats
When you adjust a seat, you may trap your‐
self or a vehicle occupant. #
When adjusting a seat, make sure that
no one has any body parts in the sweep
of the seat. *
NO
TEDama gecaused bytrapping the
seat belt when folding back the seat
backrest The seat belt could become trapped and
thus
be damaged when the seat backrest is folded
bac k. #
Make sure that the seat belt is not trap‐
ped when folding back the seat back‐
re st. #
Movethe driver's or front passenger seat for‐
wa rds, if necessar y. #
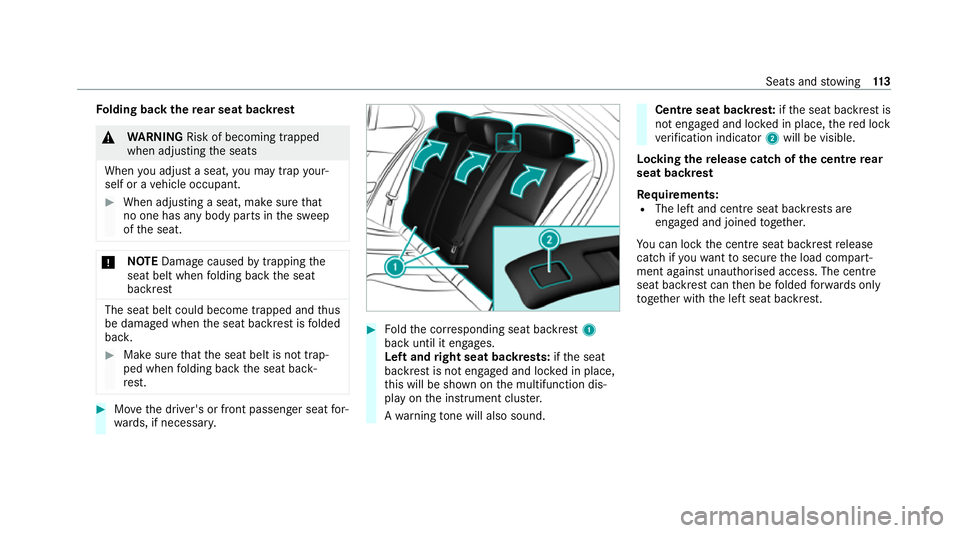
Foldthe cor responding seat backrest 1
back until it engages.
Left and right seat backrests: ifth e seat
backrest is not engaged and loc ked in place,
th is will be shown on the multifunction dis‐
play on the instrument clus ter.
A wa rning tone will also sound. Centre seat backres
t:ifth e seat backrest is
not engaged and loc ked in place, there d lock
ve rification indicator 2will be visible.
Lo cking there lease catch of the centre rear
seat backrest
Re quirements:
R The left and centre seat backrests are
engaged and joined toge ther.
Yo u can lock the cent reseat backrest release
cat chifyo uwa nttosecure the load compart‐
ment against unauthorised access. The cent re
seat backrest can then be folded forw ards only
to get her with the left seat backrest. Seats and
stowing 11 3
Page 117 of 481
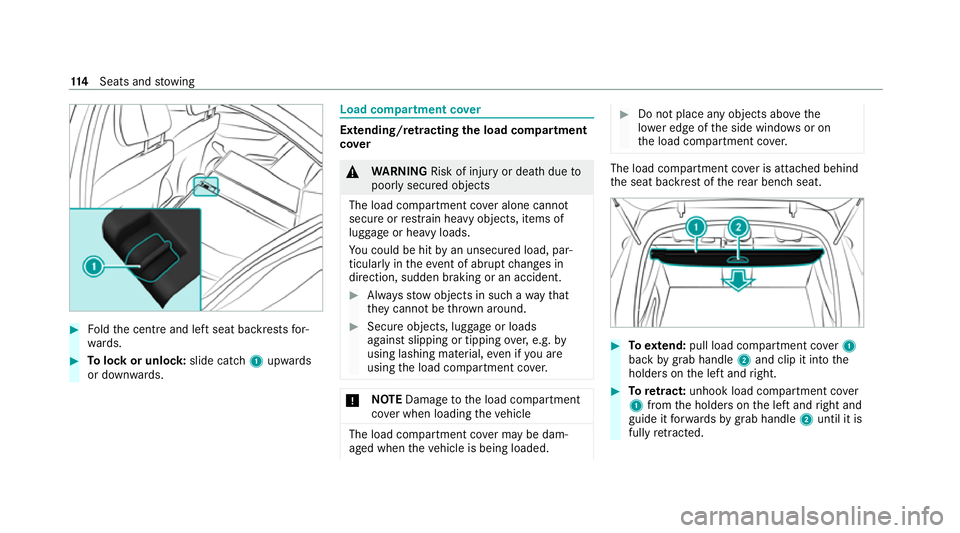
#
Foldthe cent reand left seat backrests for‐
wa rds. #
Tolock or unlock: slide catch1 upwards
or down wards. Load compartment co
ver Extending/r
etra cting the load compa rtment
co ver &
WARNING Risk of injury or death dueto
poorly secured objects
The load compartment co ver alone cannot
secure or restra in heavy objects, items of
luggage or heavy loads.
Yo u could be hit byan unsecured load, par‐
ticular lyin theev ent of abrupt changes in
direction, sudden braking or an accident. #
Alw aysstow objects in such a wayth at
th ey cannot be thro wn around. #
Secure objects, luggage or loads
against slipping or tipping over,e.g. by
using lashing material, even if you are
using the load compartment co ver. *
NO
TEDama getothe load compartment
co ver when loading theve hicle The load compartment co
ver may be dam‐
aged when theve hicle is being loaded. #
Do not place any objects abo vethe
lo we r edge of the side windo wsor on
th e load compartment co ver. The load compartment co
ver is attached behind
th e seat backrest of there ar ben chseat. #
Toextend: pull load compartment co ver1
back bygrab handle 2and clip it into the
holders on the left and right. #
Toretract: unhook load compa rtment co ver
1 from the holders on the left and right and
guide it forw ards bygrab handle 2until it is
fully retracted. 11 4
Seats and stowing
Page 120 of 481
At
taching the luggage net &
WARNING Risk of injury duetoobjects
being stowed incor rectly
If objects in theve hicle interior are stowed
incor rectly, they can slide or be thrown
around and hit vehicle occupants. In addi‐
tion, cup holders, open stowage spaces and
mobile phone brac kets cann otalw aysre tain
all objects they contain.
The reis a risk of injur y,particularly in the
ev ent of braking manoeuvres or abrupt
ch anges in direction. #
Alw aysstow objects so that they can‐
not be throw n around in su chsitua‐
tions. #
Alw ays make sure that objects do not
pr otru de from stowage spaces, luggage
nets or stowage nets. #
Close the loc kable stow age spaces
before starting a journe y. #
Stow and secure objects that are heavy,
hard, poin ted, sharp-edged, fragile or
to o lar geinthe load compartment. Obser
vethe no tes on loading theve hicle. #
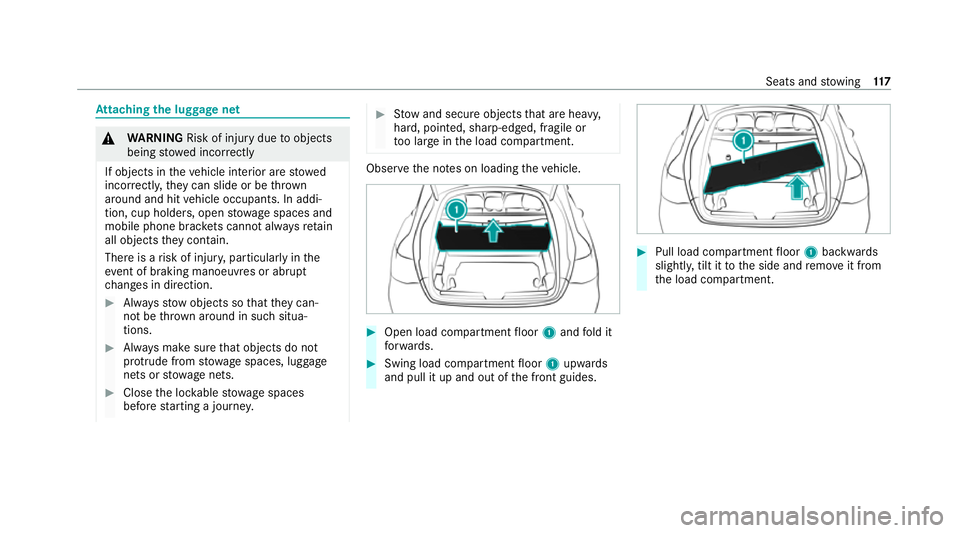
Open load compartment floor 1and fold it
fo rw ards. #
Swing load compartment floor 1upwards
and pull it up and out of the front guides. #
Pull load compartment floor 1backwards
slightl y,tilt it tothe side and remo veit from
th e load compartment. Seats and
stowing 117
Page 121 of 481
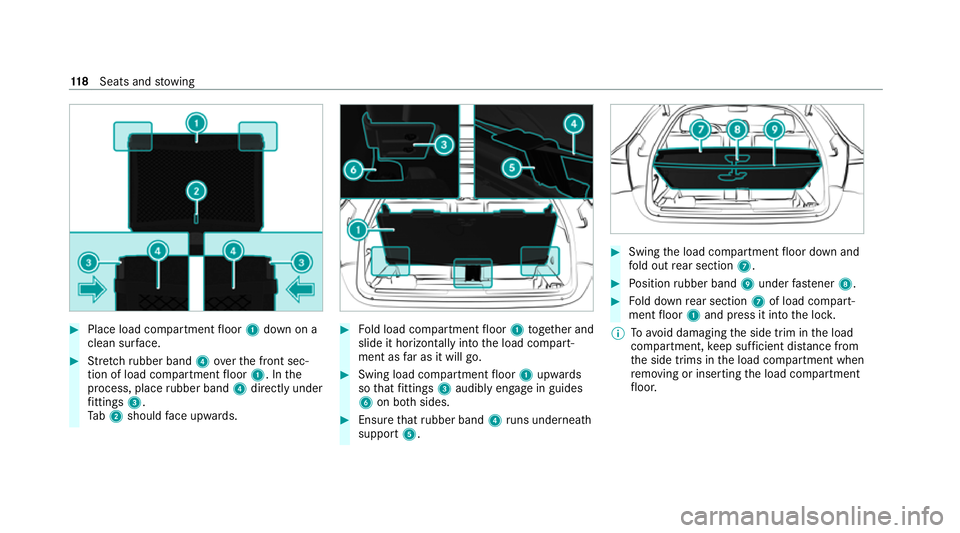
#
Place load compartment floor 1down on a
clean sur face. #
Stretch rubber band 4overth e front sec‐
tion of load compartment floor 1. In the
process, place rubber band 4directly under
fi ttings 3.
Ta b2 should face upwa rds. #
Fold load compartment floor 1toge ther and
slide it horizon tally into the load compart‐
ment as far as it will go. #
Swing load compartment floor 1upwards
so that fittings 3audibly engage in guides
6 on bo thsides. #
Ensure that rubber band 4runs undernea th
support 5. #
Swing the load compartment floor down and
fo ld out rear section 7. #
Position rubber band 9under fastener 8. #
Fold down rear section 7of load compart‐
ment floor 1and press it into the loc k.
% Toavo id damaging the side trim in the load
compartment, keep suf ficient dist ance from
th e side trims in the load compartment when
re moving or inserting the load compartment
fl oor. 11 8
Seats and stowing