Page 117 of 481

#
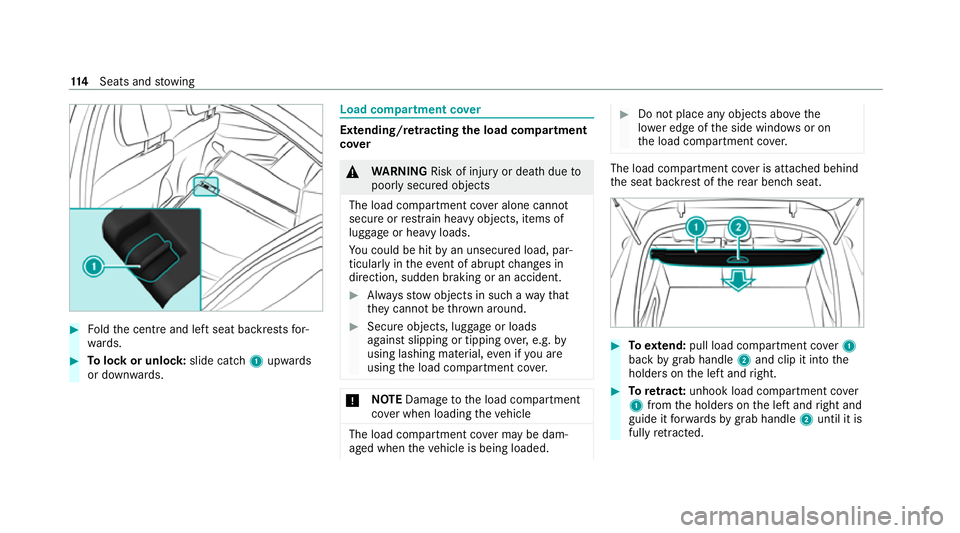
Foldthe cent reand left seat backrests for‐
wa rds. #
Tolock or unlock: slide catch1 upwards
or down wards. Load compartment co
ver Extending/r
etra cting the load compa rtment
co ver &
WARNING Risk of injury or death dueto
poorly secured objects
The load compartment co ver alone cannot
secure or restra in heavy objects, items of
luggage or heavy loads.
Yo u could be hit byan unsecured load, par‐
ticular lyin theev ent of abrupt changes in
direction, sudden braking or an accident. #
Alw aysstow objects in such a wayth at
th ey cannot be thro wn around. #
Secure objects, luggage or loads
against slipping or tipping over,e.g. by
using lashing material, even if you are
using the load compartment co ver. *
NO
TEDama getothe load compartment
co ver when loading theve hicle The load compartment co
ver may be dam‐
aged when theve hicle is being loaded. #
Do not place any objects abo vethe
lo we r edge of the side windo wsor on
th e load compartment co ver. The load compartment co
ver is attached behind
th e seat backrest of there ar ben chseat. #
Toextend: pull load compartment co ver1
back bygrab handle 2and clip it into the
holders on the left and right. #
Toretract: unhook load compa rtment co ver
1 from the holders on the left and right and
guide it forw ards bygrab handle 2until it is
fully retracted. 11 4
Seats and stowing
Page 118 of 481
Installing and
removing the load co mpart‐
ment co ver
Re quirements:
R The load compartment co ver is retracted.
Re moving the load co mpartment co ver #
Press in the end cap of the load compart‐
ment co ver1 ontheright- or left-hand side. #
Push the load compartment co ver1 into
th ere cess 2onthe opposite side. #
Take the load compartment co ver1 out by
pulling it upwards. Fi
tting the load co mpartment co ver #
Place the load compartment co ver1 inthe
re cess 2onthe left- or right-hand side. #
Press in the end cap of the load compart‐
ment co ver1 onthe opposite side and
insert the load compartment co ver1 into
th eot her recess 2. #
Slide the end cap outwards. Overview of
the tie-down eyes Obser
vethe no tes on loading theve hicle
(/ page 108). 1
Tie-down eyes Overview of bag hooks
&
WARNING Risk of injury when using bag
hooks with heavy objects
The bag hooks cannot restra in heavy objects
or items of luggage. Seats and
stowing 11 5
Page 119 of 481
Objects or items of luggage may be
flung
around and hit vehicle occupants. #
Only hang light objects on the bag
hooks. #
Never hang hard, sharp-edged or fragile
objects on the bag hooks. Obser
vethe no tes on loading theve hicle
(/ page 108).
Subject the bag hooks toa maximum load of
3 kg and do not attach any goods tothem. 1
Bag hook Overview of clo
thes hooks on the tailgate Obser
vethe no tes on loading theve hicle
(/ page 108). 1
Clot hes hook
The clo thes hooks are not suitable for hanging
heavy objects as this can cause theta ilgate to
lo we r auto matical ly. Use the clo thes hooks only
fo r light objects such as jac kets. 11 6
Seats and stowing
Page 120 of 481

At
taching the luggage net &
WARNING Risk of injury duetoobjects
being stowed incor rectly
If objects in theve hicle interior are stowed
incor rectly, they can slide or be thrown
around and hit vehicle occupants. In addi‐
tion, cup holders, open stowage spaces and
mobile phone brac kets cann otalw aysre tain
all objects they contain.
The reis a risk of injur y,particularly in the
ev ent of braking manoeuvres or abrupt
ch anges in direction. #
Alw aysstow objects so that they can‐
not be throw n around in su chsitua‐
tions. #
Alw ays make sure that objects do not
pr otru de from stowage spaces, luggage
nets or stowage nets. #
Close the loc kable stow age spaces
before starting a journe y. #
Stow and secure objects that are heavy,
hard, poin ted, sharp-edged, fragile or
to o lar geinthe load compartment. Obser
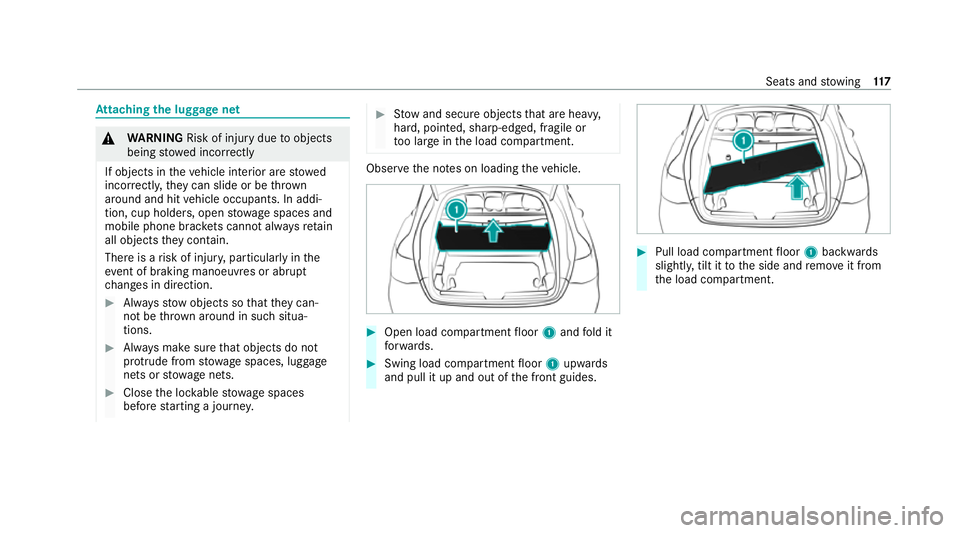
vethe no tes on loading theve hicle. #
Open load compartment floor 1and fold it
fo rw ards. #
Swing load compartment floor 1upwards
and pull it up and out of the front guides. #
Pull load compartment floor 1backwards
slightl y,tilt it tothe side and remo veit from
th e load compartment. Seats and
stowing 117
Page 121 of 481
#
Place load compartment floor 1down on a
clean sur face. #
Stretch rubber band 4overth e front sec‐
tion of load compartment floor 1. In the
process, place rubber band 4directly under
fi ttings 3.
Ta b2 should face upwa rds. #
Fold load compartment floor 1toge ther and
slide it horizon tally into the load compart‐
ment as far as it will go. #
Swing load compartment floor 1upwards
so that fittings 3audibly engage in guides
6 on bo thsides. #
Ensure that rubber band 4runs undernea th
support 5. #
Swing the load compartment floor down and
fo ld out rear section 7. #
Position rubber band 9under fastener 8. #
Fold down rear section 7of load compart‐
ment floor 1and press it into the loc k.
% Toavo id damaging the side trim in the load
compartment, keep suf ficient dist ance from
th e side trims in the load compartment when
re moving or inserting the load compartment
fl oor. 11 8
Seats and stowing
Page 122 of 481
EAS
Y-PA CK load-securing kit Note
s onthe snap-in module for the load
co mp artment (telescopic rods)
The EAS Y-PA CK load-securing kit allo wsyouto
use your load co mpartment for a variet y of pur‐
poses. The comp onents are located in thestow‐
age space under the load compartment floor. 1
Telescopic rod with mounting elements and
holders Installing a
telescopic rod &
WARNING Risk of injury duetoan open
load compartment floor
If yo u drive with the load compartment floor
open, objects could be flung around and hit
ve hicle occupants as a result. There is a risk
of injur y,particularly in theeve nt of sudden
braking or a sudden change in direction. #
Alw ays close the load compartment
fl oor before a journe y. #
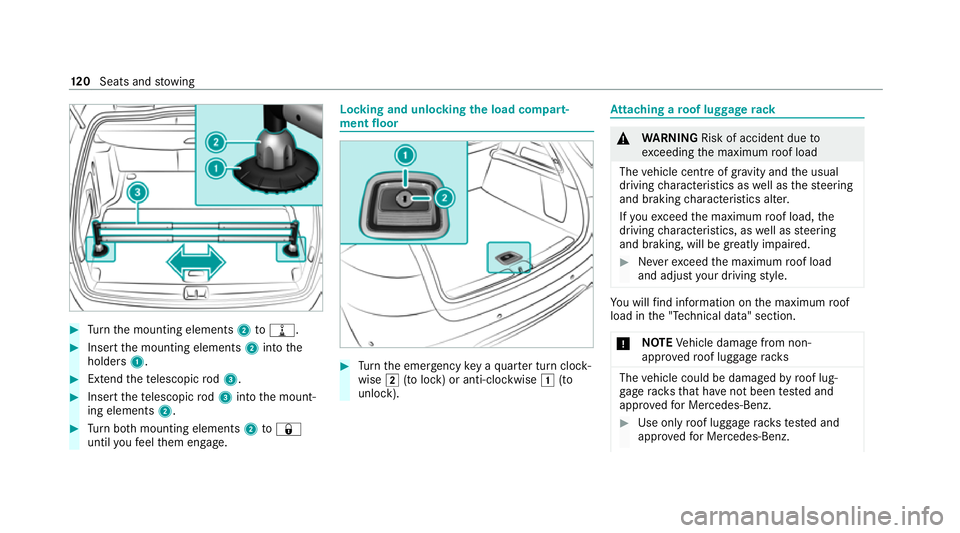
Open the load compartment floor . #
Attach the holders 1inthe desired position
to the side of the load compartment floor. #
Close the load compartment floor. Seats and
stowing 11 9
Page 123 of 481

#
Turn the mounting elements 2to= . #
Insert the mounting elements 2into the
holders 1. #
Extend thete lescopic rod3. #
Insert thete lescopic rod3 into the mount‐
ing elements 2.#
Turn both mounting elements 2to&
until youfe el them engage. Locking and unlocking
the load compa rt‐
ment floor #
Turn the emer gency key a quarter turn clock‐
wise 2(to lock) or anti-clockwise 1(to
unlock). At
taching a roof luggage rack &
WARNING Risk of accident due to
exc eeding the maximum roof load
The vehicle centre of gravity and the usual
driving characteristics as well as thesteering
and braking characteristics alter.
If yo uexc eed the maximum roof load, the
driving characteristics, as well as steering
and braking, will be greatly impaired. #
Neverexc eed the maximum roof load
and adjust your driving style. Yo
u will find information on the maximum roof
load in the "Technical data" section.
* NO
TEVehicle damage from non-
appr ovedro of luggage racks The
vehicle could be damaged byroof lug‐
ga ge rack sth at ha venot been tested and
appr ovedfo r Mercedes-Benz. #
Use only roof luggage rack ste sted and
appr ovedfo r Mercedes-Benz. 12 0
Seats and stowing
Page 124 of 481

#
Depending on theve hicle equipment,
ensure that the sliding sunroof can be
fully raised when thero of luggage rack
is fitted. #
Depending on theve hicle equipment,
ensure that theta ilgate can be fully
opened when thero of luggage rack is
fi tted. #
Position the load on thero of luggage
ra ck in such a wayth at theve hicle will
not sus tain damage even when it is in
motion. *
NO
TEDama getothe co vers The co
vers may be dama ged and scratched
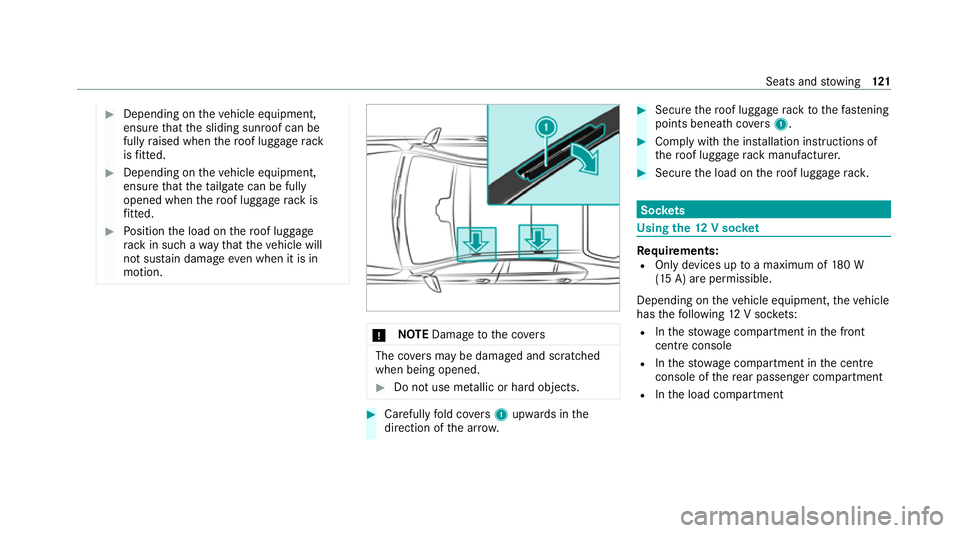
when being opened. #
Do not use me tallic or hard objects. #
Carefully fold co vers 1 upwards in the
direction of the ar row. #
Secu rethero of luggage rack tothefast ening
points beneath co vers 1 . #
Comply with the ins tallation instructions of
th ero of luggage rack manufacturer. #
Secure the load on thero of luggage rack. Soc
kets Using the
12V so cket Re
quirements:
R Only devices up toa maximum of 180 W
(15 A) are permissible.
Depending on theve hicle equipment, theve hicle
has thefo llowing 12V soc kets:
R Inthestow age compartment in the front
cent reconsole
R Inthestow age compartment in the cent re
console of there ar passenger compartment
R Inthe load compartment Seats and
stowing 121