Page 472 of 594
No.FUSE RAT-
ING PROTECTED COMPONENT
F16 15 A Illumination
F17 10 A Brake lights
F18 10 A Reverse lights
F19 10 A Rear turn signal lights
F20 10 A Taillights
F21 10 A Taillights
F22 7.5 A
Air bag
*
F23 ――
Maintenance and Care
Owner Maintenance
6-42*Some models.
CX-30_8JP5-EA-20K_Edition1_new 2020-7-22 15:50:09
Page 486 of 594

WARNING
Do not install the temporary spare tire
on the front wheels (driving wheels):
Driving with the temporary spare tire
on one of the front driving wheels is
dangerous. Handling will be affected.
You could lose control of the vehicle,
especially on ice or snow bound roads,
and have an accident. Move a regular
tire to the front wheel and install the
temporary spare tire to the rear.
CAUTION
When using the temporary spare tire,
driving stability may decrease
compared to when using only the
conventional tire. Drive carefully.
To avoid damage to the temporary
spare tire or to the vehicle, observe
the following precautions:
Do not exceed 80 km/h (50 mph).
Avoid driving over obstacles. Also,
do not drive through an automatic
car wash. This tire's diameter is
smaller than a conventional tire, so
the ground clearance is reduced.
Do not use a tire chain on this tire
because it will not fit properly.
Do not use your temporary spare
tire on any other vehicle, it has
been designed only for your
Mazda.
Use only one temporary spare tire
on your vehicle at the same time.
To remove the spare tire
1. Remove the luggage mat.
2.(Vehicles with sub-woofer)
Uncouple the sub-woofer
connector.
NOTE
Extra strength may be required to
uncouple the connector. Be sure to
squeeze the tab firmly.
3. (Vehicles with sub-woofer)
Turn the spare tire hold-down bolt
counterclockwise and remove the
sub-woofer and the spare tire.
If Trouble Arises
Flat Tire
7-4
CX-30_8JP5-EA-20K_Edition1_new 2020-7-22 15:50:09
Page 490 of 594

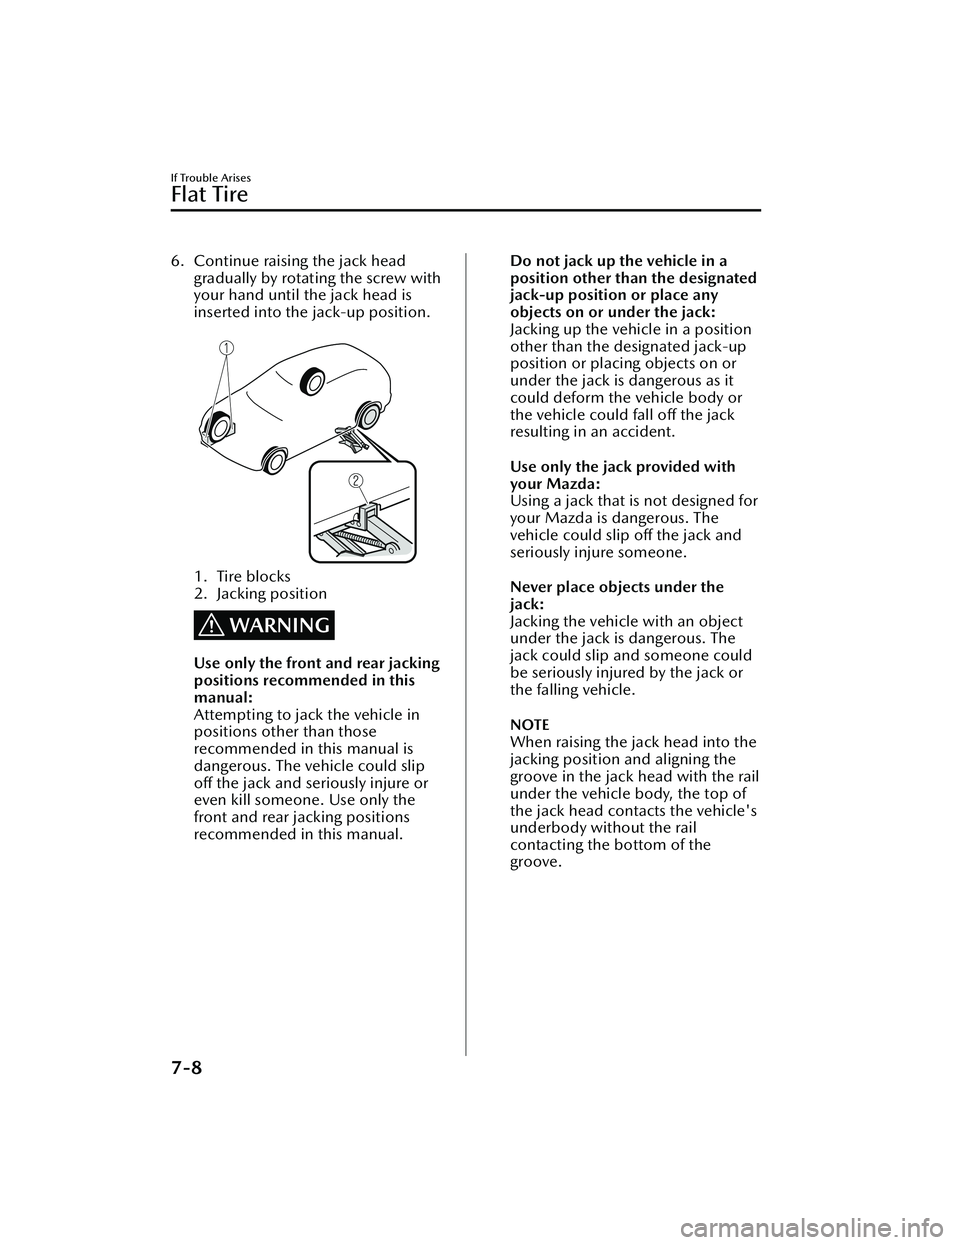
6. Continue raising the jack headgradually by rotating the screw with
your hand until the jack head is
inserted into the jack-up position.
1. Tire blocks
2. Jacking position
WARNING
Use only the front and rear jacking
positions recommended in this
manual:
Attempting to jack the vehicle in
positions other than those
recommended in this manual is
dangerous. The vehicle could slip
off the jack and seriously injure or
even kill someone. Use only the
front and rear jacking positions
recommended in this manual.
Do not jack up the vehicle in a
position other than the designated
jack-up position or place any
objects on or under the jack:
Jacking up the vehicle in a position
other than the designated jack-up
position or placing objects on or
under the jack is dangerous as it
could deform the vehicle body or
the vehicle could fall off the jack
resulting in an accident.
Use only the jack provided with
your Mazda:
Using a jack that is not designed for
your Mazda is dangerous. The
vehicle could slip off the jack and
seriously injure someone.
Never place objects under the
jack:
Jacking the vehicle with an object
under the jack is dangerous. The
jack could slip and someone could
be seriously injured by the jack or
the falling vehicle.
NOTE
When raising the jack head into the
jacking position and aligning the
groove in the jack head with the rail
under the vehicle body, the top of
the jack head contacts the vehicle's
underbody without the rail
contacting the bottom of the
groove.
If Trouble Arises
Flat Tire
7-8
CX-30_8JP5-EA-20K_Edition1_new 2020-7-22 15:50:09
Page 493 of 594

3. Install the lug nuts with the bevelededge inward; tighten them by hand.
WARNING
Do not apply oil or grease to lug
nuts and bolts and do not tighten
the lug nuts beyond the
recommended tightening torque:
Applying oil or grease to lug nuts
and bolts is dangerous. The lug nuts
could loosen while driving and
cause the tire to come off, resulting
in an accident. In addition, lug nuts
and bolts could be damaged if
tightened more than necessary.
4. Turn the jack handle counterclockwise using the lug
wrench and lower the vehicle.
5. Use the lug wrench to tighten the nuts in the order shown.
If you are unsure of how tight the
nuts should be, have them
inspected at an Authorized Mazda
Dealer.
Nut tightening torque
N·m (kgf·m, ft·lbf) 108―
147 (12 ―14,
80― 108)
WARNING
Always securely and correctly
tighten the lug nuts:
Improperly or loosely tightened lug
nuts are dangerous. The wheel
could wobble or come off. This
could result in loss of vehicle
control and cause a serious
accident.
Be sure to reinstall the same nuts
you removed or replace them with
metric nuts of the same
configuration:
Because the wheel studs and lug
nuts on your Mazda have metric
threads, using a non-metric nut is
dangerous. On a metric stud, it
would not secure the wheel and
would damage the stud, which
could cause the wheel to slip
off
and cause an accident.
6. (Aluminum wheel equipped
vehicle)
Remove the center cap by tapping
it from the backside of the wheel
using the lug wrench.
7. (Without
flat tire belt)
Store the damaged and/or flat tire
in the rear cargo area.
(With flat tire belt)
Open the luggage mat.
8. Remove the belt for securing the
flat tire.
If Trouble Arises
Flat Tire
7-11
CX-30_8JP5-EA-20K_Edition1_new 2020-7-22 15:50:09
Page 494 of 594

9. Put the flat tire into the liftgate onthe left and toward the back.
10.Fold the right side of the rearseatback forward.
11.Thread the belt through the rear seat as shown in the figure.
12.Thread the buckle through thewheel as shown in the figure and
secure it so that the buckle does
not contact the wheel.
13.Thread the belt through the buckle,then pull the belt end to secure the
flat tire.
14.Return the seatback on the rightside of the rear seat to its original
position.
15.Remove the tire blocks and store the tools and jack.
16.Check the inflation pressure. Refer to Tires on page 9-8.
17.Have the flat tire repaired or replaced as soon as possible.
WARNING
Do not drive with any tires that have
incorrect air pressure:
Driving on tires with incorrect air
pressure is dangerous. Tires with
incorrect pressure could affect
handling and result in an accident.
When you check the regular tires' air
pressure, check the spare tire, too.
NOTE
To prevent the jack and tool from
rattling, store them properly.
If Trouble Arises
Flat Tire
7-12
CX-30_8JP5-EA-20K_Edition1_new 2020-7-22 15:50:09
Page 501 of 594

To w i n g D e s c r i p t i o n
▼Towing Description
We recommend that towing be done
only by an Authorized Mazda Dealer
or a commercial tow-truck service.
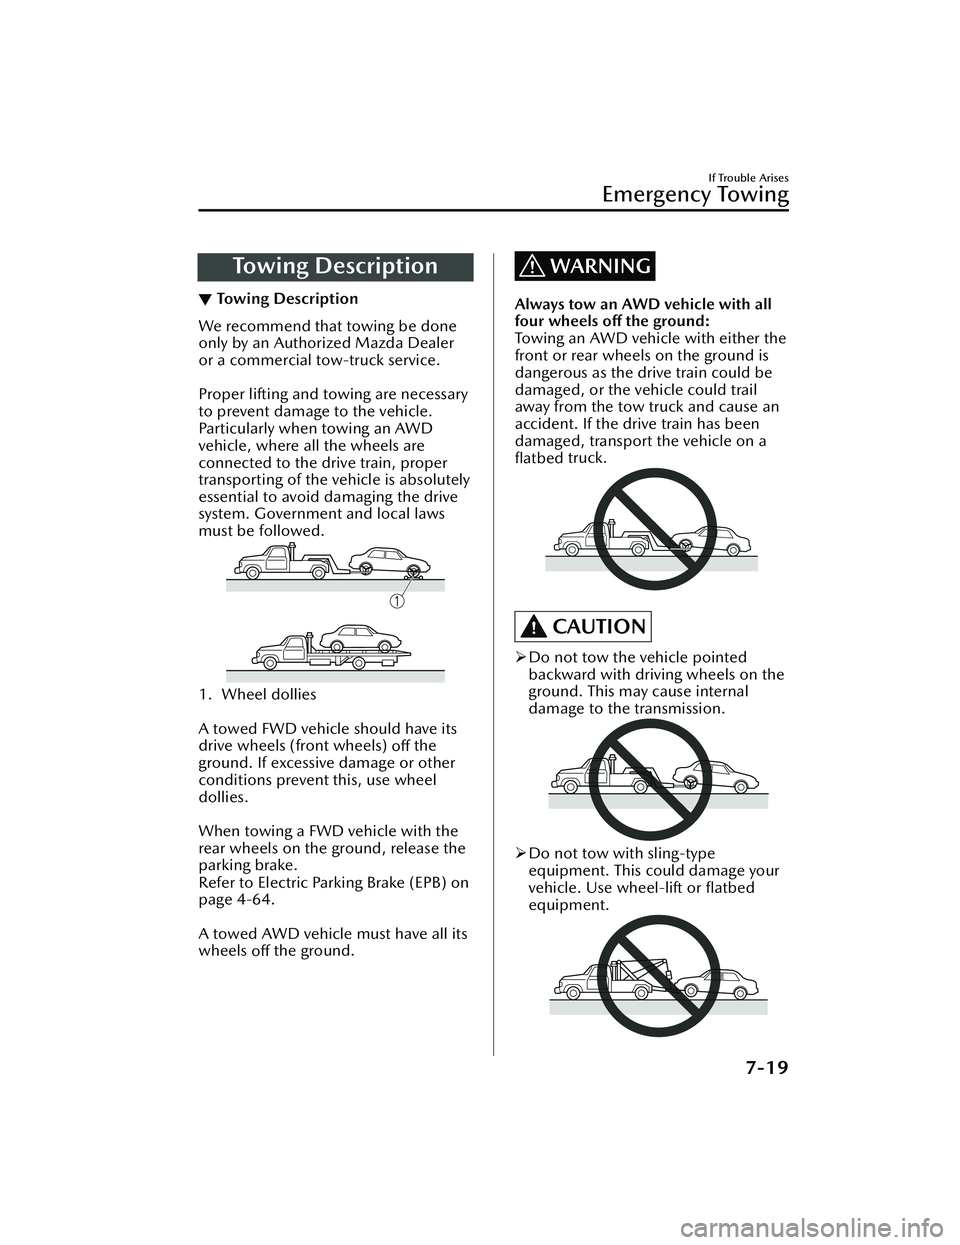
Proper lifting and towing are necessary
to prevent damage to the vehicle.
Particularly when towing an AWD
vehicle, where all the wheels are
connected to the drive train, proper
transporting of the vehicle is absolutely
essential to avoid damaging the drive
system. Government and local laws
must be followed.
1. Wheel dollies
A towed FWD vehicle should have its
drive wheels (front wheels)
off the
ground. If excessive damage or other
conditions prevent this, use wheel
dollies.
When towing a FWD vehicle with the
rear wheels on the ground, release the
parking brake.
Refer to Electric Parking Brake (EPB) on
page 4-64.
A towed AWD vehicle must have all its
wheels off the ground.
WARNING
Always tow an AWD vehicle with all
four wheels
off the ground:
Towing an AWD vehicle with either the
front or rear wheels on the ground is
dangerous as the drive train could be
damaged, or the vehicle could trail
away from the tow truck and cause an
accident. If the drive train has been
damaged, transport the vehicle on a
flatbed truck.
CAUTION
Do not tow the vehicle pointed
backward with driving wheels on the
ground. This may cause internal
damage to the transmission.
Do not tow with sling-type
equipment. This could damage your
vehicle. Use wheel-lift or flatbed
equipment.
If Trouble Arises
Emergency Towing
7-19
CX-30_8JP5-EA-20K_Edition1_new 2020-7-22 15:50:09
Page 502 of 594
If the parking brake cannot be
released when towing the vehicle,
transport the vehicle with all front
and rear wheels raised off the ground
as shown in the figure. If the vehicle
is towed without raising the wheels
off the ground, the brake system
could be damaged.
1. Wheel dollies
Tiedown Hooks*
▼ Tiedown Hooks
CAUTION
Do not use the front and rear tiedown
eyelets for towing the vehicle.
They have been designed only for
securing the vehicle to a transport
vessel during shipping.
Using the eyelets for any other purpose
could result in the vehicle being
damaged.
1. Remove the tiedown eyelet and the
lug wrench from the luggage
compartment (page 7-3).
2. Wrap a flathead screwdriver or similar tool with a soft cloth to
prevent damage to a painted
bumper, and open the cap located
on the front or rear bumper.
Front
If Trouble Arises
Emergency Towing
7-20*Some models.
CX-30_8JP5-EA-20K_Edition1_new 2020-7-22 15:50:09
Page 503 of 594
Rear
CAUTION
Do not use excessive force as it may
damage the cap or scratch the
painted bumper surface.
NOTE
Remove the cap completely and
store it so as not to lose it.
3. Securely install the tiedown eyelet using the lug wrench.
Front
1. Lug wrench
2. Tiedown eyelet
Rear
1. Lug wrench
2. Tiedown eyelet
4. Hook the tying rope to the tiedown eyelet.
CAUTION
If the tiedown eyelet is not securely
tightened, it may loosen or
disengage from the bumper when
tying the vehicle. Make sure that
the tiedown eyelet is securely
tightened to the bumper.
If Trouble Arises
Emergency Towing
7-21
CX-30_8JP5-EA-20K_Edition1_new 2020-7-22 15:50:09