2021 LINCOLN CORSAIR heating
[x] Cancel search: heatingPage 101 of 638

1. Unlock the steering column.
2.
Adjust the steering wheel to the desired
position. 3. Lock the steering column. RESETTING THE STOPPING
POSITION - VEHICLES WITH:
POWER ADJUSTABLE STEERING
COLUMN
Note:
The steering wheel stops when it
detects an obstruction. This sets a new
stopping position.
To reset the steering column to its normal
stopping position:
1. Confirm there is nothing obstructing the motion of the steering column.
2. Press and hold the steering column control until the steering column stops
moving.
3. Press the steering column control again.
Note: The steering column may start to move
again.
4. When the steering column stops, continue holding the control for a few
seconds.
5. Repeat for each direction, as necessary. HORN Press on the center of the steering
wheel near the horn icon to
activate the horn.
SWITCHING THE HEATED
STEERING WHEEL ON (IF EQUIPPED) Press the button on the climate
control.
Note: You can use the heated steering
wheel only when the engine is running.
Note: The system uses a sensor and is
designed to control the temperature of the
steering wheel and to prevent it from
overheating.
Note: In warm temperatures, the steering
wheel quickly reaches its maximum
temperature and the system reduces the
current to the heating element. This could
cause you to think that the system has
stopped working but it has not. This is
normal.
98
Corsair (CTF) Canada/United States of America, enUSA, Edition date: 202007, First-Printing Steering WheelE279962 E270945
Page 126 of 638

Information display.
E
Engine coolant temperature gauge.
F
Information Bar
Displays information related to the
navigation, outside air temperature,
odometer and distance to empty.
Distance to Empty - Indicates the
approximate distance your vehicle can travel
on the fuel remaining in the tank. Changes
in driving pattern can cause the value to not
only decrease but also increase or stay
constant for periods of time.
Information Display
Information that appears depends on your
vehicle settings. See General Information
(page 131). Engine Coolant Temperature Gauge
Shows the temperature of the engine
coolant. At normal operating temperature,
the needle remains in the center section. If
the needle enters the red section, the engine
is overheating. Stop the engine, switch the
ignition off and determine the cause once
the engine has cooled down.
Note:
Do not restart the engine until the
cause of the overheating has been resolved. WARNING:
Do not remove the
coolant reservoir cap when the engine is
on or the cooling system is hot. Wait 10
minutes for the cooling system to cool
down. Cover the coolant reservoir cap with
a thick cloth to prevent the possibility of
scalding and slowly remove the cap.
Failure to follow this instruction could result
in personal injury. Fuel Gauge
The fuel gauge indicates about how much
fuel is in the fuel tank.
The arrow adjacent to the fuel pump symbol
indicates on which side of your vehicle the
fuel filler door is located.
Note:
The fuel gauge may vary slightly when
your vehicle is moving or on a slope.
Low Fuel Reminder
A low fuel level reminder displays and
sounds when the distance to empty reaches
75 mi (120 km) to empty for MyKey, and at
50 mi (80 km), 25 mi (40 km), 10 mi (20 km)
and 0 mi (0 km) for all vehicle keys.
Note: The low fuel reminder can appear at
different fuel gauge positions depending on
fuel economy conditions. This variation is
normal.
123
Corsair (CTF) Canada/United States of America, enUSA, Edition date: 202007, First-Printing Instrument Cluster
Page 144 of 638
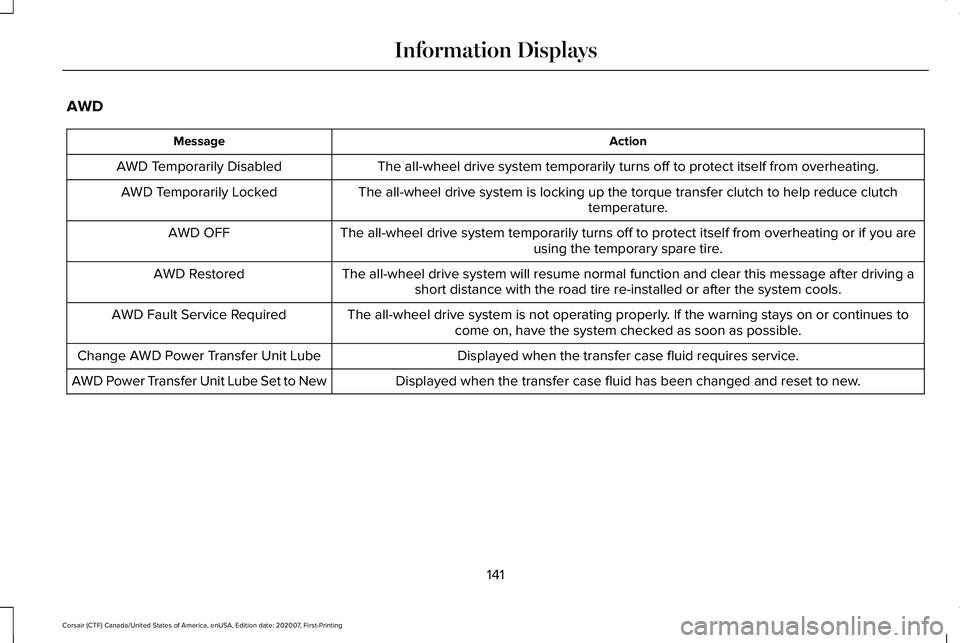
AWD
Action
Message
The all-wheel drive system temporarily turns off to protect itself from \
overheating.
AWD Temporarily Disabled
The all-wheel drive system is locking up the torque transfer clutch to h\
elp reduce clutchtemperature.
AWD Temporarily Locked
The all-wheel drive system temporarily turns off to protect itself from \
overheating or if you areusing the temporary spare tire.
AWD OFF
The all-wheel drive system will resume normal function and clear this me\
ssage after driving ashort distance with the road tire re-installed or after the system cools\
.
AWD Restored
The all-wheel drive system is not operating properly. If the warning stays on or continues tocome on, have the system checked as soon as possible.
AWD Fault Service Required
Displayed when the transfer case fluid requires service.
Change AWD Power Transfer Unit Lube
Displayed when the transfer case fluid has been changed and reset to new\
.
AWD Power Transfer Unit Lube Set to New
141
Corsair (CTF) Canada/United States of America, enUSA, Edition date: 202007, First-Printing Information Displays
Page 159 of 638
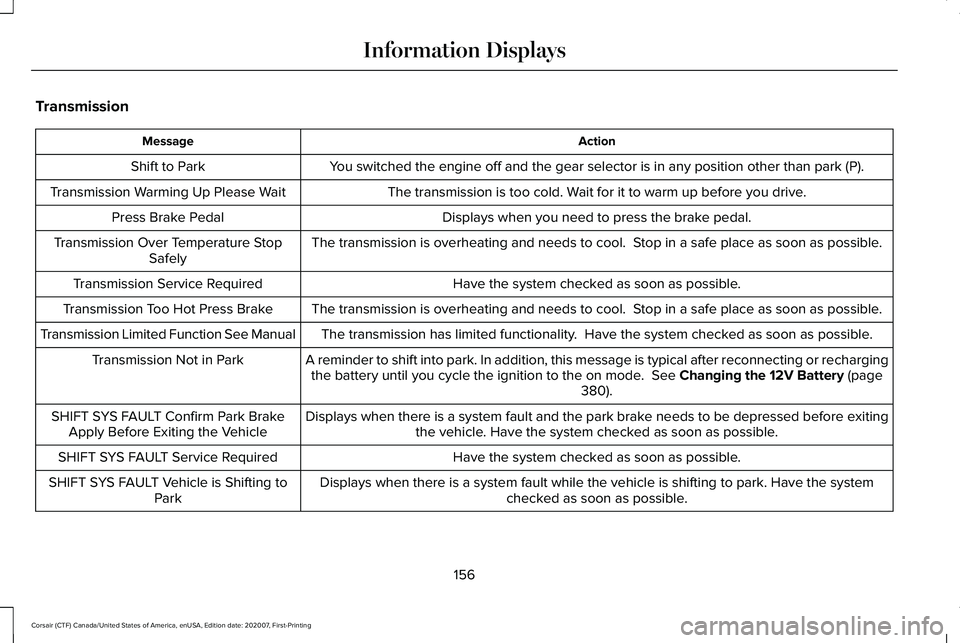
Transmission
Action
Message
You switched the engine off and the gear selector is in any position othe\
r than park (P).
Shift to Park
The transmission is too cold. Wait for it to warm up before you drive.
Transmission Warming Up Please Wait
Displays when you need to press the brake pedal.
Press Brake Pedal
The transmission is overheating and needs to cool. Stop in a safe place as soon as possible.
Transmission Over Temperature Stop
Safely
Have the system checked as soon as possible.
Transmission Service Required
The transmission is overheating and needs to cool. Stop in a safe place as soon as possible.
Transmission Too Hot Press Brake
The transmission has limited functionality. Have the system checked as soon as possible.
Transmission Limited Function See Manual
A reminder to shift into park. In addition, this message is typical afte\
r reconnecting or rechargingthe battery until you cycle the ignition to the on mode. See Changing the 12V Battery (page
380).
Transmission Not in Park
Displays when there is a system fault and the park brake needs to be depressed before exitingthe vehicle. Have the system checked as soon as possible.
SHIFT SYS FAULT Confirm Park Brake
Apply Before Exiting the Vehicle
Have the system checked as soon as possible.
SHIFT SYS FAULT Service Required
Displays when there is a system fault while the vehicle is shifting to p\
ark. Have the systemchecked as soon as possible.
SHIFT SYS FAULT Vehicle is Shifting to
Park
156
Corsair (CTF) Canada/United States of America, enUSA, Edition date: 202007, First-Printing Information Displays
Page 170 of 638

Note:
The system adjusts to heat or cool the
interior to the temperature you select as
quickly as possible.
Note: For the system to function efficiently,
the instrument panel and side air vents
should be fully open.
Note: If you select AUTO during cold outside
temperatures, the system directs air flow to
the windshield and side window air vents. In
addition, the blower motor may run at a
slower speed until the engine warms up.
Note: If you select
AUTO during hot
temperatures and the inside of the vehicle
is hot, the system uses recirculated air to
maximize interior cooling. Blower motor
speed may also reduce until the air cools.
Quickly Heating the Interior
1. Press and release
AUTO.
2. Adjust the temperature function to the setting you prefer.
Recommended Settings for Heating
1. Press and release
AUTO. 2. Adjust the temperature function to the
setting you prefer. Use
72°F (22°C) as a
starting point, then adjust the setting as
necessary.
Quickly Cooling the Interior
1. Press and release
MAX A/C.
Recommended Settings for Cooling
1. Press and release
AUTO.
2. Adjust the temperature function to the setting you prefer. Use
72°F (22°C) as a
starting point, then adjust the setting as
necessary.
Defogging the Side Windows in Cold
Weather
1. Press and release defrost or maximum defrost.
2. Adjust the temperature control to the setting you prefer. Use
72°F (22°C) as a
starting point, then adjust the setting as
necessary. HEATED WINDSHIELD
(IF EQUIPPED)
Windshield Wiper De-Icer When you switch the heated rear
window on, the windshield wiper
de-icer turns on.
HEATED REAR WINDOW Press the button to clear the rear
window of thin ice and fog. The
heated rear window turns off after
a short period of time.
Note: Do not use harsh chemicals, razor
blades or other sharp objects to clean or
remove decals from the inside of the heated
rear window. The vehicle warranty may not
cover damage to the heated rear window
grid lines.
167
Corsair (CTF) Canada/United States of America, enUSA, Edition date: 202007, First-Printing Climate ControlE184884 E184884
Page 185 of 638
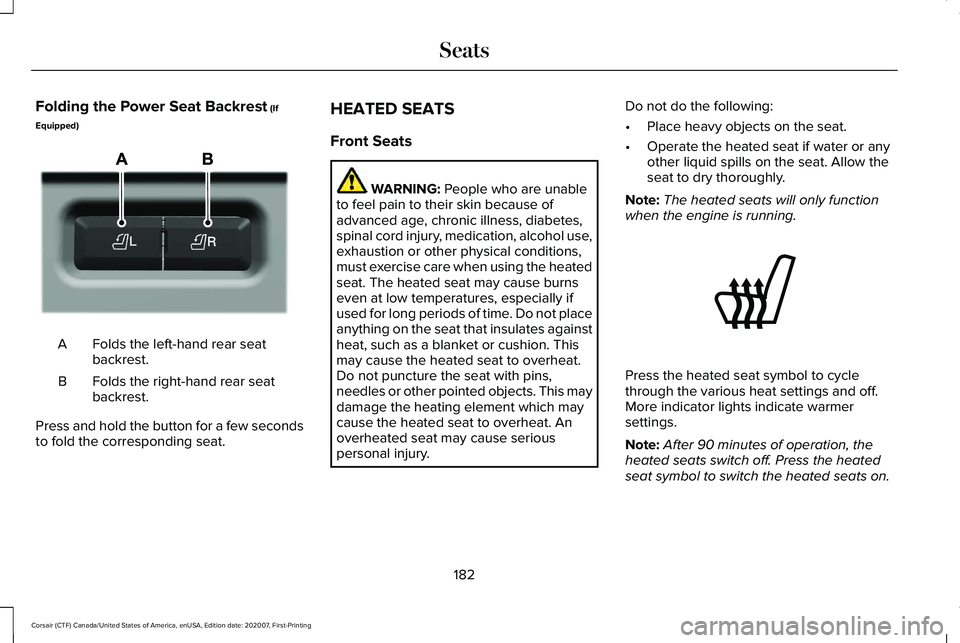
Folding the Power Seat Backrest (If
Equipped) Folds the left-hand rear seat
backrest.
A
Folds the right-hand rear seat
backrest.
B
Press and hold the button for a few seconds
to fold the corresponding seat. HEATED SEATS
Front Seats WARNING:
People who are unable
to feel pain to their skin because of
advanced age, chronic illness, diabetes,
spinal cord injury, medication, alcohol use,
exhaustion or other physical conditions,
must exercise care when using the heated
seat. The heated seat may cause burns
even at low temperatures, especially if
used for long periods of time. Do not place
anything on the seat that insulates against
heat, such as a blanket or cushion. This
may cause the heated seat to overheat.
Do not puncture the seat with pins,
needles or other pointed objects. This may
damage the heating element which may
cause the heated seat to overheat. An
overheated seat may cause serious
personal injury. Do not do the following:
•
Place heavy objects on the seat.
• Operate the heated seat if water or any
other liquid spills on the seat. Allow the
seat to dry thoroughly.
Note: The heated seats will only function
when the engine is running. Press the heated seat symbol to cycle
through the various heat settings and off.
More indicator lights indicate warmer
settings.
Note:
After 90 minutes of operation, the
heated seats switch off. Press the heated
seat symbol to switch the heated seats on.
182
Corsair (CTF) Canada/United States of America, enUSA, Edition date: 202007, First-Printing SeatsE298032 E146322
Page 186 of 638
Note:
Depending on your remote start
settings, the heated seats may remain on
after you remote start your vehicle. The
heated seats may also turn on when you
start your vehicle if they were on when your
vehicle was turned off.
Rear Seats (If Equipped) WARNING:
Persons who are unable
to feel pain to the skin because of
advanced age, chronic illness, diabetes,
spinal cord injury, medication, alcohol use,
exhaustion, or other physical conditions,
must exercise care when using the seat
heater. The seat heater may cause burns
even at low temperatures, especially if
used for long periods of time. Do not place
anything on the seat that insulates against
heat, such as a blanket or cushion,
because this may cause the seat heater to overheat. Do not puncture the seat with
pins, needles, or other pointed objects
because this may damage the heating
element which may cause the seat heater
to overheat. An overheated seat may
cause serious personal injury.
Do not do the following:
• Place heavy objects on the seat.
• Operate the seat heater if water or any
other liquid spills on the seat. Allow the
seat to dry thoroughly.
Note: The heated seats will only function
when the engine is running.
The rear seat heat controls are located on
the rear of the center console. Press the heated seat symbol to cycle
through the various heat settings and off.
More indicator lights indicate warmer
settings.
VENTILATED SEATS
(IF EQUIPPED)
Note: The ventilated seats switch on during
a remote start if they are enabled.
See
Enabling Remote Start (page 161). The
ventilated seats may also switch on when
you start your vehicle if they were on when
you previously switched your vehicle off.
Do not do the following:
• Spill liquid on the front seats. This may
cause the air vent holes to become
blocked and not work properly.
• Place cargo or objects under the seats.
They may block the air intake causing
the air vents to not work properly.
The ventilated seats only function when the
engine is running.
183
Corsair (CTF) Canada/United States of America, enUSA, Edition date: 202007, First-Printing SeatsE146322
Page 191 of 638
Note:
We recommend that upon the sale or
lease termination of your vehicle, you erase
the programmed function buttons for security
reasons. See Clearing the Garage Door
Opener (page 190).
GARAGE DOOR OPENER
LIMITATIONS
Canadian radio-frequency laws require
transmitter signals to time-out (or quit) after
several seconds – which may not be long
enough for HomeLink to pick up the signal.
U.S. gate operators time-out in the same
manner.
Note: If programming a garage door opener
or gate operator, it is advised to unplug the
device during the “cycling” process to
prevent possible overheating. PROGRAMMING THE GARAGE
DOOR OPENER TO YOUR HAND-
HELD TRANSMITTER
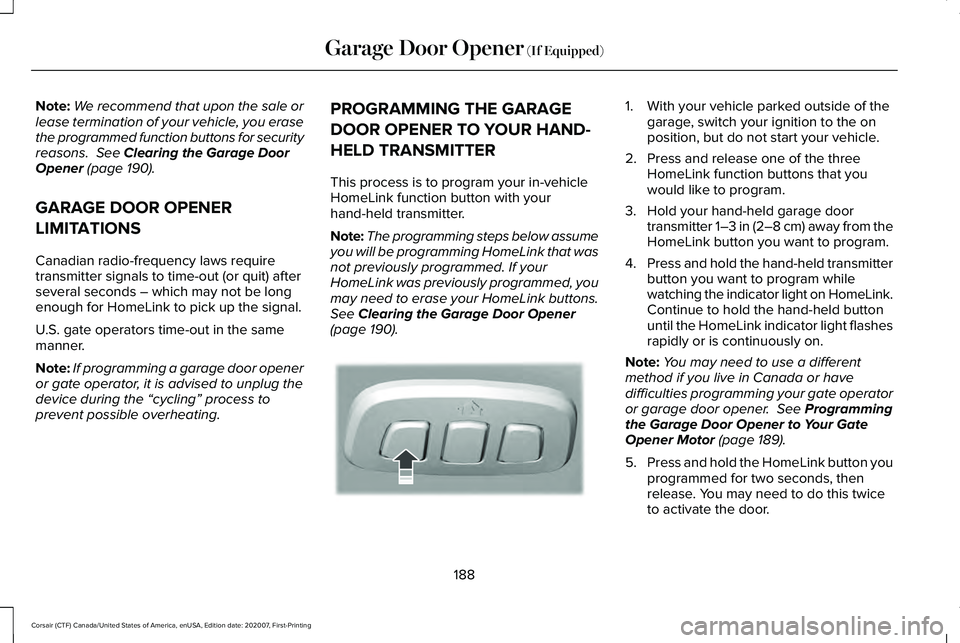
This process is to program your in-vehicle
HomeLink function button with your
hand-held transmitter.
Note:
The programming steps below assume
you will be programming HomeLink that was
not previously programmed. If your
HomeLink was previously programmed, you
may need to erase your HomeLink buttons.
See
Clearing the Garage Door Opener
(page 190). 1. With your vehicle parked outside of the
garage, switch your ignition to the on
position, but do not start your vehicle.
2. Press and release one of the three HomeLink function buttons that you
would like to program.
3. Hold your hand-held garage door transmitter 1–3 in (2–8 cm) away from the
HomeLink button you want to program.
4. Press and hold the hand-held transmitter
button you want to program while
watching the indicator light on HomeLink.
Continue to hold the hand-held button
until the HomeLink indicator light flashes
rapidly or is continuously on.
Note: You may need to use a different
method if you live in Canada or have
difficulties programming your gate operator
or garage door opener.
See Programming
the Garage Door Opener to Your Gate
Opener Motor
(page 189).
5. Press and hold the HomeLink button you
programmed for two seconds, then
release. You may need to do this twice
to activate the door.
188
Corsair (CTF) Canada/United States of America, enUSA, Edition date: 202007, First-Printing Garage Door Opener
(If Equipped)E188212