2021 LINCOLN CORSAIR battery
[x] Cancel search: batteryPage 227 of 638

If the service engine soon indicator remains
on, have your vehicle serviced at the first
available opportunity. Although some
malfunctions detected by the OBD-II may not
have symptoms that are apparent, continued
driving with the service engine soon indicator
on can result in increased emissions, lower
fuel economy, reduced engine and
transmission smoothness and lead to more
costly repairs.
Readiness for Inspection and
Maintenance (I/M) Testing
Some state and provincial and local
governments may have
Inspection/Maintenance (I/M) programs to
inspect the emission control equipment on
your vehicle. Failure to pass this inspection
could prevent you from getting a vehicle
registration.
If the service engine soon indicator
is on or the bulb does not work,
your vehicle may need service.
See On-Board Diagnostics. Your vehicle may not pass the I/M test if the
service engine soon indicator is on or not
working properly (bulb is burned out), or if
the OBD-II system has determined that some
of the emission control systems have not
been properly checked. In this case, the
vehicle is not ready for I/M testing.
If the vehicle
’s engine or transmission has
just been serviced, or the battery has
recently run down or been replaced, the
OBD-II system may indicate that the vehicle
is not ready for I/M testing. To determine if
the vehicle is ready for I/M testing, turn the
ignition key to the on position for 15 seconds
without cranking the engine. If the service
engine soon indicator blinks eight times, it
means that the vehicle is not ready for I/M
testing; if the service engine soon indicator
stays on solid, it means that your vehicle is
ready for I/M testing.
The OBD-II system checks the emission
control system during normal driving. A
complete check may take several days.
If the vehicle is not ready for I/M testing, you
can perform the following driving cycle
consisting of mixed city and highway driving: 1. 15 minutes of steady driving on an
expressway or highway followed by 20
minutes of stop-and-go driving with at
least four 30-second idle periods.
2. Allow your vehicle to sit for at least eight
hours with the ignition off. Then, start the
vehicle and complete the above driving
cycle. The vehicle must warm up to its
normal operating temperature. Once
started, do not turn off the vehicle until
the above driving cycle is complete.
If the vehicle is still not ready for I/M testing,
you need to repeat the above driving cycle.
224
Corsair (CTF) Canada/United States of America, enUSA, Edition date: 202007, First-Printing Engine Emission Control
Page 228 of 638

GENERAL INFORMATION
WARNING: This battery pack should
only be serviced by an authorized electric
vehicle technician. Improper handling can
result in personal injury or death. WARNING: Apply the parking brake,
shift into park (P), switch the ignition off
and remove the key before you open the
hood or have any service or repair work
completed. If you do not switch the ignition
off, the engine could restart at any time.
Failure to follow this instruction could result
in personal injury or death. WARNING:
Do not touch the
electronic ignition system parts after you
have switched the ignition on or when the
engine is running. The system operates at
high voltage. Failure to adhere to this
warning could result in serious personal
injury or death. WARNING:
Keep your hands and
clothing clear of the engine cooling fan. Note:
The high-voltage battery does not
require regular service maintenance.
Your vehicle consists of various high-voltage
components and wiring. All of the
high-voltage power flows through specific
wiring assemblies labeled as such or covered
with a solid orange convolute, or orange
striped tape, or both. Do not come in contact
with these components.
The high-voltage battery pack contains a
lithium-ion battery. The pack is underneath
the vehicle. The high-voltage battery system
uses an advanced liquid heating and cooling
system to regulate the high-voltage battery
temperature and help maximize high-voltage
battery life.
CHARGING THE HIGH VOLTAGE
BATTERY
IMPORTANT SAFETY INSTRUCTIONS WARNING: In Canada, do not use
the 120 volt convenience cord in
commercial garages. WARNING:
This equipment has
arcing or sparking parts. Do not expose to
flammable vapors. Position this equipment
at least
18 in (450 mm) above the floor.
RISK OF FIRE or ELECTRIC SHOCK WARNING:
The AC wall plug must
fit firmly into the AC outlet. If the
connection feels loose, worn or the AC
outlet is damaged, please have a qualified
electrician replace the AC outlet. Using a
convenience cord with a worn outlet may
cause burns, property damage and
increase the risk of electric shock. WARNING:
Do not use the 120 V
convenience cord with an extension cord,
two-prong adapter, surge protector, timer
or other adapter.
225
Corsair (CTF) Canada/United States of America, enUSA, Edition date: 202007, First-Printing High Voltage Battery
(If Equipped)
Page 229 of 638
WARNING: Do not allow charging
equipment to be immersed in water or
liquids. Failure to follow this warning could
result in fire, serious personal injury or
death. WARNING:
Do not attempt to open
the charging equipment. Failure to follow
this instruction could result in personal
injury, death or property damage. WARNING:
Do not use the charging
equipment if it is faulty or has been
damaged. Failure to follow this instruction
could result in personal injury, death or
property damage. WARNING: You risk death or serious
injury to yourself and others if you do not
follow the instruction highlighted by the
warning symbol. Failure to follow the
specific warnings and instructions could
result in personal injury. WARNING:
Install charging
equipment in compliance with local
regulations. Failure to follow this warning
could result in fire, serious personal injury
or death. WARNING:
Do not use an
ungrounded wall outlet. If you suspect that
the wall outlet is not properly grounded,
have a qualified electrician inspect the wall
outlet. Failure to follow this instruction
could result in personal injury or death. WARNING:
Do not modify the
convenience cord plug. If the convenience
cord plug does not properly fit into the wall
outlet, have a qualified electrician install
the correct wall outlet. Failure to follow this
instruction could result in personal injury
or death. OPERATION INSTRUCTIONS
•
Read all the instructions before using this
product.
• Supervise this device when in use around
children.
• Do not put fingers into the electric vehicle
connector.
• Do not use this product if the flexible
power cord or electric vehicle cable has
broken insulation, or any other signs of
damage.
• Do not use this product if the enclosure
or the electric vehicle connector is
broken, cracked, open, or shows any
other indication of damage.
Note: Ground this product. If it malfunctions
or breaks down, grounding provides a path
of least resistance for electric current to
reduce the risk of electric shock. This product
comes with a cord having an equipment
grounding conductor and a grounding plug.
Make sure you plug it into an appropriate
outlet that is properly installed and grounded
in accordance with all local codes and
ordinances.
226
Corsair (CTF) Canada/United States of America, enUSA, Edition date: 202007, First-Printing High Voltage Battery
(If Equipped)
Page 230 of 638
Charging Equipment
Your vehicle has a convenience cord in the
luggage compartment.
Note:
You need to plug the convenience
cord into a dedicated outlet.
Note: Firmly fit the AC wall plug into the AC
outlet. If the connection feels loose, worn or
the AC outlet is damaged, please have a
qualified electrician replace the AC outlet.
Using a convenience cord with a worn outlet
could cause burns, property damage and
increase the risk of electric shock.
Note: Do not use the 120 volt convenience
cord with an extension cord, two-prong
adapter, surge protector, timer or other
adapter.
Note: If charging for your plug-in vehicle fails,
please call the Customer Relationship
Center, or click on Call for support or Live
Chat at our website. CAUTION: TO REDUCE THE RISK OF FIRE-
Use a three-prong AC outlet that is properly
grounded, 15-20 amps or greater, and in
good condition. Use a dedicated line. You
cannot have other appliances connected to
the same circuit. If you do not use a
dedicated circuit, the circuit breaker could
trip or open. If you do not have a dedicated
circuit, contact a licensed professional
electrician for proper installation.
Note: Make sure the electrical source meets
the requirements for the high-voltage
batteries to charge.
Make sure that the convenience cord is
completely unwrapped before charging.
Always plug the cord into the AC outlet
before connecting the charged coupler into
the charge port on your vehicle.
Note: If the power indicator light is off after
plugging in the convenience cord and you
cannot determine a charge status, use a
different outlet.
Note: Store the convenience cord in a clean
dry place between the temperature of
-39.9–157.9°F (-40–70°C) Note:
For further information on the
convenience cord, please refer to the user
manual provided with the convenience cord.
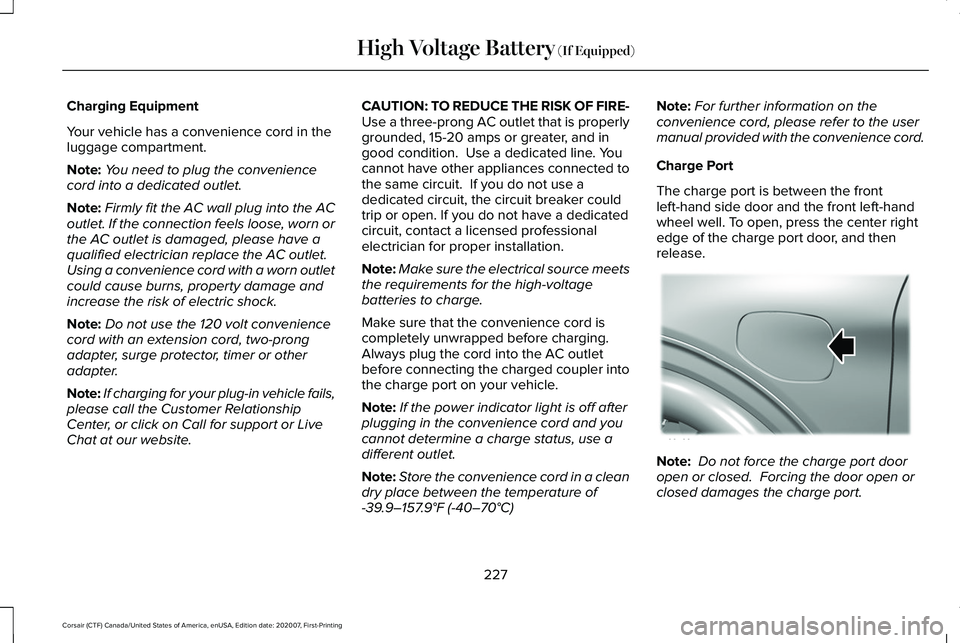
Charge Port
The charge port is between the front
left-hand side door and the front left-hand
wheel well. To open, press the center right
edge of the charge port door, and then
release. Note:
Do not force the charge port door
open or closed. Forcing the door open or
closed damages the charge port.
227
Corsair (CTF) Canada/United States of America, enUSA, Edition date: 202007, First-Printing High Voltage Battery
(If Equipped)E295258
Page 231 of 638
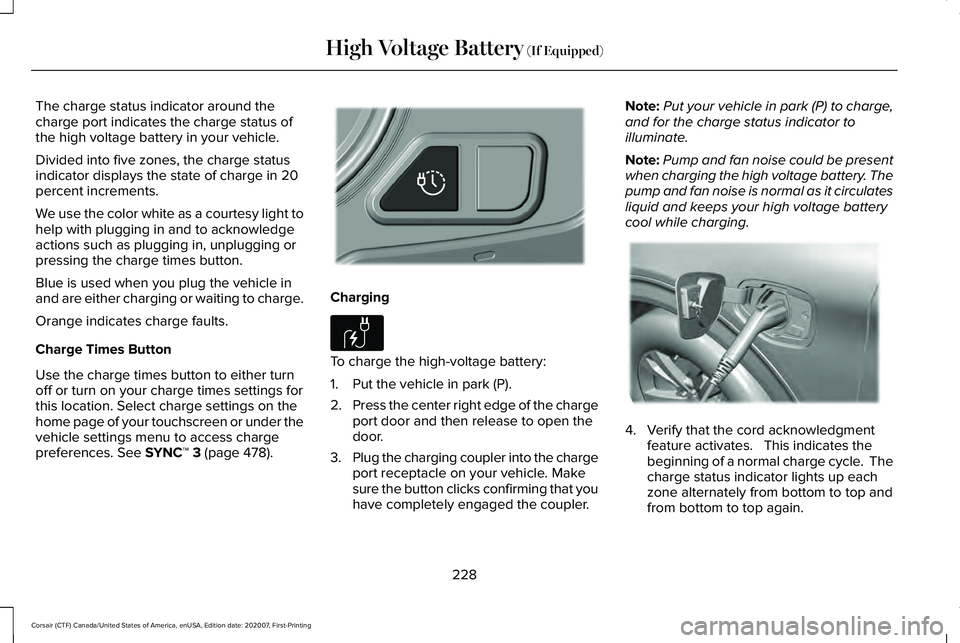
The charge status indicator around the
charge port indicates the charge status of
the high voltage battery in your vehicle.
Divided into five zones, the charge status
indicator displays the state of charge in 20
percent increments.
We use the color white as a courtesy light to
help with plugging in and to acknowledge
actions such as plugging in, unplugging or
pressing the charge times button.
Blue is used when you plug the vehicle in
and are either charging or waiting to charge.
Orange indicates charge faults.
Charge Times Button
Use the charge times button to either turn
off or turn on your charge times settings for
this location. Select charge settings on the
home page of your touchscreen or under the
vehicle settings menu to access charge
preferences. See SYNC™ 3 (page 478).
Charging
To charge the high-voltage battery:
1. Put the vehicle in park (P).
2.
Press the center right edge of the charge
port door and then release to open the
door.
3. Plug the charging coupler into the charge
port receptacle on your vehicle. Make
sure the button clicks confirming that you
have completely engaged the coupler. Note:
Put your vehicle in park (P) to charge,
and for the charge status indicator to
illuminate.
Note: Pump and fan noise could be present
when charging the high voltage battery. The
pump and fan noise is normal as it circulates
liquid and keeps your high voltage battery
cool while charging. 4. Verify that the cord acknowledgment
feature activates. This indicates the
beginning of a normal charge cycle. The
charge status indicator lights up each
zone alternately from bottom to top and
from bottom to top again.
228
Corsair (CTF) Canada/United States of America, enUSA, Edition date: 202007, First-Printing High Voltage Battery
(If Equipped)E301111 E306676 E295257
Page 232 of 638
5. If using a charging station, follow the
instructions on the charge station to
begin the charging process.
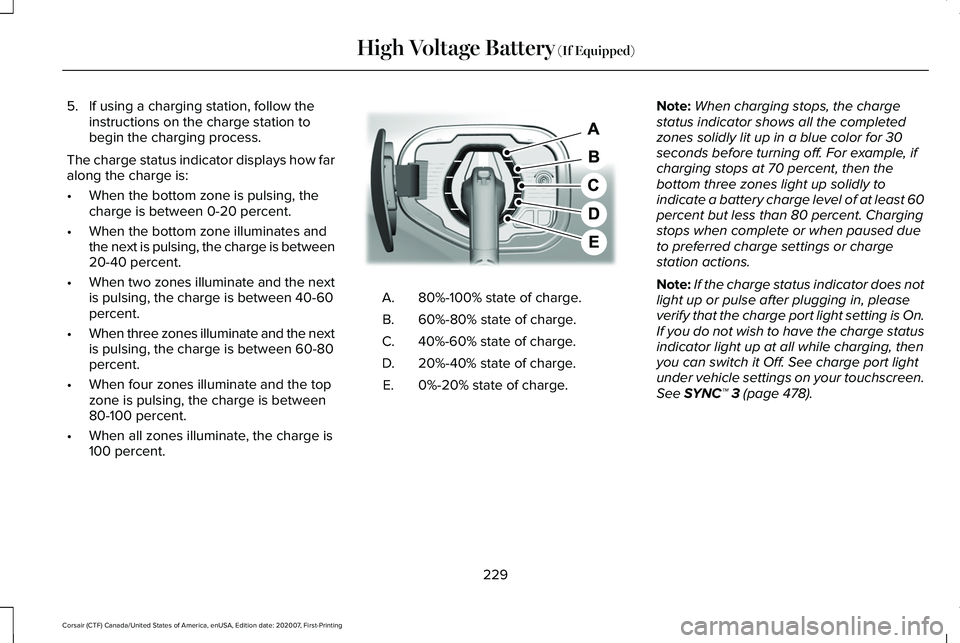
The charge status indicator displays how far
along the charge is:
• When the bottom zone is pulsing, the
charge is between 0-20 percent.
• When the bottom zone illuminates and
the next is pulsing, the charge is between
20-40 percent.
• When two zones illuminate and the next
is pulsing, the charge is between 40-60
percent.
• When three zones illuminate and the next
is pulsing, the charge is between 60-80
percent.
• When four zones illuminate and the top
zone is pulsing, the charge is between
80-100 percent.
• When all zones illuminate, the charge is
100 percent. 80%-100% state of charge.
A.
60%-80% state of charge.
B.
40%-60% state of charge.
C.
20%-40% state of charge.
D.
0%-20% state of charge.
E. Note:
When charging stops, the charge
status indicator shows all the completed
zones solidly lit up in a blue color for 30
seconds before turning off. For example, if
charging stops at 70 percent, then the
bottom three zones light up solidly to
indicate a battery charge level of at least 60
percent but less than 80 percent. Charging
stops when complete or when paused due
to preferred charge settings or charge
station actions.
Note: If the charge status indicator does not
light up or pulse after plugging in, please
verify that the charge port light setting is On.
If you do not wish to have the charge status
indicator light up at all while charging, then
you can switch it Off. See charge port light
under vehicle settings on your touchscreen.
See SYNC™ 3 (page 478).
229
Corsair (CTF) Canada/United States of America, enUSA, Edition date: 202007, First-Printing High Voltage Battery
(If Equipped)E301197
Page 233 of 638
Note:
You can identify charging faults by the
color orange on the charge status indicator.
Faults can occur within the vehicle charging
system or outside the vehicle, such as with
the charge cord, charge station or electrical
supply.
Note: If the system detects a fault in the
vehicle charging system at any point in a
charge cycle, the entire charge status
indicator lights up solidly in an orange color
for 30 seconds and then turns off. If this
happens, unplug the charging coupler and
then plug it back into the charge port
receptacle. If the problem persists, have your
vehicle checked as soon as possible.
Note: If the system detects a fault outside
the vehicle, such as with the charge station
or charge cord, the entire charge status
indicator flashes continuously for 30 seconds
and then turns off. If this happens, check the
charge cord and the charge station or
electrical supply. Locking the Charging Coupler
Note:
You need a padlock or a combination
lock with a shackle diameter of 0.2 in (5 mm)
or less, and the straight portion of the
shackle of 1.0 in (25.4 mm) of length or more.
1. Insert the lock through the hole in the charging coupler button.
2. Lock the padlock or combination lock. Waiting to Charge Note:
Select charge settings on the home
page of the touchscreen or under the vehicle
settings menu to access charge preferences.
See SYNC™ 3 (page 478).
Charging may not begin upon plugging in if
you have set up preferred charge times for
this vehicle location. Your vehicle could delay
charging to take advantage of off-peak
electricity rates. Your vehicle optimizes the
charge schedule to be complete by your next
departure time.
When waiting to charge, plugged in and not
currently charging, the charge status
indicator shows the present state of charge
of the high voltage battery by lighting up all
completed zones for 30 seconds before
turning off. For example, if the battery is at
70 percent charge then the bottom three
zones solidly light up to indicate a battery
charge level of at least 60 percent but less
than 80 percent. When the current state of
charge is less than 20 percent, none of the
zones light up.
230
Corsair (CTF) Canada/United States of America, enUSA, Edition date: 202007, First-Printing High Voltage Battery
(If Equipped)E306677 E295451 E306678
Page 234 of 638
Note:
When your vehicle is waiting to
charge, the charge status indicator turns off
30 seconds after displaying the present state
of charge. When your vehicle begins
charging, the charge status indicator turns
on and displays the status of the charge, as
described above.
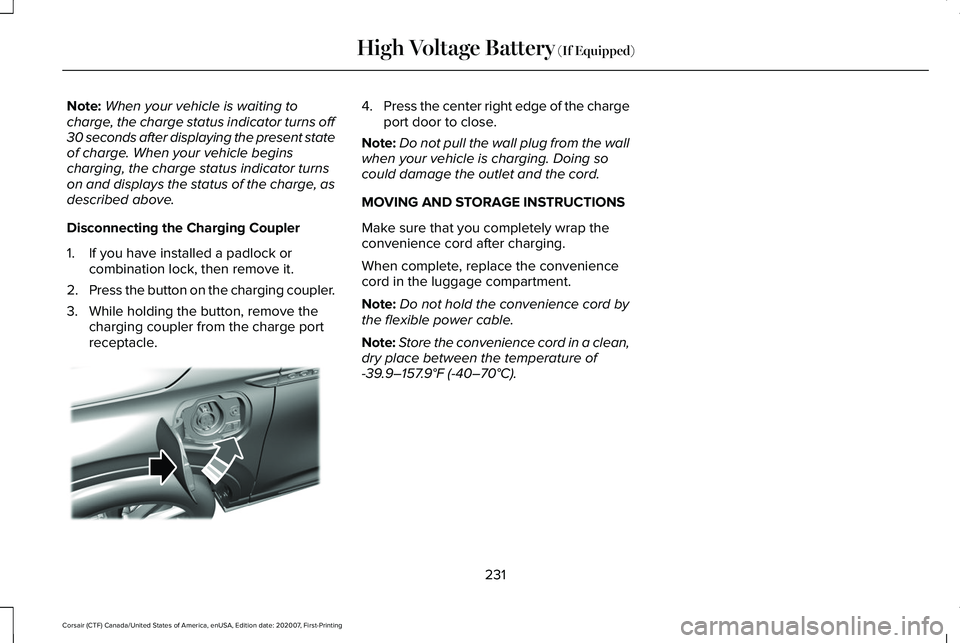
Disconnecting the Charging Coupler
1. If you have installed a padlock or combination lock, then remove it.
2. Press the button on the charging coupler.
3. While holding the button, remove the charging coupler from the charge port
receptacle. 4.
Press the center right edge of the charge
port door to close.
Note: Do not pull the wall plug from the wall
when your vehicle is charging. Doing so
could damage the outlet and the cord.
MOVING AND STORAGE INSTRUCTIONS
Make sure that you completely wrap the
convenience cord after charging.
When complete, replace the convenience
cord in the luggage compartment.
Note: Do not hold the convenience cord by
the flexible power cable.
Note: Store the convenience cord in a clean,
dry place between the temperature of
-39.9–157.9°F (-40–70°C).
231
Corsair (CTF) Canada/United States of America, enUSA, Edition date: 202007, First-Printing High Voltage Battery
(If Equipped)E295444