Page 360 of 638
Protected Component
Fuse Rating
Fuse Location
Not used (spare).
40 A
44
Passenger power seat.
30 A
45
Not used (spare).
20 A
46
Heated seats.
20 A
47
Power liftgate.
30 A
48
Anti-lock brake control pump.
60 A
49
Cooling fan.
60 A
50
Moonroof.
30 A
51
USB charge port - rear console.
5 A
52
USB charge port - rear console.
5 A
53
Rear heated seat module.
20 A
54
Starter motor.
30 A
55
Amplifier.
20 A
56
Data link connector.
10 A
57
Climate controlled seat module.
30 A
58
Body control module.
40 A
59
357
Corsair (CTF) Canada/United States of America, enUSA, Edition date: 202007, First-Printing Fuses
Page 363 of 638
Passenger Compartment Fuse Box
The fuse box is below the glove
compartment. Protected Component
Fuse Rating
Fuse Location
Not used.
5 A
1
Rear heated seats.
5 A
2
Not used (spare).
10 A
3
Ignition switch.
10 A
4
Lock.
20 A
5
360
Corsair (CTF) Canada/United States of America, enUSA, Edition date: 202007, First-Printing FusesE293328
Page 364 of 638
Protected Component
Fuse Rating
Fuse Location
Unlock.
Moonroof.
10 A
6
Passenger door module.
30 A
7
Parking assist control module.
5 A
8
Image processing module A.
5 A
9
Electrochromatic mirror.
Extended power module.
10 A
10
Power liftgate.
5 A
11
Hands-free liftgate actuation module.
Telematics control unit module.
Keyless keypad switch.
5 A
12
Driver door lock.
15 A
13
Driver door module.
30 A
14
Extended power module.
15 A
15
Vehicle dynamics module.
15 A
16
SYNC.
15 A
17
Receiver transceiver module.
Integrated control panel.
361
Corsair (CTF) Canada/United States of America, enUSA, Edition date: 202007, First-Printing Fuses
Page 368 of 638

GENERAL INFORMATION
Have your vehicle serviced regularly to help
maintain its roadworthiness and resale value.
There is a large network of authorized
dealers that are there to help you with their
professional servicing expertise. We believe
that their specially trained technicians are
best qualified to service your vehicle properly
and expertly. They are supported by a wide
range of highly specialized tools developed
specifically for servicing your vehicle.
If your vehicle requires professional service,
an authorized dealer can provide the
necessary parts and service. Check your
warranty information to find out which parts
and services are covered.
Use only recommended fuels, lubricants,
fluids and service parts conforming to
specifications. Motorcraft® parts are
designed and built to provide the best
performance in your vehicle.
Precautions
•
Do not work on a hot engine.
• Make sure that nothing gets caught in
moving parts.
• Do not work on a vehicle with the engine
running in an enclosed space, unless you
are sure you have enough ventilation.
• Keep all open flames and other burning
material (such as cigarettes) away from
the battery and all fuel related parts.
Working with the Engine Off
1. Set the parking brake and shift the transmission to park (P).
2. Switch off the engine.
3. Block the wheels.
Working with the Engine On WARNING: To reduce the risk of
vehicle damage and personal burn injuries,
do not start your engine with the air
cleaner removed and do not remove it
while the engine is running. 1. Set the parking brake and shift the
transmission to park (P).
2. Block the wheels.
OPENING AND CLOSING THE
HOOD
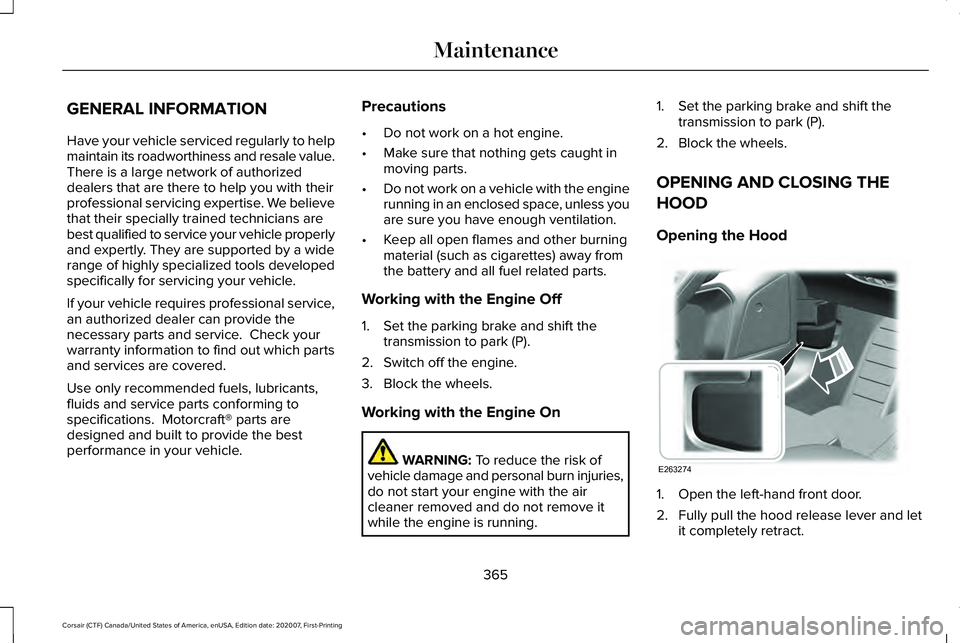
Opening the Hood 1. Open the left-hand front door.
2. Fully pull the hood release lever and let
it completely retract.
365
Corsair (CTF) Canada/United States of America, enUSA, Edition date: 202007, First-Printing MaintenanceE263274
Page 374 of 638

Note:
Do not remove the dipstick when the
engine is running.
Note: If the oil level is between the
maximum and minimum marks, the oil level
is acceptable. Do not add oil.
Note: The oil consumption of new engines
reaches its normal level after approximately
3,000 mi (5,000 km).
Adding Engine Oil WARNING:
Do not remove the filler
cap when the engine is running. WARNING:
Do not add engine oil
when the engine is hot. Failure to follow
this instruction could result in personal
injury.
Do not use supplemental engine oil additives
because they are unnecessary and could
lead to engine damage that may not be
covered by the vehicle Warranty. Only use oils certified for gasoline engines
by the American Petroleum Institute (API).
An oil with this trademark symbol conforms
to the current engine and emission system
protection standards and fuel economy
requirements of the International Lubricants
Specification Advisory Committee (ILSAC).
To top up the engine oil level do the
following:
1. Clean the area surrounding the engine
oil filler cap before you remove it.
2. Remove the engine oil filler cap.
See
Under Hood Overview (page 367). Turn
it counterclockwise and remove it. 3. Add engine oil that meets our
specifications.
See Capacities and
Specifications (page 439). You may have
to use a funnel to pour the engine oil into
the opening.
4. Recheck the oil level.
5. If the oil level is correct, replace the dipstick and make sure it is fully seated.
6. Replace the engine oil filler cap. Turn it clockwise until you feel a strong
resistance.
Note: Do not add oil further than the
maximum mark. Oil levels above the
maximum mark may cause engine damage.
Note: Make sure you install the oil filler cap
correctly.
Note: Soak up any spillage with an
absorbent cloth immediately.
OIL CHANGE INDICATOR RESET
Use the information display controls on the
steering wheel to reset the oil change
indicator.
371
Corsair (CTF) Canada/United States of America, enUSA, Edition date: 202007, First-Printing MaintenanceE142732
Page 379 of 638

4. Replace the coolant reservoir cap. Turn
the cap clockwise until it contacts the
hard stop.
5. Check the coolant level in the coolant reservoir the next few times you drive
your vehicle. If necessary, add enough
prediluted engine coolant to bring the
coolant level to the correct level.
If you have to add more than 1.1 qt (1 L) of
engine coolant per month, have your vehicle
checked as soon as possible. Operating an
engine with a low level of coolant can result
in engine overheating and possible engine
damage.
In case of emergency, you can add a large
amount of water without engine coolant in
order to reach a vehicle service location. In
this instance, qualified personnel:
1. Must drain the cooling system.
2. Chemically clean the coolant system.
3. Refill with engine coolant as soon as possible.
Water alone, without engine coolant, can
cause engine damage from corrosion,
overheating or freezing. Do not use the following as a coolant
substitute:
•
Alcohol.
• Methanol.
• Brine.
• Any coolant mixed with alcohol or
methanol antifreeze.
Alcohol and other liquids can cause engine
damage from overheating or freezing.
Do not add extra inhibitors or additives to
the coolant. These can be harmful and
compromise the corrosion protection of the
coolant.
Recycled Coolant
We do not recommend the use of recycled
coolant as an approved recycling process is
not yet available.
Dispose of used engine coolant in an
appropriate manner. Follow your
community's regulations and standards for
recycling and disposing of automotive fluids. Severe Climates
If you drive in extremely cold climates:
•
It may be necessary to increase the
coolant concentration above 50%.
• A coolant concentration of 60% provides
improved freeze point protection.
Coolant concentrations above 60%
decrease the overheat protection
characteristics of the coolant and may
cause engine damage.
If you drive in extremely hot climates:
• You can decrease the coolant
concentration to 40%.
• Coolant concentrations below 40%
decrease the freeze and corrosion
protection characteristics of the coolant
and may cause engine damage.
Vehicles driven year-round in non-extreme
climates should use prediluted coolant for
optimum cooling system and engine
protection.
376
Corsair (CTF) Canada/United States of America, enUSA, Edition date: 202007, First-Printing Maintenance
Page 385 of 638

Remove and Reinstall the Battery
To disconnect or remove the battery, do the
following:
1. Apply the parking brake and switch the
ignition off.
2. Switch all electrical equipment off, for example lights and radio.
3. Wait a minimum of two minutes before disconnecting the battery.
Note: The engine management system has
a power hold function and remains powered
for a period of time after you switch the
ignition off. This is to allow diagnostic and
adaptive tables to be stored. Disconnecting
the battery without waiting can cause
damage not covered by the vehicle
Warranty.
4. Disconnect the negative battery cable terminal.
5. Disconnect the positive battery cable terminal.
6. Remove the battery securing clamp.
7. Remove the battery.
8. To install, reverse the removal procedure. Note:
Before reconnecting the battery, make
sure the ignition remains switched off.
Note: Make sure the battery cable terminals
are fully tightened.
If you disconnect or replace the vehicle
battery, you must reset the following
features:
• Window bounce-back. See Windows
and Mirrors (page 112).
• Clock Settings.
• Pre-set radio stations.
• Steering Angle Sensor.
Note: To calibrate the steering angle sensor,
drive the vehicle above
30 mph (50 km/h)
for a minimum of 1.2 mi (2 km). Make sure to
drive straight ahead for a minimum of 30
seconds. Several vehicle functions are
disabled and a warning light could appear
until the sensor is calibrated. Note:
For flexible fuel vehicles, if you are
operating on E85, you could experience poor
starts or an inability to start the engine, and
driveability problems until the fuel trim and
ethanol content have been relearned. Drive
the vehicle at least
10 mi (16 km) to
completely relearn the idle trim and fuel trim
strategy.
Battery Disposal Make sure that you dispose of old
batteries in an environmentally
friendly way. Seek advice from
your local authority about recycling old
batteries.
ADJUSTING THE HEADLAMPS
Vertical Aim Adjustment
The assembly plant properly aims the
headlamps on your vehicle. If your vehicle
has been in an accident, have the alignment
of your headlamps checked by your
authorized dealer.
382
Corsair (CTF) Canada/United States of America, enUSA, Edition date: 202007, First-Printing MaintenanceE107998
Page 386 of 638

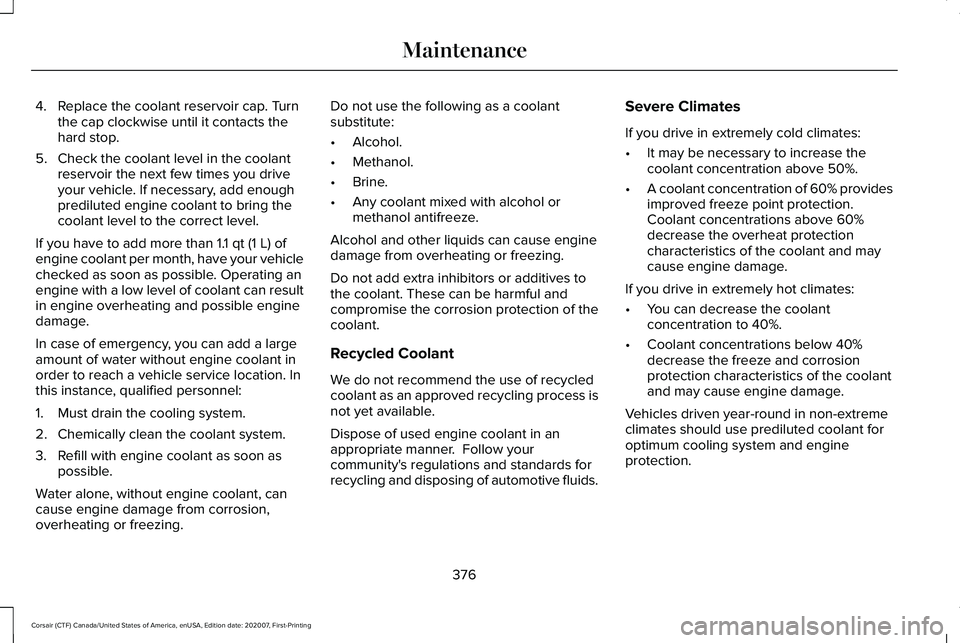
8 feet (2.4 meters)
A
Center height of lamp to ground
B
25 feet (7.6 meters)
C
Horizontal reference line
D
1. Park the vehicle directly in front of a wall
or screen on a level surface,
approximately 25 ft (7.6 m) away.
2. Measure the height of the headlamp passing beam optical center from the
ground and mark an
8 ft (2.4 m)
horizontal reference line on the vertical
wall or screen at this height. Note:
To see a clearer light pattern for
adjusting, you may want to block the light
from one headlamp while adjusting the
other.
3. Switch on the low beam headlamps to light the wall or screen and open the
hood. 4.
On the wall or screen, observe a flat zone
of high intensity light at the top of the
right-hand portion of the beam pattern.
If the top edge of the high intensity light
zone is not at the horizontal reference
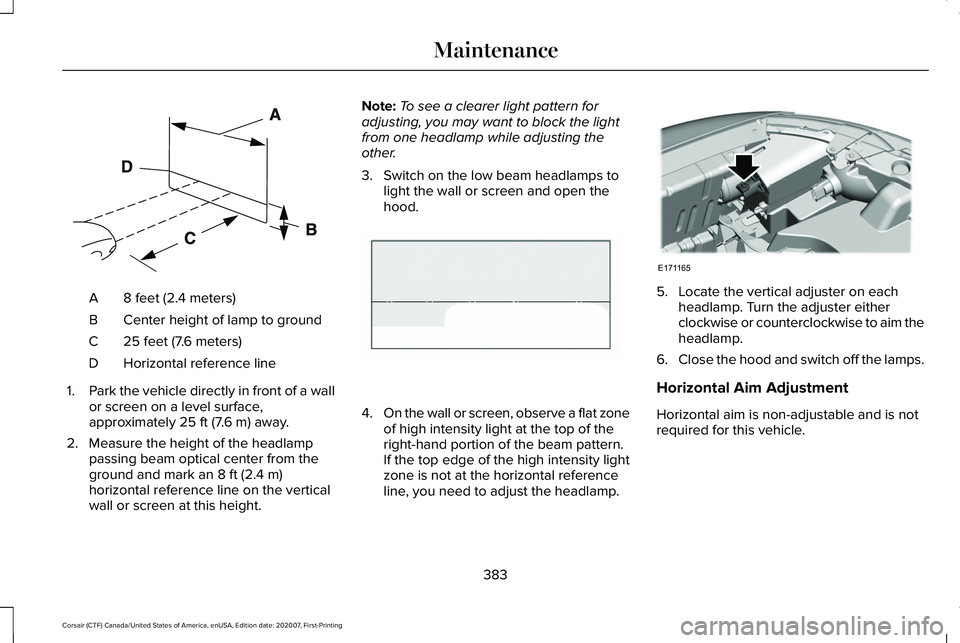
line, you need to adjust the headlamp. 5. Locate the vertical adjuster on each
headlamp. Turn the adjuster either
clockwise or counterclockwise to aim the
headlamp.
6. Close the hood and switch off the lamps.
Horizontal Aim Adjustment
Horizontal aim is non-adjustable and is not
required for this vehicle.
383
Corsair (CTF) Canada/United States of America, enUSA, Edition date: 202007, First-Printing MaintenanceE142592 E142465 E171165