2021 LEXUS RX350 Unlock all doors
[x] Cancel search: Unlock all doorsPage 118 of 508

1183-2. Opening, closing and locking the doors
detection area, it may take slightly longer
to unlock the doors after the door handle
is gripped.
●Fingernails may scrape against the door
during operation of the door handle. Be
careful not to injure fingernails or dam-
age the surface of the door.
■When the vehicle is not driven for
extended periods
●To prevent theft of the vehicle, do not
leave the electronic key within 6 ft. (2 m)
of the vehicle.
●The smart access syst em with push-but-
ton start can be deactivated in advance.
●Setting the electronic key to battery-sav-
ing mode helps to reduce key battery
depletion. ( P.116)
■To operate the system properly
Make sure to carry the electronic key when
operating the system. Do not get the elec-
tronic key too close to the vehicle when
operating the system from the outside of the
vehicle.
Depending on the position and holding
condition of the electronic key, the key may
not be detected correctly and the system
may not operate properly. (The alarm may
go off accidentally, or the door lock preven-
tion may not operate.)
■If the smart access system with
push-button start does not operate
properly
●If the doors cannot be locked or unlocked
and the back door cannot be opened,
perform the following.
• Bring the electronic key close to the door handle and perform a lock or unlock
operation.
• Bring the electronic key close to the but- ton on the back door ( P.104) and press
the button.
• Use the wireless remote control.
If the doors cannot be locked or unlocked
by perform the above, use the mechanical
key. ( P.431) However, if the mechanical
key is used while the al arm system is set, the
warning will sound. ( P.68)
●If the engine cannot be started, refer to
P.432
■Customization
Some functions can be customized.
( P.461)
■If the smart access system with
push-button start has been deactivated
in a customized setting
●Locking and unlockin g the doors: Use
the wireless remote control or mechani-
cal key. ( P.99, 104, 431)
●Starting the engine and changing engine
switch modes: P.432
●Stopping the engine: P.176
Page 136 of 508

1363-3. Adjusting the seats
■Recall procedure
1 Make sure that the doors are
locked before recalling the driving
position. Carry the electronic key
that has been registered to the driv-
ing position, and then unlock and
open the driver’s door using the
smart access system with push-but-
ton start or wireless remote control.
The driving position will move to the
recorded position (not including the steer-
ing wheel and head-up display [if
equipped]). However, the seat will move to
a position slightly behind the recorded
position in order to make entering the vehi-
cle easier.
If the driving position is in a position that
has already been recorded, the seat and
outside rear view mirrors will not move.
2Turn the engine switch to ACCES-
SORY mode or IGNITION ON
mode, or fasten a seat belt.
The seat, steering wheel and head-up dis-
play (if equipped) will move to the
recorded position.
■Recalling the driving position using the
memory recall function
●Different driving positions can be regis-
tered for each electronic key. Therefore,
the driving position that is recalled may
be different depending on the key being
carried.
●If a door other than the driver’s door is
unlocked with the smart access system
with push-button start, the driving posi-
tion cannot be recalled. In this case, press
the driving position button which has
been set.
■Customization
Some functions can be customized.
( P.461)
■Front seats
1 Up
Pull the head restraints up.
2Down
Push the head restra int down while press-
ing the lock release button .
Head restraints
Head restraints are provided for all
seats.
WARNING
■Head restraint precautions
Observe the following precautions
regarding the head re straints. Failure to
do so may result in death or serious
injury.
●Use the head restraints designed for
each respective seat.
●Adjust the head restraints to the cor-
rect position at all times.
●After adjusting the head restraints,
push down on them and make sure
they are locked in position.
●Do not drive with the head restraints
removed.
Adjusting a head restraint verti-
cally
A
Page 142 of 508
1423-4. Adjusting the steering wheel and mirrors
nor “R”.
To set the mirror angle used when the vehi-
cle is reversing, adjust the mirror angle at a
desired position with the shift lever in R.
The adjusted angle will be memorized and
the mirror will automatically tilt to the mem-
orized angle whenever the shift lever is
shifted to R from next time.
The memorized downward tilt position of
the mirror is linked to the normal position
(angle adjusted with the shift lever in other
than R). Therefore, if the normal position is
changed after adjustment, the tilt position
will also change.
When the normal position is changed, read-
just the angle in reversing.
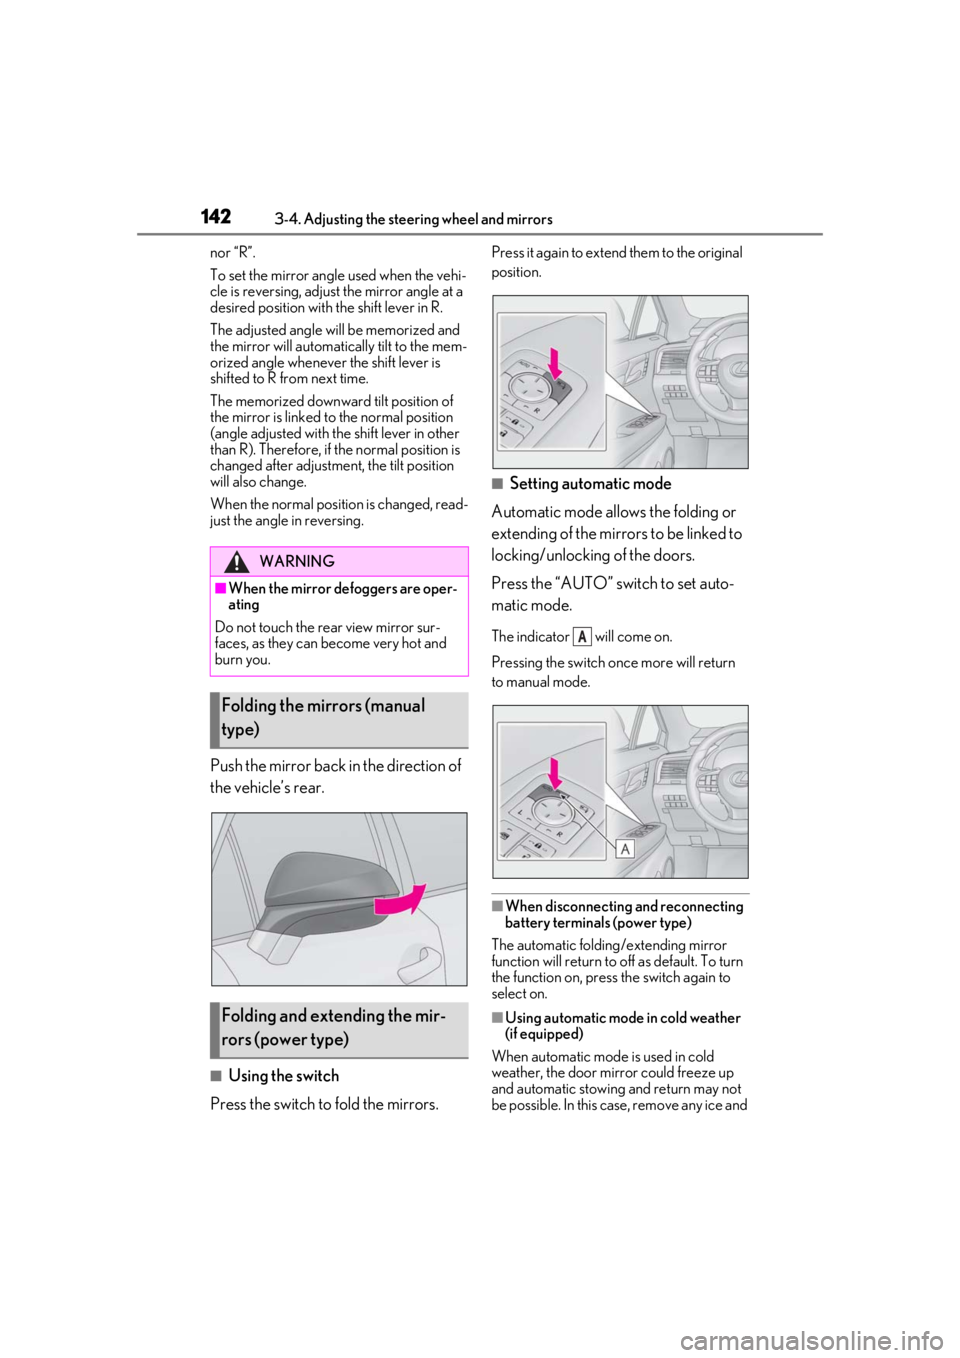
Push the mirror back in the direction of
the vehicle’s rear.
■Using the switch
Press the switch to fold the mirrors.
Press it again to extend them to the original
position.
■Setting automatic mode
Automatic mode allows the folding or
extending of the mirrors to be linked to
locking/unlocking of the doors.
Press the “AUTO” switch to set auto-
matic mode.
The indicator will come on.
Pressing the switch on ce more will return
to manual mode.
■When disconnecting and reconnecting
battery terminals (power type)
The automatic folding/extending mirror
function will return to off as default. To turn
the function on, press the switch again to
select on.
■Using automatic mode in cold weather
(if equipped)
When automatic mode is used in cold
weather, the door mirror could freeze up
and automatic stowing and return may not
be possible. In this case, remove any ice and
WARNING
■When the mirror defoggers are oper-
ating
Do not touch the rear view mirror sur-
faces, as they can become very hot and
burn you.
Folding the mirrors (manual
type)
Folding and extending the mir-
rors (power type)
A
Page 174 of 508

1744-2. Driving procedures
4-2.Driving procedures
1Check that the parking brake is set.
2 Check that the shift lever is in P.
3 Firmly depress the brake pedal.
and a message will be displayed on
the multi-information display.
If it is not displayed, the engine cannot be
started.
4 Press the engine switch shortly and
firmly.
When operating the engine switch, one
short, firm press is enough. It is not neces-
sary to press and hold the switch.
The engine will crank until it starts or for up
to 30 seconds, whichever is less.
Continue depressing the brake pedal until
the engine is completely started.
The engine can be started from any engine
switch mode.
■Engine switch illumination
According to the situation, the engine
switch illumination operates as follows.
●When a door is opened, or the engine
switch mode is changed from ACCES-
SORY or IGNITION ON mode to off,
the engine switch illumination slowly
blinks.
●When depressing the brake pedal with
carrying the electronic key on your per-
son, the engine switch illumination rapidly
blinks.
●When the engine sw itch is in ACCES-
SORY or IGNITION ON mode, the
engine switch illumination illuminates.
■If the engine does not start
●The engine immobilizer system may not
have been deactivated. ( P.66)
Contact your Lexus dealer.
●Check that the shift leve r is securely set in
P. The engine may not start if the shift
lever is displaced out of P. “To Start Vehi-
cle, Put Shift Lever into P” will be dis-
played on the multi-information display.
●If the door is unlock ed with the mechani-
cal key, the engine cannot be started
using the smart access system with
push-button start. Refer to P.432to start
the engine. However, if the electronic key
is carried inside the vehicle and the doors
are locked ( P.101), the engine can be
started.
■Electronic key battery depletion
P.96
■Conditions affecting operation
P.116
■Note for the entry function
P.117
■Steering lock function
●After turning the engine switch off and
opening and closing the doors, the steer-
ing wheel will be lock ed due to the steer-
ing lock function. Operating the engine
switch again automatically cancels the
steering lock.
●When the steering lock cannot be
Engine (ignition) switch
Performing the following opera-
tions when carryin g the electronic
key on your person starts the
engine or changes engine switch
modes.
Starting the engine
Page 189 of 508

1894-3. Operating the lights and wipers
4
Driving
Doing so interferes with the sensor detect-
ing the level of ambient light and may cause
the automatic headlight system to malfunc-
tion.
■Automatic light off system
●When the headlights come on: The head-
lights and tail lights turn off 30 seconds
after a door is opened and closed if the
engine switch is turned to ACCESSORY
mode or turned off. (The lights turn off
immediately if on the key is pressed
after all the doors are locked.)
●When only the tail lights are on: The tail
lights turn off automatically if the engine
switch is turned to ACCESSORY mode
or turned off and the driver’s door is
opened.
To turn the lights on again, turn the engine
switch to IGNITION ON mode, or turn the
light switch off once and then back to
or .
■Automatic headlight leveling system (if
equipped)
The level of the headlights is automatically
adjusted according to the number of pas-
sengers and the loading condition of the
vehicle to ensure that the headlights do not
interfere with other road users.
■Light reminder buzzer
A buzzer sounds when the engine switch is
turned off or turned to ACCESSORY
mode and the driver’s door is opened while
the lights are turned on.
■Welcome lighting
If the headlight switch is turned to and
the surrounding area is dark, unlocking the
doors using the smart access system with
push-button start or wireless remote con-
trol will turn the parking lights and tail lights
on automatically.
■Windshield wiper linked headlight illu-
mination
When driving during daytime with the
headlight switch turned to , if the wind-
shield wipers are used, the headlights will turn on automatically after several seconds
to help enhance the visibility of your vehicle.
■Battery-saving function
In order to prevent the battery of the vehicle
from discharging, if the headlights and/or
tail lights are on when the engine switch is
turned off the battery saving function will
operate and automatically turn off all the
lights after approximately 20 minutes.
When the engine switch is turned to IGNI-
TION ON mode, the battery-saving func-
tion will be disabled.
When any of the following are performed,
the battery-saving function is canceled
once and then reactivated. All the lights will
turn off automatically 20 minutes after the
battery- saving function has been reacti-
vated:
●When the headlight switch is operated
●When a door is opened or closed
■Customization
Some functions can be customized.
( P.461)
1 With the headlights on, push the
lever away from you to turn on the
high beams.
NOTICE
■To prevent battery discharge
Do not leave the lights on longer than
necessary when the engine is off.
Turning on the high beam head-
lights
Page 295 of 508

2955-3. Using the air conditioning system and defogger
5
Interior features
push-button start is used to unlock a pas-
senger door.
●The doors that can recall the air condi-
tioning setting when unlocked using the
smart access system with push-button
start can be changed.
* For details, con-
tact your Lexus dealer.
*: The doors that can recall the driving
position memory are changed at the
same time.
■Operation of the air conditioning sys-
tem in Eco drive mode
In Eco drive mode, the air conditioning sys-
tem is controlled as follows to prioritize fuel
efficiency:
●Engine speed and compressor operation
controlled to restri ct heating/cooling
capacity
●Fan speed restricted when automatic
mode is selected
To improve air condit ioning performance,
perform the following operations:
●Adjust the fan speed
●Turn off Eco drive mode ( P.271)
■When the outside temperature falls to
nearly 32°F (0°C)
The dehumidification function may not
operate even when “A/C” is selected.
■Ventilation and air conditioning odors
●To let fresh air in, set the air conditioning
system to the outside air mode.
●During use, various odors from inside and
outside the vehicle may enter into and
accumulate in the air conditioning sys-
tem. This may then cause odor to be
emitted from the vents.
●To reduce potential odors from occur-
ring:
• It is recommended that the air condition- ing system be set to outside air mode
prior to turning the vehicle off.
• The start timing of the blower may be delayed for a short period of time imme-
diately after the air conditioning system is
started in automatic mode or with the
micro dust and pollen filter on.
■Using the voice command system
Air conditioning system can be operated
using voice commands. For details, refer to
“NAVIGATION AND MULTIMEDIA
SYSTEM OWNER’S MANUAL”.
■Air conditioning filter
P.376
■Air conditioning system refrigerant
●A label regarding the refrigerant of the
air conditioning system is attached to the
hood at the location shown in the follow-
ing illustration.
●The meaning of each symbol on the label
are as follows:
■Customization
Some functions can be customized.
( P.461)
Caution
Air conditioning system
Air conditioning system
lubricant type
Requires registered tech-
nician to service air condi-
tioning system
Flammable refrigerant
Page 310 of 508
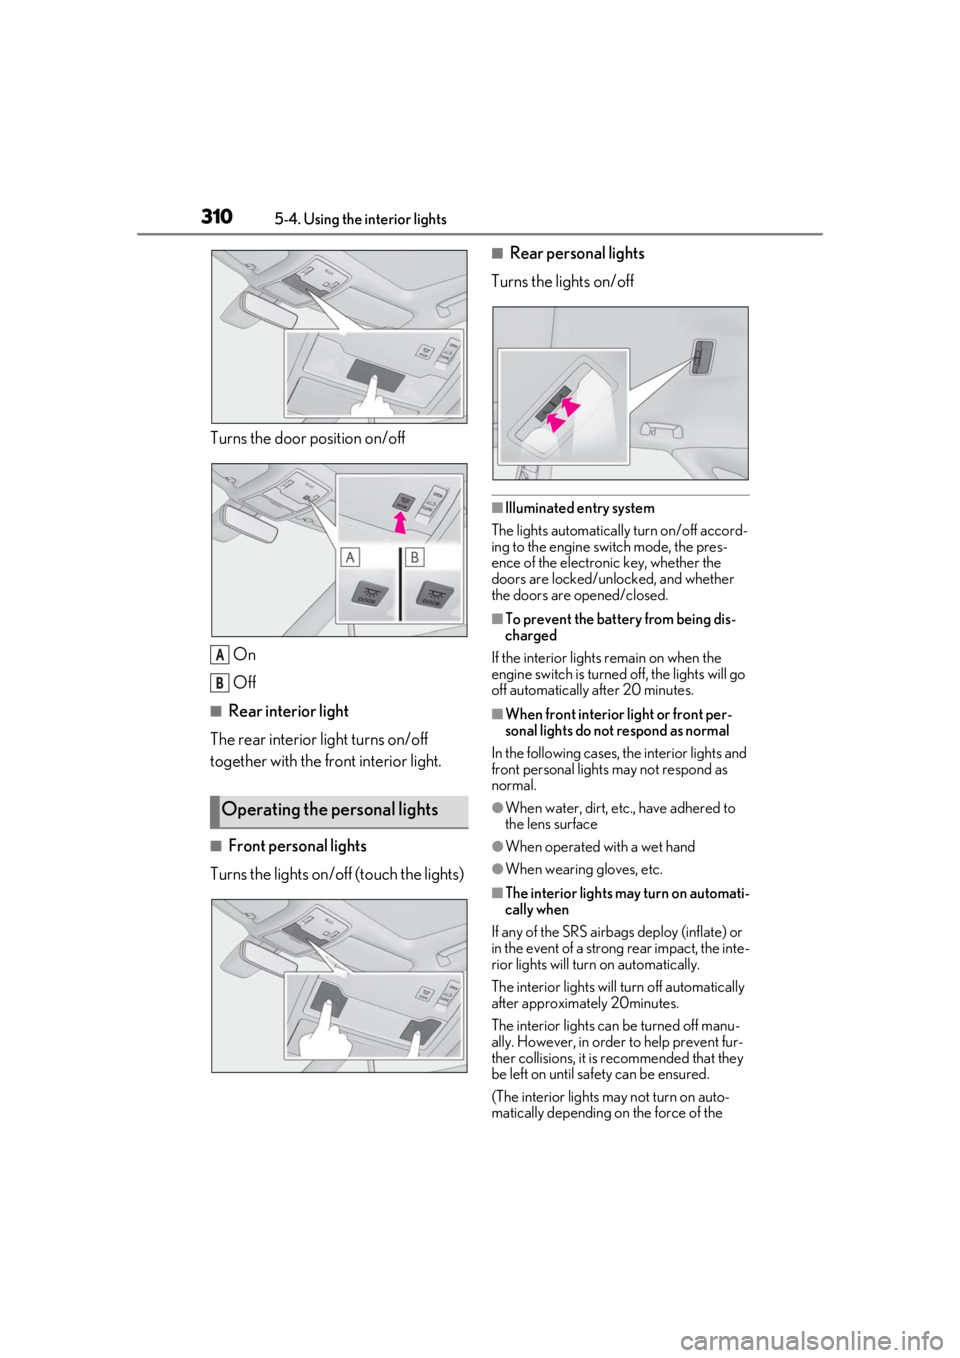
3105-4. Using the interior lights
Turns the door position on/off
On
Off
■Rear interior light
The rear interior light turns on/off
together with the front interior light.
■Front personal lights
Turns the lights on/off (touch the lights)
■Rear personal lights
Turns the lights on/off
■Illuminated entry system
The lights automatically turn on/off accord-
ing to the engine switch mode, the pres-
ence of the electronic key, whether the
doors are locked/unlocked, and whether
the doors are opened/closed.
■To prevent the battery from being dis-
charged
If the interior lights remain on when the
engine switch is turned off, the lights will go
off automatically after 20 minutes.
■When front interior light or front per-
sonal lights do not respond as normal
In the following cases, the interior lights and
front personal lights may not respond as
normal.
●When water, dirt, etc., have adhered to
the lens surface
●When operated with a wet hand
●When wearing gloves, etc.
■The interior lights may turn on automati-
cally when
If any of the SRS airbag s deploy (inflate) or
in the event of a strong rear impact, the inte-
rior lights will turn on automatically.
The interior lights will turn off automatically
after approximately 20minutes.
The interior lights can be turned off manu-
ally. However, in order to help prevent fur-
ther collisions, it is recommended that they
be left on until sa fety can be ensured.
(The interior lights may not turn on auto-
matically depending on the force of the
Operating the personal lights
A
B
Page 344 of 508
3446-1. Maintenance and care
6-1.Maintenance and care
Working from top to bottom, liber-
ally apply water to the vehicle body,
wheel wells and underside of the
vehicle to remove any dirt and dust.
Wash the vehicle body using a
sponge or soft cloth, such as a
chamois.
For hard-to-remove marks, use car
wash soap and rinse thoroughly with
water.
Wipe away any water.
Wax the vehicle when the water-
proof coating deteriorates.
If water does not bead on a clean surface,
apply wax when the vehicle body is cool.
■Self-restoring coat
The vehicle body has a self-restoring coat-
ing that is resistant to small surface
scratches caused in a car wash etc.
●The coating lasts for 5 to 8 years from
when the vehicle is delivered from the
plant.
●The restoration time differs depending on
the depth of the scratch and outside tem-
perature.
The restoration time may become
shorter when the coating is warmed by
applying warm water.
●Deep scratches caused by keys, coins,
etc. cannot be restored.
●Do not use wax that contains abrasives.
■Automatic car washes
●Before washing the vehicle:
• Fold the mirrors
• Turn off the power back door
Start washing from the front of the vehicle.
Extend the mirrors before driving.
●Brushes used in automatic car washes
may scratch the vehicle surface, parts
(wheel, etc.) and harm your vehicle’s
paint.
●Rear spoiler may not be washable in
some automatic car washes. There may
also be an increased risk of damage to
vehicle.
■High pressure car washes
As water may enter the cabin, do not bring
the nozzle tip near the gaps around the
doors or perimeter of the windows, or spray
these areas continuously.
■When using a car wash
If the door handle becomes wet while the
electronic key is within the effective range,
the door may lock and unlock repeatedly. In
that case, follow the following correction
procedures to wash the vehicle:
●Place the key in a position 6 ft. (2 m) or
more separate from the vehicle while the
vehicle is being wash ed. (Take care to
ensure that the key is not stolen.)
●Set the electronic key to battery-saving
mode to disable the smart access system
with push-button start. ( P.116)
■Wheels and wheel ornaments
●Remove any dirt immediately by using a
neutral detergent.
●Wash detergent off with water immedi-
ately after use.
●To protect the paint from damage, make
sure to observe the following precau-
tions.
• Do not use acidic, alkaline or abrasive
detergent
• Do not use hard brushes
• Do not use detergent on the wheels when they are hot, such as after driving or park-
ing in hot weather
Cleaning and protecting the
vehicle exterior
Perform cleaning in a manner
appropriate to each component
and its material.
Cleaning instructions