2021 LEXUS RX350 warning
[x] Cancel search: warningPage 413 of 508

4137-2. Steps to take in an emergency
7
When trouble arises
The master warning light and warning buzzers operate as follows depending on
the content of the message. If a message indicates the need for inspection by a
dealer, have the vehicle inspected by your Lexus dealer immediately.
Master warning light
The master warning light also comes on
or flashes in order to indicate that a mes-
sage is currently being displayed on the
multi-information display.
Multi-information display
Follow the instructions of the message
on the multi-information display.
If any of the warning messages are
shown again after the appropriate
actions have been performed, contact
your Lexus dealer.
A
B
Messages and warnings
Warning buzzer*Warning
Comes onSounds
Indicates an important situat ion, such as when a sys-
tem related to driving is ma lfunctioning or that dan-
ger may result if the co rrection procedure is not
performed
FlashesSoundsIndicates a situation, such as when damage to the
vehicle or danger may result
Page 414 of 508

4147-2. Steps to take in an emergency
In some situations, the master warning light and warning buzzer may not oper-
ate as specified. In this case, follow the instructions displayed in the warning
message.
If a warning light comes on or flashes at the same time that a warning message is
displayed, take corrective actio n according to the warning light. ( P.403)
*: A buzzer sounds the first time a message is shown on the multi-information display.
■Warning messages
The warning messages explained below
may differ from the actual messages
according to operation conditions and vehi-
cle specifications.
■Warning buzzer
In some cases, the bu zzer may not be heard
due to being in a noisy location or audio
sound.
■If “Shift to P Before Exiting Vehicle” is
displayed
Message is displayed when the driver’s
door is opened withou t turning the engine
switch off with the shift lever in any position
other than P.
Shift the shift lever to P.
■If “Power Turned Off to Save Battery” is
displayed
This message is displayed when the power
was cut off due to the automatic power off
function. The next time the engine is started,
increase the engine speed slightly and
maintain it at that speed for approximately
5 minutes to recharge the battery.
■If “AWD System Overheated Switching
to 2WD Mode” or “AWD System Over-
heated 2WD Mode Engaged” is dis-
played (AWD models)
This message may be displayed when driv-
ing under extremely high load conditions.
Drive the vehicle at low speeds or stop the
vehicle in a safe place with the engine run-
ning until the me ssage is cleared.
If the message is not cleared, have the vehi-
cle inspected by your Lexus dealer.
■If “Headlight System Malfunction Visit
Your Dealer” is displayed
The following systems may be malfunction-
ing. Have the vehicle inspected by your
Lexus dealer immediately.
●The LED headlight system
●AFS (Adaptive Front-lighting System) (if
equipped)
●The automatic headlight leveling system
●Automatic High Beam
■If “Radar Cruise Control Unavailable
See Owner's Manual” is displayed
The dynamic radar cruise control with
full-speed range system is suspended tem-
porarily or until the problem shown in the
message is re solved. (causes and coping
methods: P.207)
Comes onDoes not sound
Indicates a condition, such as malfunction of electri-
cal components, their cond ition, or indicates the
need for maintenance
FlashesDoes not sound
Indicates a situation, such as when an operation has
been performed incorrectly, or indicates how to
perform an operation correctly
Warning buzzer*Warning
Page 416 of 508

4167-2. Steps to take in an emergency
●If any of the following messages are
shown on the multi-information display, it
may indicate a malfunction. Immediately
stop the vehicle and contact your Lexus
dealer.
• “Braking Power Low”
• “Charging System Malfunction”
• “Oil Pressure Low”
Stop the vehicle in a safe place on a
hard, flat surface.
Set the parking brake.
Shift the shift lever to P.
Stop the engine.
Turn on the emergency flashers.
( P.394)
NOTICE
■If “High Power Consumption Partial
Limit On AC/Heater Operation” is
displayed frequently
There is a possible malfunction relating
to the charging system or the battery
may be deteriorating. Have the vehicle
inspected by your Lexus dealer.
If you have a flat tire
Your vehicle is equipped with a
spare tire. The flat tire can be
replaced with the spare tire.
For details about tires: P.365
WARNING
■If you have a flat tire
Do not continue driving with a flat tire.
Driving even a short distance with a flat
tire can damage the tire and the wheel
beyond repair, which could result in an
accident.
Before jacking up the vehicle
Page 418 of 508

4187-2. Steps to take in an emergency
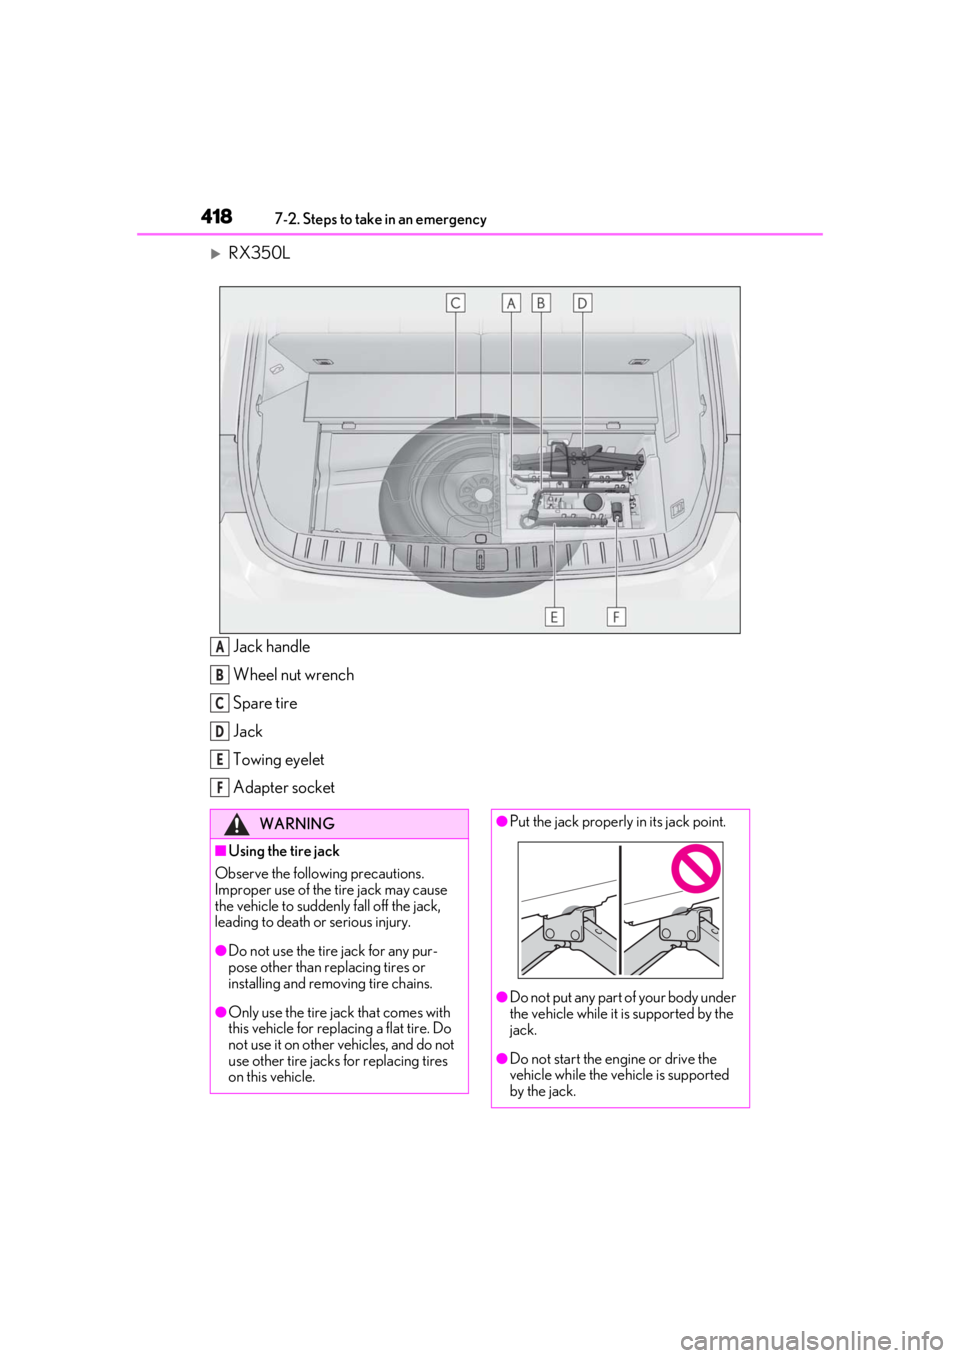
RX350LJack handle
Wheel nut wrench
Spare tire
Jack
Towing eyelet
Adapter socket
A
B
C
D
E
F
WARNING
■Using the tire jack
Observe the following precautions.
Improper use of the tire jack may cause
the vehicle to suddenly fall off the jack,
leading to death or serious injury.
●Do not use the tire jack for any pur-
pose other than replacing tires or
installing and removing tire chains.
●Only use the tire jack that comes with
this vehicle for replacing a flat tire. Do
not use it on other vehicles, and do not
use other tire jacks for replacing tires
on this vehicle.
●Put the jack properly in its jack point.
●Do not put any part of your body under
the vehicle while it is supported by the
jack.
●Do not start the engine or drive the
vehicle while the vehicle is supported
by the jack.
Page 419 of 508

4197-2. Steps to take in an emergency
7
When trouble arises
When replacing tires on a vehicle with
wheel lock nuts, use the following pro-
cedures to remove and install the
wheel lock nuts. The wheel lock key is
stored in the tray inside the luggage
compartment. Always return the wheel
lock key to its original position after
use, so that it does not get lost.
■Removal
For ease of removal, the wheel lock nut
should always be the first one loos-
ened.
1 Place the wheel lock key on top of
the wheel lock nut, turning until the
wheel lock key and wheel lock nut
patterns engage.
2 Place the wheel nut wrench on the
wheel lock key, and while applying
pressure on the wheel lock key,
loosen the wheel lock nut.
■Installation
For ease of installation, the wheel lock nut should always be the last one tight-
ened.
1
By hand, install a wheel lock nut on
each wheel.
2 Place the wheel lock key on top of
the wheel lock nut, turning until the
wheel lock key and wheel lock nut
patterns engage.
3 Place the wheel nut wrench on the
wheel lock key, and while applying
pressure on the wheel lock key,
tighten the wheel lock nut to the
recommended torque.
1 Secure the deck board using the
hook. ( P.319)
2 Disengage the hook and take out
the jack.
RX350: Remove the wheel nut wrench
and then the jack.
RX350L: Remove the jack handle and
then the jack.
WARNING
●Do not raise the vehicle while some-
one is inside.
●When raising the vehicle, do not put an
object on or under the jack.
●Do not raise the vehicle to a height
greater than that required to replace
the tire.
●Use a jack stand if it is necessary to get
under the vehicle.
●When lowering the vehicle, make sure
that there is no-one near the vehicle. If
there are people nearby, warn them
vocally before lowering.
Wheel lock nut (if equipped)
NOTICE
Do not use an impact wrench. Using an
impact wrench may cause permanent
damage to wheel lock nut and wheel lock
key. If in doubt about wheel lock applica-
tion, contact your Lexus dealer.
Taking out the jack
Page 421 of 508

4217-2. Steps to take in an emergency
7
When trouble arises
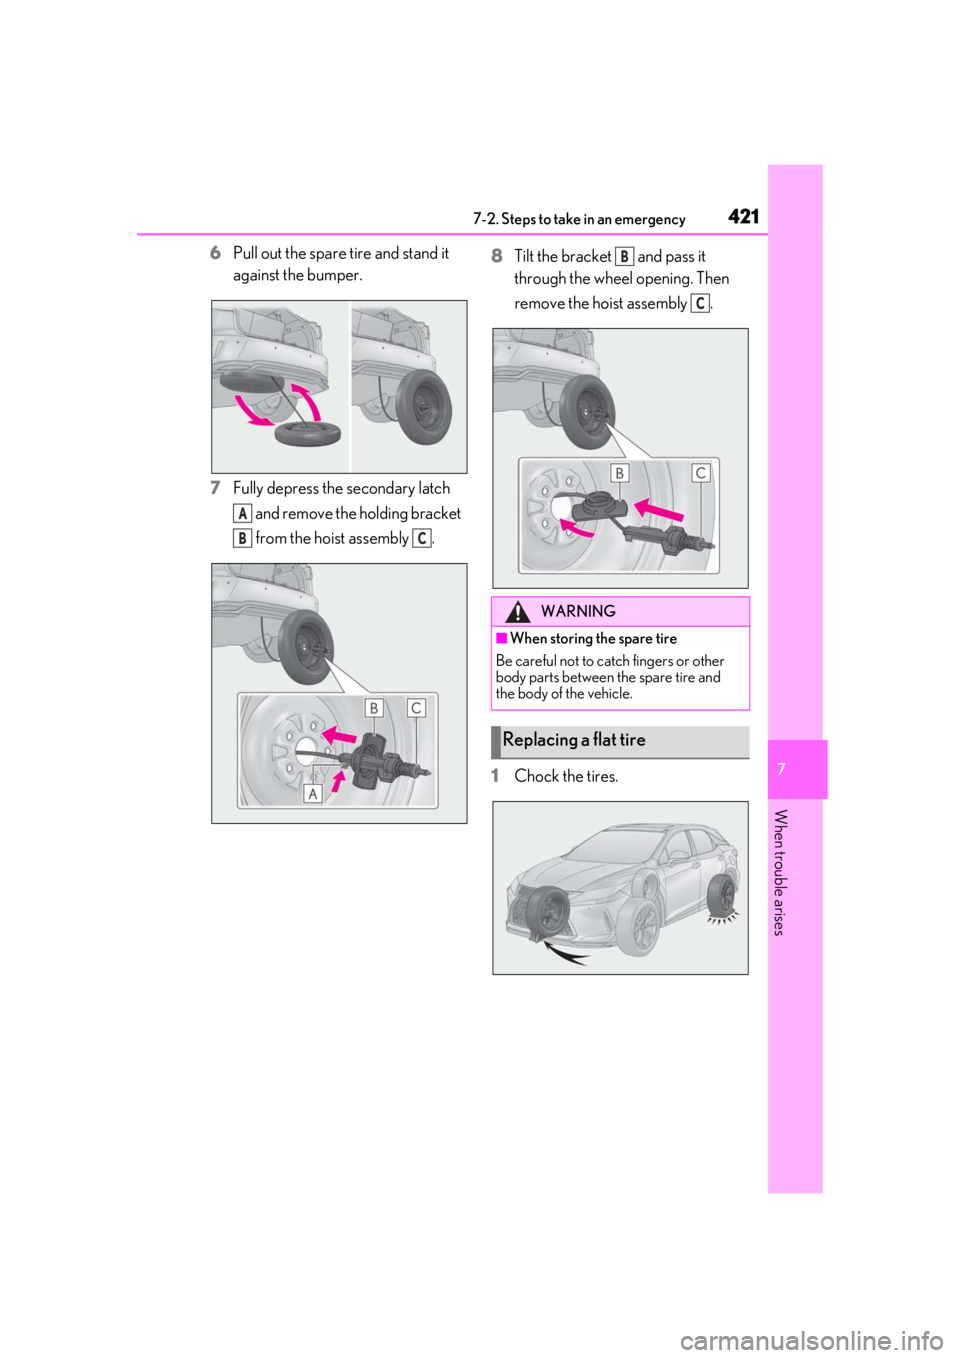
6Pull out the spare tire and stand it
against the bumper.
7 Fully depress the secondary latch
and remove the holding bracket
from the hoist assembly . 8
Tilt the bracket and pass it
through the wheel opening. Then
remove the hoist assembly .
1 Chock the tires.
A
BC
WARNING
■When storing the spare tire
Be careful not to catch fingers or other
body parts between the spare tire and
the body of the vehicle.
Replacing a flat tire
B
C
Page 423 of 508

4237-2. Steps to take in an emergency
7
When trouble arises
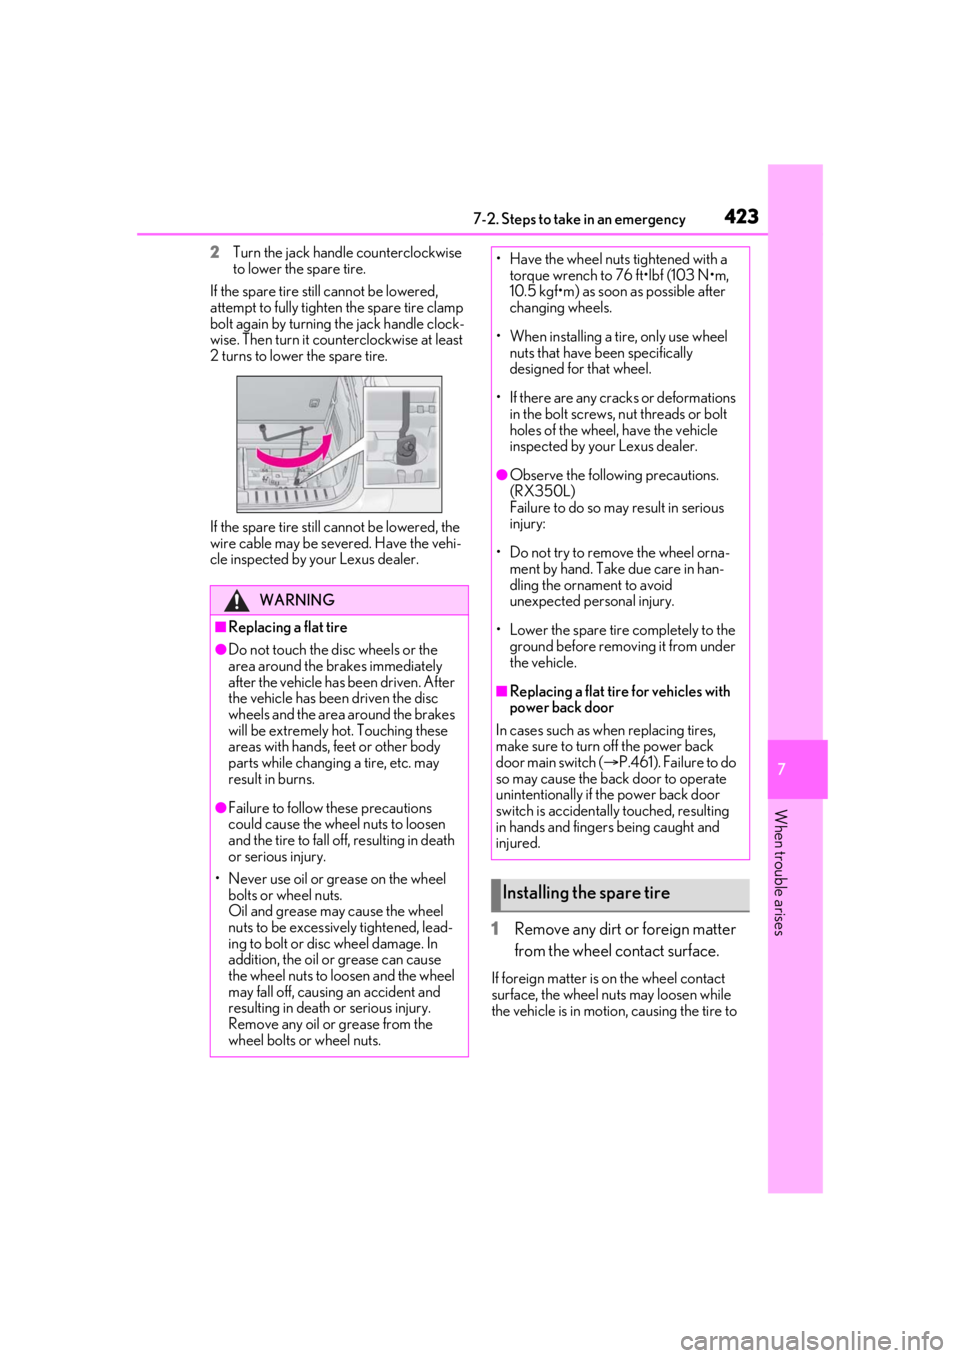
2Turn the jack handle counterclockwise
to lower the spare tire.
If the spare tire still cannot be lowered,
attempt to fully tighten the spare tire clamp
bolt again by turning the jack handle clock-
wise. Then turn it coun terclockwise at least
2 turns to lower the spare tire.
If the spare tire still ca nnot be lowered, the
wire cable may be seve red. Have the vehi-
cle inspected by your Lexus dealer.
1 Remove any dirt or foreign matter
from the wheel contact surface.
If foreign matter is on the wheel contact
surface, the wheel nuts may loosen while
the vehicle is in motion, causing the tire to
WARNING
■Replacing a flat tire
●Do not touch the disc wheels or the
area around the brakes immediately
after the vehicle has been driven. After
the vehicle has been driven the disc
wheels and the area around the brakes
will be extremely hot. Touching these
areas with hands, feet or other body
parts while changing a tire, etc. may
result in burns.
●Failure to follow these precautions
could cause the wheel nuts to loosen
and the tire to fall of f, resulting in death
or serious injury.
• Never use oil or grease on the wheel bolts or wheel nuts.
Oil and grease may cause the wheel
nuts to be excessively tightened, lead-
ing to bolt or disc wheel damage. In
addition, the oil or grease can cause
the wheel nuts to loosen and the wheel
may fall off, causing an accident and
resulting in death or serious injury.
Remove any oil or grease from the
wheel bolts or wheel nuts.
• Have the wheel nuts tightened with a torque wrench to 76 ft•lbf (103 N•m,
10.5 kgf•m) as soon as possible after
changing wheels.
• When installing a tire, only use wheel nuts that have been specifically
designed for that wheel.
• If there are any cracks or deformations in the bolt screws, nut threads or bolt
holes of the wheel, have the vehicle
inspected by your Lexus dealer.
●Observe the following precautions.
(RX350L)
Failure to do so may result in serious
injury:
• Do not try to remove the wheel orna- ment by hand. Take due care in han-
dling the ornament to avoid
unexpected personal injury.
• Lower the spare tire completely to the ground before removing it from under
the vehicle.
■Replacing a flat tire for vehicles with
power back door
In cases such as when replacing tires,
make sure to turn off the power back
door main switch ( P.461). Failure to do
so may cause the back door to operate
unintentionally if th e power back door
switch is accidentally touched, resulting
in hands and fingers being caught and
injured.
Installing the spare tire
Page 424 of 508

4247-2. Steps to take in an emergency
come off.
2Install the spare tire and loosely
tighten each wheel nut by hand by
approximately the same amount.
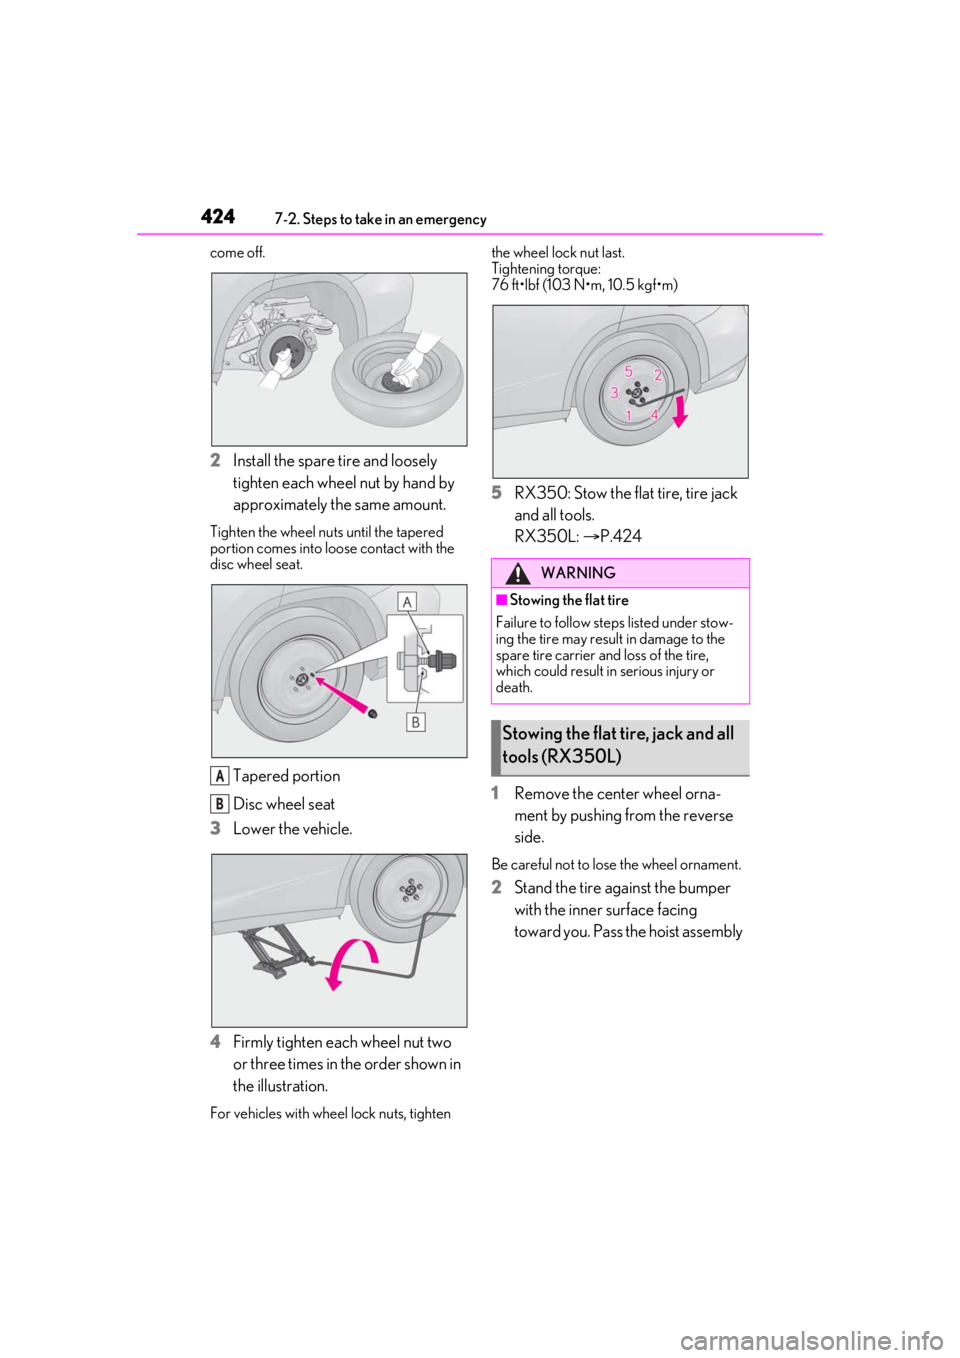
Tighten the wheel nuts until the tapered
portion comes into loose contact with the
disc wheel seat.
Tapered portion
Disc wheel seat
3 Lower the vehicle.
4 Firmly tighten each wheel nut two
or three times in the order shown in
the illustration.
For vehicles with wheel lock nuts, tighten the wheel lock nut last.
Tightening torque:
76 ft•lbf (103 N•m, 10.5 kgf•m)
5
RX350: Stow the flat tire, tire jack
and all tools.
RX350L: P.424
1 Remove the center wheel orna-
ment by pushing from the reverse
side.
Be careful not to lose the wheel ornament.
2Stand the tire against the bumper
with the inner surface facing
toward you. Pass the hoist assembly
A
B
WARNING
■Stowing the flat tire
Failure to follow st eps listed under stow-
ing the tire may result in damage to the
spare tire carrier and loss of the tire,
which could result in serious injury or
death.
Stowing the flat tire, jack and all
tools (RX350L)