Page 311 of 508
3115-4. Using the interior lights
5
Interior features
impact and conditions of the collision.)
■Customization
Some functions can be customized.
( P.461)
NOTICE
■Removing light lenses
Never remove the lens for the front inte-
rior light and front personal lights. Other-
wise, the lights will be damaged. If the
lens need to remove , contact your Lexus
dealer.
■To prevent battery discharge
Do not leave the lights on longer than
necessary when the engine is not run-
ning.
Page 322 of 508
3225-6. Using the other interior features
5-6.Using the other interior features
The USB charging ports are used to
supply 2.1 A of electricity at 5 V to
external devices.
The USB charging ports are for
charging only. They are not designed
for data transfer or other purposes.
Depending on the external device, it
may not charge properly. Refer to the
manual included with the device
before using a USB charging port.
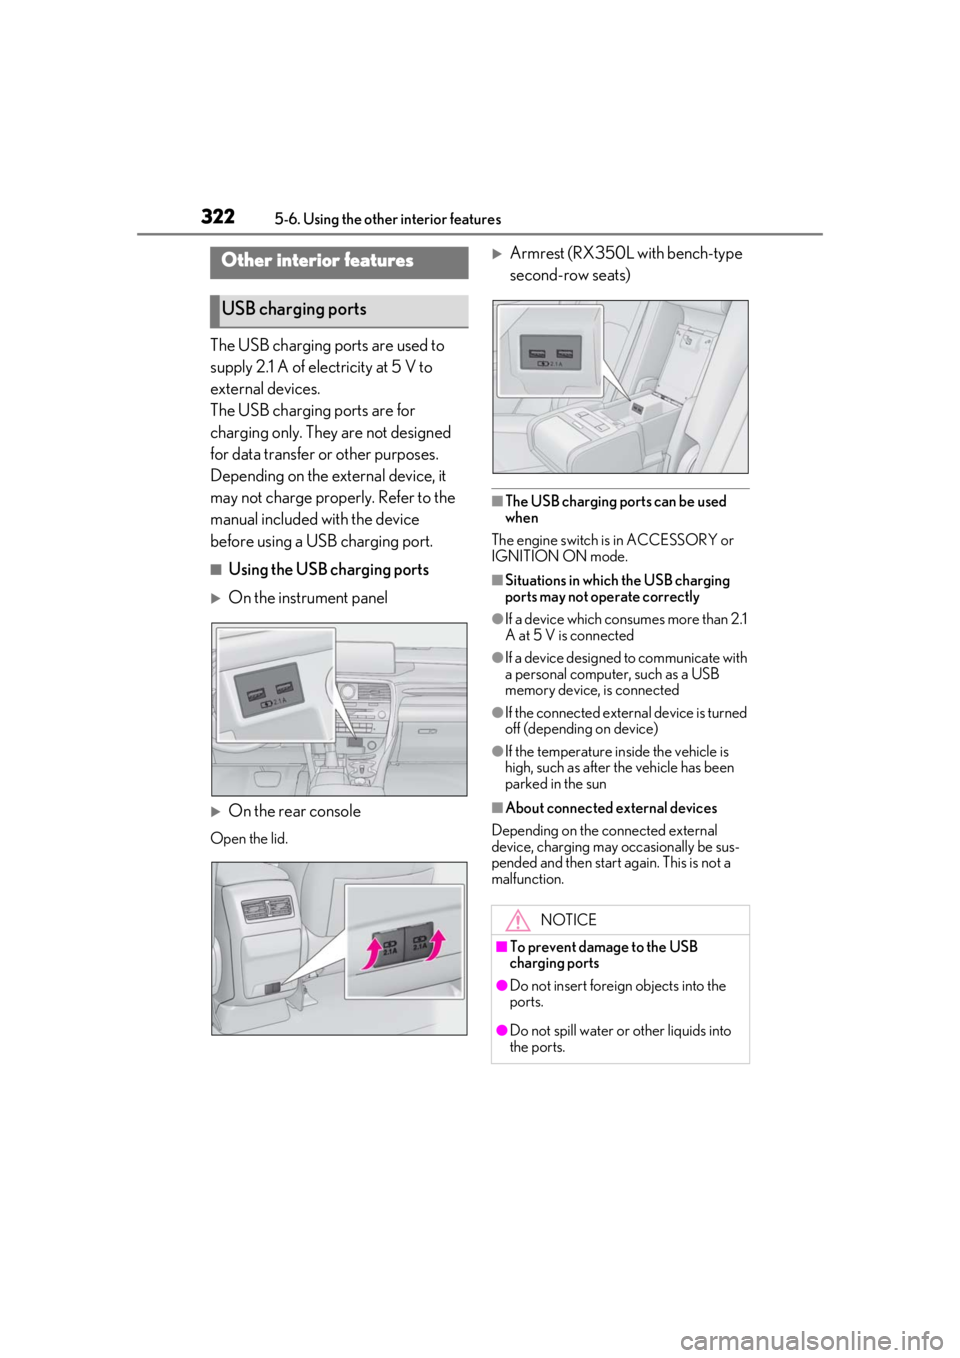
■Using the USB charging ports
On the instrument panel
On the rear console
Open the lid.
Armrest (RX350L with bench-type
second-row seats)
■The USB charging ports can be used
when
The engine switch is in ACCESSORY or
IGNITION ON mode.
■Situations in whic h the USB charging
ports may not operate correctly
●If a device which consumes more than 2.1
A at 5 V is connected
●If a device designed to communicate with
a personal computer, such as a USB
memory device, is connected
●If the connected external device is turned
off (depending on device)
●If the temperature inside the vehicle is
high, such as after the vehicle has been
parked in the sun
■About connected external devices
Depending on the connected external
device, charging may occasionally be sus-
pended and then start again. This is not a
malfunction.
Other interior features
USB charging ports
NOTICE
■To prevent damage to the USB
charging ports
●Do not insert foreign objects into the
ports.
●Do not spill water or other liquids into
the ports.
Page 323 of 508
3235-6. Using the other interior features
5
Interior features
A portable device, such as a smart-
phone or mobile battery, can be
charged by just placing it on the
charging area, provided the device is
compatible with the Qi wireless
charging standard created by the
Wireless Power Consortium.
The wireless charger cannot be used
with a portable device that is larger
than the charging area. Additionally,
depending on the portable device, the
wireless charger may not operate
properly. Refer to the operation man-
ual of the portable device.
■The “Qi” symbol
The “Qi” symbol is a trademark of the
Wireless Power Consortium.
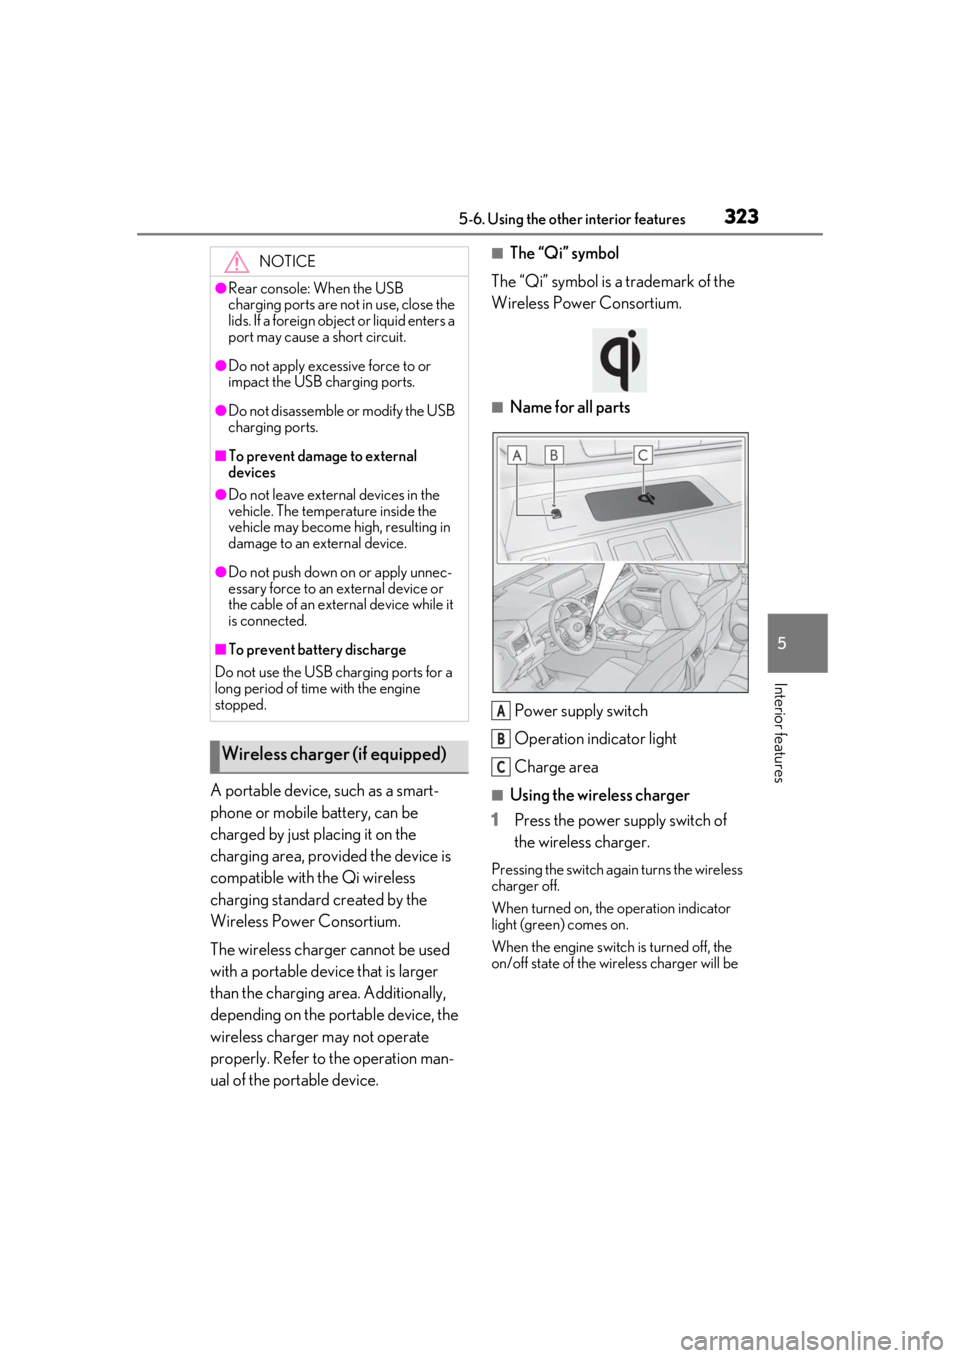
■Name for all parts
Power supply switch
Operation indicator light
Charge area
■Using the wireless charger
1 Press the power supply switch of
the wireless charger.
Pressing the switch again turns the wireless
charger off.
When turned on, the operation indicator
light (green) comes on.
When the engine switch is turned off, the
on/off state of the wi reless charger will be
NOTICE
●Rear console: When the USB
charging ports are not in use, close the
lids. If a foreign object or liquid enters a
port may cause a short circuit.
●Do not apply excessive force to or
impact the USB charging ports.
●Do not disassemble or modify the USB
charging ports.
■To prevent damage to external
devices
●Do not leave external devices in the
vehicle. The temperature inside the
vehicle may become high, resulting in
damage to an external device.
●Do not push down on or apply unnec-
essary force to an external device or
the cable of an external device while it
is connected.
■To prevent battery discharge
Do not use the USB charging ports for a
long period of time with the engine
stopped.
Wireless charger (if equipped)
A
B
C
Page 325 of 508

3255-6. Using the other interior features
5
Interior features
Blinks (orange) 4 times repeatedly
■The wireless charger can be operated
when
The engine switch is in ACCESSORY or
IGNITION ON mode.
■Portable devices t hat can be charged
●Portable devices compatible with the Qi
wireless charging standard can be
charged by the wireless charger. How-
ever, compatibility with all devices which
meet the Qi wireless charging standard is
not guaranteed.
●The wireless charger is designed to sup-
ply low power electricity (5 W or less) to
a cellular phone, smartphone, or other
portable device.
■If a cover or accessory is attached to the
portable device
Do not charge a portable device if a cover
or accessory which is not Qi compatible is
attached. Depending on the type of cover
and/or accessory attached, it may not be
possible to charge the portable device. If
the portable device is placed on the
charging area and does not charge, remove
the cover and/or accessories.
■If interference is heard in AM radio
broadcasts while charging
Turn off the wireless charger and check if
the noise is reduced. If noise is reduced,
press and hold the powe r supply switch of
the wireless charger fo r 2 seconds. The fre-
quency of the wireless charger is changed
and noise may be reduced. When the fre-
quency is changed, the operation indicator
light will blink (orange) 2 times.
■Charging precautions
●If the electronic key cannot be detected
in the cabin, charging cannot be per-
formed. When a door is opened and
closed, charging may be temporarily sus-
pended.
●While charging, the wi reless charger and
the portable device will become warm.
This is not a malfunction. If a portable
device becomes warm while charging
and charging stops due to the protection
function of the portable device, wait until
the portable device cools down and
charge it again.
■Sound generated during operation
When the power supply switch is turned on
or while a portable device is being identi-
fied, operation sounds may be heard. This is
not a malfunction.
■Cleaning the wireless charger
P.347
Suspected causesMeasure
A foreign object
exists between
the portable
device and
charging area.
Remove the foreign
object.
Portable device is
not positioned
properly on the
charging area.Move the portable
device toward the cen-
ter of the charging
area.
Suspected causesMeasure
The temperature
of the wireless
charger is exces-
sively high.Stop charging immedi-
ately and continue
charging after a while.
Page 330 of 508
3305-6. Using the other interior features
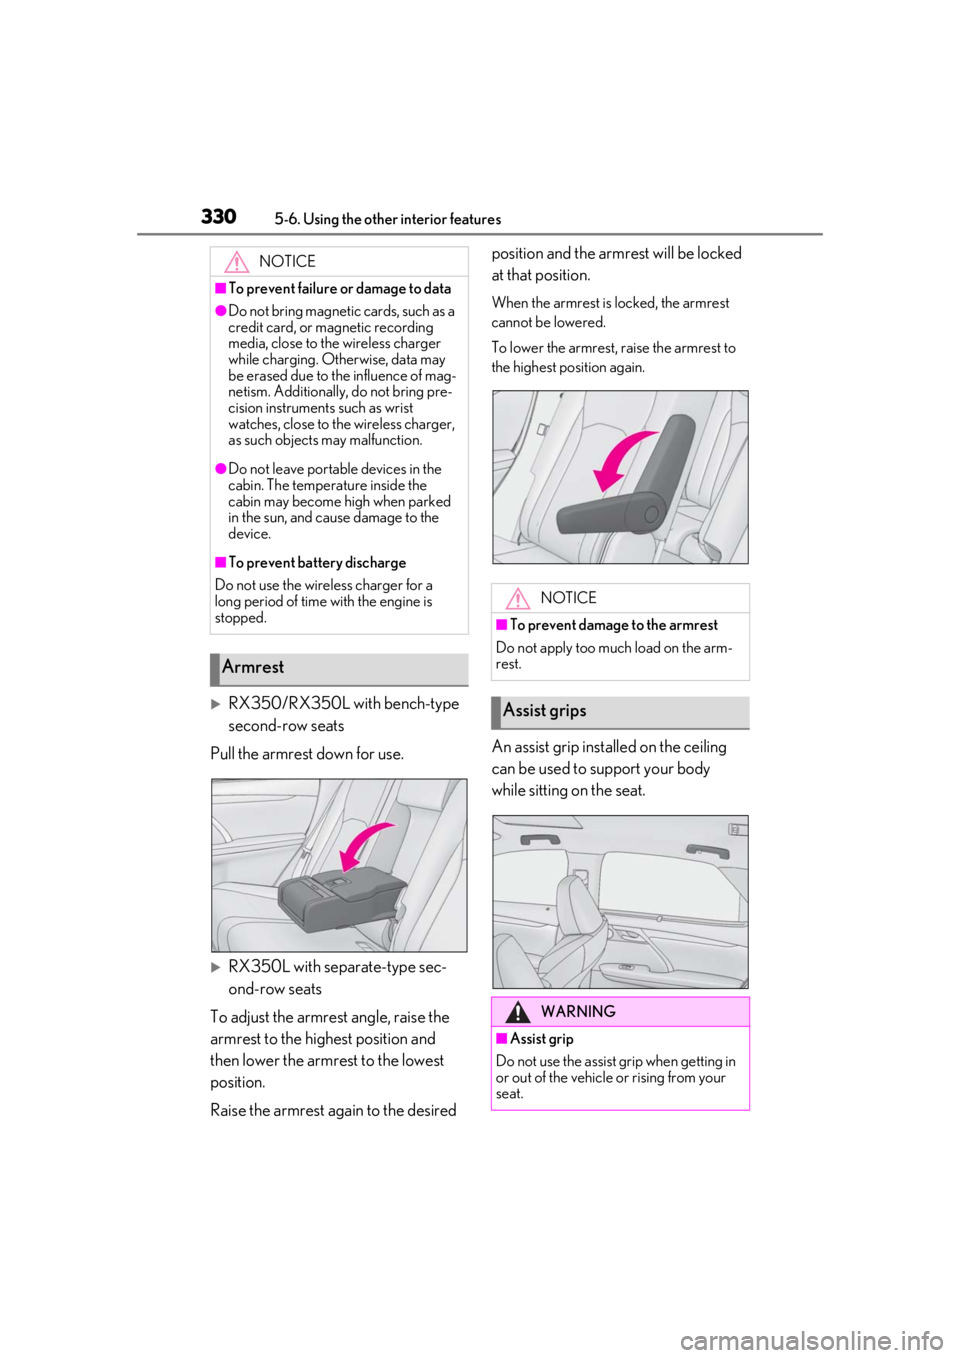
RX350/RX350L with bench-type
second-row seats
Pull the armrest down for use.
RX350L with separate-type sec-
ond-row seats
To adjust the armrest angle, raise the
armrest to the highest position and
then lower the armrest to the lowest
position.
Raise the armrest again to the desired position and the armrest will be locked
at that position.
When the armrest is locked, the armrest
cannot be lowered.
To lower the armrest, raise the armrest to
the highest position again.
An assist grip installed on the ceiling
can be used to support your body
while sitting on the seat.
NOTICE
■To prevent failure or damage to data
●Do not bring magnetic cards, such as a
credit card, or magnetic recording
media, close to the wireless charger
while charging. Otherwise, data may
be erased due to the influence of mag-
netism. Additionally, do not bring pre-
cision instruments such as wrist
watches, close to the wireless charger,
as such objects may malfunction.
●Do not leave portab
le devices in the
cabin. The temperature inside the
cabin may become high when parked
in the sun, and cause damage to the
device.
■To prevent battery discharge
Do not use the wireless charger for a
long period of time with the engine is
stopped.
Armrest
NOTICE
■To prevent damage to the armrest
Do not apply too much load on the arm-
rest.
Assist grips
WARNING
■Assist grip
Do not use the assist grip when getting in
or out of the vehicle or rising from your
seat.
Page 332 of 508
3325-6. Using the other interior features
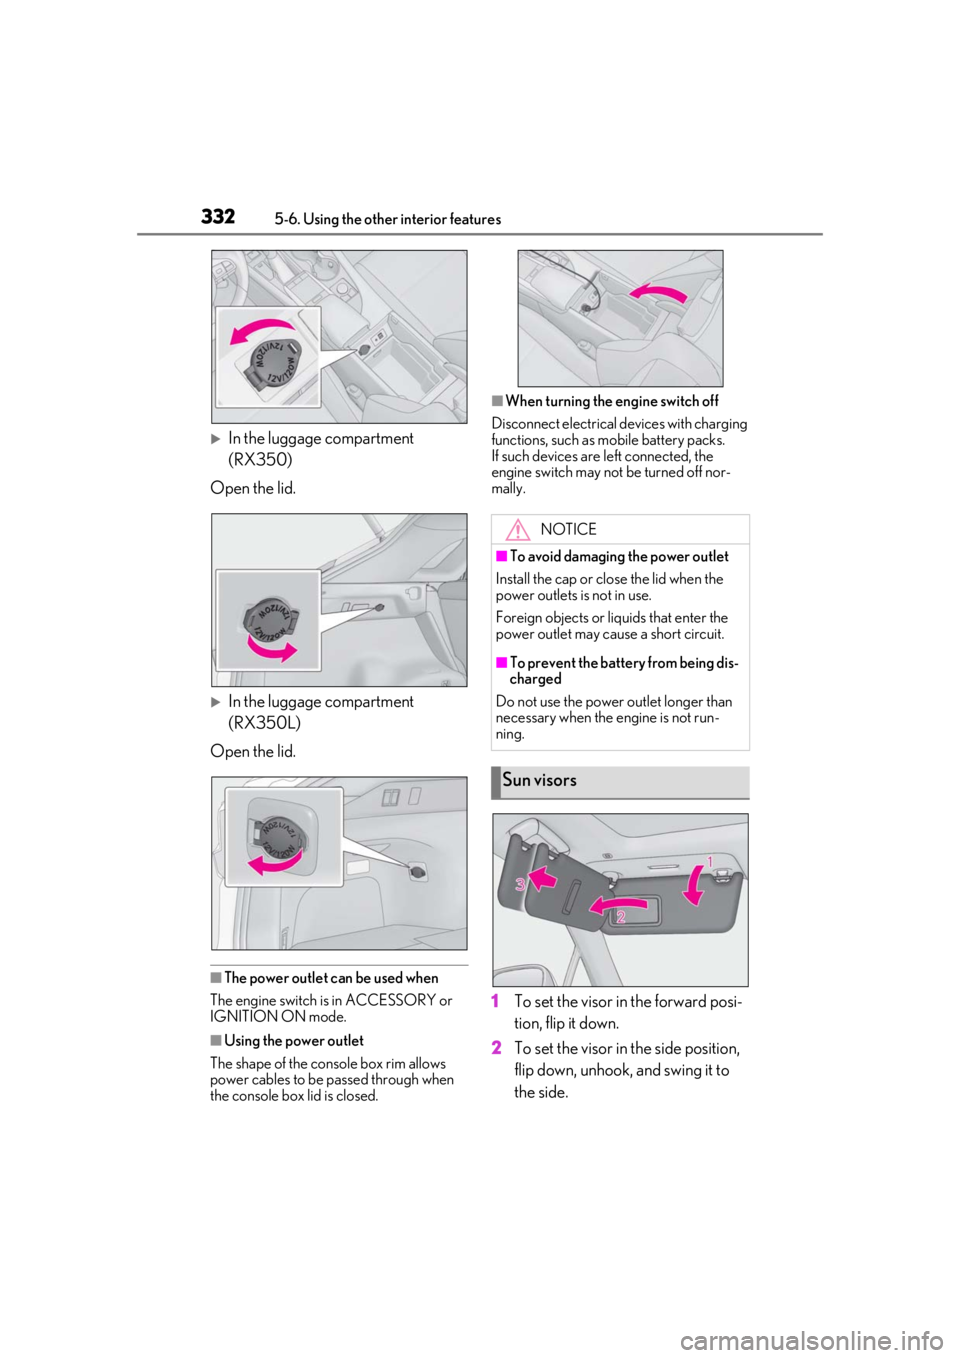
In the luggage compartment
(RX350)
Open the lid.
In the luggage compartment
(RX350L)
Open the lid.
■The power outlet can be used when
The engine switch is in ACCESSORY or
IGNITION ON mode.
■Using the power outlet
The shape of the console box rim allows
power cables to be passed through when
the console box lid is closed.
■When turning the engine switch off
Disconnect electrical devices with charging
functions, such as mobile battery packs.
If such devices are left connected, the
engine switch may not be turned off nor-
mally.
1 To set the visor in the forward posi-
tion, flip it down.
2 To set the visor in the side position,
flip down, unhook, and swing it to
the side.
NOTICE
■To avoid damaging the power outlet
Install the cap or close the lid when the
power outlets is not in use.
Foreign objects or liquids that enter the
power outlet may cause a short circuit.
■To prevent the battery from being dis-
charged
Do not use the power outlet longer than
necessary when the engine is not run-
ning.
Sun visors
Page 333 of 508
3335-6. Using the other interior features
5
Interior features
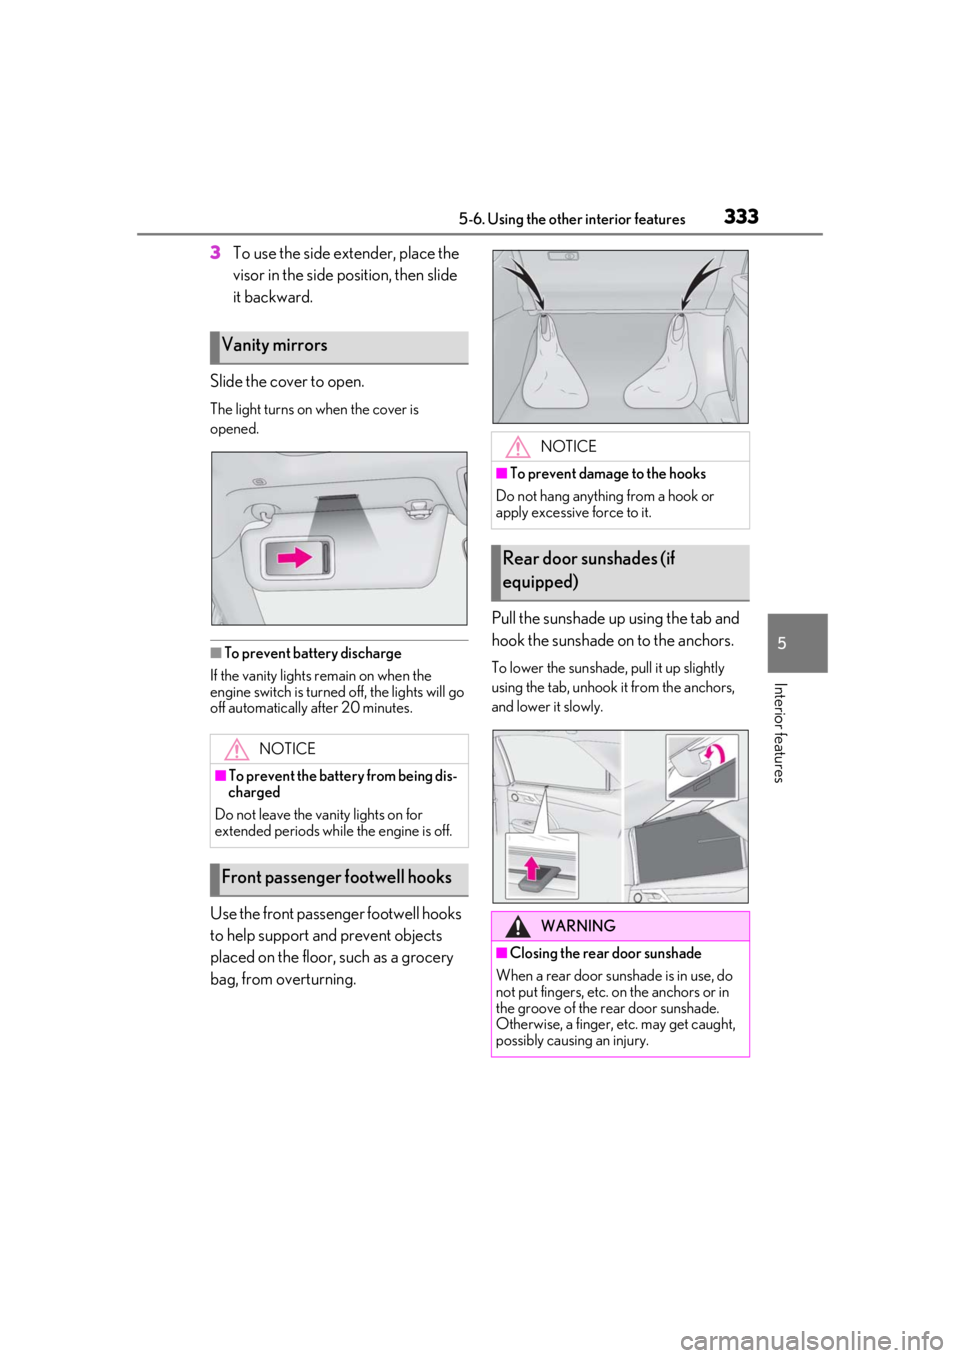
3To use the side extender, place the
visor in the side position, then slide
it backward.
Slide the cover to open.
The light turns on when the cover is
opened.
■To prevent battery discharge
If the vanity lights remain on when the
engine switch is turned off, the lights will go
off automatically after 20 minutes.
Use the front passenger footwell hooks
to help support and prevent objects
placed on the floor, such as a grocery
bag, from overturning. Pull the sunshade up using the tab and
hook the sunshade on to the anchors.
To lower the sunshade, pull it up slightly
using the tab, unhook it from the anchors,
and lower it slowly.
Vanity mirrors
NOTICE
■To prevent the battery from being dis-
charged
Do not leave the vanity lights on for
extended periods while the engine is off.
Front passenger footwell hooks
NOTICE
■To prevent damage to the hooks
Do not hang anything from a hook or
apply excessive force to it.
Rear door sunshades (if
equipped)
WARNING
■Closing the rear door sunshade
When a rear door sunshade is in use, do
not put fingers, etc. on the anchors or in
the groove of the rear door sunshade.
Otherwise, a finger, etc. may get caught,
possibly causing an injury.
Page 343 of 508

343
6
6
Maintenance and care
Maintenance and care
.6-1. Maintenance and careCleaning and protecting the vehi-cle exterior ................................ 344
Cleaning and protecting the vehi- cle interior ................................. 347
6-2. Maintenance Maintenance requirements........................................................ 350
General maintenance .............. 351
Emission inspection and mainte- nance (I/M) programs ......... 354
6-3. Do-it-yourself maintenance Do-it-yourself service precautions........................................................ 355
Hood............................................... 357
Positioning a floor jack............ 357
Engine compartment............... 359
Tires ................................................ 365
Tire inflation pressure .............. 373
Wheels........................................... 374
Air conditioning filter...............376
Windshield wiper inserts........ 378
Electronic key battery ............. 379
Checking and replacing fuses ......................................................... 381
Headlight aim.............................. 382
Light bulbs .................................... 384