2021 LEXUS RX350 light
[x] Cancel search: lightPage 196 of 508

1964-3. Operating the lights and wipers
accordance with rain volume and vehi-
cle speed.
The sensor sensitivity can be adjusted
when “AUTO” is selected.
1 (U.S.A.) or (Canada)
Off
2 Rain-sensing wiper operation
3 (U.S.A.) or (Canada)
Low speed operation
4 (U.S.A.) or (Canada)
High speed operation
5 (U.S.A.) or (Canada)
Temporary operation 6
Increases the sensitivity
7 Decreases the sensitivity
8 Washer/wiper dual opera-
tion
Pulling the lever operates the wipers and
washer.
The wipers will automatically operate a
couple of times after the washer squirts.
Vehicles with headlight cleaners:
When the engine swit ch is in IGNITION
ON mode and the headlights are on, if the
lever is pulled, the he adlight cleaners will
operate once. After this, the headlight
cleaners will operate every 5th time the
lever is pulled.
■The windshield wipers and washer can
be operated when
The engine switch is in IGNITION ON
mode.
■Dripping prevention wiper sweep (vehi-
cles with rain-sensi ng windshield wip-
ers)
After washing and wipi ng operation several
Page 197 of 508

1974-3. Operating the lights and wipers
4
Driving
times, the wipers operate one more time
after a short delay to prevent dripping.
However, this function will not operate while
driving.
■Effects of vehicle speed on wiper opera-
tion
Vehicle speed affects the intermittent wiper
interval.
■Raindrop sensor (vehicles with
rain-sensing windshield wipers)
●The raindrop sensor judges the amount
of raindrops.
An optical sensor is adopted. It may not
operate properly when sunlight from the
rising or setting of the sun intermittently
strikes the windshield, or if bugs, etc. are
present on the windshield
●If the wiper switch is turned to the
“AUTO” position while the engine switch
is in IGNITION ON mode, the wipers
will operate once to show that AUTO
mode is activated.
●When the sensor sensit ivity ring is turned
toward high while in “AUTO” position, the
wipers will operate once to indicate that
the sensor sensitiv ity is enhanced.
●If the temperature of the raindrop sensor
is 194°F (90°C) or higher, or 5°F (-15°C)
or lower, automatic operation may not
occur. In this case, operate the wipers in
any mode other than AUTO mode.
■If no windshield washer fluid sprays
Check that the washer nozzles are not
blocked, if there is washer fluid in the
washer fluid tank.
■Front door opening linked windshield
wiper stop function (vehicles with
rain-sensing windshield wipers)
When “AUTO” is selected and the wind-
shield wipers are operatin g, if a front door is opened, the operation
of the windshield
wipers will be stopped to prevent anyone
near the vehicle from being sprayed by
water from the wipers, provided the vehicle
is stopped with the parking brake applied or
the shift lever in P. When the front door is
closed, wiper operation will resume.
■Customization
Some functions can be customized.
( P.461)
When the windshield wipers are not
WARNING
■Caution regarding the use of wind-
shield wipers in AUTO mode (vehi-
cles with rain-sensing windshield
wipers)
The windshield wipers may operate
unexpectedly if the sensor is touched or
the windshield is subj ect to vibration in
A U T O m o d e . T a k e c a r e t h a t y o u r f i n g e r s ,
etc. do not become caught in the wind-
shield wipers.
■Caution regarding the use of washer
fluid
When it is cold, do not use the washer
fluid until the windshield becomes warm.
The fluid may freeze on the windshield
and cause low visibility. This may lead to
an accident, resulting in death or serious
injury.
NOTICE
■When the washer fluid tank is empty
Do not operate the switch continually as
the washer fluid pump may overheat.
■When a nozzle becomes blocked
In this case, contact your Lexus dealer.
Do not try to clear it with a pin or other
object. The nozzle will be damaged.
Changing the windshield wiper
rest position/Lifting the wind-
shield wipers
Page 198 of 508

1984-3. Operating the lights and wipers
being used, they retract to below the
hood. To enable the windshield wipers
to be lifted when parking in cold condi-
tions or when replacing a windshield
wiper insert, change the rest position of
the windshield wipers to the service
position using the wiper lever.
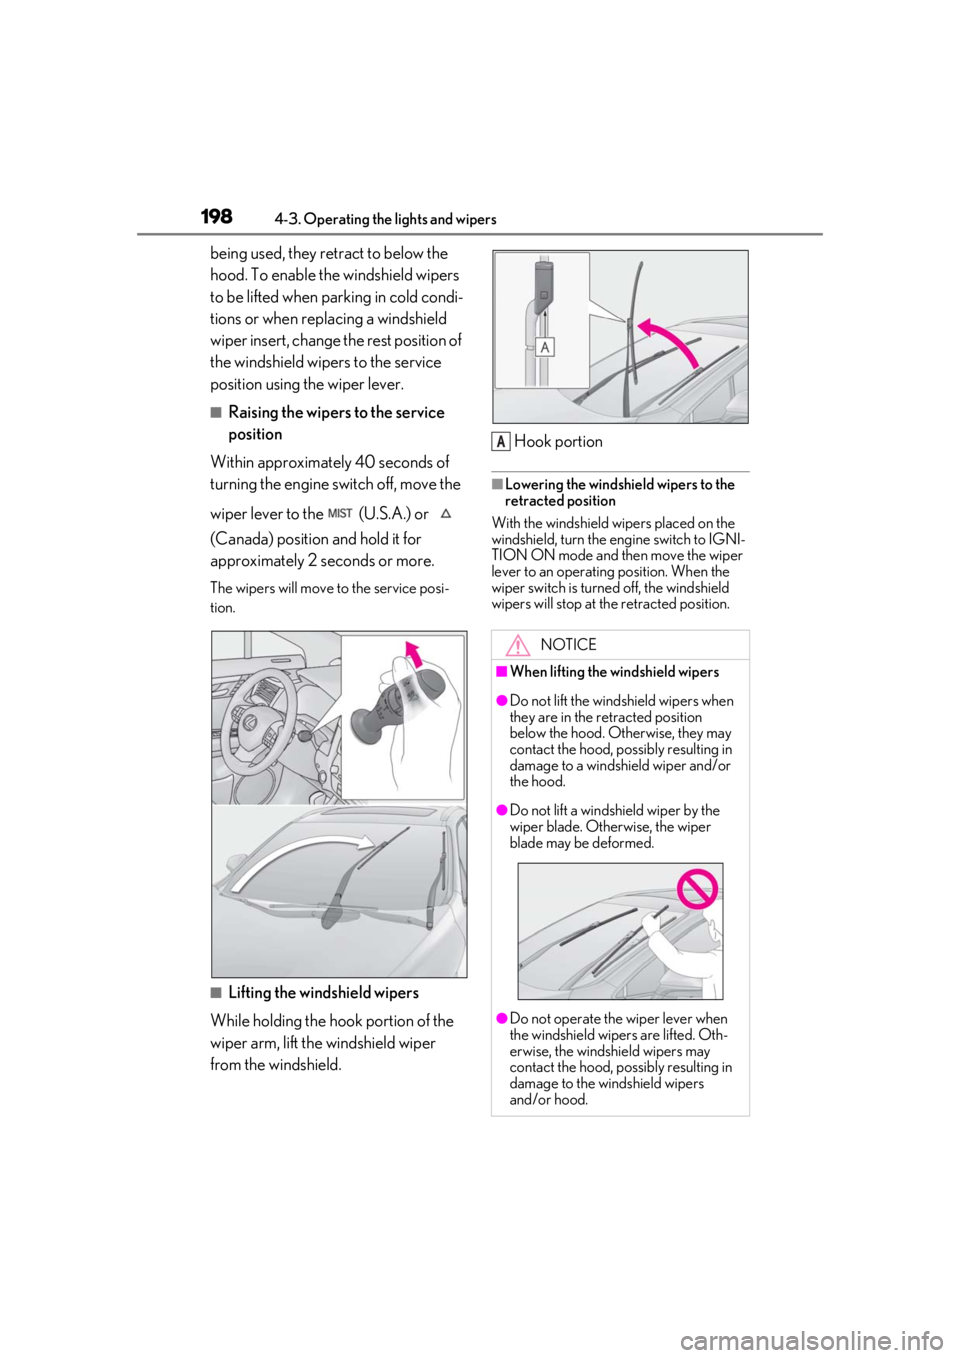
■Raising the wipers to the service
position
Within approximately 40 seconds of
turning the engine switch off, move the
wiper lever to the (U.S.A.) or
(Canada) position and hold it for
approximately 2 se conds or more.
The wipers will move to the service posi-
tion.
■Lifting the windshield wipers
While holding the hook portion of the
wiper arm, lift the windshield wiper
from the windshield. Hook portion
■Lowering the windshield wipers to the
retracted position
With the windshield wipers placed on the
windshield, turn the en gine switch to IGNI-
TION ON mode and then move the wiper
lever to an operating position. When the
wiper switch is turned off, the windshield
wipers will stop at the retracted position.
NOTICE
■When lifting the windshield wipers
●Do not lift the wind shield wipers when
they are in the retracted position
below the hood. Otherwise, they may
contact the hood, possibly resulting in
damage to a windshield wiper and/or
the hood.
●Do not lift a windshield wiper by the
wiper blade. Otherwise, the wiper
blade may be deformed.
●Do not operate the wiper lever when
the windshield wipe rs are lifted. Oth-
erwise, the windshield wipers may
contact the hood, possibly resulting in
damage to the windshield wipers
and/or hood.
A
Page 199 of 508

1994-3. Operating the lights and wipers
4
Driving
Operating the switch operates
the rear wiper as follows.
1 (U.S.A.) or (Canada)
Off
2 (U.S.A.) or (Canada) Inter-
mittent operation
3 (U.S.A.) or (Canada) Nor-
mal operation 4
Washer/wiper dual opera-
tionPushing the lever oper ates the wiper and
washer.
The wiper will automatically operate a cou-
ple of times after the washer squirts.
■The rear window wiper and washer can
be operated when
The engine switch is in IGNITION ON
mode.
■If no washer fluid sprays
Check that the wash er nozzle is not
blocked if there is wash er fluid in the washer
fluid tank.
Rear window wiper and
washer
NOTICE
■When the rear window is dry
Do not use the wiper, as it may damage
the rear window.
Operating the wiper lever
NOTICE
■When the washer fluid tank is empty
Do not operate the switch continually as
the washer fluid pump may overheat.
■When a nozzle becomes blocked
In this case, contact your Lexus dealer.
Do not try to clear it with a pin or other
object. The nozzle will be damaged.
Page 201 of 508

2014-4. Refueling
4
Driving
1With the doors unlocked, press the
center of the rear edge of the fuel
filler door.
Push inward and take your hand away to
slightly open the fuel filler door. Then open
the door fully by hand.
2Open the fuel filler door until it is
securely locked.
3 Turn the fuel tank cap slowly and
remove it, then put it into the holder
on the fuel filler door.
■If the fuel filler door cannot be opened
P.430
1 After refueling, turn the fuel tank
cap until you hear a click. Once the cap is released, it will turn slightly in
the opposite direction.
2 Close the fuel filler door, and press
the center of the rear edge of the
fuel filler door.
When you lock the doors, the fuel filler
door will lock also.
■Fuel filler door lock condition
The fuel filler door may not be locked even
when the vehicle’s doors are locked in the
following conditions:
●When operating the door lock button
inside the vehicle
●When the automatic door locking system
is operated ( P.102)
●When the fuel filler door is closed after
the vehicle’s doors are locked
Opening the fuel tank cap
Closing the fuel tank cap
Page 205 of 508

2054-5. Using the driving support systems
4
Driving
WARNING
●If the part of the windshield in front of
the front camera is fogged up or cov-
ered with condensation, or ice, use the
windshield defogger to remove the
fog, condensation, or ice. (P.292)
●If water droplets cannot be properly
removed from the area of the wind-
shield in front of the front camera by
the windshield wipers, replace the
wiper insert or wiper blade.
●Do not attach window tint to the wind-
shield.
●Replace the windshield if it is damaged
or cracked.
After replacing the windshield, the
front camera must be recalibrated.
Contact your Lexus dealer.
●Do not allow liquids to contact the
front camera.
●Do not allow bright lights to shine into
the front camera.
●Do not dirty or damage the front cam-
era.
When cleaning the inside of the wind-
shield, do not allow glass cleaner to
contact the lens of the front camera.
Also, do not touch the lens.
If the lens is dirty or damaged, contact
your Lexus dealer.
●Do not subject the front camera to a
strong impact.
●Do not change the installation position
or direction of the front camera or
remove it.
●Do not disassemble the front camera.
●Do not modify any components of the
vehicle around the front camera
(inside rear view mirror, etc.) or ceiling.
●Do not attach any accessories to the
hood, front grille or front bumper that
may obstruct the front camera. Con-
tact your Lexus dealer for details.
●If a surfboard or other long object is to
be mounted on the roof, make sure
that it will not obstruct the front cam-
era.
●Do not modify the headlights or other
lights.
Page 208 of 508

2084-5. Using the driving support systems
●In the following situations, if the situation has changed (or the vehicle has been driven for
some time) and the normal operating conditions are detected, the message will disappear
and the system will become operational.
If the message does not disappear, contact your Lexus dealer.
• When the temperature around the radar sensor is outside of the operational range, such
as when the vehicle is in the sun or in an extremely cold environment
• When the front camera cannot detect objects in front of the vehicle, such as when driving
in the dark, snow, or fog, or when brig ht lights are shining into the front camera
When the temperature around the front
camera is outside of the operational range,
such as when the vehicle is in the sun or in an
extremely cold environment
If the front camera is hot, such as after the
vehicle had been parked in the sun, use the
air conditioning system to decrease the tem-
perature around the front camera.
If a sunshade was used when the vehicle
was parked, depending on its type, the sun-
light reflected from the surface of the sun-
shade may cause the temperature of the
front camera to become excessively high.
If the front camera is cold, such after the
vehicle is parked in an extremely cold envi-
ronment, use the air conditioning system to
increase the temperature around the front
camera.
The area in front of the front camera is
obstructed, such as when the hood is open
or a sticker is attached to the part of the
windshield in front of the front camera.
Close the hood, remove the sticker, etc. to
clear the obstruction.
SituationActions
Page 211 of 508

2114-5. Using the driving support systems
4
Driving
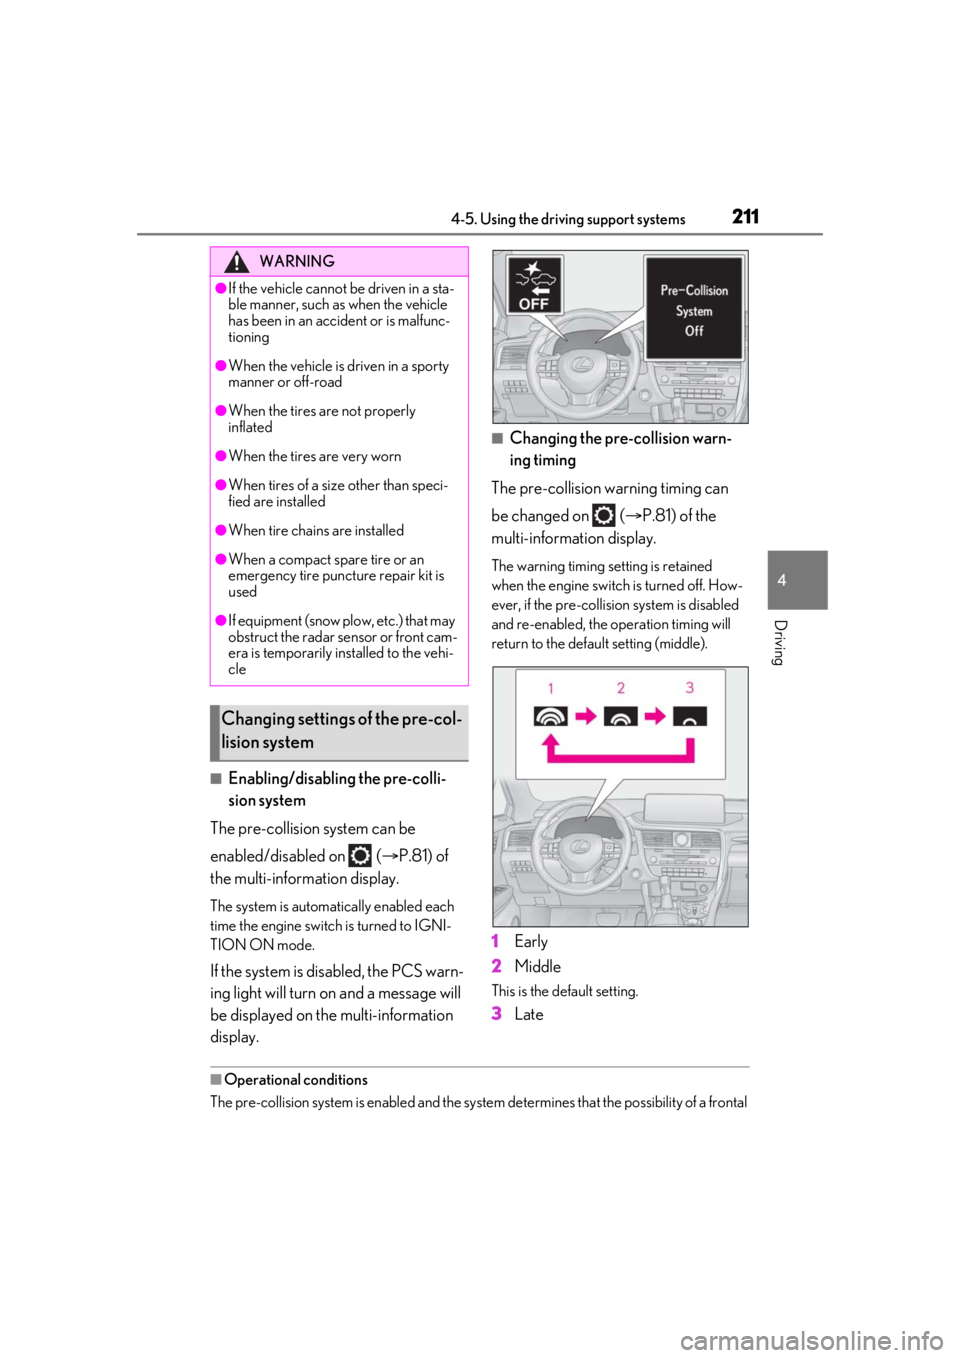
■Enabling/disabling the pre-colli-
sion system
The pre-collision system can be
enabled/disabled on ( P.81) of
the multi-information display.
The system is automatically enabled each
time the engine switch is turned to IGNI-
TION ON mode.
If the system is disabled, the PCS warn-
ing light will turn on and a message will
be displayed on the multi-information
display.
■Changing the pre-collision warn-
ing timing
The pre-collision warning timing can
be changed on ( P.81) of the
multi-information display.
The warning timing setting is retained
when the engine switch is turned off. How-
ever, if the pre-collision system is disabled
and re-enabled, the operation timing will
return to the default setting (middle).
1 Early
2 Middle
This is the default setting.
3Late
■Operational conditions
The pre-collision system is enabled and the system determines that the possibility of a frontal
WARNING
●If the vehicle cannot be driven in a sta-
ble manner, such as when the vehicle
has been in an accident or is malfunc-
tioning
●When the vehicle is driven in a sporty
manner or off-road
●When the tires are not properly
inflated
●When the tires are very worn
●When tires of a size other than speci-
fied are installed
●When tire chains are installed
●When a compact spare tire or an
emergency tire puncture repair kit is
used
●If equipment (snow plow, etc.) that may
obstruct the radar sensor or front cam-
era is temporarily installed to the vehi-
cle
Changing settings of the pre-col-
lision system