2021 LEXUS RX350 equipped
[x] Cancel search: equippedPage 321 of 508
3215-5. Using the storage features
5
Interior features
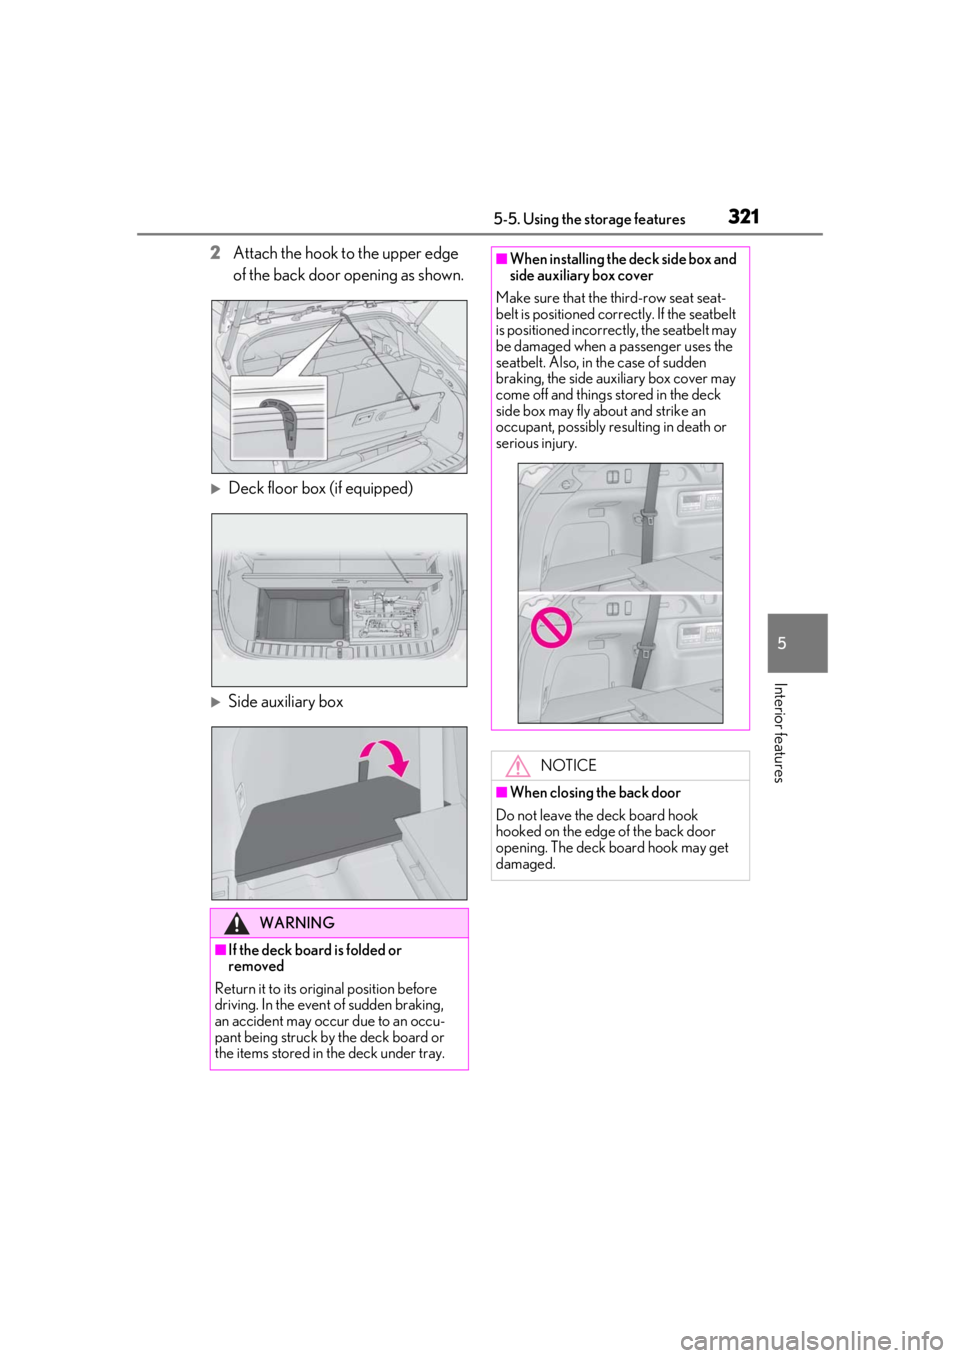
2Attach the hook to the upper edge
of the back door opening as shown.
Deck floor box (if equipped)
Side auxiliary box
WARNING
■If the deck board is folded or
removed
Return it to its original position before
driving. In the event of sudden braking,
an accident may occur due to an occu-
pant being struck by the deck board or
the items stored in the deck under tray.
■When installing the deck side box and
side auxiliary box cover
Make sure that the third-row seat seat-
belt is positioned correctly. If the seatbelt
is positioned incorrec tly, the seatbelt may
be damaged when a passenger uses the
seatbelt. Also, in the case of sudden
braking, the side auxiliary box cover may
come off and things stored in the deck
side box may fly about and strike an
occupant, possibly resulting in death or
serious injury.
NOTICE
■When closing the back door
Do not leave the deck board hook
hooked on the edge of the back door
opening. The deck board hook may get
damaged.
Page 323 of 508
3235-6. Using the other interior features
5
Interior features
A portable device, such as a smart-
phone or mobile battery, can be
charged by just placing it on the
charging area, provided the device is
compatible with the Qi wireless
charging standard created by the
Wireless Power Consortium.
The wireless charger cannot be used
with a portable device that is larger
than the charging area. Additionally,
depending on the portable device, the
wireless charger may not operate
properly. Refer to the operation man-
ual of the portable device.
■The “Qi” symbol
The “Qi” symbol is a trademark of the
Wireless Power Consortium.
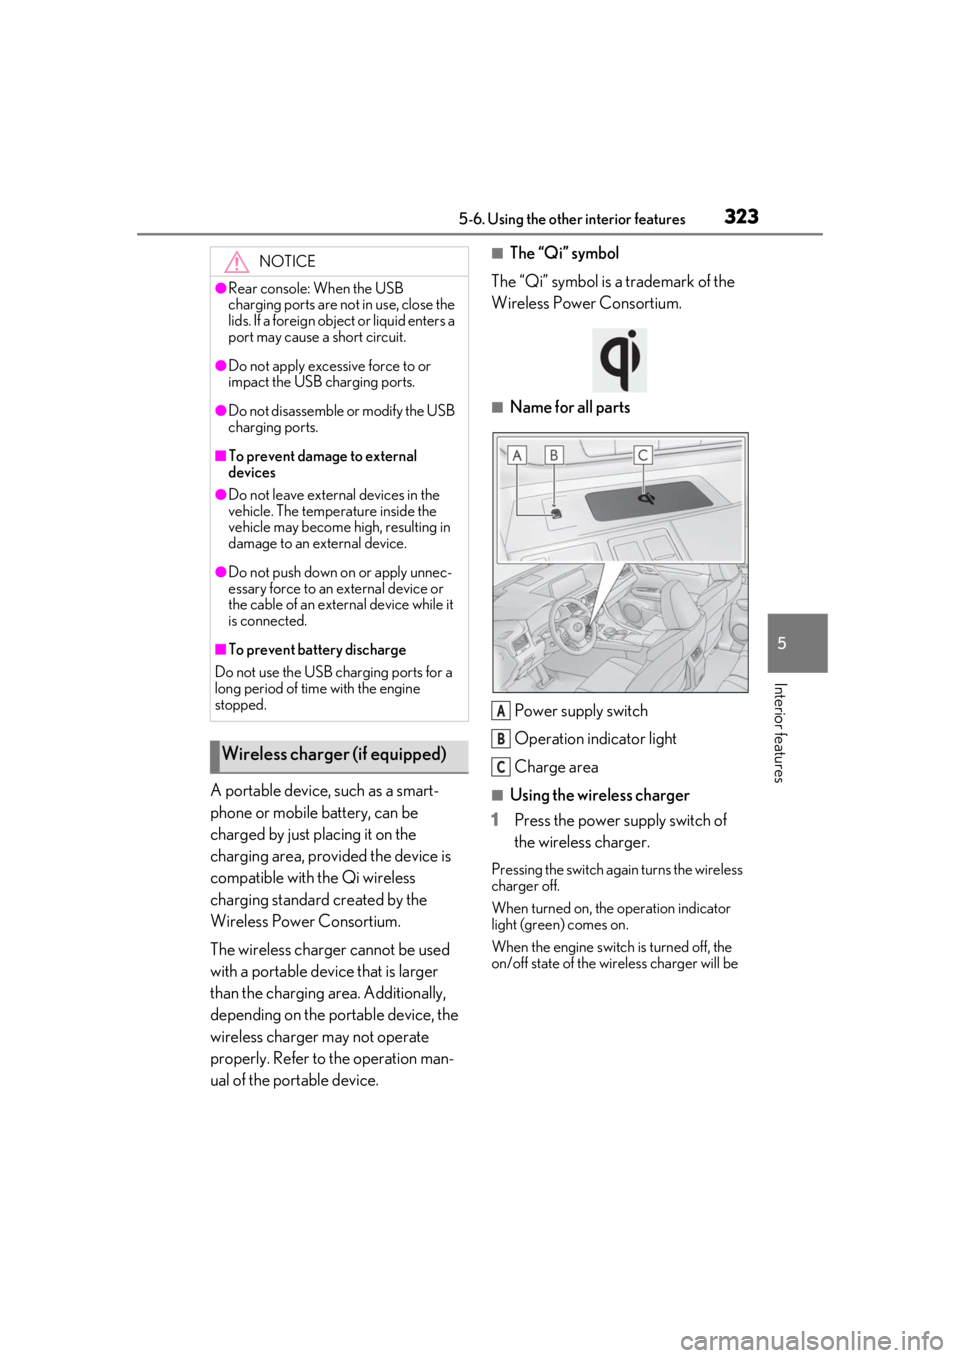
■Name for all parts
Power supply switch
Operation indicator light
Charge area
■Using the wireless charger
1 Press the power supply switch of
the wireless charger.
Pressing the switch again turns the wireless
charger off.
When turned on, the operation indicator
light (green) comes on.
When the engine switch is turned off, the
on/off state of the wi reless charger will be
NOTICE
●Rear console: When the USB
charging ports are not in use, close the
lids. If a foreign object or liquid enters a
port may cause a short circuit.
●Do not apply excessive force to or
impact the USB charging ports.
●Do not disassemble or modify the USB
charging ports.
■To prevent damage to external
devices
●Do not leave external devices in the
vehicle. The temperature inside the
vehicle may become high, resulting in
damage to an external device.
●Do not push down on or apply unnec-
essary force to an external device or
the cable of an external device while it
is connected.
■To prevent battery discharge
Do not use the USB charging ports for a
long period of time with the engine
stopped.
Wireless charger (if equipped)
A
B
C
Page 333 of 508
3335-6. Using the other interior features
5
Interior features
3To use the side extender, place the
visor in the side position, then slide
it backward.
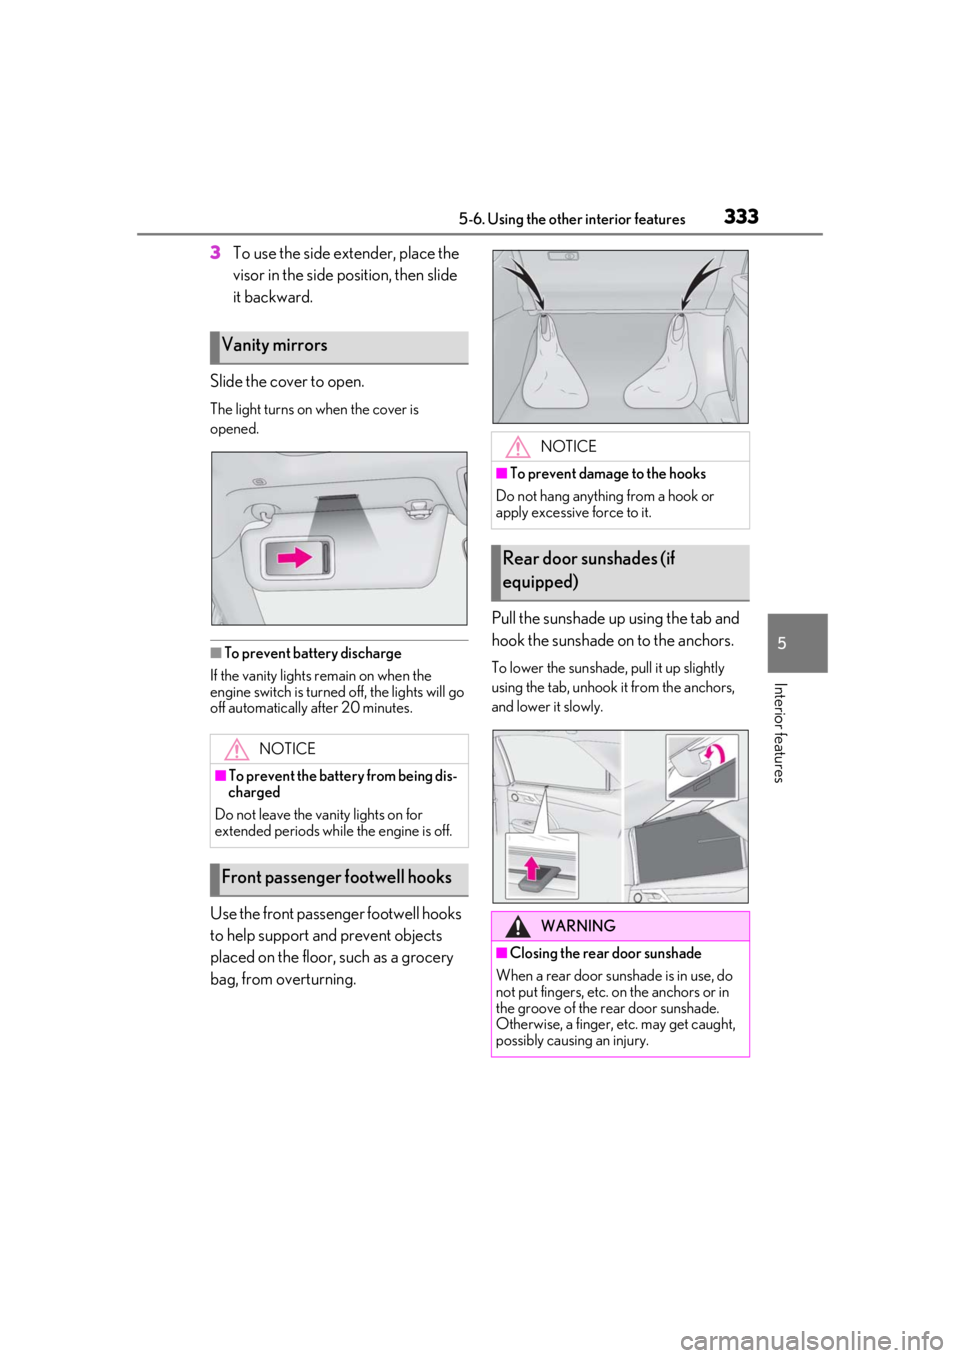
Slide the cover to open.
The light turns on when the cover is
opened.
■To prevent battery discharge
If the vanity lights remain on when the
engine switch is turned off, the lights will go
off automatically after 20 minutes.
Use the front passenger footwell hooks
to help support and prevent objects
placed on the floor, such as a grocery
bag, from overturning. Pull the sunshade up using the tab and
hook the sunshade on to the anchors.
To lower the sunshade, pull it up slightly
using the tab, unhook it from the anchors,
and lower it slowly.
Vanity mirrors
NOTICE
■To prevent the battery from being dis-
charged
Do not leave the vanity lights on for
extended periods while the engine is off.
Front passenger footwell hooks
NOTICE
■To prevent damage to the hooks
Do not hang anything from a hook or
apply excessive force to it.
Rear door sunshades (if
equipped)
WARNING
■Closing the rear door sunshade
When a rear door sunshade is in use, do
not put fingers, etc. on the anchors or in
the groove of the rear door sunshade.
Otherwise, a finger, etc. may get caught,
possibly causing an injury.
Page 336 of 508
3365-6. Using the other interior features
■Before programming HomeLink®
During programming, it is possible
that garage doors, gates, or other
devices may operate. For this rea-
son, make sure that people and
objects are clear of the garage door
or other devices to prevent injury or
other potential harm.
It is recommended that a new bat-
tery be placed in the remote control
transmitter for more accurate pro-
gramming.
Garage door opener motors manu-
factured after 1995 may be
equipped with rolling code protec-
tion. If this is the case, you may need
a stepladder or other sturdy, safe
device to reach the “Learn” or
“Smart” button on the garage door
opener motor.
■Programming HomeLink®
Steps 1 through 3 must be performed
within 60 seconds, otherwise the indi-
cator light will stop flashing and pro-
gramming will not be able to be
completed.
1 Press and release the HomeLink
®
button you want to program and check that the HomeLink
® indica-
tor light flashes (orange).
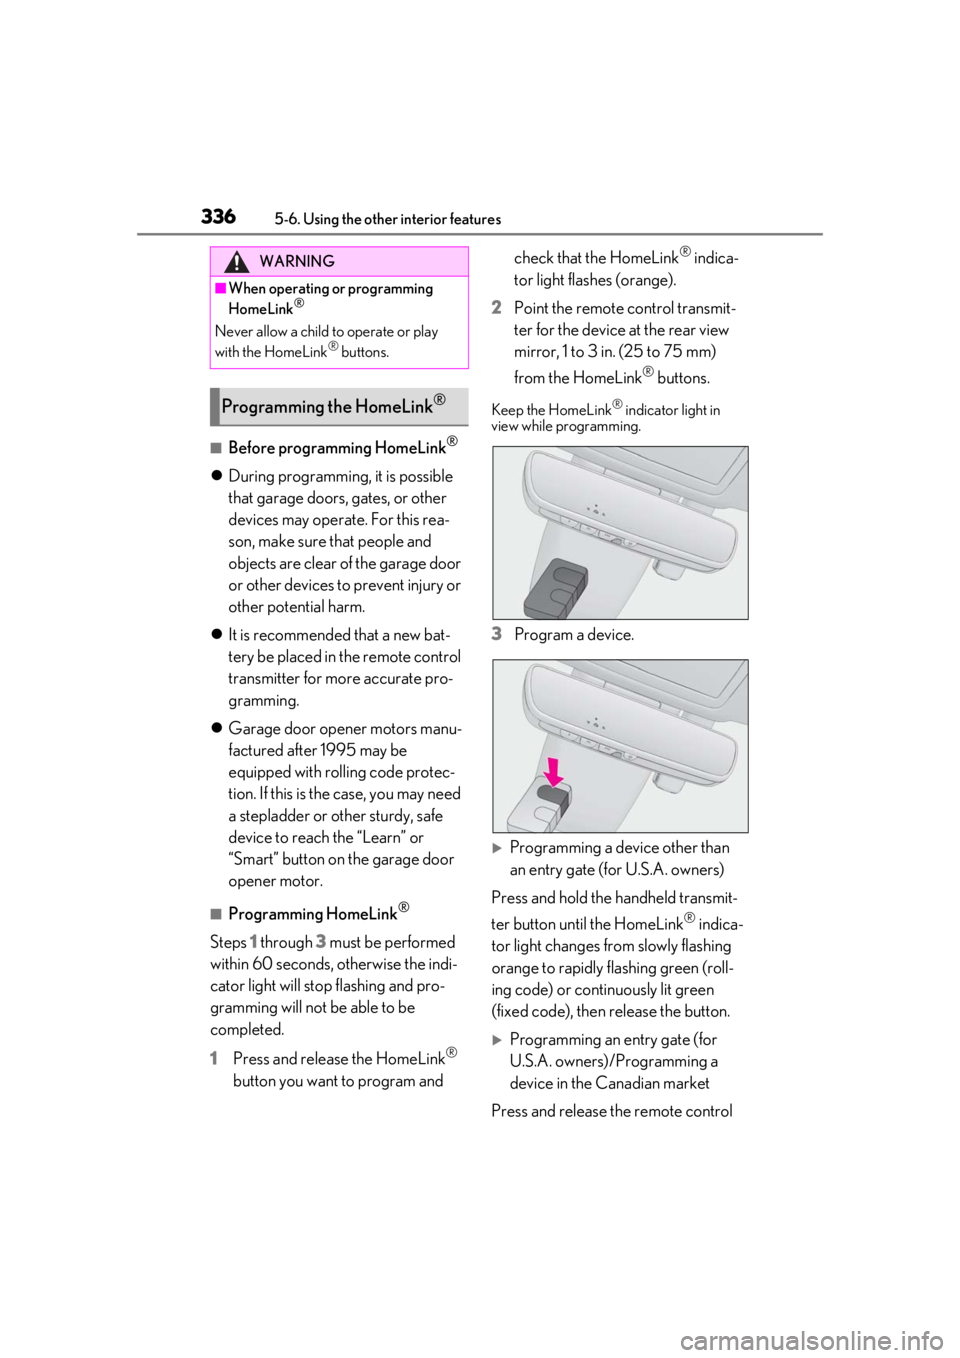
2 Point the remote control transmit-
ter for the device at the rear view
mirror, 1 to 3 in. (25 to 75 mm)
from the HomeLink
® buttons.
Keep the HomeLink® indicator light in
view while programming.
3 Program a device.
Programming a device other than
an entry gate (for U.S.A. owners)
Press and hold the handheld transmit-
ter button until the HomeLink
® indica-
tor light changes from slowly flashing
orange to rapidly flashing green (roll-
ing code) or continuously lit green
(fixed code), then release the button.
Programming an entry gate (for
U.S.A. owners)/Programming a
device in the Canadian market
Press and release the remote control
WARNING
■When operating or programming
HomeLink®
Never allow a child to operate or play
with the HomeLink® buttons.
Programming the HomeLink®
Page 337 of 508
3375-6. Using the other interior features
5
Interior features
transmitter button at 2 second inter-
vals, repeatedly, until the HomeLink
®
indicator light changes from slowly
flashing (orange) to rapidly flashing
(green) (rolling code ) or continuously
lit (green) (fixed code).
4 Test the HomeLink
® operation by
pressing the newly programmed
button and observing the indicator
light:
Indicator light illuminates: Program-
ming of a fixed code device has
completed. The garage door or
other device should operate when a
HomeLink
® button is pressed and
released.
Indicator light flashes rapidly: The
garage door opener motor or other
device is equipped with a rolling
code. To complete programming,
firmly press and hold the Home-
Link
® button for 2 seconds then
release it.
If the garage door or other device
does not operate, proceed to “Pro-
gramming a rolling code system”.
5 Repeat the steps above to program
another device for any of the
remaining HomeLink
® buttons.
■Programming a rolling code sys-
tem
2 or more people may be necessary to
complete rolling code programming.
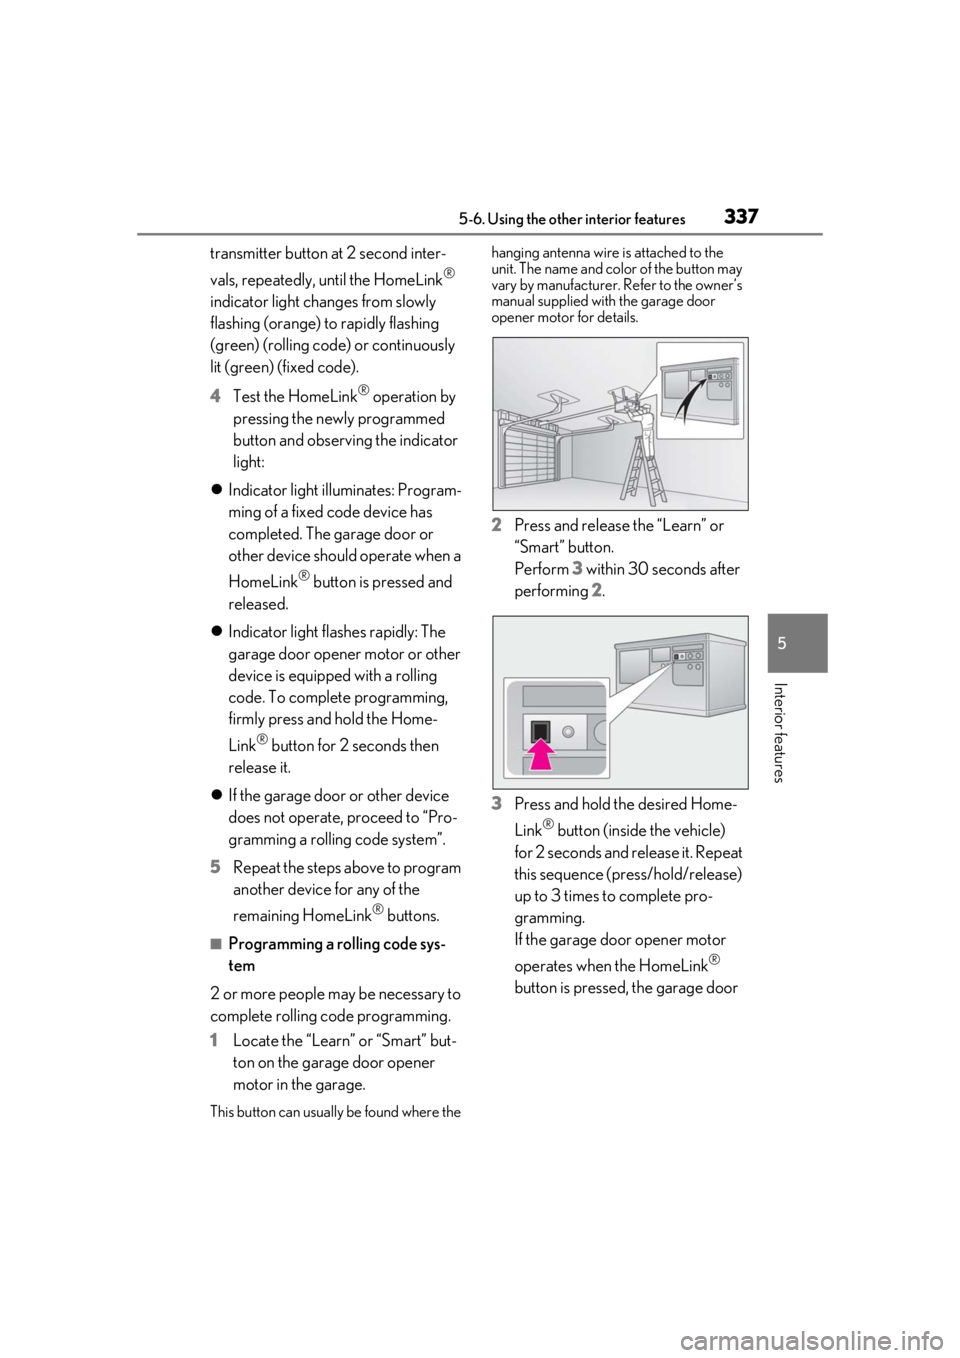
1 Locate the “Learn” or “Smart” but-
ton on the garage door opener
motor in the garage.
This button can usuall y be found where the hanging antenna wire is attached to the
unit. The name and color of the button may
vary by manufacturer.
Refer to the owner’s
manual supplied with the garage door
opener motor for details.
2 Press and release the “Learn” or
“Smart” button.
Perform 3 within 30 seconds after
performing 2.
3 Press and hold the desired Home-
Link
® button (inside the vehicle)
for 2 seconds and release it. Repeat
this sequence (press/hold/release)
up to 3 times to complete pro-
gramming.
If the garage door opener motor
operates when the HomeLink
®
button is pressed, the garage door
Page 340 of 508

3405-6. Using the other interior features
*:If equipped
To turn the compass on or off, press
and hold the switch for 3 seconds.
Directions are displayed as follows:
■Conditions unfavorable to correct
operation
The compass may not show the correct
direction in the following conditions:
●The vehicle is stopped immediately after
turning.
●The vehicle is on an inclined surface.
●The vehicle is in a place where the earth’s
magnetic field is subject to interference
by artificial magnetic fields (under-
ground car park/parking lot, under a
steel tower, between buildings, roof car
park/parking lot, near an intersection,
near a large vehicle, etc.).
●The vehicle has become magnetized.
(There is a magnet or metal object near
the inside rear view mirror.)
●The battery has been disconnected.
●A door is open.
Compass*
The compass on the inside rear
view mirror indicates the direction
in which the vehicle is heading.
Operation and displays
DisplayDirection
“N”North
“NE”Northeast
“E”East
“SE”Southeast
“S”South
“SW”Southwest
“W”West
“NW”Northwest
WARNING
■While driving the vehicle
Do not adjust the display. Adjust the dis-
play only when the vehicle is stopped.
NOTICE
■To avoid compass malfunctions
Do not place magnets or any metal
objects near the inside rear view mirror.
Doing this may cause the compass sen-
sor to malfunction.
■To ensure normal operation of the
compass
●Do not perform a circling calibration of
the compass in a place where the
earth’s magnetic field is subject to
interference by artificial magnetic
fields.
●During calibration, do not operate
electric systems (moon roof, pan-
oramic moon roof, power windows,
etc.) as they may interfere with the cal-
ibration.
Page 346 of 508
3466-1. Maintenance and care
WARNING
●Lexus Safety System + 2.0
●BSM (if equipped)
●RCTA (if equipped)
●PKSB (if equipped)
NOTICE
■To prevent paint deterioration and
corrosion on the body and compo-
nents (aluminum wheels, etc.)
●Wash the vehicle immediately in the
following cases:
• After driving near the sea coast
• After driving on salted roads
• If coal tar or tree sap is present on the paint surface
• If dead insects, in sect droppings or
bird droppings are present on the
paint surface
• After driving in an area contaminated with soot, oily smoke, mine dust, iron
powder or chemical substances
• If the vehicle becomes heavily soiled with dust or mud
• If liquids such as benzene and gasoline are spilled on the paint surface
●If the paint is chip ped or scratched,
have it repaired immediately.
●To prevent the wheels from corroding,
remove any dirt and store in a place
with low humidity when storing the
wheels.
■Cleaning the exterior lights
●Wash carefully. Do not use organic
substances or scrub with a hard brush.
This may damage the surfaces of the
lights.
●Do not apply wax to the surfaces of the
lights.
Wax may cause damage to the lenses.
■When using an automatic car wash
(vehicles with rain-sensing windshield
wipers)
Set the wiper switch to the off position.
If the wiper switch is in “AUTO”, the wip-
ers may operate and the wiper blades
may be damaged.
■When using a high pressure car wash
●When washing the vehicle, do not let
water of the high pressure washer hit
directly or the vicinity of the camera.
Due to the shock from the high pres-
sure water, it is possible the device may
not operate as normal.
●Do not bring the nozzle tip close to
boots (rubber or resin manufactured
cover), connectors or the following
parts. The parts may be damaged if
they come into contact with high-pres-
sure water.
• Traction related parts
•Steering parts
• Suspension parts
• Brake parts
●Keep the cleaning nozzle at least 11.9
in. (30 cm) away from the vehicle
body. Otherwise resin section, such as
moldings and bumpers, may be
deformed and damaged.
Also, do not continuously hold the nozzle
in the same place.
●Do not spray the lower part of the
windshield continuously.
If water enters the air conditioning sys-
tem intake located near the lower part of
the windshield, the air conditioning sys-
tem may not operate correctly.
●Do not wash the underside of the vehi-
cle using a high pressure car washer.
Page 367 of 508
3676-3. Do-it-yourself maintenance
6
Maintenance and care
roads, we recommend using snow tires. If
you need snow tires, select tires of the
same size, construction and load capacity
as the originally installed tires. Since your
vehicle has radial tires as original equip-
ment, make sure your snow tires also have
radial construction. Do not install studded
tires without first checking local regula-
tions for possible restrictions. Snow tires
should be installed on all wheels.
( P.280)
■If the tread on snow tires wears down
below 0.16 in. (4 mm)
The effectiveness of the tires as snow tires is
lost.
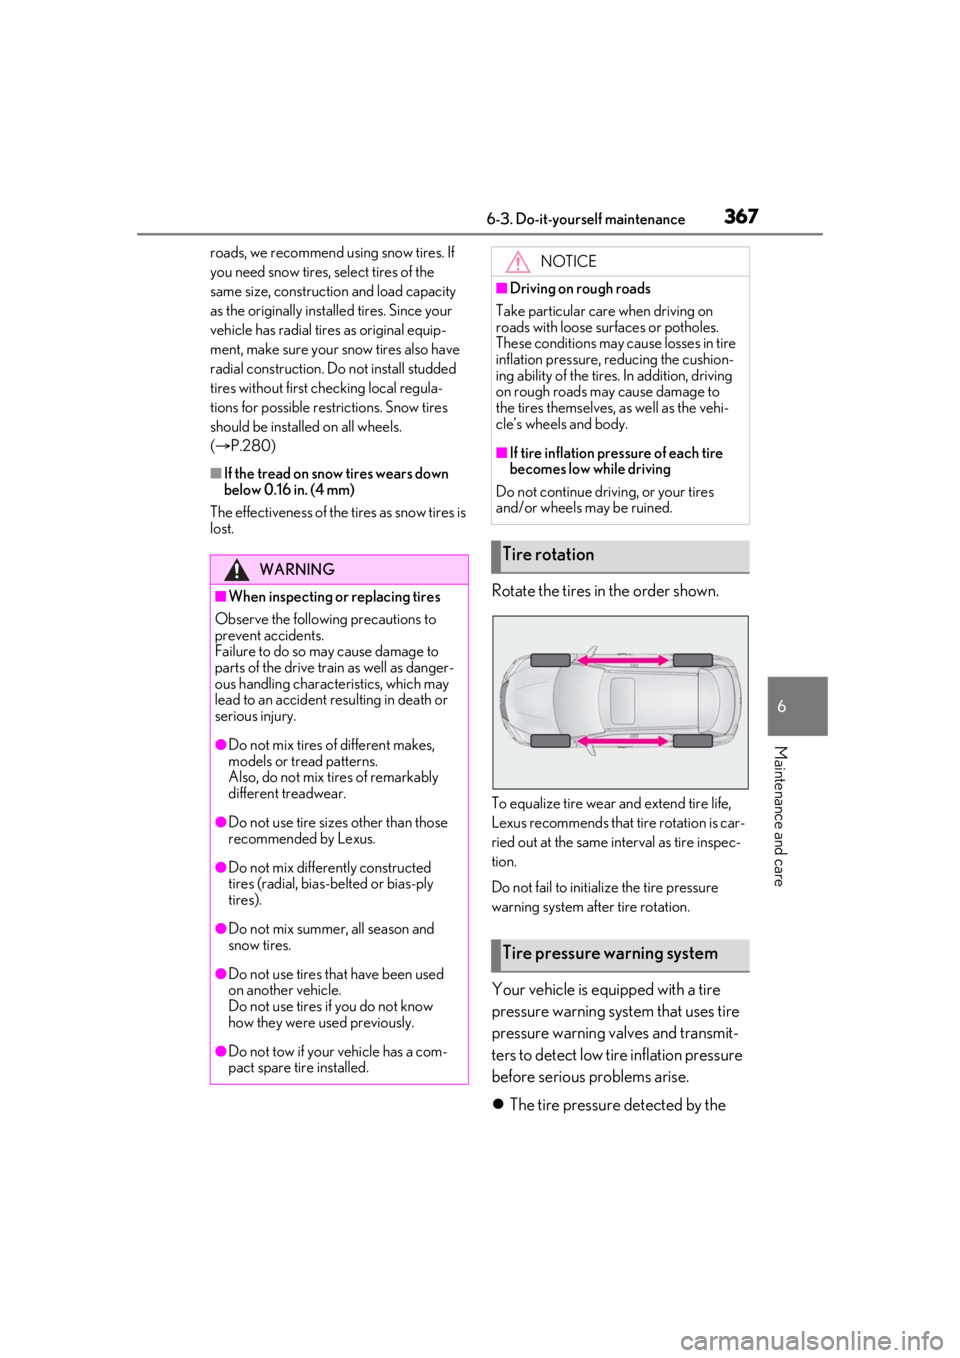
Rotate the tires in the order shown.
To equalize tire wear and extend tire life,
Lexus recommends that tire rotation is car-
ried out at the same in terval as tire inspec-
tion.
Do not fail to initialize the tire pressure
warning system after tire rotation.
Your vehicle is equipped with a tire
pressure warning system that uses tire
pressure warning valves and transmit-
ters to detect low ti re inflation pressure
before serious problems arise.
The tire pressure detected by the
WARNING
■When inspecting or replacing tires
Observe the following precautions to
prevent accidents.
Failure to do so may cause damage to
parts of the drive train as well as danger-
ous handling characteristics, which may
lead to an accident resulting in death or
serious injury.
●Do not mix tires of different makes,
models or tread patterns.
Also, do not mix tires of remarkably
different treadwear.
●Do not use tire sizes other than those
recommended by Lexus.
●Do not mix differently constructed
tires (radial, bias-b elted or bias-ply
tires).
●Do not mix summer, all season and
snow tires.
●Do not use tires that have been used
on another vehicle.
Do not use tires if you do not know
how they were used previously.
●Do not tow if your vehicle has a com-
pact spare tire installed.
NOTICE
■Driving on rough roads
Take particular care when driving on
roads with loose surfaces or potholes.
These conditions may cause losses in tire
inflation pressure, reducing the cushion-
ing ability of the tires. In addition, driving
on rough roads may cause damage to
the tires themselves, as well as the vehi-
cle’s wheels and body.
■If tire inflation pressure of each tire
becomes low while driving
Do not continue driving, or your tires
and/or wheels may be ruined.
Tire rotation
Tire pressure warning system