2021 LEXUS RC350 child seat
[x] Cancel search: child seatPage 44 of 400
441-1. For safe use
A child restraint system for a small
child or baby must itself be properly
restrained on the seat with the lap por-
tion of the lap/shoulder belt.
■Installing child restraint system
using a seat belt (child restraint
lock function belt)
Install the child restraint system in
accordance to the operation manual
enclosed with the child restraint sys-
tem.
■Rear-facing Infant seat/convert-
ible seat
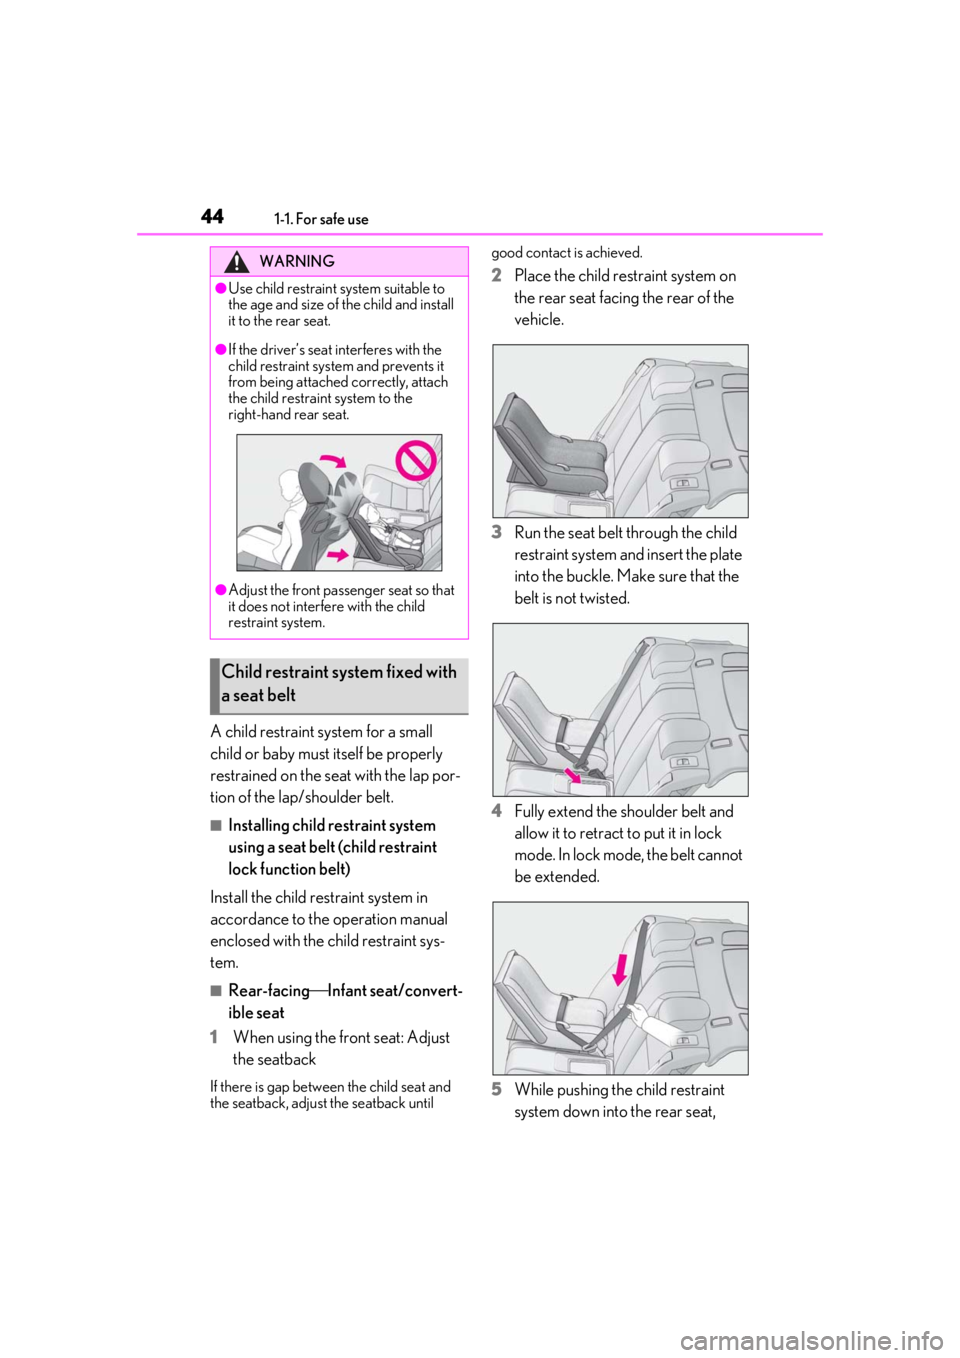
1 When using the front seat: Adjust
the seatback
If there is gap between the child seat and
the seatback, adjust the seatback until good contact is achieved.
2
Place the child restraint system on
the rear seat facing the rear of the
vehicle.
3 Run the seat belt through the child
restraint system and insert the plate
into the buckle. Make sure that the
belt is not twisted.
4 Fully extend the shoulder belt and
allow it to retract to put it in lock
mode. In lock mode, the belt cannot
be extended.
5 While pushing the child restraint
system down into the rear seat, WARNING
●Use child restraint system suitable to
the age and size of the child and install
it to the rear seat.
●If the driver’s seat interferes with the
child restraint system and prevents it
from being attached correctly, attach
the child restraint system to the
right-hand rear seat.
●Adjust the front passenger seat so that
it does not interfere with the child
restraint system.
Child restraint system fixed with
a seat belt
Page 45 of 400
451-1. For safe use
1
For safety and security
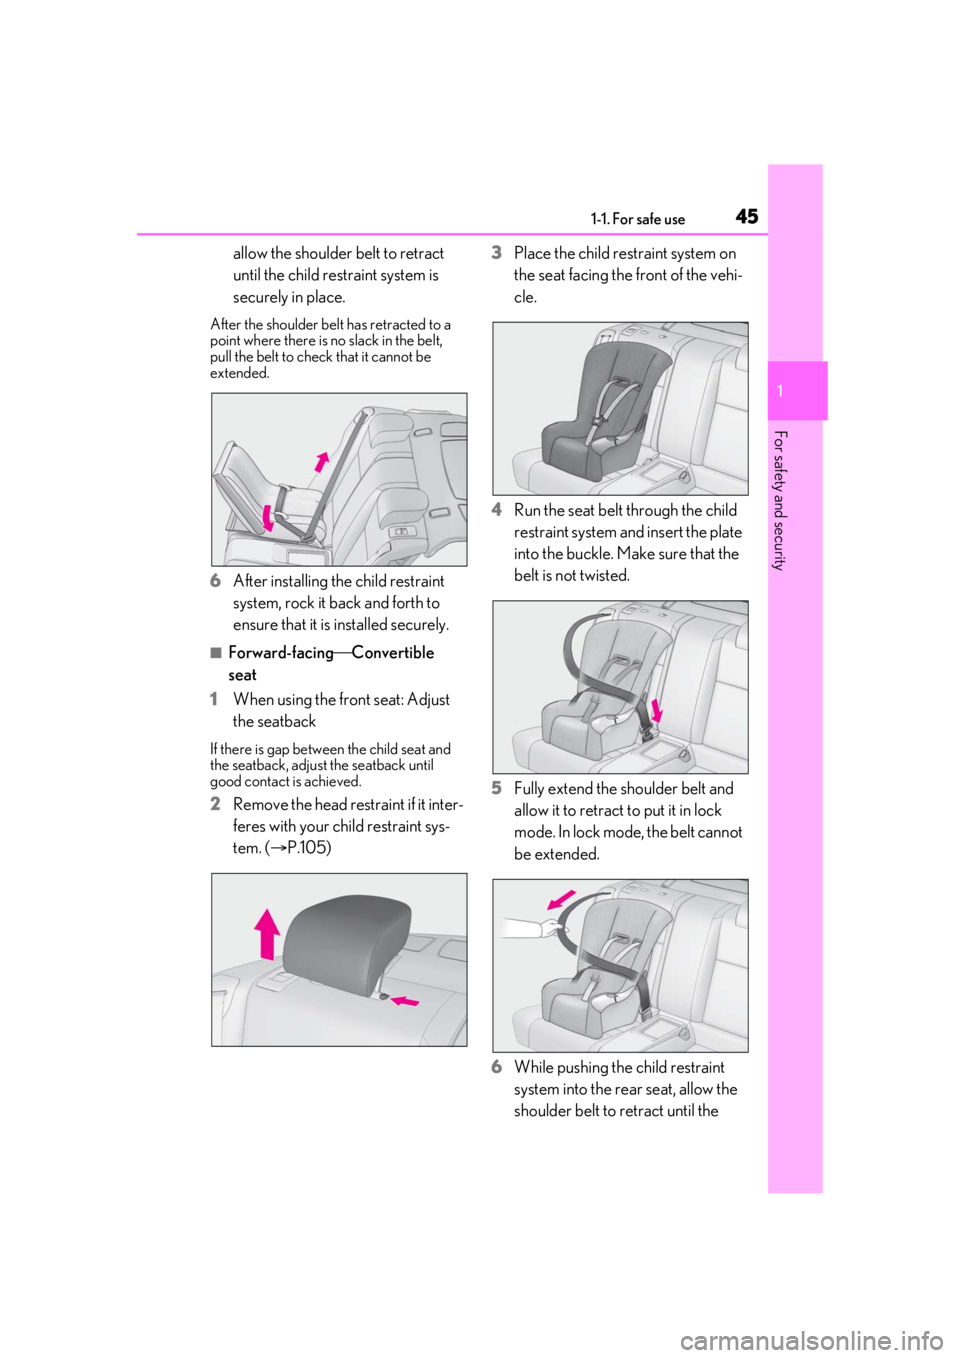
allow the shoulder belt to retract
until the child restraint system is
securely in place.
After the shoulder belt has retracted to a
point where there is no slack in the belt,
pull the belt to check that it cannot be
extended.
6After installing the child restraint
system, rock it back and forth to
ensure that it is installed securely.
■Forward-facingConvertible
seat
1 When using the front seat: Adjust
the seatback
If there is gap between the child seat and
the seatback, adjust the seatback until
good contact is achieved.
2Remove the head restraint if it inter-
feres with your child restraint sys-
tem. ( P.105) 3
Place the child restraint system on
the seat facing the front of the vehi-
cle.
4 Run the seat belt through the child
restraint system and insert the plate
into the buckle. Make sure that the
belt is not twisted.
5 Fully extend the shoulder belt and
allow it to retract to put it in lock
mode. In lock mode, the belt cannot
be extended.
6 While pushing the child restraint
system into the rear seat, allow the
shoulder belt to retract until the
Page 46 of 400
461-1. For safe use
child restraint system is securely in
place.
After the shoulder belt has retracted to a
point where there is no slack in the belt,
pull the belt to check that it cannot be
extended.
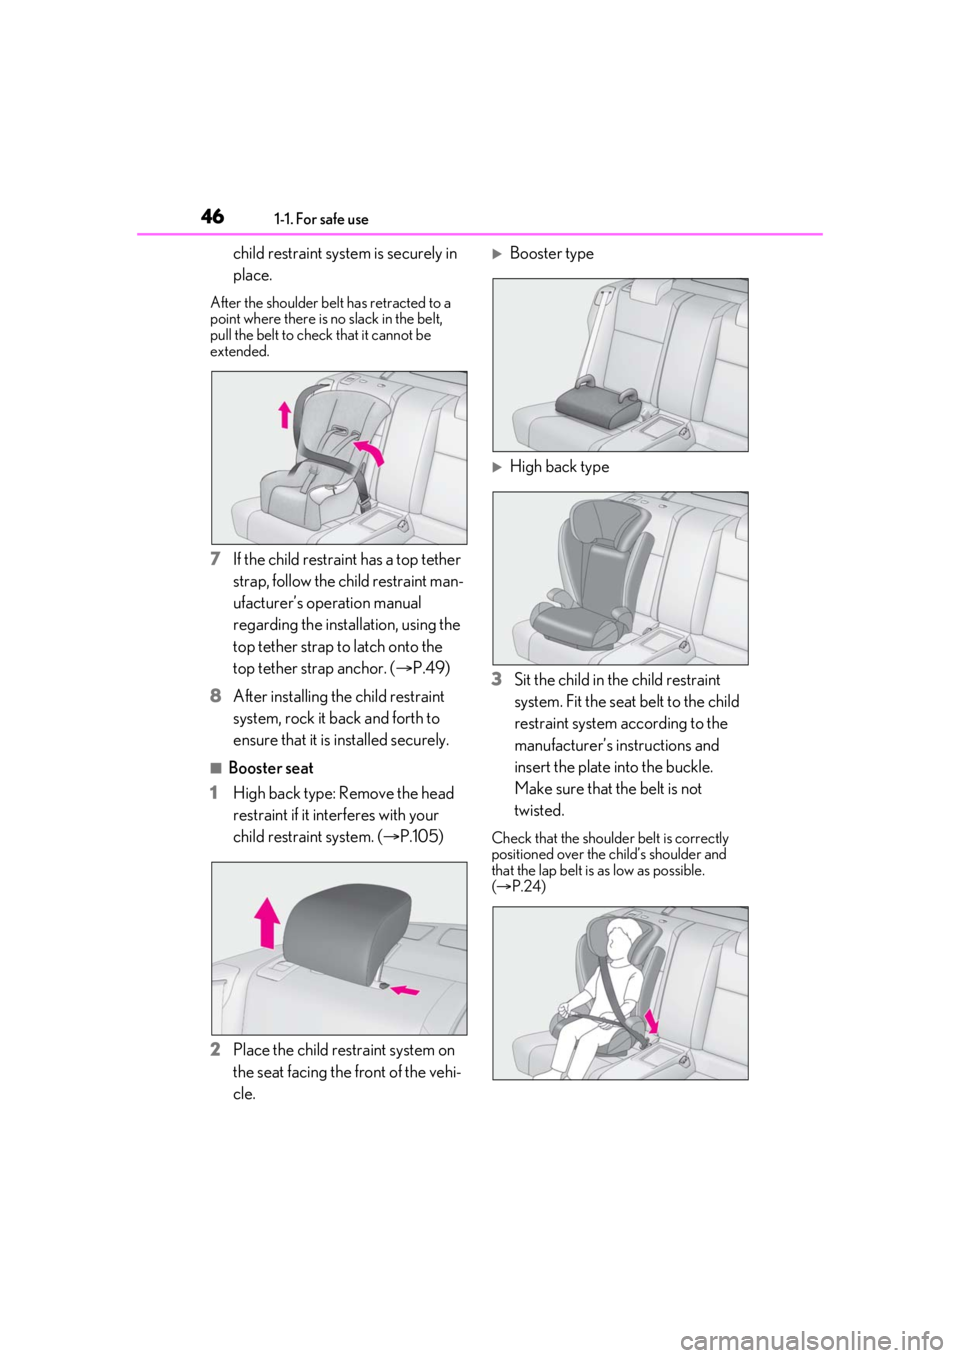
7If the child restraint has a top tether
strap, follow the child restraint man-
ufacturer’s operation manual
regarding the installation, using the
top tether strap to latch onto the
top tether strap anchor. ( P.49)
8 After installing the child restraint
system, rock it back and forth to
ensure that it is installed securely.
■Booster seat
1 High back type: Remove the head
restraint if it interferes with your
child restraint system. ( P.105)
2 Place the child restraint system on
the seat facing the front of the vehi-
cle.
Booster type
High back type
3 Sit the child in the child restraint
system. Fit the seat belt to the child
restraint system according to the
manufacturer’s in structions and
insert the plate into the buckle.
Make sure that the belt is not
twisted.
Check that the shoulder belt is correctly
positioned over the child’s shoulder and
that the lap belt is as low as possible.
( P.24)
Page 47 of 400

471-1. For safe use
1
For safety and security
■Removing a child restraint system
installed with a seat belt
Press the buckle release button and
fully retract the seat belt.
When releasing the buckle, the child
restraint system may spring up due to the
rebound of the seat cushion. Release the
buckle while holding down the child
restraint system.
Since the seat belt automatically reels itself,
slowly return it to the stowing position.
■Child restraint LATCH anchors
LATCH anchors are provided for the
each rear seat. (Buttons displaying the
location of the anchors are attached to
the seats.)
WARNING
■When installing a child restraint sys-
tem
Observe the following precautions.
Failure to do so may result in death or
serious injury.
●Do not allow children to play with the
seat belt. If the seat belt becomes
twisted around a child’s neck, it may
lead to choking or other serious inju-
ries that could result in death. If this
occurs and the buckle cannot be
unfastened, scissors should be used to
cut the belt.
●Ensure that the belt and plate are
securely locked and the seat belt is not
twisted.
●Shake the child restraint system left
and right, and forward and backward
to ensure that it has been securely
installed.
●After securing a child restraint system,
never adjust the seat.
●When a booster seat is installed,
always ensure that th e shoulder belt is
positioned across the center of the
child’s shoulder. The belt should be
kept away from the child’s neck, but
not so that it could fall off the child’s
shoulder.
●Follow all installation instructions pro-
vided by the child restraint system
manufacturer.
■When installing a booster seat
To prevent the belt from going into ALR
lock mode, do not fully extend the shoul-
der belt. ALR mode causes the belt to
tighten only. This could cause injury or
discomfort to the child. ( P.26)
■Do not use a seat belt extender
If a seat belt extender is used when
installing a child restra int system, the seat
belt will not securely hold the child
restraint system, which could cause
death or serious injury to the child or
other passengers in the event of sudden
braking, sudden swerving or an accident.
Child restraint system fixed with
child restraint LATCH anchors
Page 49 of 400
491-1. For safe use
1
For safety and security
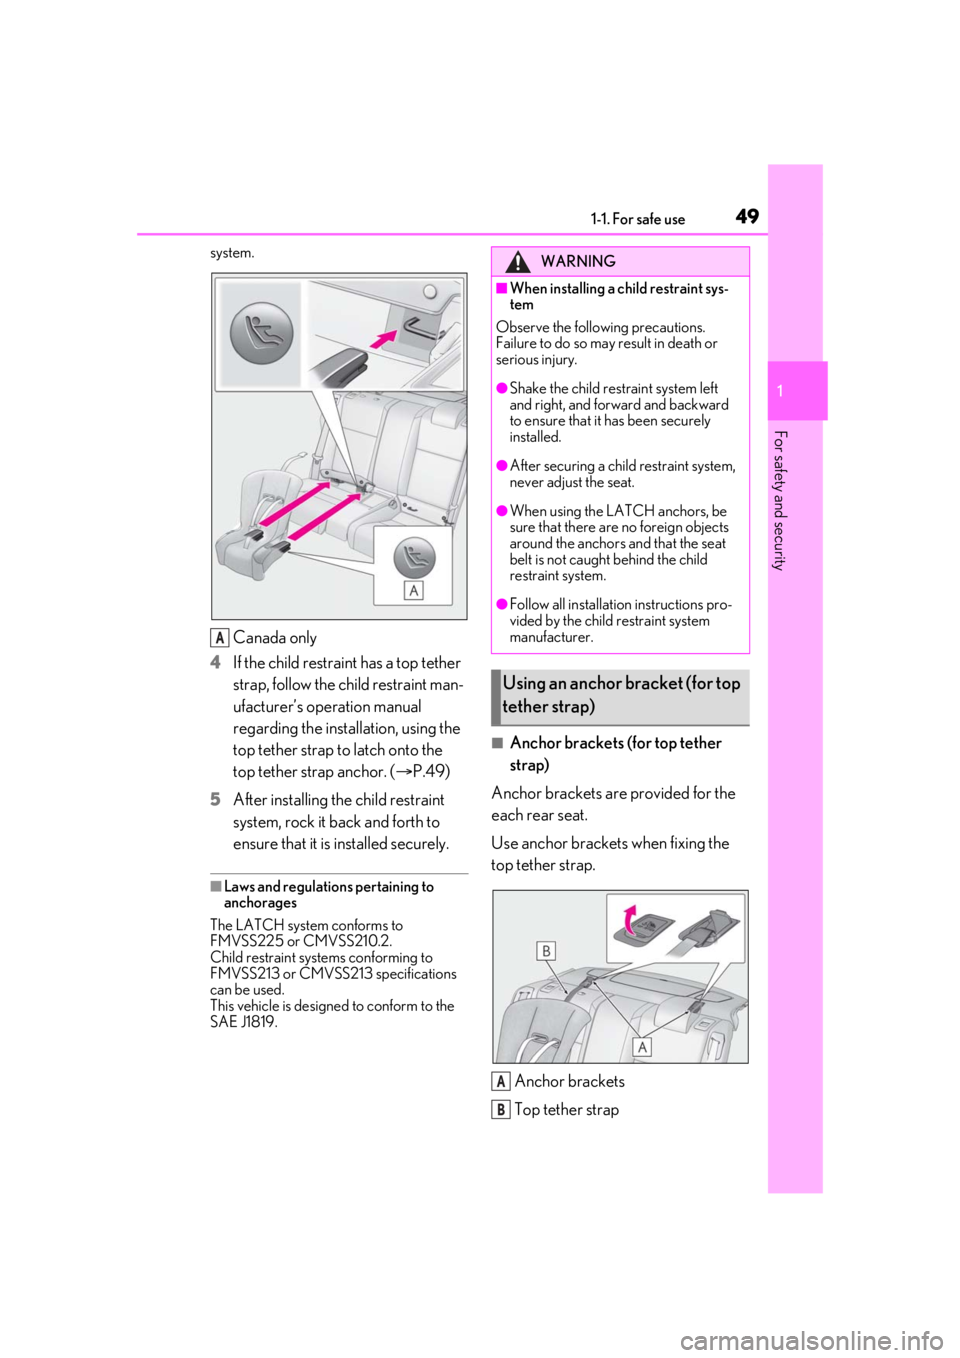
system.
Canada only
4 If the child restraint has a top tether
strap, follow the child restraint man-
ufacturer’s operation manual
regarding the installation, using the
top tether strap to latch onto the
top tether strap anchor. ( P.49)
5 After installing the child restraint
system, rock it back and forth to
ensure that it is installed securely.
■Laws and regulations pertaining to
anchorages
The LATCH system conforms to
FMVSS225 or CMVSS210.2.
Child restraint systems conforming to
FMVSS213 or CMVSS213 specifications
can be used.
This vehicle is designed to conform to the
SAE J1819.
■Anchor brackets (for top tether
strap)
Anchor brackets are provided for the
each rear seat.
Use anchor brackets when fixing the
top tether strap.
Anchor brackets
Top tether strap
A
WARNING
■When installing a child restraint sys-
tem
Observe the following precautions.
Failure to do so may result in death or
serious injury.
●Shake the child rest raint system left
and right, and forward and backward
to ensure that it has been securely
installed.
●After securing a child restraint system,
never adjust the seat.
●When using the LATCH anchors, be
sure that there are no foreign objects
around the anchors and that the seat
belt is not caught behind the child
restraint system.
●Follow all installation instructions pro-
vided by the child restraint system
manufacturer.
Using an anchor bracket (for top
tether strap)
A
B
Page 50 of 400
501-1. For safe use
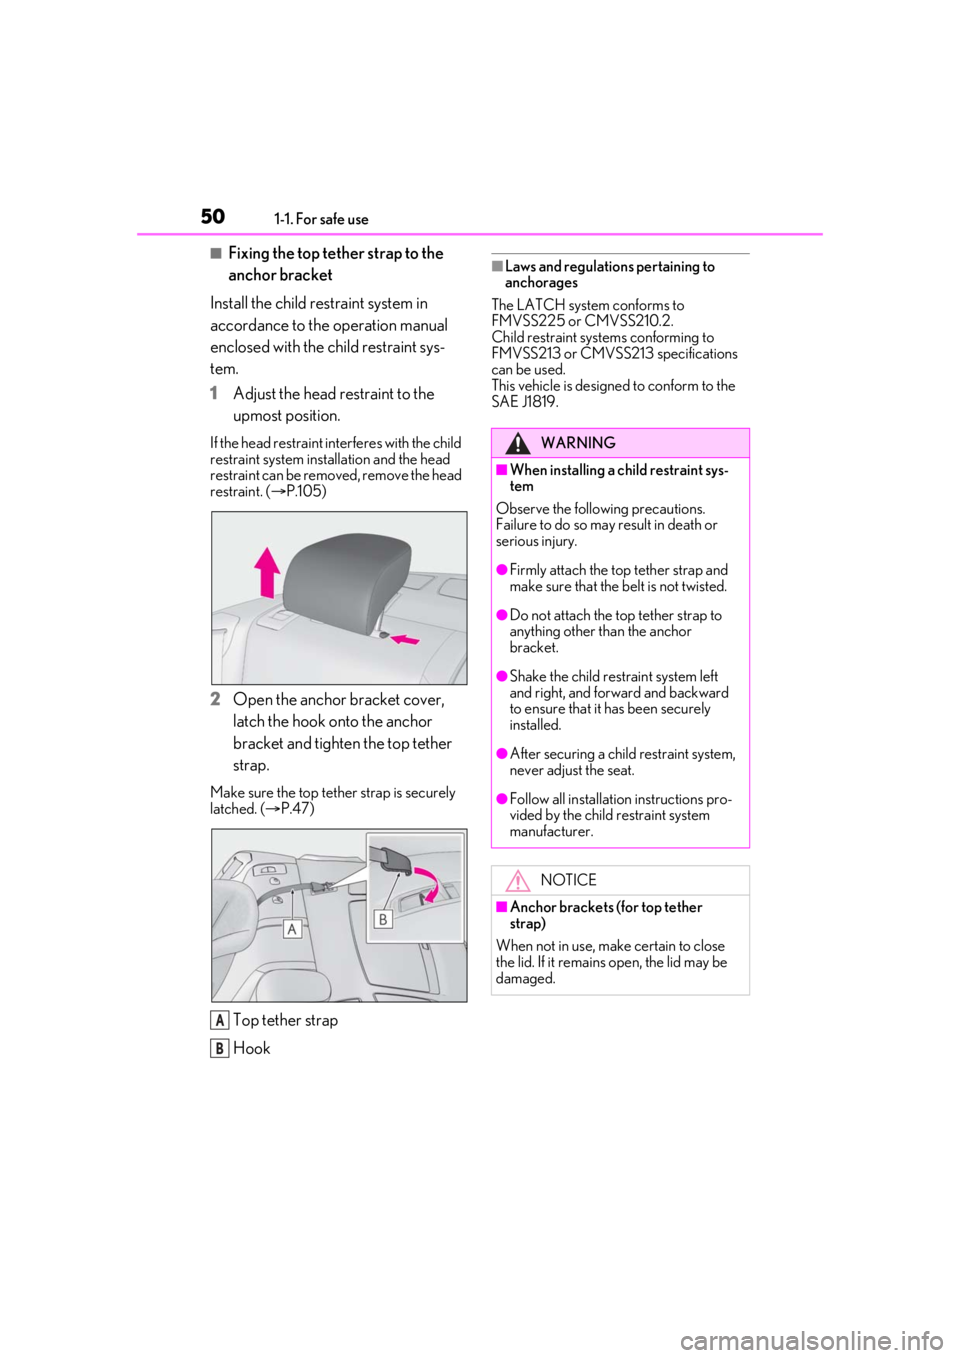
■Fixing the top tether strap to the
anchor bracket
Install the child restraint system in
accordance to the operation manual
enclosed with the child restraint sys-
tem.
1 Adjust the head restraint to the
upmost position.
If the head restraint interferes with the child
restraint system insta llation and the head
restraint can be removed, remove the head
restraint. ( P.105)
2 Open the anchor bracket cover,
latch the hook onto the anchor
bracket and tighten the top tether
strap.
Make sure the top tether strap is securely
latched. ( P.47)
Top tether strap
Hook
■Laws and regulations pertaining to
anchorages
The LATCH system conforms to
FMVSS225 or CMVSS210.2.
Child restraint systems conforming to
FMVSS213 or CMVSS213 specifications
can be used.
This vehicle is designed to conform to the
SAE J1819.
A
B
WARNING
■When installing a child restraint sys-
tem
Observe the following precautions.
Failure to do so may result in death or
serious injury.
●Firmly attach the top tether strap and
make sure that the belt is not twisted.
●Do not attach the top tether strap to
anything other than the anchor
bracket.
●Shake the child rest raint system left
and right, and forward and backward
to ensure that it has been securely
installed.
●After securing a child restraint system,
never adjust the seat.
●Follow all installation instructions pro-
vided by the child restraint system
manufacturer.
NOTICE
■Anchor brackets (for top tether
strap)
When not in use, make certain to close
the lid. If it remains open, the lid may be
damaged.
Page 102 of 400

1023-3. Adjusting the seats
P.94
*: If equipped
The seat and steering wheel* are auto-
matically adjusted to allow the driver to
enter and exit the vehicle easily.
When all of the following have been
performed, the driver’s seat and steer-
ing wheel
* are automatically adjusted
to a position that allows driver to enter
and exit the vehicle easily.
The shift lever has been shifted to P.
The engine switch has been turned
off.
The driver’s seat belt has been
unfastened.
When any of the following has been
performed, the driver’s seat and steer-
WARNING
■When folding the rear seatbacks
down
●Do not fold the seatbacks down while
driving.
●Stop the vehicle on level ground, set
the parking brake and shift the shift
lever to P.
●Do not allow anyone to sit on a folded
seatback or in the trunk while driving.
●Do not allow children to enter the
trunk.
■After returning the rear seatback to
the upright position
●Make sure that the seatback is
securely locked in position by lightly
pushing it back and forth.
If the seatback is not securely locked, the
red marking will be visible on the seat-
back lock release knob. Make sure that
the red marking is not visible.
●Check that the seat belts are not
twisted or caught in the seatback.
Luggage security system
Power easy access sys-
tem/driving position mem-
ory
*/memory recall function*
This feature automatically adjusts
the driver’s seat, steering wheel
and outside rear view mirrors to
make entering and exiting the vehi-
cle easier or to suit your prefer-
ences.
Power easy access system
Page 139 of 400

1394-2. Driving procedures
4
Driving
■If the brake system warning light comes
on
P.295
■Usage in winter time
P.205
Turns the brake hold system on
The brake hold standby indicator (green)
comes on. While the system is holding
the brake, the brake hold operated indica-
tor (yellow) comes on.
■Brake hold system operating conditions
The brake hold system cannot be turned on
in the following conditions:
●The driver’s door is not closed.
●The driver is not wearing the seat belt.
●The parking brake is engaged.
If any of the conditions above are detected
when the brake hold system is enabled, the
system will turn off and the brake hold
standby indicator light will go off. In addi-
tion, if any of the conditions are detected
while the system is holding the brake, a
WARNING
■When parking the vehicle
Do not leave a child in the vehicle alone.
The parking brake may be released unin-
tentionally and there is the danger of the
vehicle moving that may lead to an acci-
dent resulting in death or serious injury.
NOTICE
■When parking the vehicle
Before you leave the vehicle, shift the
shift lever to P, set the parking brake and
make sure that the vehicle does not
move.
■When the system malfunctions
Stop the vehicle in a safe place and
check the warning messages.
■When the parking brake cannot be
released due to a malfunction
Driving the vehicle with the parking
brake set will lead to brake components
overheating, which may affect braking
performance and increase brake wear.
Have the vehicle inspected by your
Lexus dealer immediately if this occurs.
Brake Hold
The brake hold system keeps the
brake applied when the shift lever is
in D, M or N with the system on and
the brake pedal has been
depressed to stop the vehicle. The
system releases the brake when the
accelerator pedal is depressed with
the shift lever in D or M to allow
smooth start off.
Enabling the system
A
B