2021 LEXUS RC300 brakes
[x] Cancel search: brakesPage 187 of 400

1874-5. Using the driving support systems
4
Driving
■The intuitive parking assist can be oper-
ated when
●Front center sensors:
• The engine switch is in IGNITION ON
mode.
• The shift lever is in a position other than P or R.
• The vehicle speed is less than about 6 mph (10 km/h).
●Front corner sensors:
• The engine switch is in IGNITION ON mode.
• The shift lever is in a position other than P.
• The vehicle speed is less than about 6 mph (10 km/h).
(At any speed when the shift lever is in R)
●Rear corner and rear center sensors:
• The engine switch is in IGNITION ON mode.
• The shift lever is in R.
■Muting the buzzer sound
●To mute the buzzer sound:
The buzzer can be temporarily muted by
pressing “OK” of the meter control
switches while an obstacle detection dis-
play is shown on the multi-information dis-
play.
●To cancel the mute:
Mute will be automatically canceled in the
following situations.
• When the shift position is changed (except shifting from D to N, or N to D).
• When the vehicle speed has reached or
exceeded 6 mph (10 km/h) with the shift
position in D.
• When the intuitive par king assist is turned
off once and turned on again.
• When the engine switch is turned off once and turned to IGNITION ON
mode again.
■If “Clean Parking Assist Sensor” is dis-
played on the multi-information display
A sensor may be covered with ice, snow,
dirt, etc. Remove the ice, snow, dirt, etc.,
from the sensor to return the system to nor-
mal.
Also, due to ice forming on a sensor at low
temperatures, a warning message may be displayed or the sensor may not be able to
detect an object. Once the ice melts, the
system will return to normal.
■Sensor detection information
●The following situations may occur
during use.
• The sensors may be able to only detect objects near the fron t and rear bumpers.
• Depending on the shape of the object
and other factors, the detection distance
may shorten, or detection may be impos-
sible.
• There will be a short delay between object detection and di splay. Even at low
speeds, there is a possibility that the
object will come within the sensor’s
detection areas befo re the display is
shown and the warning beep sounds.
• It might be difficult to hear the buzzer due to the volume of the audio system or air
flow noise of the air conditioning system.
• It may be difficult to hear the buzzer if buzzers for other systems are sounding.
■Conditions under wh ich the function
may not function correctly
Certain vehicle conditions and the sur-
rounding environment may affect the ability
of a sensor to correctly detect objects. Par-
ticular instances where this may occur are
listed below.
●There is dirt, snow or ice on a sensor.
(Cleaning the sensors will resolve this
problem.)
●A sensor is frozen. (Thawing the area will
resolve this problem.)
In especially cold weather, if a sensor is
frozen the sensor display may be dis-
played abnormally, or objects, such as a
wall, may not be detected.
●A sensor is covered in any way.
●When a sensor or the area around a sen-
sor is extremely hot or cold.
●On an extremely bumpy road, on an
incline, on gravel, or on grass.
●The vicinity of the vehicle is noisy due to
vehicle horns, motorcycle engines, air
brakes of large vehicles, or other loud
noises producing ultrasonic waves.
●There is another vehicle equipped with
Page 201 of 400

2014-5. Using the driving support systems
4
Driving
■ABS (Anti-lock Brake System)
Helps to prevent wheel lock when the
brakes are applied suddenly, or if the
brakes are applied while driving on a
slippery road surface
■Brake assist
Generates an increased level of brak-
ing force after the brake pedal is
depressed when the system detects a
panic stop situation
■VSC (Vehicle Stability Control)
Helps the driver to control skidding
when swerving sudden ly or turning on
slippery road surfaces
■Enhanced VSC (Enhanced Vehi-
cle Stability Control)
Provides cooperative control of the
ABS, TRAC, VSC and EPS.
Helps to maintain directional stability
when swerving on slippery road sur-
faces by controlling steering perfor-
mance.
■TRAC (Traction Control)
Helps to maintain drive power and pre-
vent the drive wheels from spinning
when starting the vehicle or accelerat-
ing on slippery roads
■Hill-start assist control
Helps to reduce the backward move-
ment of the vehicle when starting on an
uphill
■VGRS (Variable Gear Ratio Steer-
ing) (if equipped)
Adjusts the front wheel turning angle in
accordance with the vehicle speed and
steering wheel movement
■DRS (Dynamic Rear Steering) (if
equipped)
Contributes to the turning characteris-
tics and responsiveness of the vehicle
by adjusting the rear wheel angle of the
vehicle in accordance with steering
wheel movement.
■EPS (Electric Power Steering)
Employs an electric motor to reduce
the amount of effort needed to turn the
steering wheel
■Adaptive Variable Suspension Sys-
tem (if equipped)
By independently controlling the
damping force of th e shock absorbers
for each of the 4 wheels according to
the road and driving conditions, this
system combines riding comfort with
superior vehicle stability, and helps
good vehicle posture.
Driving assist systems
To keep driving safety and perfor-
mance, the following systems oper-
ate automatically in response to
various driving situations. Be aware,
however, that these systems are
supplementary and should not be
relied upon too heavily when oper-
ating the vehicle.
Summary of the driving assist
systems
Page 202 of 400

2024-5. Using the driving support systems
■LDH (Lexus Dynamic Handling
system) (if equipped)
Provides integrated control of the
VGRS, DRS and EPS. Contributes to
turning characteristics at low speeds,
responsiveness at medium speeds and
safety at high speeds by controlling the
steering angle of the front and rear
wheels in accordance with the steering
wheel operation and vehicle speed.
■VDIM (Vehicle Dynamics Inte-
grated Management)
Provides integrated control of the
ABS, brake assist, TRAC, VSC,
hill-start assist cont rol, EPS and VGRS
systems
Helps to maintain vehicle stability when
swerving on slippery road surfaces by
controlling the brakes, engine output,
steering assist, and steering ratio
■When the TRAC/VSC systems are
operating
The slip indicator light will flash while the
TRAC/VSC systems are operating.
■Disabling the TRAC system
If the vehicle gets stuck in mud, dirt or snow,
the TRAC system may reduce power from
the engine to the wheels. Pressing the
switch to turn the system off may make it
easier for you to rock the vehicle in order to
free it.
To turn the TRAC system off, quickly press and release the switch.
The “Traction Co
ntrol Turned Off” will be
shown on the multi-information display.
Press the switch ag ain to turn the sys-
tem back on.
■Turning off both TRAC and VSC sys-
tems
To turn the TRAC and VSC systems off,
press and hold the switch for more
than 3 seconds while the vehicle is stopped.
The VSC OFF indicator light will come on
and the “Traction Control Turned Off” will
be shown on the multi-information display.
*
Press the switch ag ain to turn the sys-
tems back on.
*: On vehicles with PCS (Pre-Collision System), pre-collision brake assist,
pre-collision braking, and steering con-
trol (performed through cooperative
control of PCS and LDH) (if equipped)
will also be disabled. The Pre-Collision
System warning light will come on and a
message will be di splayed on the
multi-information display. ( P.168)
Page 206 of 400
2064-6. Driving tips
warm water over the frozen area to
melt the ice. Wipe away the water
immediately to prevent it from
freezing.
To ensure proper operation of the
climate control system fan, remove
any snow that has accumulated on
the air inlet vents in front of the
windshield.
Check for and remove any excess
ice or snow that may have accumu-
lated on the exterior lights, vehicle’s
roof, chassis, around the tires or on
the brakes.
Remove any snow or mud from the
bottom of your shoes before getting
in the vehicle.
Accelerate the vehicle slowly, keep a
safe distance between you and the
vehicle ahead, and drive at a reduced
speed suitable to road conditions.
Park the vehicle and move the shift
lever to P without setting the park-
ing brake. The parking brake may
freeze up, preventing it from being
released. If the vehicle is parked
without setting the parking brake,
make sure to block the wheels.
Failure to do so may be dangerous
because it may cause the vehicle to
move unexpectedly, possibly lead-
ing to an accident.
When the parking brake is in automatic mode, release the parking brake after shift-
ing the shift lever to P. (
P.137)
If the vehicle is parked without set-
ting the parking brake, confirm that
the shift lever cannot be moved out
of P
*.
*: The shift lever will be locked if it is
attempted to be shifted from P to any
other position with out depressing the
brake pedal. If the shift lever can be
shifted from P, there may be a problem
with the shift lock system. Have the vehi-
cle inspected by your Lexus dealer
immediately.
Vehicles with front and rear tires of
the same size except for vehicles
with LDH and 19-inch tires
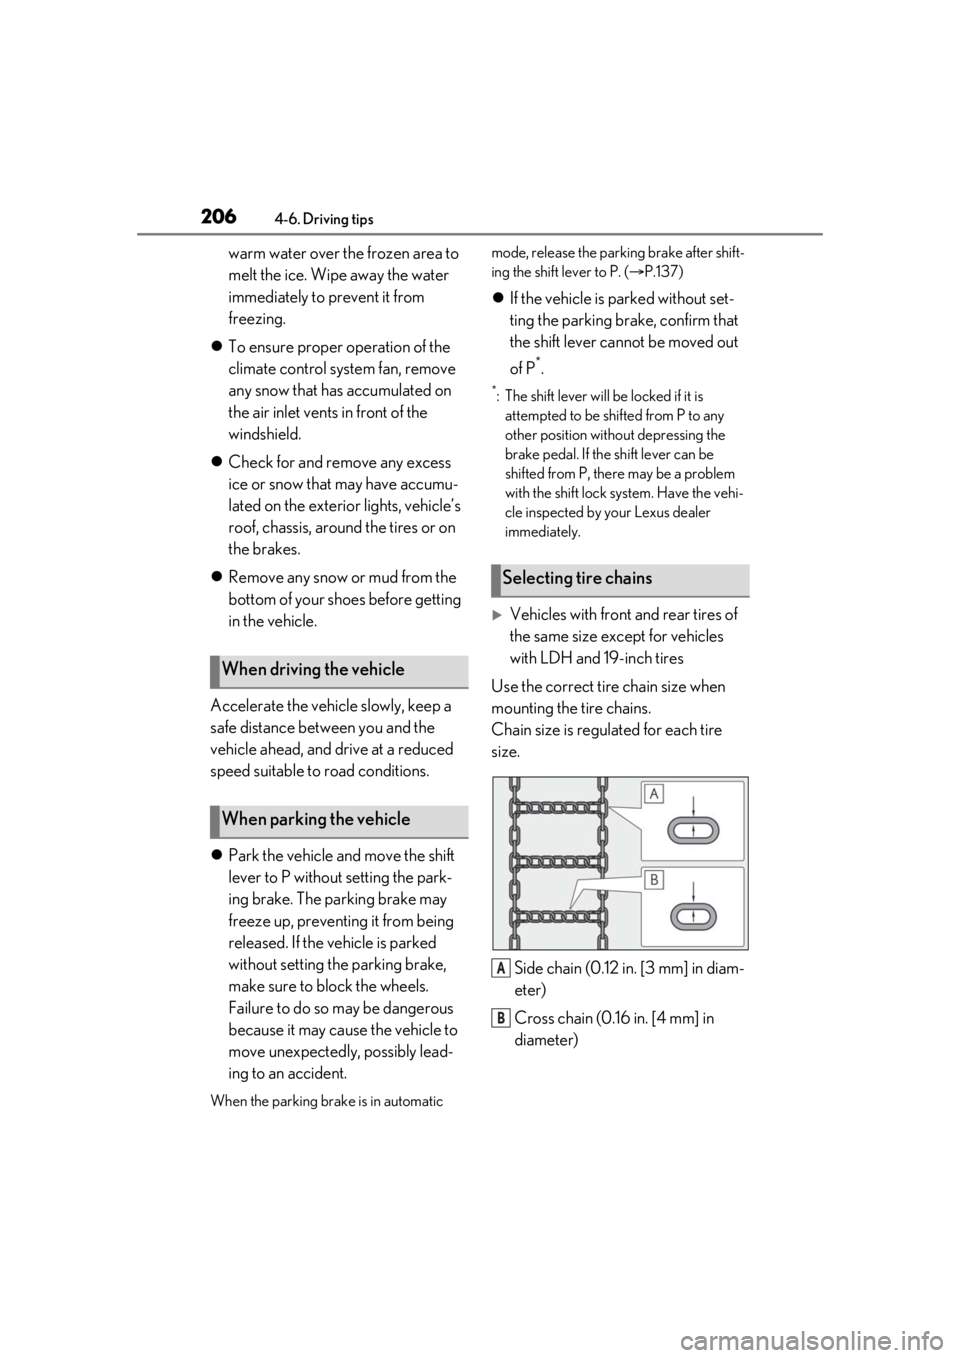
Use the correct tire chain size when
mounting the tire chains.
Chain size is regulated for each tire
size.
Side chain (0.12 in. [3 mm] in diam-
eter)
Cross chain (0.16 in. [4 mm] in
diameter)
When driving the vehicle
When parking the vehicle
Selecting tire chains
A
B
Page 250 of 400
2506-2. Maintenance
Radiator, con-
denser and inter-
cooler radiator
The radiator, con-
denser and inter-
cooler radiator should
be free from foreign
objects. (P.262)
Washer fluid
Is there sufficient
washer fluid?
( P.264)
Vehicle interior
ItemsCheck points
Accelerator
pedal
• The accelerator
pedal should move
smoothly (without
uneven pedal effort
or catching).
Automatic trans-
mission “Park”
mechanism
•When parked on a slope and the shift
lever is in P, is the
vehicle securely
stopped?
Brake pedal
• Does the brake pedal move
smoothly?
• Does the brake pedal have appro-
priate clearance
from the floor?
• Does the brake pedal have the cor-
rect amount of free
play?
ItemsCheck points
Brakes
• The vehicle should not pull to one side
when the brakes are
applied.
•The brakes should work effectively.
• The brake pedal should not feel
spongy.
• The brake pedal should not get too
close to the floor
when the brakes are
applied.
Head restraints
•Do the head restraints move
smoothly and lock
securely?
Indicators/buzz-
ers•Do the indicators and buzzers function
properly?
Lights• Do all the lights come on?
Parking brake
• Does the parking brake pedal move
smoothly?
• When parked on a slope and the park-
ing brake is on, is the
vehicle securely
stopped?
Seat belts
• Do the seat belts operate smoothly?
• The seat belts should not be damaged.
ItemsCheck points
Page 287 of 400
2877-1. Essential information
7
When trouble arises
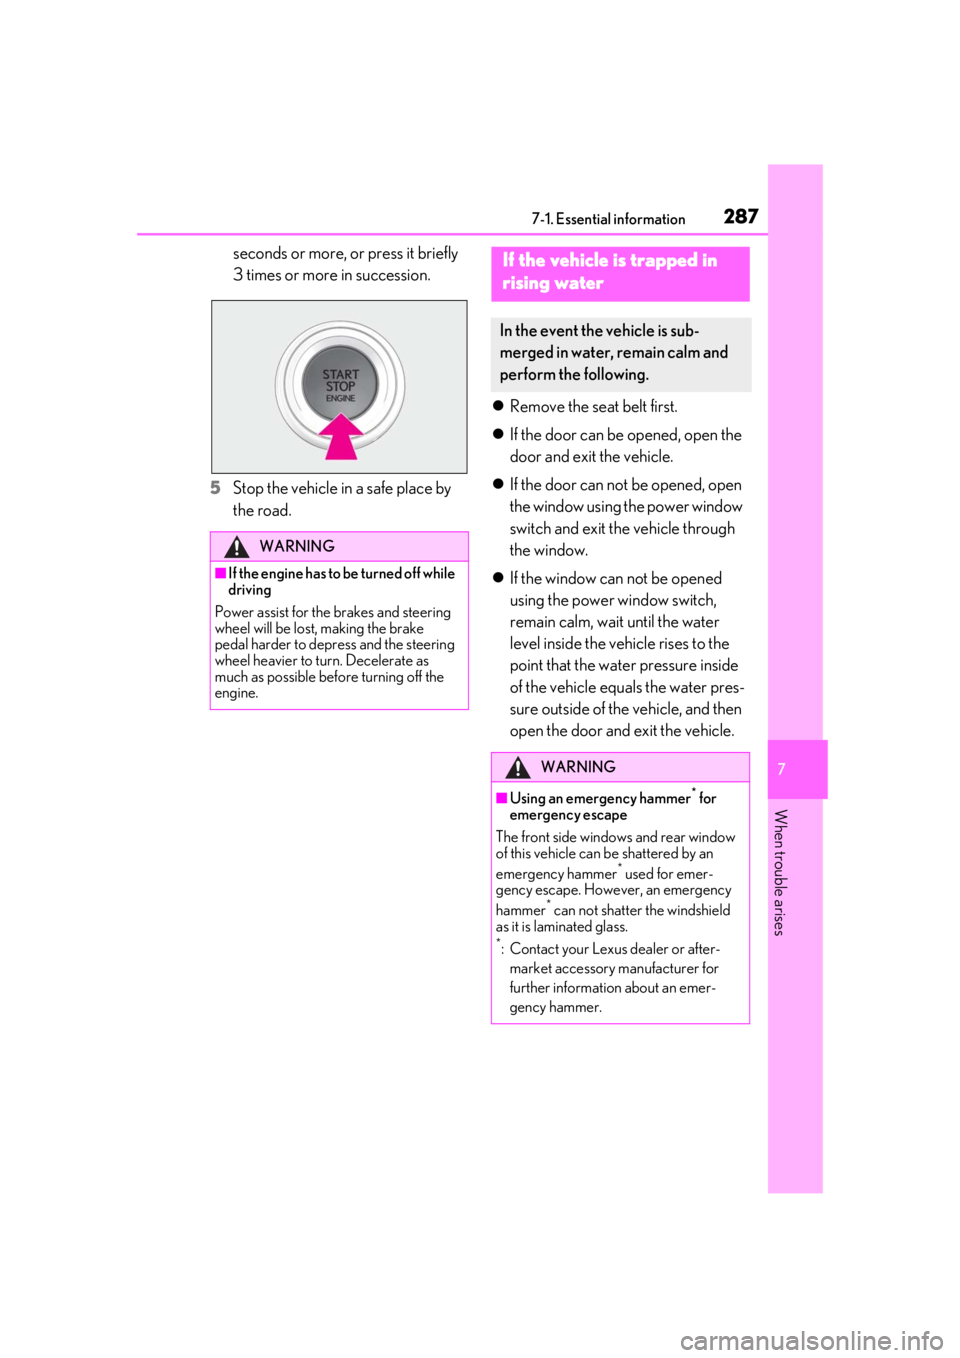
seconds or more, or press it briefly
3 times or more in succession.
5 Stop the vehicle in a safe place by
the road.
Remove the seat belt first.
If the door can be opened, open the
door and exit the vehicle.
If the door can not be opened, open
the window using the power window
switch and exit the vehicle through
the window.
If the window can not be opened
using the power window switch,
remain calm, wait until the water
level inside the vehicle rises to the
point that the water pressure inside
of the vehicle equals the water pres-
sure outside of the vehicle, and then
open the door and exit the vehicle.
WARNING
■If the engine has to be turned off while
driving
Power assist for the brakes and steering
wheel will be lost, making the brake
pedal harder to depress and the steering
wheel heavier to turn. Decelerate as
much as possible before turning off the
engine.
If the vehicle is trapped in
rising water
In the event the vehicle is sub-
merged in water, remain calm and
perform the following.
WARNING
■Using an emergency hammer* for
emergency escape
The front side window s and rear window
of this vehicle can be shattered by an
emergency hammer
* used for emer-
gency escape. However, an emergency
hammer
* can not shatter the windshield
as it is laminated glass.
*: Contact your Lexus dealer or after-
market accessory manufacturer for
further information about an emer-
gency hammer.
Page 291 of 400
2917-2. Steps to take in an emergency
7
When trouble arises
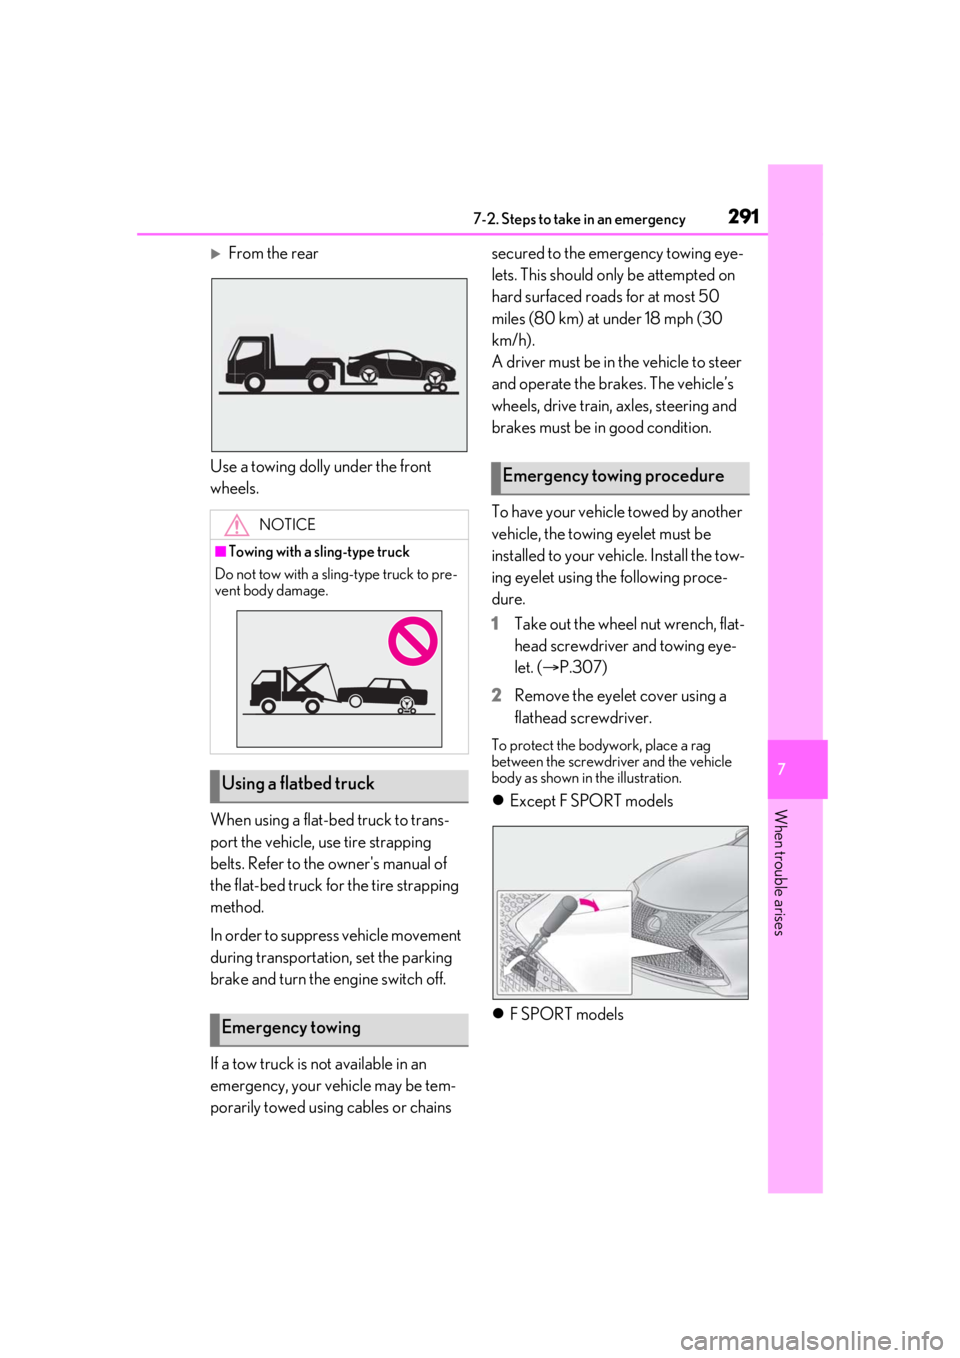
From the rear
Use a towing dolly under the front
wheels.
When using a flat-bed truck to trans-
port the vehicle, use tire strapping
belts. Refer to the owner's manual of
the flat-bed truck for the tire strapping
method.
In order to suppress vehicle movement
during transportati on, set the parking
brake and turn the engine switch off.
If a tow truck is not available in an
emergency, your vehicle may be tem-
porarily towed using cables or chains secured to the emergency towing eye-
lets. This should only be attempted on
hard surfaced roads for at most 50
miles (80 km) at under 18 mph (30
km/h).
A driver must be in the vehicle to steer
and operate the brakes. The vehicle’s
wheels, drive train, axles, steering and
brakes must be in good condition.
To have your vehicle towed by another
vehicle, the towing eyelet must be
installed to your vehicle. Install the tow-
ing eyelet using the following proce-
dure.
1
Take out the wheel nut wrench, flat-
head screwdriver and towing eye-
let. ( P.307)
2 Remove the eyelet cover using a
flathead screwdriver.
To protect the bodywork, place a rag
between the screwdriver and the vehicle
body as shown in the illustration.
Except F SPORT models
F SPORT models
NOTICE
■Towing with a sling-type truck
Do not tow with a sling-type truck to pre-
vent body damage.
Using a flatbed truck
Emergency towing
Emergency towing procedure
Page 292 of 400
2927-2. Steps to take in an emergency
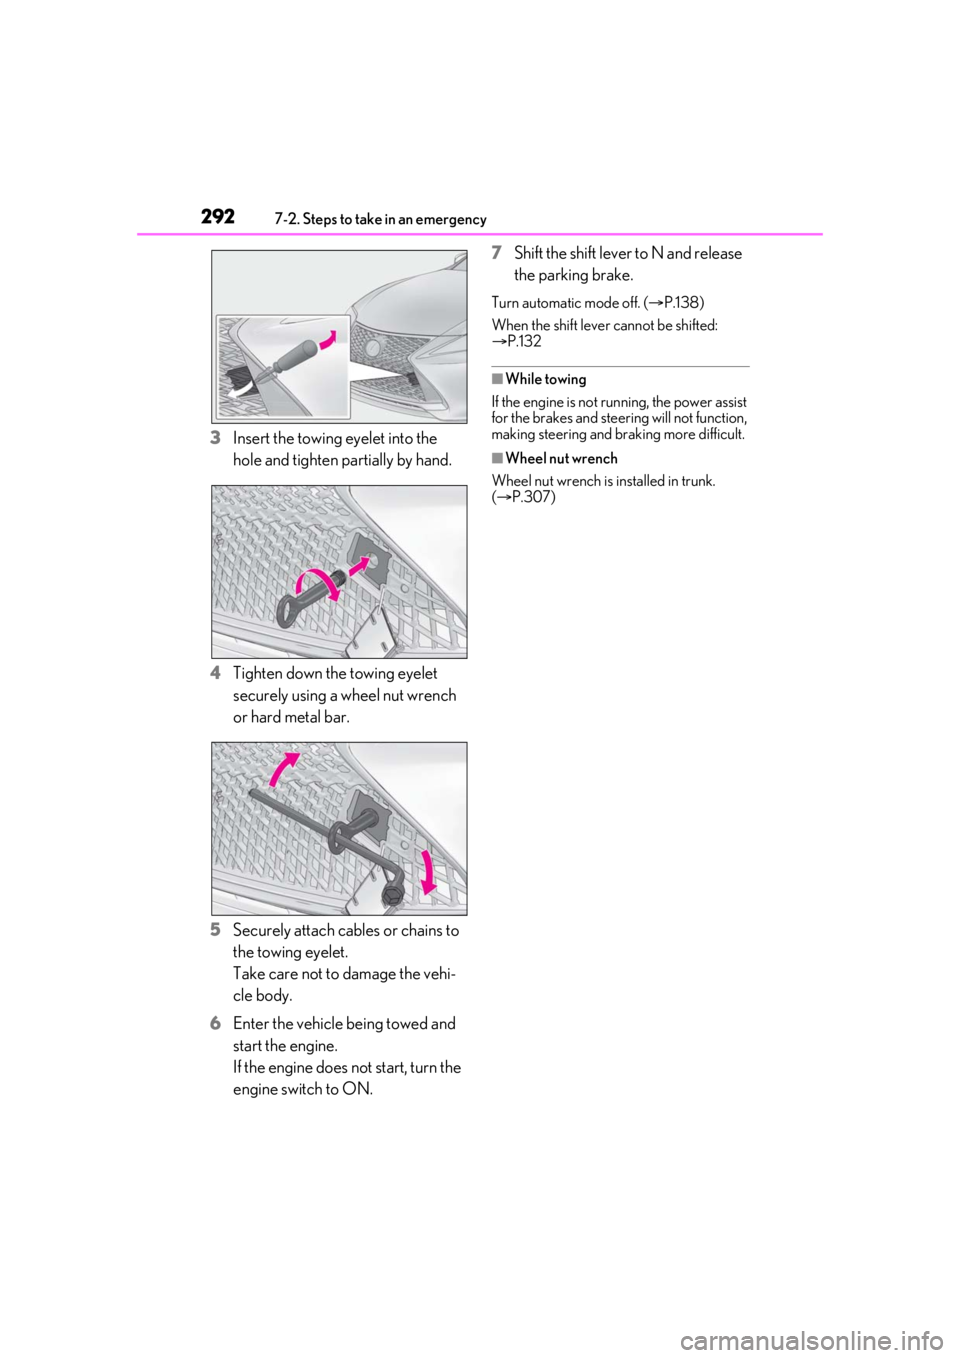
3Insert the towing eyelet into the
hole and tighten partially by hand.
4 Tighten down the towing eyelet
securely using a wheel nut wrench
or hard metal bar.
5 Securely attach cables or chains to
the towing eyelet.
Take care not to damage the vehi-
cle body.
6 Enter the vehicle being towed and
start the engine.
If the engine does not start, turn the
engine switch to ON. 7
Shift the shift lever to N and release
the parking brake.
Turn automatic mode off. ( P.138)
When the shift lever cannot be shifted:
P.132
■While towing
If the engine is not running, the power assist
for the brakes and steering will not function,
making steering and braking more difficult.
■Wheel nut wrench
Wheel nut wrench is installed in trunk.
( P.307)