2021 LEXUS LS500 change time
[x] Cancel search: change timePage 396 of 520

3966-3. Do-it-yourself maintenance
■Routine tire inflation pressure checks
The tire pressure warning system does not
replace routine tire inflation pressure
checks. Make sure to check tire inflation
pressure as part of your routine of daily
vehicle checks.
■Tire inflation pressure
●It may take a few minutes to display the
tire inflation pressure after the engine
switch is turned to IGNITION ON mode.
It may also take a few minutes to display
the tire inflation pres sure after inflation
pressure has been adjusted.
●Tire inflation pressure changes with tem-
perature. The displayed values may also
be different from the values measured
using a tire pressure gauge.
■Situations in which the tire pressure
warning system may not operate prop-
erly
●In the following cases, the tire pressure
warning system may not operate prop-
erly.
• If non-genuine Lexus wheels are used.
• If a tire has been repl aced with a tire that
is not an OE (Original Equipment) tire.
• If a tire has been repl aced with a tire that
is not of the specified size.
• If tire chains, etc. are installed.
• An auxiliary-supported run-flat tire is equipped.
• If a window tint that affects the radio wave signals is installed.
• If there is a lot of snow or ice on the vehi-
cle, particularly around the wheels or
wheel housings.
• If the tire inflation pressure is much higher
than the specified level.
• If wheels not equipped with tire pressure warning valves and tr ansmitter are used.
• If the ID code on the tire pressure warn- ing valves and transmitters is not regis-
tered in the tire pressure warning
computer.
●Performance may be affected in the fol-
lowing situations.
• When driving near a TV tower, electric
power plant, gas station, radio station,
large display, airport or other facility that
generates strong radio waves or electri- cal noise
• When carrying a portable radio, cellular phone, cordless phone or other wireless
communication device
If tire position information is not correctly
displayed due to the radio wave conditions,
the display may be corrected by changing
the location of the vehicle as the radio wave
conditions may change.
●When the vehicle is stopped, the time
taken for the warning to start or turn off
may be longer.
●When the inflation pressure of a tire
drops rapidly, for example when a tire has
burst, the warning may not operate.
■Warning performance of the tire pres-
sure warning system
The warning of the tire pressure warning
system will change in accordance with driv-
ing conditions. For this reason, the system
may give a warning even if the tire pressure
does not reach a low enough level, or if the
pressure is higher than the pressure that
was adjusted to when the system was initial-
ized.
Page 399 of 520

3996-3. Do-it-yourself maintenance
6
Maintenance and care
■The tire pressure warning system
must be initialized in the following
circumstances:
When the tire inflation pressure is
changed such as when changing
traveling speed or load weight.
When the tire inflation pressure is
changed such as when the tire size
is changed.
When rotating the tires.
After performing the transmitter ID
code registration procedure.
( P.400)
When the tire pressure warning system
is initialized, the cu rrent tire inflation
pressure is set as the benchmark pres-
sure.
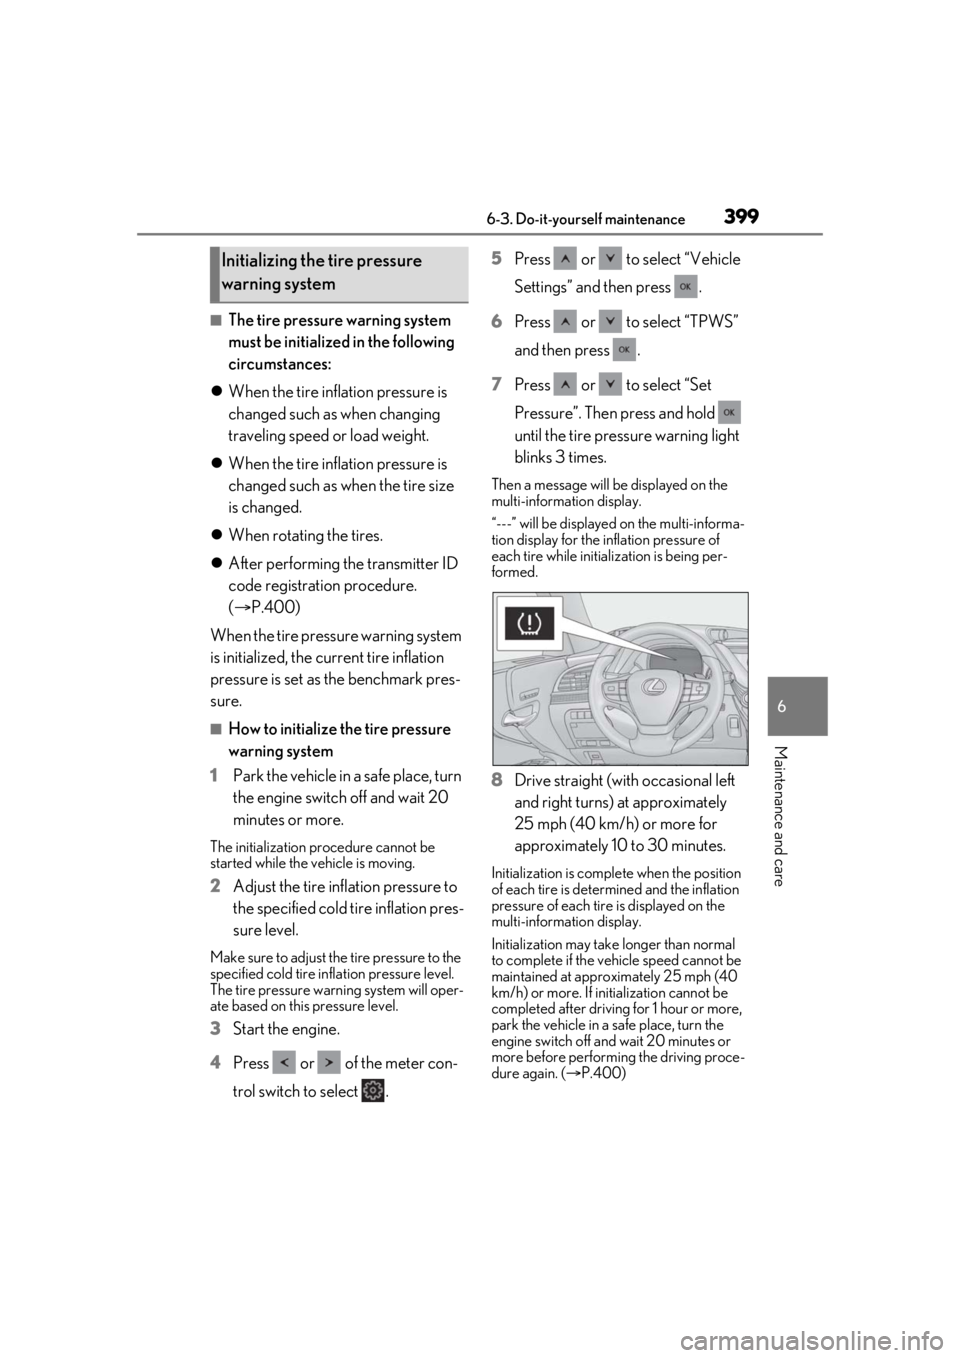
■How to initialize the tire pressure
warning system
1 Park the vehicle in a safe place, turn
the engine switch off and wait 20
minutes or more.
The initialization procedure cannot be
started while the vehicle is moving.
2Adjust the tire inflation pressure to
the specified cold tire inflation pres-
sure level.
Make sure to adjust th e tire pressure to the
specified cold tire infl ation pressure level.
The tire pressure warning system will oper-
ate based on this pressure level.
3 Start the engine.
4 Press or of the meter con-
trol switch to select . 5
Press or to select “Vehicle
Settings” and then press .
6 Press or to select “TPWS”
and then press .
7 Press or to select “Set
Pressure”. Then press and hold
until the tire pressure warning light
blinks 3 times.
Then a message will be displayed on the
multi-information display.
“---” will be displayed on the multi-informa-
tion display for the inflation pressure of
each tire while initialization is being per-
formed.
8Drive straight (with occasional left
and right turns) at approximately
25 mph (40 km/h) or more for
approximately 10 to 30 minutes.
Initialization is comple te when the position
of each tire is determ ined and the inflation
pressure of each tire is displayed on the
multi-information display.
Initialization may take longer than normal
to complete if the vehicle speed cannot be
maintained at approx imately 25 mph (40
km/h) or more. If initialization cannot be
completed after driving for 1 hour or more,
park the vehicle in a safe place, turn the
engine switch off and wait 20 minutes or
more before performing the driving proce-
dure again. ( P.400)
Initializing the tire pressure
warning system
Page 401 of 520

4016-3. Do-it-yourself maintenance
6
Maintenance and care
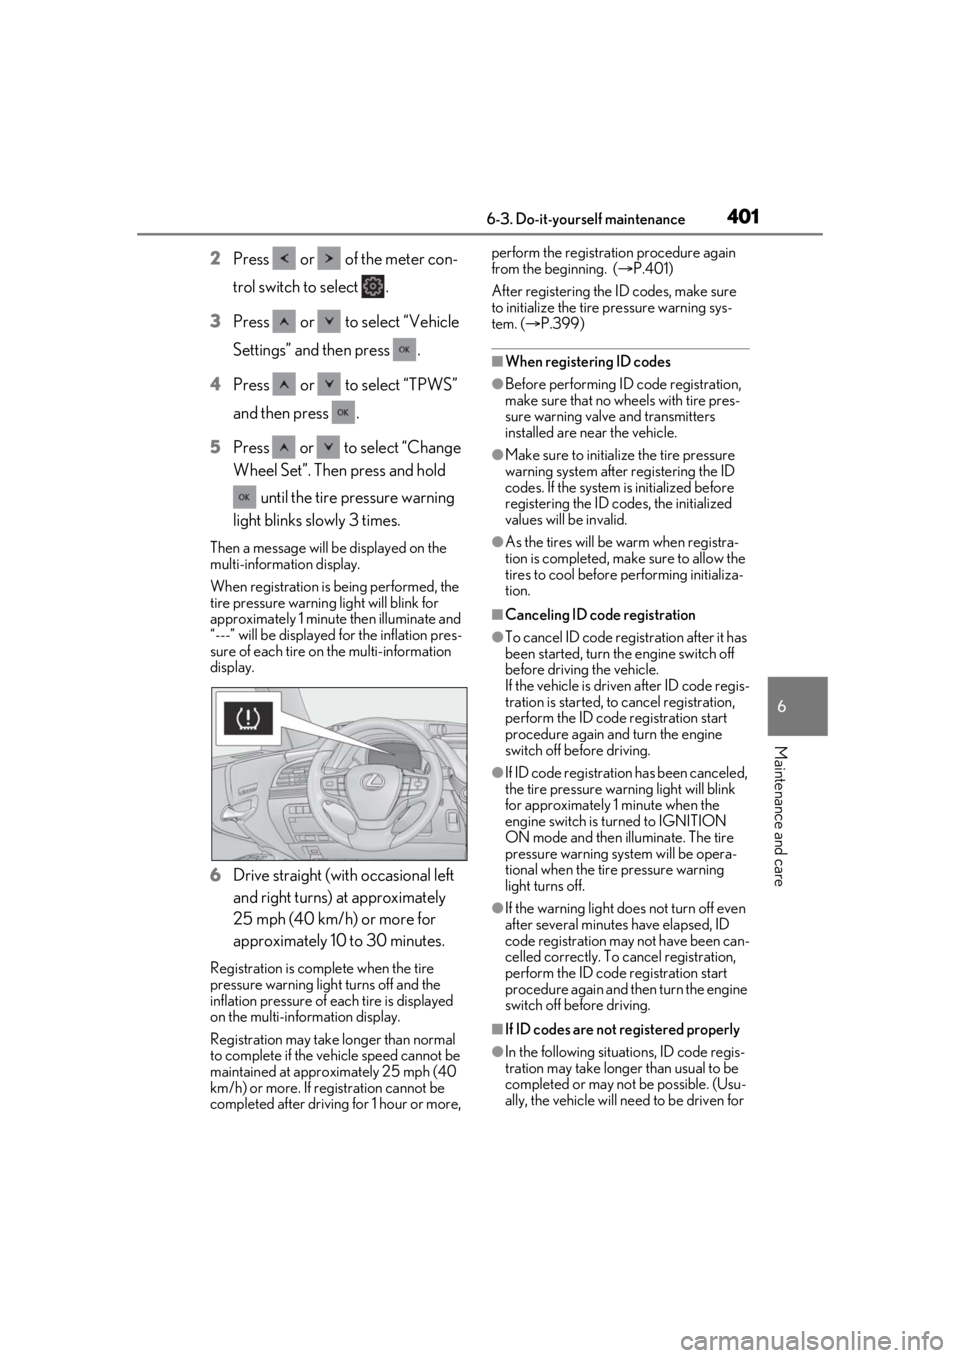
2Press or of the meter con-
trol switch to select .
3 Press or to select “Vehicle
Settings” and then press .
4 Press or to select “TPWS”
and then press .
5 Press or to select “Change
Wheel Set”. Then press and hold
until the tire pressure warning
light blinks slowly 3 times.
Then a message will be displayed on the
multi-information display.
When registration is being performed, the
tire pressure warning light will blink for
approximately 1 minute then illuminate and
“---” will be displayed for the inflation pres-
sure of each tire on the multi-information
display.
6 Drive straight (with occasional left
and right turns) at approximately
25 mph (40 km/h) or more for
approximately 10 to 30 minutes.
Registration is complete when the tire
pressure warning light turns off and the
inflation pressure of each tire is displayed
on the multi-information display.
Registration may take longer than normal
to complete if the vehicle speed cannot be
maintained at approximately 25 mph (40
km/h) or more. If registration cannot be
completed after driving for 1 hour or more, perform the registration procedure again
from the beginning. (
P.401)
After registering the ID codes, make sure
to initialize the tire pressure warning sys-
tem. ( P.399)
■When registering ID codes
●Before performing ID code registration,
make sure that no wheels with tire pres-
sure warning valve and transmitters
installed are near the vehicle.
●Make sure to initializ e the tire pressure
warning system after registering the ID
codes. If the system is initialized before
registering the ID codes, the initialized
values will be invalid.
●As the tires will be warm when registra-
tion is completed, ma ke sure to allow the
tires to cool before performing initializa-
tion.
■Canceling ID code registration
●To cancel ID code regi stration after it has
been started, turn the engine switch off
before driving the vehicle.
If the vehicle is driven after ID code regis-
tration is started, to cancel registration,
perform the ID code registration start
procedure again and turn the engine
switch off before driving.
●If ID code registration has been canceled,
the tire pressure warning light will blink
for approximately 1 minute when the
engine switch is tu rned to IGNITION
ON mode and then illuminate. The tire
pressure warning system will be opera-
tional when the tire pressure warning
light turns off.
●If the warning light does not turn off even
after several minutes have elapsed, ID
code registration may not have been can-
celled correctly. To cancel registration,
perform the ID code registration start
procedure again and then turn the engine
switch off before driving.
■If ID codes are not registered properly
●In the following situations, ID code regis-
tration may take longer than usual to be
completed or may not be possible. (Usu-
ally, the vehicle will need to be driven for
Page 444 of 520

4447-2. Steps to take in an emergency
■Changing engine switch modes
Release the brake pedal and press the
engine switch in step 3 above. The engine
does not start and modes will be changed
each time the switch is pressed. ( P.177)
If you have a set of jumper (or booster)
cables and a second vehicle with a
12-volt battery, you can jump start your
vehicle by following the steps below.
Method connecting jumper (or
booster) cables to the battery
1 Confirm that the electronic key is
being carried.
When connecting the jumper (or booster)
cables, depending on the situation, the
alarm may activate and doors locked.
( P.67)
2 Open the trunk lid and remove the
luggage mat. ( P.349)
In the event that the trunk opener cannot
be used, use the mechanical key to open
the trunk. (P.442)
If the vehicle battery is dis-
charged
The following procedures may be
used to start the engine if the vehi-
cle’s battery is discharged.
You can also call your Lexus dealer
or a qualified repair shop.
Restarting the engine
Page 489 of 520

4898-2. Customization
8
Vehicle specifications
■Vehicle customization
●When the smart access system with
push-button start is off, the entry unlock
function cannot be customized.
●When the doors remain closed after
unlocking the doors and the timer acti-
vated automatic door lock function acti-
vates, signals will be generated in
accordance with the operation buzzer
volume and operational signal (Emer-
gency flashers) function settings.
●Some settings can be changed using a
switch or the audio system screen. If a
setting is changed using a switch, the
changed setting will not be reflected on
the audio system screen until the engine
switch is turned off and then to IGNI-
TION ON mode.
■Clock settings screen
If the clock adjustment screen is displayed
continuously when attempting to change
the clock settings, the system may be mal-
functioning. Have the vehicle inspected by
your Lexus dealer.
Operation when you
approach the vehicle with the
electronic key on your person
OnOff———O
Footwell lightsOnOff———O
Door trim ornament lightsOnOff———O
Time elapsed before the outer
foot lights turn off15 seconds
Off
O——O7.5 seconds
30 seconds
Operation of the outer foot
lights when you approach the
vehicle with the electronic
key on your person
OnOff———O
Operation of the outer foot
lights when the doors are
unlocked
OnOff———O
Operation of the outer foot
lights when a door is openedOnOff———O
Fading out of the outer foot
lights when they turn offLongShort———O
FunctionDefault settingCustomized set-
tingABCD
Page 490 of 520

4908-3. Initialization
8-3.Initialization
*:If equipped
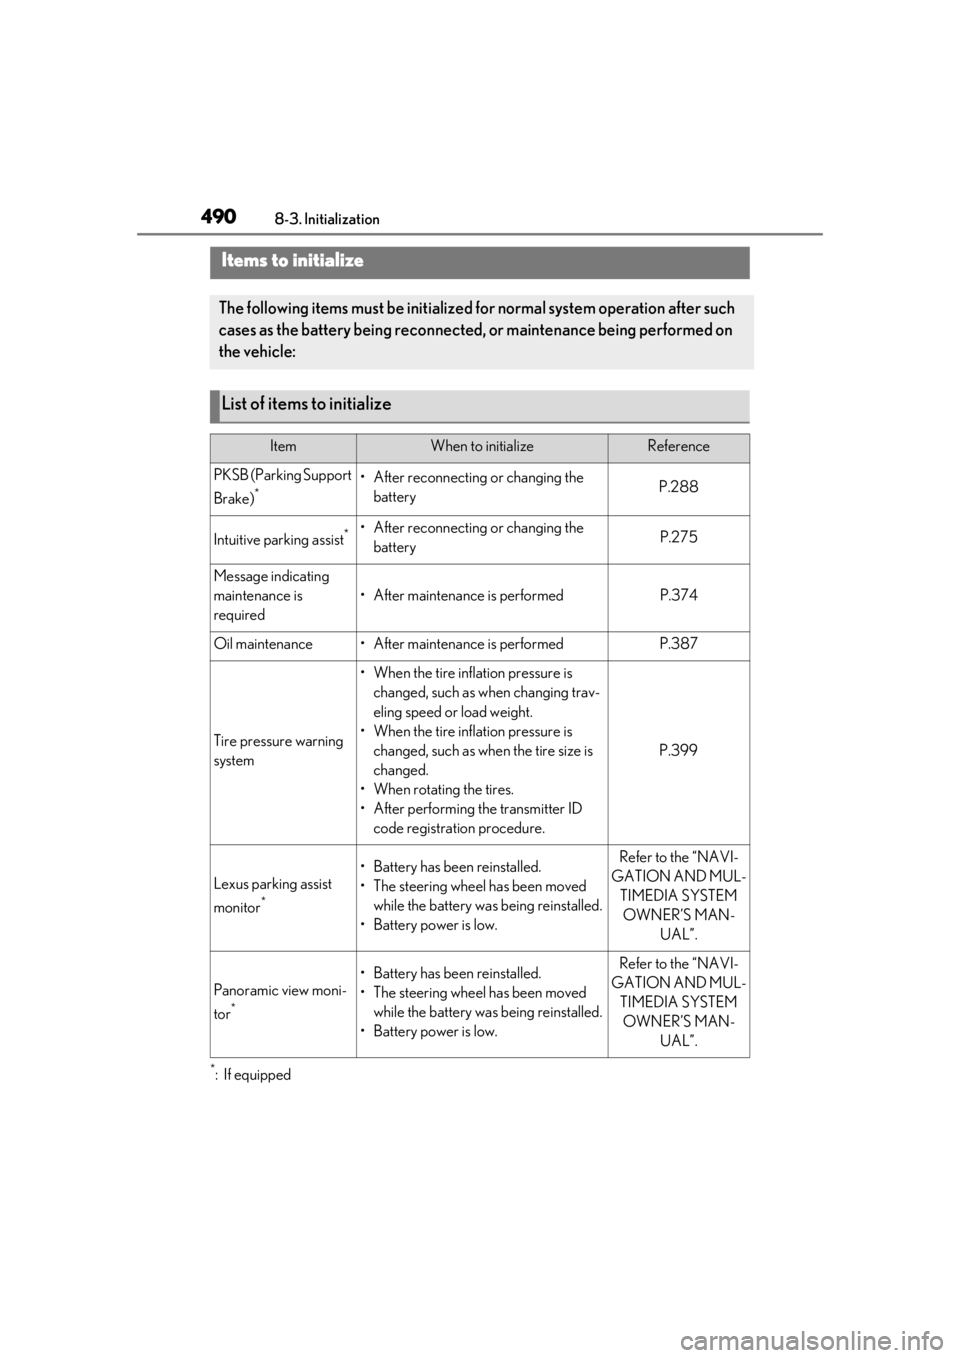
Items to initialize
The following items must be initialized for normal system operation after such
cases as the battery being reconnected, or maintenance being performed on
the vehicle:
List of items to initialize
ItemWhen to initializeReference
PKSB (Parking Support
Brake)
*• After reconnecting or changing the batteryP.288
Intuitive parking assist*• After reconnecting or changing the batteryP.275
Message indicating
maintenance is
required
• After maintenance is performedP.374
Oil maintenance• After maintenance is performedP.387
Tire pressure warning
system
• When the tire inflation pressure is changed, such as when changing trav-
eling speed or load weight.
• When the tire inflation pressure is changed, such as when the tire size is
changed.
• When rotating the tires.
• After performing the transmitter ID code registration procedure.
P.399
Lexus parking assist
monitor
*
• Battery has been reinstalled.
• The steering wheel has been moved while the battery was being reinstalled.
• Battery power is low.Refer to the “NAVI-
GATION AND MUL- TIMEDIA SYSTEM OWNER’S MAN- UAL”.
Panoramic view moni-
tor
*
• Battery has been reinstalled.
• The steering wheel has been moved while the battery was being reinstalled.
• Battery power is low.Refer to the “NAVI-
GATION AND MUL- TIMEDIA SYSTEM OWNER’S MAN- UAL”.
Page 509 of 520

509Alphabetical Index
Digital Rearview Mirror..............................143
Dimension ...................................................... 456
Dinghy towing................................................. 173
DisplayCenter Display..............................................316
Dynamic radar cruise control with full-speed range ...................................... 254
Head-up display ........................................... 89
Intuitive parking assist...............................272
LTA (Lane Tracing Assist).................... 244
Multi-information display .......................... 82
Parking Support Brake function (rear pedestrians) .............................................. 296
RCD (Rear Camera Detection) ..........281
RCTA .............................................................. 279
Warning message..................................... 436
Distance until next engine oil change76, 81
Do-it-yourself maintenance .................... 375
Door courtesy lights ................................... 340
Door lock Doors.................................................................102
Smart access system with push-button start ................................................................... 113
Wireless remote control......................... 100
Doors Automatic door lock ing and unlocking
system ........................................................... 106
Door closer ................................................... 105
Door glasses ..................................................153
Door lock.........................................................102
Open door warning bu zzer ...... 103, 105
Outside rear view mirrors ....................... 151
Rear door child-protectors ................... 105
Drive distance .................................................. 84
Drive info 1/Drive info 2 .............................. 84
Driver’s seat position memory Driving position memory.........................133
Memory recall function ............................135
Power easy access system .....................133
Drive-Start Control (DSC) .......................170
Driving Break-in tips .................................................. 165 Correct driving posture ............................ 23
Driving mode select switch ..................299
Procedures .................................................... 164
Winter drive tips ........................................ 309
Driving information display ........................ 84
Driving position memory............................133 Memory recall function............................ 135
Power easy access system .................... 133
Driving range ................................................... 84
Driving support system information display ............................................................................. 87
DRS (Dynamic Rear Steering) .............. 304
DSC (Drive-Start Control) .......................170
Dynamic radar cruise control with full-speed range .............................. 251, 254Warning message .....................................263
Dynamic Rear Steering (DRS) .............. 304
E
ECB (Electronically Controlled Brake Sys-
tem) ................................................................ 304
Eco Driving Indicator............................85, 93
Eco Driving Indicator Light ........................ 85
EDR (Event data recorder) ........................... 8
Elapsed time ..................................................... 84
Electric Power Steering (EPS) .............. 304 Warning light .............................................. 430
Electronic key .................................................. 98 Battery-saving function.............................. 114
If the electronic key does not operate properly ....................................................... 442
Replacing the battery ................................ 410
Electronic roof sunshade Jam protection function ........................... 160
Operation ....................................................... 158
Electronically Controlled Brake System (ECB) ............................................................ 304
Electronically modulated air suspension ........................................................................... 301
Emergency flashers ..................................... 418
Emergency, in case of If a warning buzzer sounds................... 427