2021 LEXUS LS500 ECO mode
[x] Cancel search: ECO modePage 258 of 520
![LEXUS LS500 2021 Owners Manual 2584-5. Using the driving support systems
approximately 20 mph [30 km/h])
and press the “-SET” switch to set
the speed.
Cruise control “SET” indicator will come
on.
The vehicle speed at the LEXUS LS500 2021 Owners Manual 2584-5. Using the driving support systems
approximately 20 mph [30 km/h])
and press the “-SET” switch to set
the speed.
Cruise control “SET” indicator will come
on.
The vehicle speed at the](/manual-img/36/58935/w960_58935-257.png)
2584-5. Using the driving support systems
approximately 20 mph [30 km/h])
and press the “-SET” switch to set
the speed.
Cruise control “SET” indicator will come
on.
The vehicle speed at the moment the
switch is released becomes the set speed.
Adjusting the set speed by the
switch
To change the set speed, press the
“+RES” or “-SET” switch until the
desired set speed is displayed.
1 Increases the speed (Except when
the vehicle has been stopped by
system control in vehicle-to-vehi-
cle distance control mode)
2 Decreases the speed
Fine adjustment: Press the switch.
Large adjustment: Press and hold the
switch to change the speed, and release when the desired speed is reached.
In the vehicle-to-vehicle distance con-
trol mode, the set speed will be
increased or decreased as follows:
• For the U.S. mainland, Hawaii
Fine adjustment: By 1 mph (1.6 km/h)*1 or 1
km/h (0.6mph)
*2 each time the switch is
pressed
Large adjustment: Increases or decreases
in 1mph (1.6 km/h)
*1 or 1 km/h (0.6 mph)*2
increments for as long as the switch is held
• For Canada, Guam and Puerto Rico
Fine adjustment: By 1 mph (1.6 km/h)*1 or 1
km/h (0.6mph)
*2 each time the switch is
pressed
Large adjustment: Increases or decreases
in 5 mph (8 km/h)
*1 or 5 km/h (3.1 mph)*2
increments for as long as the switch is held
In the constant speed control mode
( P.261), the set speed will be
increased or decreased as follows:
Fine adjustment: By 1 mph (1.6 km/h)*1 or 1
km/h (0.6 mph)
*2 each time the switch is
pressed
Large adjustment: The speed will continue
to change while the switch is held.
*1: When the set speed is shown in “MPH”
*2: When the set speed is shown in “km/h”
Increasing the set speed by the
accelerator pedal
1 Accelerate with accelerator pedal
operation to the desired vehicle
speed
2 Press the “-SET” switch
Adjusting the set speed
Page 261 of 520

2614-5. Using the driving support systems
4
Driving
Depending on the situation, the vehicle
speed will then return to the vehi-
cle-to-vehicle distance control mode
set speed.
In situations where vehicle-to-vehicle
distance control needs to operate,
such as when a preceding vehicle cuts
in front of your vehicle, the curve speed
reduction function will be canceled.
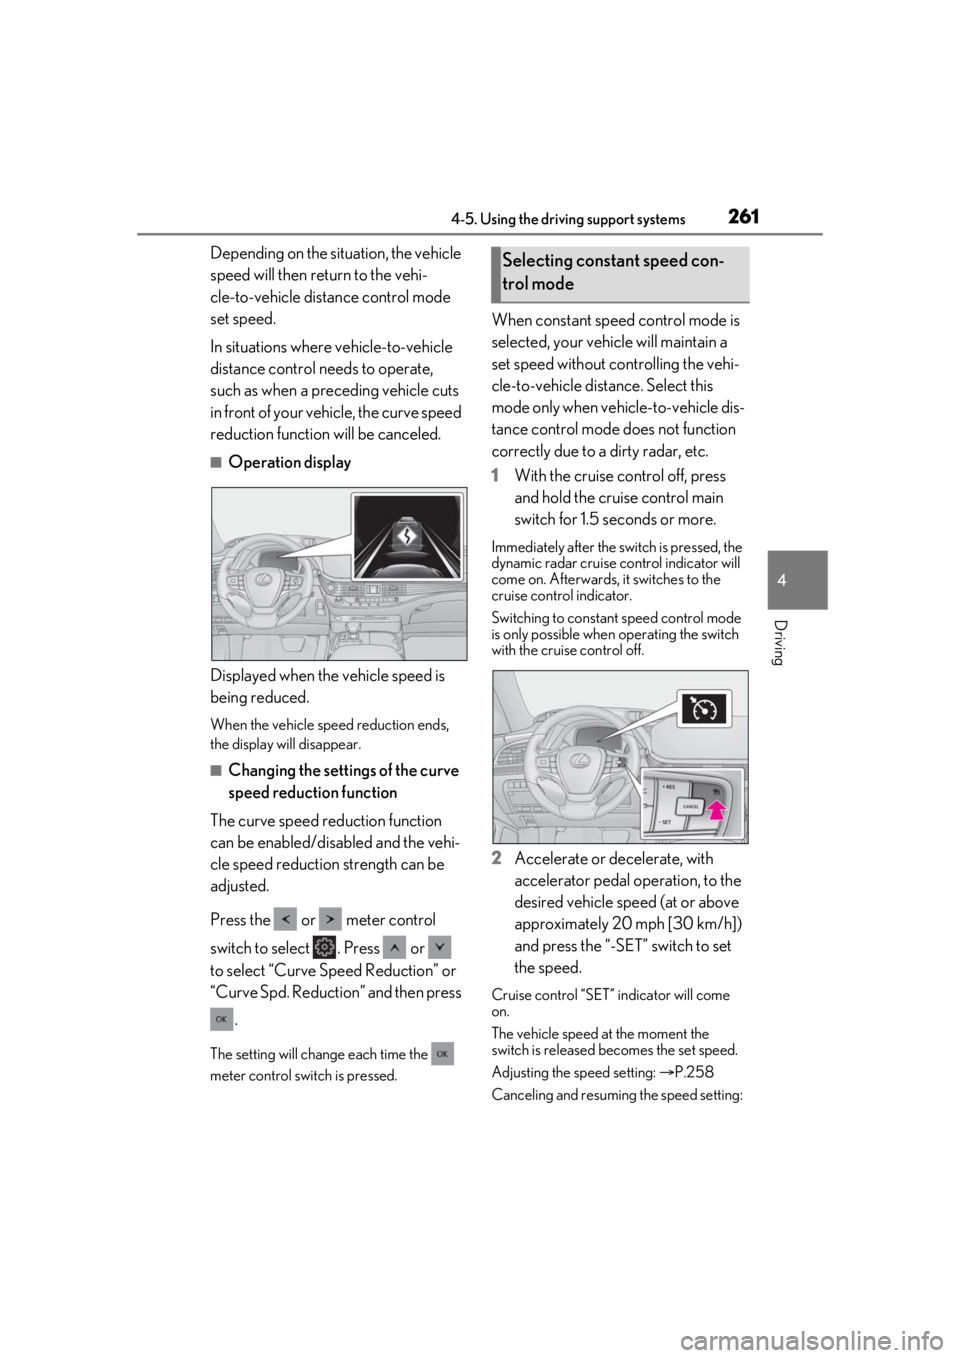
■Operation display
Displayed when the vehicle speed is
being reduced.
When the vehicle speed reduction ends,
the display will disappear.
■Changing the settings of the curve
speed reduction function
The curve speed reduction function
can be enabled/disabled and the vehi-
cle speed reduction strength can be
adjusted.
Press the or meter control
switch to select . Press or
to select “Curve Speed Reduction” or
“Curve Spd. Reduction” and then press .
The setting will change each time the
meter control switch is pressed.
When constant speed control mode is
selected, your vehicle will maintain a
set speed without controlling the vehi-
cle-to-vehicle distance. Select this
mode only when vehicle-to-vehicle dis-
tance control mode does not function
correctly due to a dirty radar, etc.
1With the cruise control off, press
and hold the cruise control main
switch for 1.5 seconds or more.
Immediately after the switch is pressed, the
dynamic radar cruise control indicator will
come on. Afterwards, it switches to the
cruise control indicator.
Switching to constant speed control mode
is only possible when operating the switch
with the cruise control off.
2 Accelerate or decelerate, with
accelerator pedal operation, to the
desired vehicle speed (at or above
approximately 20 mph [30 km/h])
and press the “-SET” switch to set
the speed.
Cruise control “SET” indicator will come
on.
The vehicle speed at the moment the
switch is released becomes the set speed.
Adjusting the speed setting: P.258
Canceling and resuming the speed setting:
Selecting constant speed con-
trol mode
Page 262 of 520

2624-5. Using the driving support systems
P.260
■Dynamic radar cruise control with
full-speed range can be set when
●The shift position is in D.
●The desired set spee d can be set when
the vehicle speed is approximately 20
mph (30 km/h) or more.
(However, when the vehicle speed is set
while driving at below approximately 20
mph [30 km/h], the set speed will be set
to approximately 20 mph [30 km/h].)
■Accelerating after setting the vehicle
speed
The vehicle can accelerate by operating the
accelerator pedal. After accelerating, the
set speed resumes. However, during vehi-
cle-to-vehicle distance control mode, the
vehicle speed may decrease below the set
speed in order to maintain the distance to
the preceding vehicle.
■When the vehicle stops while follow-up
cruising
●Pressing the “+RES” switch while the
vehicle ahead stops w ill resume follow-up
cruising if the vehicle ahead starts off
within approximately 3 seconds after the
switch is pressed.
●If the vehicle ahead starts off within 3 sec-
onds after your vehicle stops, follow-up
cruising will be resumed.
■Automatic cancelation of vehi-
cle-to-vehicle distance control mode
Vehicle-to-vehicle dist ance control mode is
automatically canceled in the following situ-
ations.
●VSC is activated.
●TRAC is activated for a period of time.
●When the VSC or TRAC system is
turned off.
●When snow mode is set.
●The sensor cannot detect correctly
because it is covered in some way.
●When the brake control or output restric-
tion control of a driving support system
operates. (For example: Pre-Collision
System, Drive-Start Control)
●The parking brake is operated.
●The vehicle is stopped by system control
on a steep incline.
●The following are detected when the
vehicle has been stopped by system con-
trol:
• The driver is not wearing a seat belt.
• The driver’s door is opened.
• The vehicle has been stopped for about 3 minutes.
If vehicle-to-vehicle distance control mode
is automatically canceled for any reasons
other than the above, there may be a mal-
function in the system. Contact your Lexus
dealer.
■Automatic cancelation of constant
speed control mode
Constant speed control mode is automati-
cally canceled in the following situations:
●Actual vehicle speed is more than
approximately 10 mph (16 km/h) below
the set vehicle speed.
●Actual vehicle speed falls below approxi-
mately 20 mph (30 km/h).
●VSC is activated.
●TRAC is activated for a period of time.
●When the VSC or TRAC system is
turned off.
●When the brake control or output restric-
tion control of a driving support system
operates. (For example: Pre-Collision
System, Drive-Start Control)
●The parking brake is operated.
If constant speed control mode is automati-
cally canceled for any reasons other than
the above, there may be a malfunction in the
system. Contact your Lexus dealer.
Page 268 of 520

2684-5. Using the driving support systems
Use the meter control switches to turn
on/off the function.
1Press or to select .
2 Press or to select and
then press .
When the BSM function is disabled, the
BSM OFF indicator illuminates. (Each time
the engine switch is turned off then
changed to IGNITION ON mode, the
Blind Spot Monitor will be enabled auto-
matically.)
■Vehicles that can be detected by the Blind Spot Monitor
The Blind Spot Monitor uses rear side radar sensors to detect the following vehi-
cles traveling in adjacent lanes and advises the driver of the presence of such vehi-
cles via the indicators on th e outside rear view mirrors.
Vehicles that are traveling in areas that are not visible using the outside rear
view mirrors (the blind spots)
WARNING
●Do not subject a sensor or its sur-
rounding area on the rear bumper to a
strong impact.
If a sensor is moved even slightly off
position, the system may malfunction
and vehicles may not be detected cor-
rectly.
In the following situations, have your
vehicle inspected by your Lexus
dealer.
• A sensor or its surrounding area is subject to a strong impact.
• If the surrounding area of a sensor is scratched or dented, or part of them
has become disconnected.
●Do not disassemb le the sensor.
●Do not modify the sensor or surround-
ing area on the rear bumper.
●If a sensor or the rear bumper needs to
be removed/installed or replaced,
contact your Lexus dealer.
●Do not paint the rear bumper any
color other than an official Lexus color.
Turning the Blind Spot Monitor
on/off
Blind Spot Monitor operation
A
Page 278 of 520

2784-5. Using the driving support systems
If a vehicle approaching from the right or
left at the rear of the vehicle is detected,
the RCTA icon (P.279) for the detected
side will be displayed on the Center Dis-
play. This illustration shows an example of a
vehicle approaching from both sides of the
vehicle.
RCTA buzzer
If a vehicle approaching from the right or
left at the rear of the vehicle is detected, a
buzzer will sound. The buzzer also sounds
for approximately 1 second immediately
after the RCTA function is turned on.
Use the meter control switches to
enable/disable the RCTA function.
( P.83)
1 Press or to select .
2 Press or to select “PKSA”
and then press .
3 Press or to select “RCTA”
and then press .
When the RCTA function is disabled, the
RCTA OFF indicator ( P.70) illuminates.
(Each time the engine switch is turned off
then changed to IGNITION ON mode,
the RCTA function will be enabled auto-
matically.)
■Outside rear view mirror indicator visi-
bility
In strong sunlight, the outside rear view mir-
ror indicator may be difficult to see.
■Hearing the RCTA buzzer
The RCTA buzzer may be difficult to hear
over loud noises, such as if the audio system
volume is high.
■When “RCTA Not Available” is shown
on the multi-information display
Water, snow, mud, etc., may be attached to
the rear bumper around the sensors.
( P.267) Removing the water, snow, mud,
etc., from the attached to the rear bumper
around the sensors to normal.
Additionally, the function may not function
normally when used in extremely hot or
cold environments.
■Rear side radar sensors
P.267
Turning the RCTA function
on/off
D
WARNING
■Cautions regarding the use of the
function
The driver is solely responsible for safe
driving. Always drive safely, taking care
to observe your surroundings.
The RCTA function is only a supplemen-
tary function which alerts the driver that a
vehicle is approaching from the right or
left at the rear of the vehicle. As the
RCTA function may not function cor-
rectly under certai n conditions, the
driver’s own visual confirmation of safety
is necessary. Over re liance on this func-
tion may lead to an accident resulting
death or serious injury.
NOTICE
■Before using the RCTA function
Do not place obstacles near the sensors.
Page 282 of 520

2824-5. Using the driving support systems
2Press or to select “PKSA”
and then press .
3 Press or to select “RCD”
and then press .
When the RCD function is disabled, the
RCD OFF indicator ( P.70) illuminates.
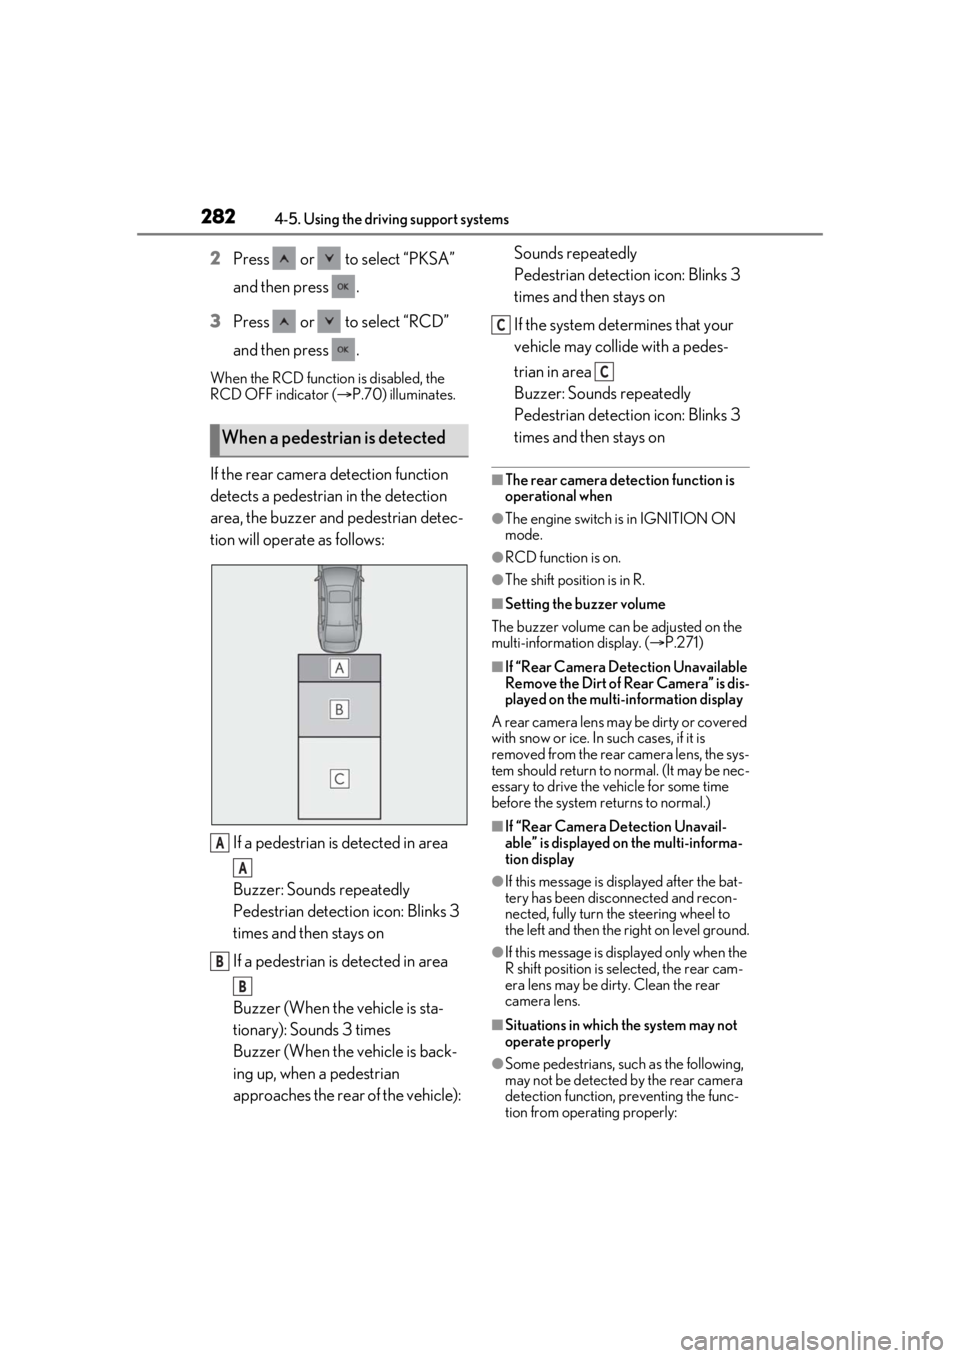
If the rear camera detection function
detects a pedestrian in the detection
area, the buzzer and pedestrian detec-
tion will operate as follows:
If a pedestrian is detected in area
Buzzer: Sounds repeatedly
Pedestrian detection icon: Blinks 3
times and then stays on
If a pedestrian is detected in area
Buzzer (When the vehicle is sta-
tionary): Sounds 3 times
Buzzer (When the vehicle is back-
ing up, when a pedestrian
approaches the rear of the vehicle): Sounds repeatedly
Pedestrian detection icon: Blinks 3
times and then stays on
If the system determines that your
vehicle may collide with a pedes-
trian in area
Buzzer: Sounds repeatedly
Pedestrian detection icon: Blinks 3
times and then stays on■The rear camera dete
ction function is
operational when
●The engine switch is in IGNITION ON
mode.
●RCD function is on.
●The shift position is in R.
■Setting the buzzer volume
The buzzer volume can be adjusted on the
multi-information display. ( P.271)
■If “Rear Camera Detection Unavailable
Remove the Dirt of Rear Camera” is dis-
played on the multi-information display
A rear camera lens ma y be dirty or covered
with snow or ice. In such cases, if it is
removed from the rear camera lens, the sys-
tem should return to normal. (It may be nec-
essary to drive the vehicle for some time
before the system returns to normal.)
■If “Rear Camera Detection Unavail-
able” is displayed on the multi-informa-
tion display
●If this message is di splayed after the bat-
tery has been disconnected and recon-
nected, fully turn the steering wheel to
the left and then the right on level ground.
●If this message is di splayed only when the
R shift position is selected, the rear cam-
era lens may be dirty. Clean the rear
camera lens.
■Situations in which the system may not
operate properly
●Some pedestrians, such as the following,
may not be detected by the rear camera
detection function, preventing the func-
tion from operating properly:
When a pedestrian is detected
A
A
B
B
C
C
Page 287 of 520

2874-5. Using the driving support systems
4
Driving
Engine output
Braking force
Time
Engine output restriction control
begins operating
System determines that possibility
of collision with detected object is
high
Engine output reduced
System determines that possibility
of collision with detected object is
extremely high
Brake control begins operating
Brake control strength increased
Example: Multi-information display:
“BRAKE!”
Example: Multi-information display:
“Switch to Brake”
■If the Parking Support Brake has oper-
ated
If the vehicle is stopped due to operation of
the Parking Support Brake, the Parking
Support Brake will be disabled and the
PKSB OFF indicator will illuminate. If the
Parking Support Brake operates unneces-
sarily, brake control can be canceled by
depressing the brake pedal or waiting for
approximately 2 seconds for it to automati-
cally be canceled. Then, the vehicle can be
operated by depressing the accelerator pedal.
■Re-enabling the Parking Support Brake
To re-enable the Parking Support Brake
when it has been disabled due to operation
of the Parking Support Brake, either enable
the system again ( P.285), or turn the
engine switch off and then back to IGNI-
TION ON mode.
Additionally, if any of the following condi-
tions are met, the system will be re-enabled
automatically and the PKSB OFF indicator
will turn off:
●The P shift position is selected
●The object is no longer detected in the
traveling direction of the vehicle
●The traveling direction of the vehicle
changes*
*
: Except when the Parking Support Brake function (rear pedestrians) operated.
■If “Parking Support Brake Unavailable”
is displayed on th e multi-information
display
●If this message is di splayed only when the
R shift position is selected, the rear cam-
era lens may be dirty. Clean the camera
lens. If this message is displayed when the
shift position is any position other than R,
a sensor on the front or rear bumper may
be dirty. Clean the sensors and their sur-
rounding area on the bumpers.
●Initialization may not have been per-
formed after a battery terminal was dis-
connected and reconnected. Initialize the
system. ( P.288)
If this message continues to be displayed
even after initializati on, have the vehicle
inspected by your Lexus dealer.
■If “Parking Support Brake Unavailable”
and “Parking Assist Unavailable” are
displayed on the multi-information dis-
play
Water may be continuous ly flowing over the
sensor surface, such as in a heavy rain.
When the system determines that it is nor-
mal, the system will return to normal.
A
B
C
D
E
F
G
H
I
J
K
Page 299 of 520

2994-5. Using the driving support systems
4
Driving
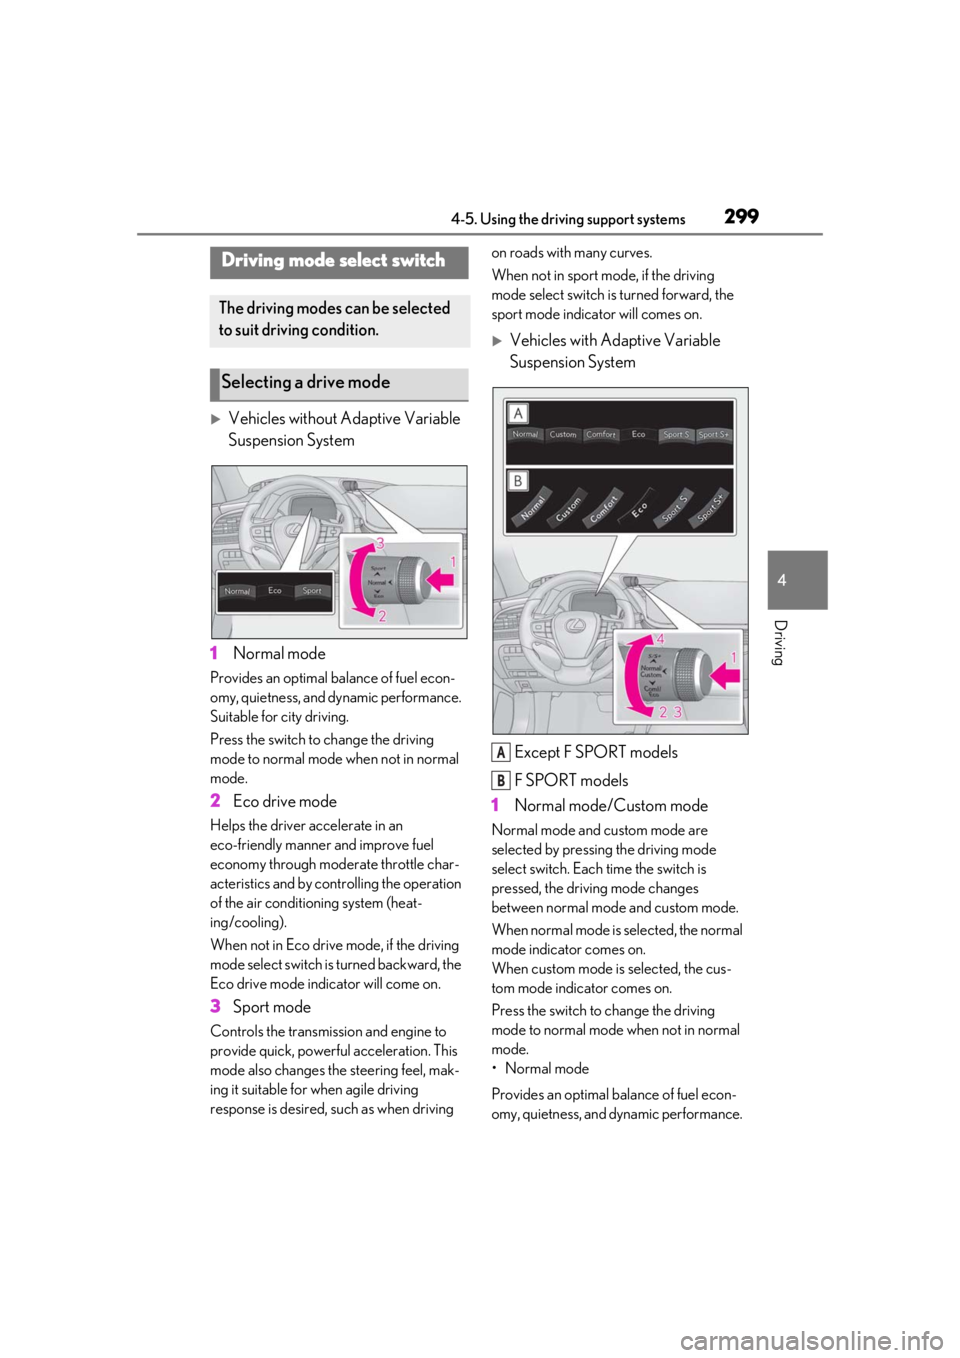
Vehicles without Adaptive Variable
Suspension System
1 Normal mode
Provides an optimal ba lance of fuel econ-
omy, quietness, and dynamic performance.
Suitable for city driving.
Press the switch to change the driving
mode to normal mode when not in normal
mode.
2 Eco drive mode
Helps the driver accelerate in an
eco-friendly manner and improve fuel
economy through moderate throttle char-
acteristics and by controlling the operation
of the air conditioning system (heat-
ing/cooling).
When not in Eco drive mode, if the driving
mode select switch is turned backward, the
Eco drive mode indicator will come on.
3Sport mode
Controls the transmission and engine to
provide quick, powerful acceleration. This
mode also changes the steering feel, mak-
ing it suitable for when agile driving
response is desired, such as when driving on roads with many curves.
When not in sport mode, if the driving
mode select switch is turned forward, the
sport mode indicator will comes on.
Vehicles with Adaptive Variable
Suspension System
Except F SPORT models
F SPORT models
1 Normal mode/Custom mode
Normal mode and custom mode are
selected by pressing the driving mode
select switch. Each time the switch is
pressed, the driving mode changes
between normal mode and custom mode.
When normal mode is selected, the normal
mode indicator comes on.
When custom mode is selected, the cus-
tom mode indicator comes on.
Press the switch to change the driving
mode to normal mode when not in normal
mode.
• Normal mode
Provides an optimal ba lance of fuel econ-
omy, quietness, and dynamic performance.
Driving mode select switch
The driving modes can be selected
to suit driving condition.
Selecting a drive mode
A
B