2021 LEXUS LS500 trunk
[x] Cancel search: trunkPage 144 of 520

1443-4. Adjusting the steering wheel and mirrors
1Digital mirror mode
Displays an image of the area behind the
vehicle.
will illuminate in this mode.
2Optical mirror mode
Turns off the display of the Digital Rearview
Mirror allows it to be used as an optical
mirror.
■Digital mirror mode operating condi-
tion
The engine switch is turned to IGNITION
ON mode.
When the engine switch is changed from
IGNITION ON mode to off or ACCES-
SORY mode, the image will disappear after
several seconds.
■When using the Digital Rearview Mir-
ror in digital mirror mode
●If it is difficult to see the displayed image
due to light reflected off the Digital Rear-
view Mirror, the camera being dirty, or if
lights of a vehicle behind your vehicle or
the displayed image are bothering you,
change to optical mirror mode.
●When the trunk is open, the Digital Rear-
view Mirror image may not display prop-
erly. Before driving, make sure the trunk
is closed.
●If the display is difficult to see due to
reflected light, close the sunshade for the
moon roof or the electronic sunshade for
the panoramic moon roof.
●Any of the following conditions may
occur when driving in the dark, such as at
night. None of them indicates that a mal- function has occurred.
• Colors of objects in the displayed image may differ from their actual color.
• Depending on the height of the lights of the vehicle behind, the area around the
vehicle may appear white and blurry.
• Automatic image adjustment for brighter surrounding image may cause flickering.
If it is difficult to see the displayed image or
flickering bothers you, change to optical
mirror mode.
●The Digital Rearview Mirror may
become hot while it is in digital mirror
mode.
This is not a malfunction.
●Depending on your physical condition or
age, it may take longer than usual to focus
on the displayed image. In this case,
change to optical mirror mode.
●Do not let passengers stare at the dis-
played image when the vehicle is being
driven, as doing so may cause motion
sickness.
■When the system malfunctions
If the symbol shown in the illustration is dis-
played when using the Digital Rearview
Mirror in digital mirror mode, the system
may be malfunctioning. The symbol will dis-
appear in a few second s. Operate the lever,
change to optical mirror mode and have the
vehicle inspected by your Lexus dealer.
■Adjusting the mirror height
The height of the rear view mirror can
be adjusted to suit your driving pos-
ture.
Change to optical mirror mode, adjust-
Adjusting the mirror
Page 149 of 520

1493-4. Adjusting the steering wheel and mirrors
3
Before driving
The image is difficult to
see.Foreign matters (such as water
droplets, snow, mud, etc.) is on
the camera lens.
Operate the dedicated
camera cleaning washer
and clean the camera lens.
( P.196)
Change to optical mirror
mode.
Rinse the camera with a
large quantity of water,
wipe it clean with a soft
cloth dampened with water,
and then change back to
digital mirror mode.
The image is out of
alignment.
The trunk is not fully closed.Fully close the trunk.
The camera or its surrounding
area has received a strong
impact.Change to optical mirror
mode and have the vehicle
inspected by your Lexus
dealer.
The display is dim and
is displayed.
The system may be malfunction-
ing.
Change to optical mirror
mode and have the vehicle
inspected by your Lexus
dealer.
goes off.
SymptomLikely causeSolution
Page 171 of 520

1714-1. Before driving
4
Driving
gage load capacity calculated in Step
4.
(6) If your vehicle will be towing a
trailer, load from your trailer will be
transferred to your vehicle. Consult
this manual to determine how this
reduces the available cargo and lug-
gage load capacity of your vehicle.
( P.172)
Lexus does not recommend towing a
trailer with your vehicle. Your vehicle is not
designed for trailer towing.
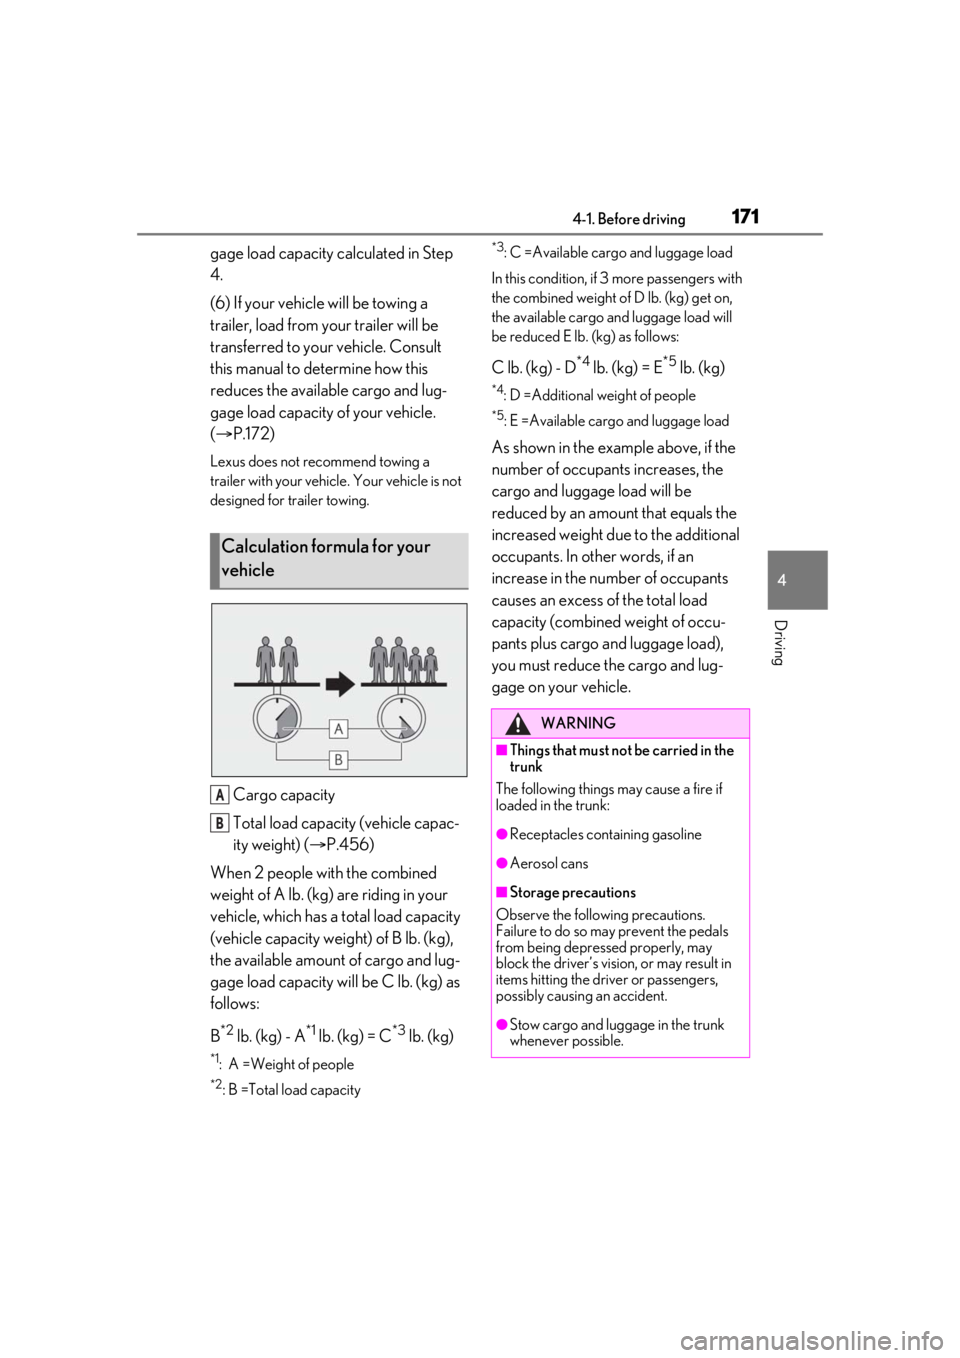
Cargo capacity
Total load capacity (vehicle capac-
ity weight) ( P.456)
When 2 people with the combined
weight of A lb. (kg) are riding in your
vehicle, which has a total load capacity
(vehicle capacity weight) of B lb. (kg),
the available amount of cargo and lug-
gage load capacity will be C lb. (kg) as
follows:
B
*2 lb. (kg) - A*1 lb. (kg) = C*3 lb. (kg)
*1: A =Weight of people
*2: B =Total load capacity
*3: C =Available cargo and luggage load
In this condition, if 3 more passengers with
the combined weight of D lb. (kg) get on,
the available cargo and luggage load will
be reduced E lb. (kg) as follows:
C lb. (kg) - D*4 lb. (kg) = E*5 lb. (kg)
*4: D =Additional weight of people
*5: E =Available cargo and luggage load
As shown in the example above, if the
number of occupant s increases, the
cargo and luggage load will be
reduced by an amount that equals the
increased weight due to the additional
occupants. In other words, if an
increase in the number of occupants
causes an excess of the total load
capacity (combined weight of occu-
pants plus cargo and luggage load),
you must reduce the cargo and lug-
gage on your vehicle.
Calculation formula for your
vehicle
A
B
WARNING
■Things that must not be carried in the
trunk
The following things may cause a fire if
loaded in the trunk:
●Receptacles containing gasoline
●Aerosol cans
■Storage precautions
Observe the following precautions.
Failure to do so may prevent the pedals
from being depressed properly, may
block the driver’s vision, or may result in
items hitting the driver or passengers,
possibly causing an accident.
●Stow cargo and luggage in the trunk
whenever possible.
Page 192 of 520

1924-3. Operating the lights and wipers
●When a door or the trunk is opened or
closed
■Welcome light illumination control
The parking lights and tail lights automati-
cally turn on at night when the doors are
unlocked using the entry function or wire-
less remote control if the light switch is in
the position.
■Customization
Some functions can be customized.
( P.476)
1 With the headlights on, push the
lever away from you to turn on the
high beams.
Pull the lever toward you to the center
position to turn the high beams off.
2Pull the lever toward you and
release it to flash the high beams
once.
You can flash the high beams with the
headlights on or off.
AFS (Adaptive Front-lighting System)
secures excellent visibility at intersec-
tions and on curves by automatically
adjusting the direction of the light axis
of the headlights according to vehicle
speed and the degree of the tire’s angle
as controlled by steering input.
AFS operates at speeds of approximately
6 mph (10 km/h) or higher.
■Customization
Some functions can be customized.
( P.476)
When the steering wheel or turn
signal lever is operated while the
headlights are on (low beam), a cor-
nering light will turn on and light up
the direction of movement of the
vehicle. The cornering lights are
designed to ensure excellent visibil-
ity when making a turn at an inter-
section.
However, when vehicle speed is more than
approximately 22 mph (35 km/h), the cor-
nering lights will not turn on.
When the shift position is in R while
the headlights are on (low beam),
both cornering lights will turn on.
This is designed to enhance visibility
when parking.
■Cornering lights
When the cornering lights are on for more
than 30 minutes, they will turn off automati-
cally.
NOTICE
■To prevent battery discharge
Do not leave the lights on longer than
necessary when the engine is not run-
ning.
Turning on the high beam head-
lights
AFS (Adaptive Front-lighting
System)
Cornering lights
Page 301 of 520

3014-5. Using the driving support systems
4
Driving
*:If equipped
■Situations in which the vehicle height
control may not operate properly
●In the following situations, the vehicle
height may change slowly or may not
change to the correct height:
• When the vehicle comes into contact with snow, ice, stone, etc.
• When the ambient temperature is low
• When the accumulator tank pressure is low
●In the following situations, the vehicle
height may not change:
• If the hood or trunk is not fully closed
• If the brake pedal depressed and the
vehicle is stopped
• When the vehicle is on a significantly
uneven or undulating road
• When the vehicle is on a slanted road or a slope
■Operating sound of the air suspension
compressor and valves
In the following situations the air suspension
compressor and valves may operate and a
sound may be heard, but this does not indi-
cate a malfunction.
●When passengers enter or exit the vehi-
cle or cargo is loaded or unloaded, caus- ing the vehicle height to change
●When the height of the vehicle is
changed using the vehicle height adjust-
ment switch
●When the doors are opened/closed
●When the doors are locked/unlocked
■When the accumulator
tank pressure is
low
When the accumulator tank pressure is low,
the air suspension compressor and valves
may operate repeatedly even though the
vehicle height is not being changed. This
does not indicate a malfunction.
■When “Air Suspension System Malfunc-
tion Visit Your Dealer” is displayed on
the multi-information display
The system may not operate properly. Have
the vehicle inspected by your Lexus dealer.
■Customization
Some functions can be customized.
( P.476)
Electronically modulated air
suspension*
The height of the vehicle when driv-
ing can be selected using the vehi-
cle height adjustment switch. The
selected height level will be main-
tained regardless of the number of
passengers or weight of cargo.
Additionally, setti ngs of the follow-
ing functions can be changed:
Enabling/Disabling controls of
access mode
Temporarily disabling vehicle
height control
WARNING
■Precautions for the electronically
modulated air suspension
●Even if the engine is not running, the
vehicle height may change through
vehicle height control. Be sure to keep
your hands and feet away from the
area underneath the vehicle and
between the tires and vehicle body.
Otherwise part of your body may get
caught, possibly causing an injury.
●In situations such as the following,
make sure to disable all functions of
the vehicle height control of the elec-
tronically modulated air suspension.
Otherwise, the vehicle height may
change and part or your body may be
caught under the vehicle, possibly
causing injury.
• When the vehicle is parked on a curb
• If any of the wheels is not touching the ground
Page 313 of 520

313
5
5
Interior features
Interior features
.5-1. Remote Touch/DisplayRemote Touch ............................. 314
Center Display ............................ 316
Rear Multi Operation Panel ......................................................... 318
5-2. Lexus Climate Concierge Lexus Climate Concierge ...... 321
5-3. Using the air conditioning system and defogger
Front automatic air conditioning system ......................................... 323
Rear automatic air conditioning system ......................................... 333
Heated steering wheel/seat heat- ers/seat ventilators ................ 336
5-4. Using the interior lights Interior lights list......................... 340
5-5. Using the storage features List of storage features............ 344
Trunk features............................. 349
5-6. Using the other interior features Other interior features ........... 352
Garage door opener............... 360
Page 346 of 520

3465-5. Using the storage features
■Glove box light
The glove box light turns on when the tail
lights are on.
■Trunk opener main switch
The trunk opener main switch is located in
the glove box. ( P.112)
■Removing the partition
The partition inside the glove box can be
removed by pulling it.
Push the button.
■Coin holder light
The Coin holder light turns on when the tail
lights are on.
Front
Press in and release the button.
Rear (vehicles without power rear
seat)
Pull the armrest down then push in the
cup holder trim to extend the cup hold-
ers.
Rear (vehicles with power rear seat)
Press in and release the button.
WARNING
■Caution while driving
Keep the glove box closed. In the event
of sudden braking or sudden swerving,
an accident may occur due to an occu-
pant being struck by the open glove box
or the items stored inside.
Coin holder
WARNING
■Caution while driving
Keep the coin holder closed.
Injuries may result in the event of an acci-
dent or sudden braking.
Cup holders
Page 349 of 520

3495-5. Using the storage features
5
Interior features
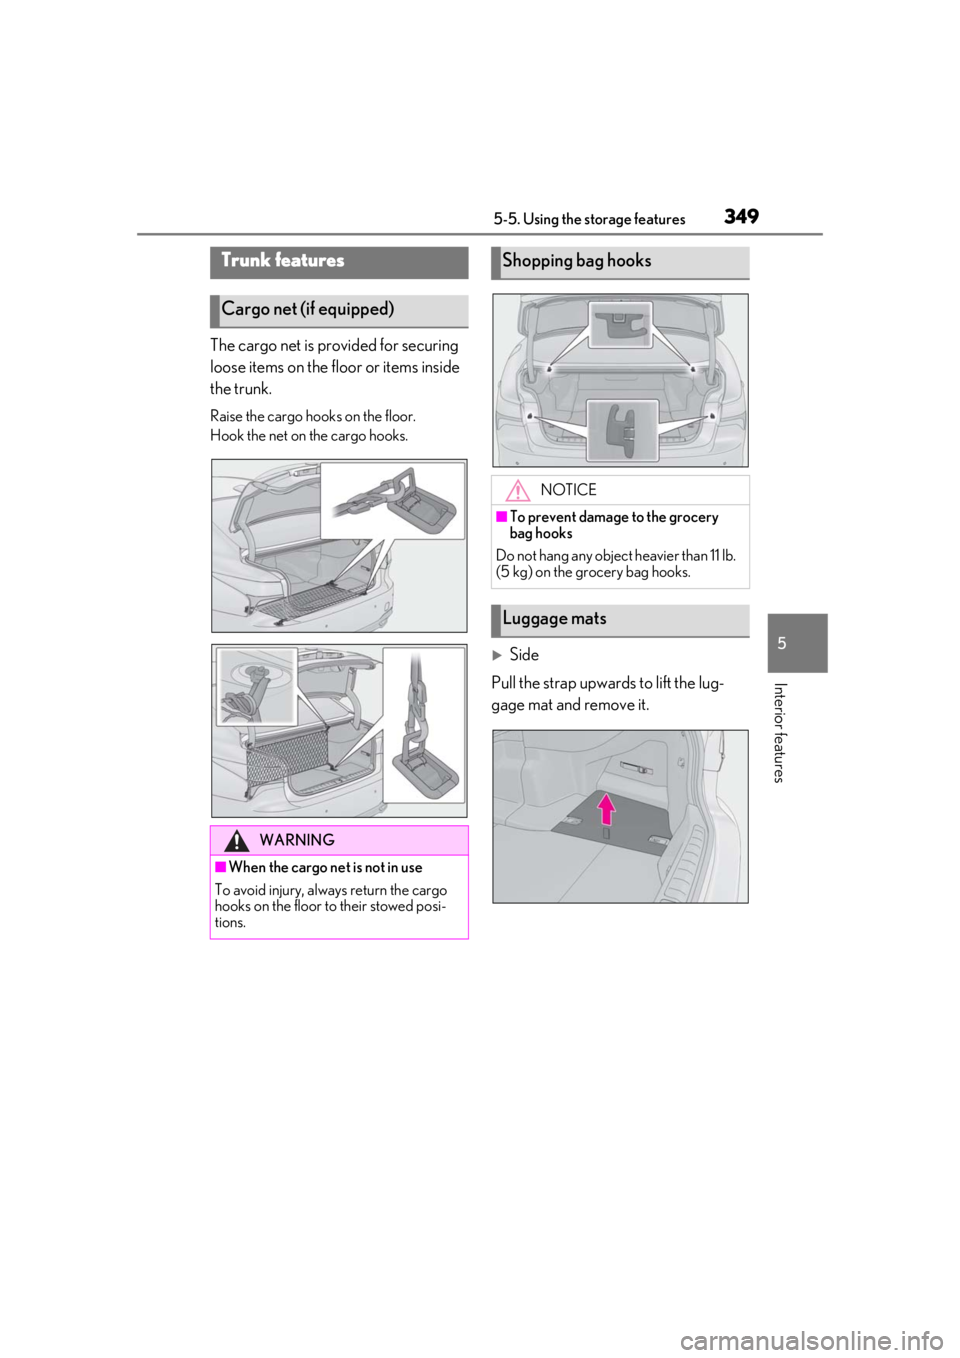
The cargo net is provided for securing
loose items on the floor or items inside
the trunk.
Raise the cargo hooks on the floor.
Hook the net on the cargo hooks.
Side
Pull the strap upwards to lift the lug-
gage mat and remove it.
Trunk features
Cargo net (if equipped)
WARNING
■When the cargo net is not in use
To avoid injury, always return the cargo
hooks on the floor to their stowed posi-
tions.
Shopping bag hooks
NOTICE
■To prevent damage to the grocery
bag hooks
Do not hang any object heavier than 11 lb.
(5 kg) on the grocery bag hooks.
Luggage mats