Page 107 of 436

1073-3. Adjusting the seats
3
Before driving
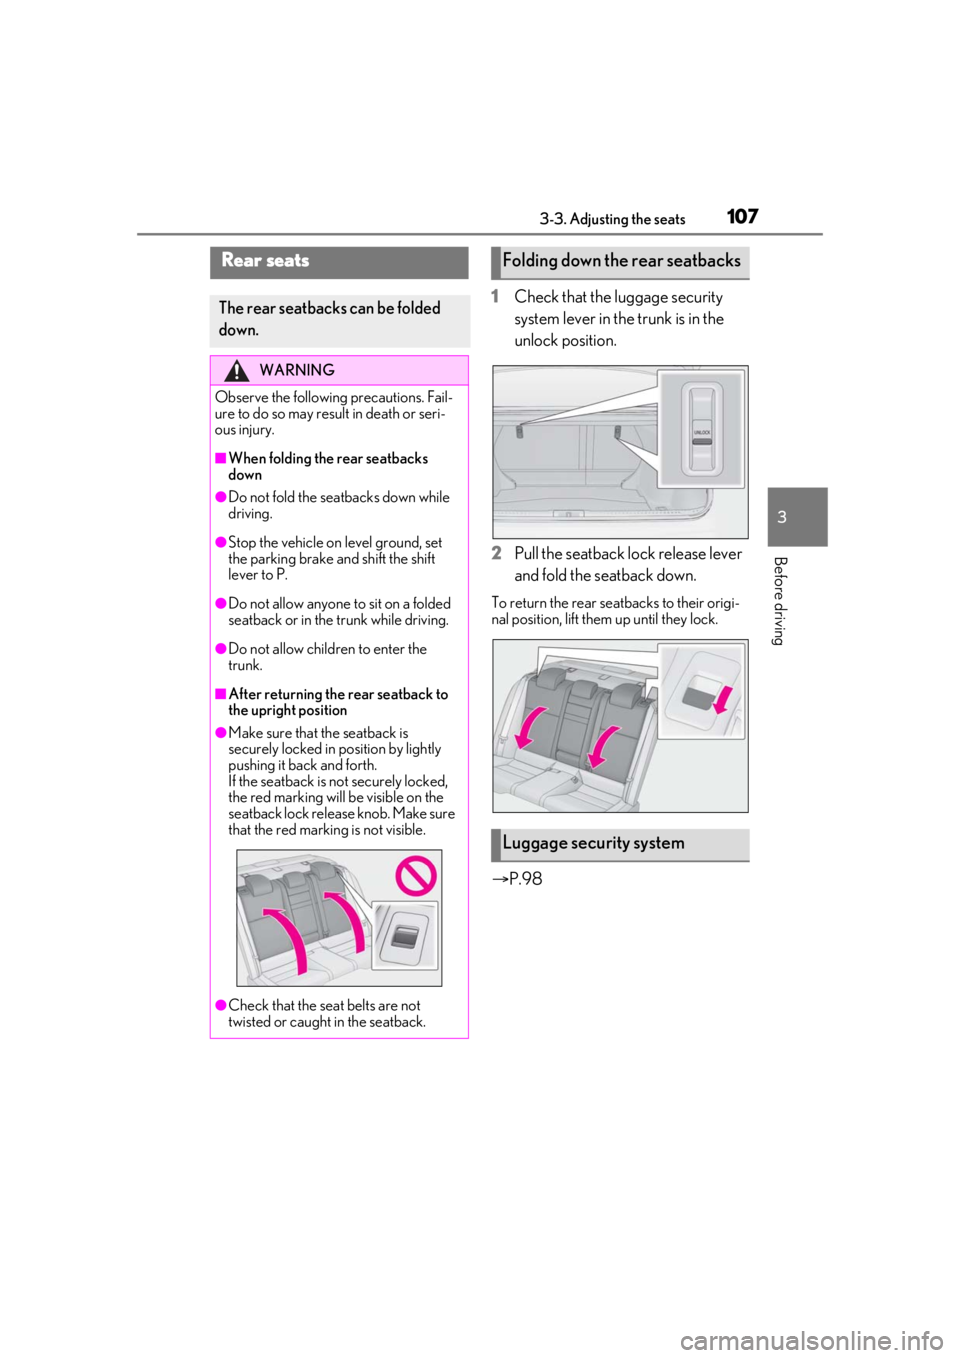
1Check that the luggage security
system lever in the trunk is in the
unlock position.
2 Pull the seatback lock release lever
and fold the seatback down.
To return the rear seatbacks to their origi-
nal position, lift them up until they lock.
P.98
Rear seats
The rear seatbacks can be folded
down.
WARNING
Observe the following precautions. Fail-
ure to do so may result in death or seri-
ous injury.
■When folding the rear seatbacks
down
●Do not fold the seatbacks down while
driving.
●Stop the vehicle on level ground, set
the parking brake and shift the shift
lever to P.
●Do not allow anyone to sit on a folded
seatback or in the trunk while driving.
●Do not allow children to enter the
trunk.
■After returning the rear seatback to
the upright position
●Make sure that the seatback is
securely locked in position by lightly
pushing it back and forth.
If the seatback is not securely locked,
the red marking will be visible on the
seatback lock release knob. Make sure
that the red marking is not visible.
●Check that the seat belts are not
twisted or caught in the seatback.
Folding down the rear seatbacks
Luggage security system
Page 131 of 436

1314-1. Before driving
4
Driving
*3: C =Available cargo and luggage load
In this condition, if 3 more passengers with
the combined weight of D lb. (kg) get on,
the available cargo and luggage load will
be reduced E lb. (kg) as follows:
C lb. (kg) - D*4 lb. (kg) = E*5 lb. (kg)
*4: D =Additional weight of people
*5: E =Available cargo and luggage load
As shown in the example above, if the
number of occupants increases, the
cargo and luggage load will be
reduced by an amount that equals the
increased weight due to the additional
occupants. In other words, if an
increase in the number of occupants
causes an excess of the total load
capacity (combined weight of occu-
pants plus cargo and luggage load),
you must reduce the cargo and lug-
gage on your vehicle.
WARNING
■Things that must not be carried in the
trunk
The following things may cause a fire if
loaded in the trunk:
●Receptacles containing gasoline
●Aerosol cans
■Storage precautions
Observe the following precautions.
Failure to do so may prevent the pedals
from being depressed properly, may
block the driver’s vision, or may result in
items hitting the driver or passengers,
possibly causing an accident.
●Stow cargo and luggage in the trunk
whenever possible.
●To prevent cargo and luggage from
sliding forward during braking, do not
stack anything in th e enlarged trunk.
Keep cargo and luggage low, as close
to the floor as possible.
●When you fold down the rear seats,
long items should not be placed
directly behind the front seats.
●Never allow anyone to ride in the
enlarged trunk. It is not designed for
passengers. They should ride in their
seats with thei r seat belts properly fas-
tened.
●Do not place cargo or luggage in or on
the following locations.
• At the feet of the driver
• On the front passenger or rear seats (when stacking items)
• On the package tray
• On the instrument panel
•On the dashboard
• In front of the Center Display
●Secure all items in the occupant com-
partment.
■Capacity and distribution
●Do not exceed the maximum axle
weight rating or the total vehicle
weight rating.
●Even if the total load of occupant’s
weight and the cargo load is less than
the total load capacity, do not apply the
load unevenly. Improper loading may
cause deterioration of steering or
braking control which may cause
death or serious injury.
Page 150 of 436

1504-3. Operating the lights and wipers
Doing so interferes with the sensor detect-
ing the level of ambient light and may cause
the automatic headlight system to malfunc-
tion.
■Automatic light off system
When the light switch is in , or : The headlights and tail lights turn off
30 seconds after the engine switch is
turned to ACCESSORY mode or turned
off and a door is opened and all of the doors
and trunk are closed. (The lights turn off
immediately if on the key is pressed
twice after all the doors are closed.)
To turn the lights on again, turn the engine
switch to IGNITION ON mode, or turn the
light switch off once and then back to
or .
If any of the doors or trunk lid is left open,
the lights automatically turn off after 20
minutes.
■Light reminder buzzer
A buzzer sounds when the engine switch is
turned off or turned to ACCESSORY
mode and the driver’s door is opened while
the lights are turned on.
■Automatic headlight leveling system (if
equipped)
The level of the headlights is automatically
adjusted according to the number of pas-
sengers and the loading condition of the
vehicle to ensure that the headlights do not
interfere with other road users.
■Customization
Some functions can be customized.
( P.394)
1 With the headlights on, push the
lever away from you to turn on the
high beams.
Pull the lever toward you to the center
position to turn the high beams off.
2Pull the lever toward you and
release it to flash the high beams
once.
You can flash the high beams with the
headlights on or off.
NOTICE
■To prevent battery discharge
Do not leave the lights on longer than
necessary when the engine is not run-
ning.
Turning on the high beam head-
lights
Page 247 of 436
247
5
5
Interior features
Interior features
.5-1. Remote Touch/DisplayRemote Touch ............................ 248
Center Display ........................... 250
5-2. Using the air conditioning system and defogger
Automatic air conditioning system ........................................................ 253
Heated steering wheel/seat heat- ers/seat ventilators ................. 261
5-3. Using the interior lights Interior lights list......................... 263
5-4. Using the storage features List of storage features............ 266
Trunk features............................. 268
5-5. Using the other interior features Other interior features ........... 270
Garage door opener............... 273
Page 267 of 436
2675-4. Using the storage features
5
Interior features
■Glove box light
The glove box light turns on when the
engine switch is in ACCESSORY or IGNI-
TION ON mode.
■Trunk opener main switch
The trunk opener main switch is located in
the glove box. ( P.98)
■Removing the partition
The insert inside the glove box can be
removed.
Push the knob.
Lift by hand to fully open the console box.
■Cup holders
Front
Rear (if equipped)
To open, pull down the armrest and
press the button and release the rear
cup holder on the armrest.
WARNING
■Caution while driving
Keep the glove box closed.
In the event of sudden braking or sudden
swerving, an accident may occur due to
an occupant being struck by the open
glove box or the items stored inside.
Console box
WARNING
■Caution while driving
Keep the console box closed.
Injuries may result in the event of an acci-
dent or sudden braking.
Cup holders/Bottle holders
Page 268 of 436

2685-4. Using the storage features
■Bottle holders
■Cup holders/Bottle holders
●When storing a bottle, close the cap.
●The bottle may not be stored depending
on its size or shape.
●The rubber mats at the bottom of the
front cup holders can be removed.
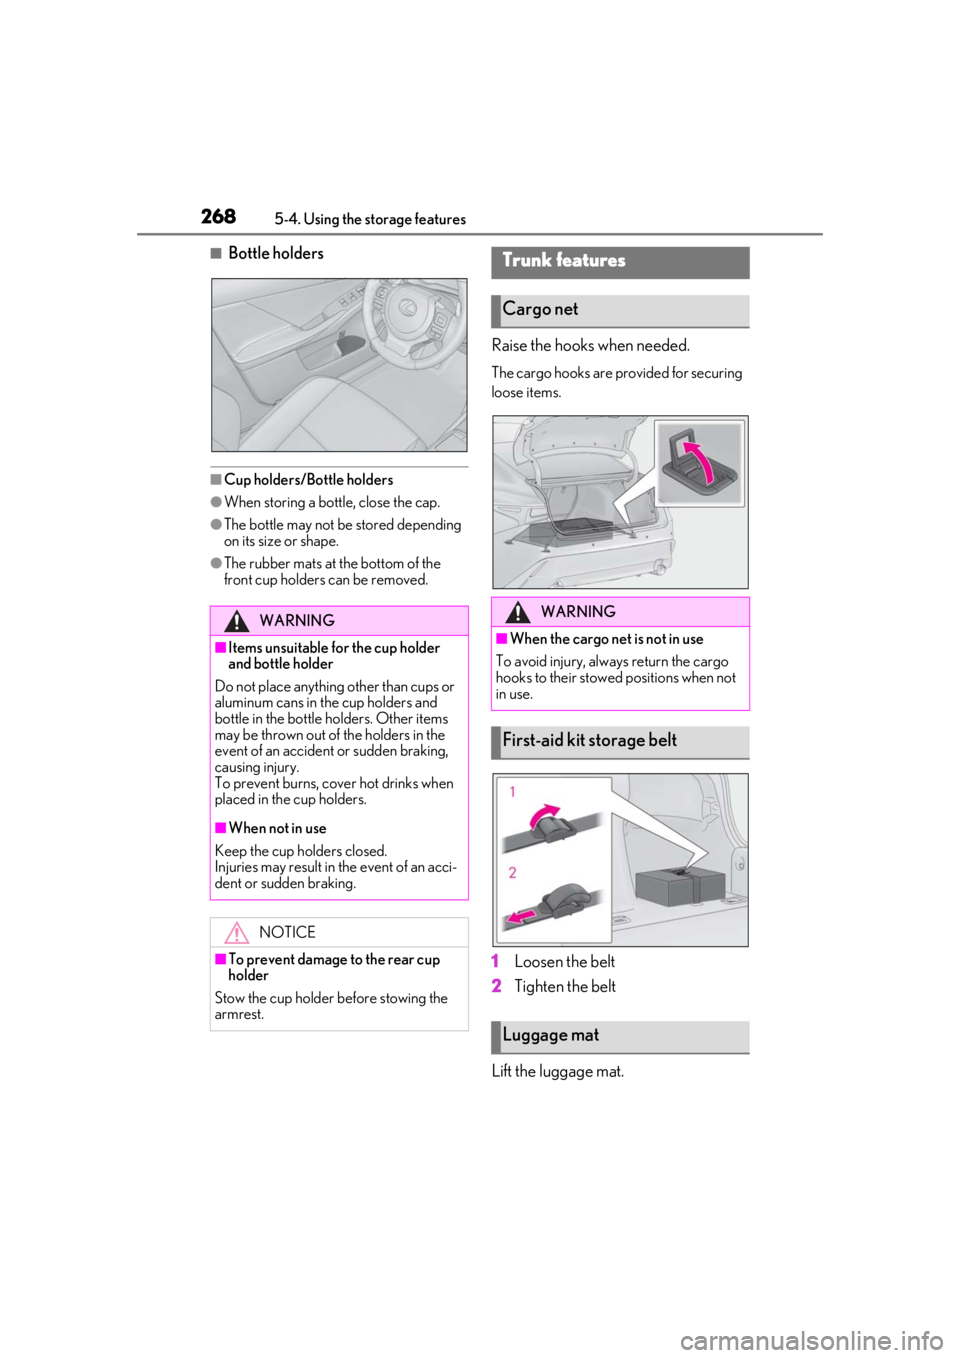
Raise the hooks when needed.
The cargo hooks are provided for securing
loose items.
1Loosen the belt
2 Tighten the belt
Lift the luggage mat.
WARNING
■Items unsuitable for the cup holder
and bottle holder
Do not place anything other than cups or
aluminum cans in the cup holders and
bottle in the bottle holders. Other items
may be thrown out of the holders in the
event of an accident or sudden braking,
causing injury.
To prevent burns, cover hot drinks when
placed in the cup holders.
■When not in use
Keep the cup holders closed.
Injuries may result in the event of an acci-
dent or sudden braking.
NOTICE
■To prevent damage to the rear cup
holder
Stow the cup holder before stowing the
armrest.
Trunk features
Cargo net
WARNING
■When the cargo net is not in use
To avoid injury, always return the cargo
hooks to their stowed positions when not
in use.
First-aid kit storage belt
Luggage mat
Page 289 of 436
2896-2. Maintenance
6
Maintenance and care
Seats• Do the seat controls operate properly?
Steering wheel
• Does the steering wheel rotate
smoothly?
• Does the steering wheel have the cor-
rect amount of free
play?
•There should not be any strange sounds
coming from the
steering wheel.
Vehicle exterior
ItemsCheck points
Doors/trunk• Do the doors/trunk operate smoothly?
Engine hood
•Does the engine hood lock system
work properly?
Fluid leaks
•There should not be any signs of fluid
leakage after the
vehicle has been
parked.
ItemsCheck points
Tires
• Is the tire inflation pressure correct?
• The tires should not be damaged or
excessively worn.
• Have the tires been rotated according to
the maintenance
schedule?
•The wheel bolts should not be loose.
Windshield wip-
ers
• The wiper blades should not show any
signs of cracking,
splitting, wear, con-
tamination or defor-
mation.
• The wiper blades should clear the
windshield without
streaking or skip-
ping.
ItemsCheck points
Page 323 of 436

3236-3. Do-it-yourself maintenance
6
Maintenance and care
■Front turn signal lights (bulb type)
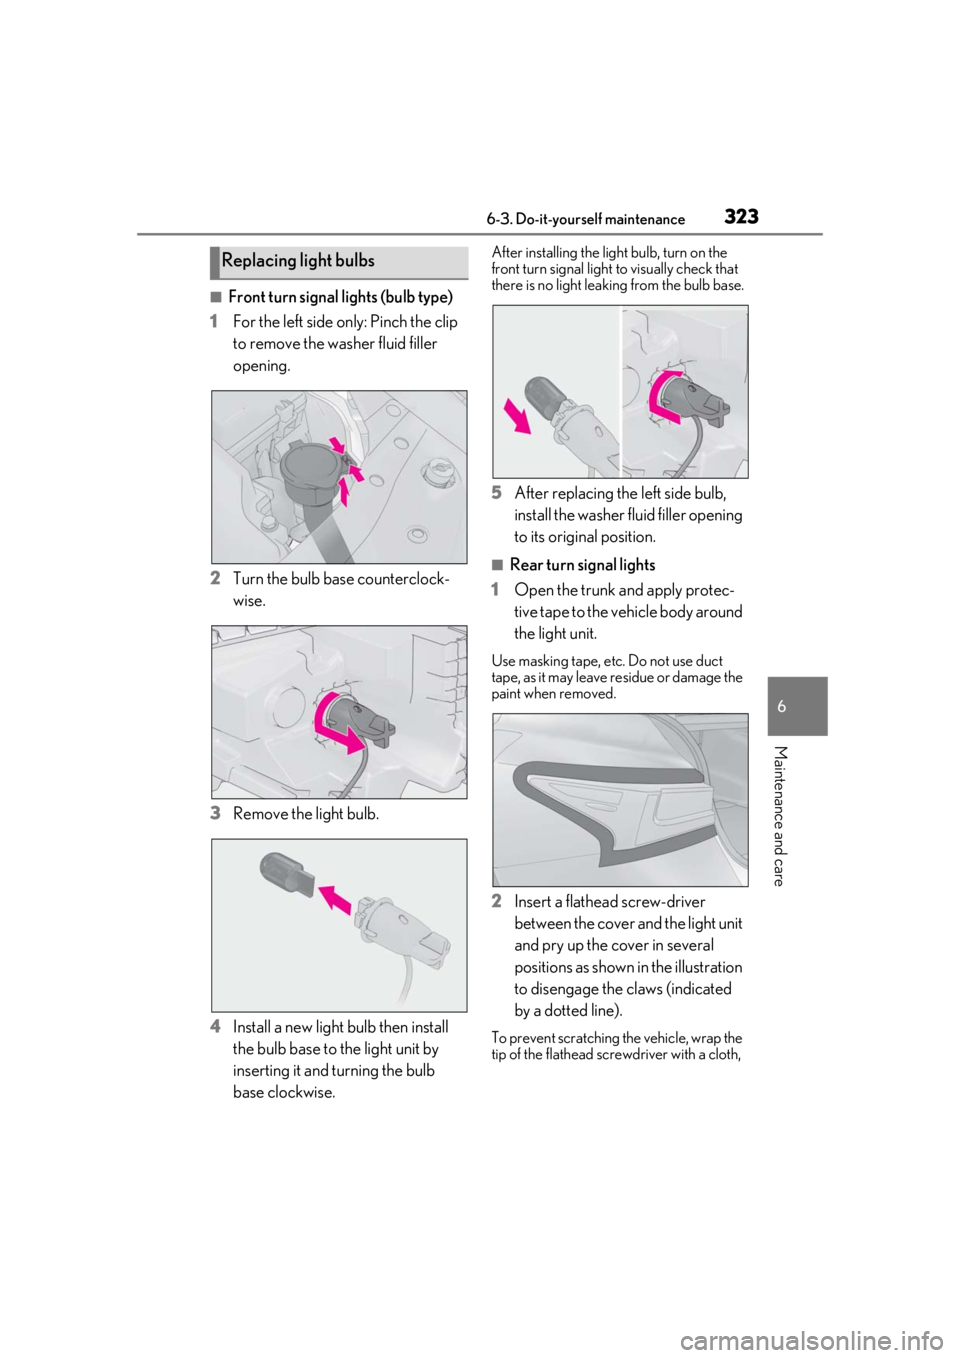
1 For the left side only: Pinch the clip
to remove the washer fluid filler
opening.
2 Turn the bulb base counterclock-
wise.
3 Remove the light bulb.
4 Install a new light bulb then install
the bulb base to the light unit by
inserting it and turning the bulb
base clockwise.
After installing the light bulb, turn on the
front turn signal light to visually check that
there is no light leaking from the bulb base.
5 After replacing the left side bulb,
install the washer fluid filler opening
to its original position.
■Rear turn signal lights
1 Open the trunk and apply protec-
tive tape to the vehicle body around
the light unit.
Use masking tape, etc. Do not use duct
tape, as it may leave residue or damage the
paint when removed.
2Insert a flathead screw-driver
between the cover and the light unit
and pry up the cover in several
positions as shown in the illustration
to disengage the claws (indicated
by a dotted line).
To prevent scratching the vehicle, wrap the
tip of the flathead scre wdriver with a cloth,
Replacing light bulbs