2021 LEXUS ES350 ECU
[x] Cancel search: ECUPage 358 of 464

3587-2. Steps to take in an emergency
hard surfaced roads for at most 50
miles (80 km) at under 18 mph (30
km/h).
A driver must be in the vehicle to steer
and operate the brakes. The vehicle’s
wheels, drive train, axles, steering and
brakes must be in good condition.
To have your vehicle towed by another
vehicle, the towing eyelet must be
installed to your vehicle. Install the tow-
ing eyelet using the following proce-
dure.
1 Take out the wheel nut wrench and
towing eyelet. ( P.376)
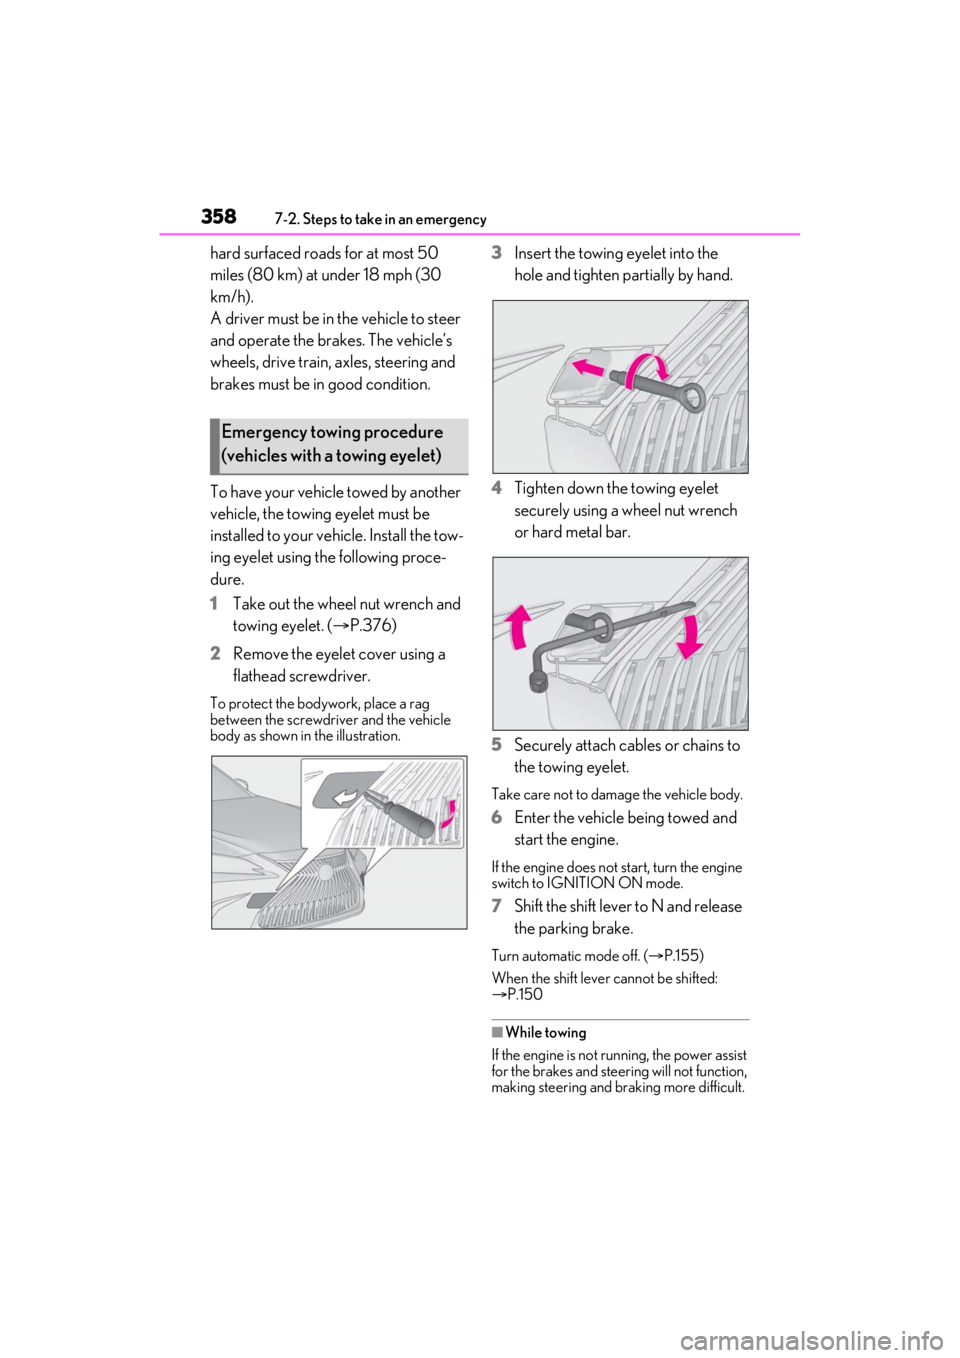
2 Remove the eyelet cover using a
flathead screwdriver.
To protect the bodywork, place a rag
between the screwdriver and the vehicle
body as shown in the illustration.
3Insert the towing eyelet into the
hole and tighten partially by hand.
4 Tighten down the towing eyelet
securely using a wheel nut wrench
or hard metal bar.
5 Securely attach cables or chains to
the towing eyelet.
Take care not to damage the vehicle body.
6Enter the vehicle being towed and
start the engine.
If the engine does not start, turn the engine
switch to IGNITION ON mode.
7Shift the shift lever to N and release
the parking brake.
Turn automatic mode off. ( P.155)
When the shift lever cannot be shifted:
P.150
■While towing
If the engine is not running, the power assist
for the brakes and steering will not function,
making steering and braking more difficult.
Emergency towing procedure
(vehicles with a towing eyelet)
Page 368 of 464

3687-2. Steps to take in an emergency
■Brake hold operated indicator (warning buzzer)
■Master warning light (warning buzzer)
■Warning buzzer
In some cases, the bu zzer may not be heard
due to being in a noisy location or audio
sound.
■Front passenger detection sensor, seat
belt reminder and warning buzzer
●If luggage is placed on the front passen-
ger seat, the front passenger detection
sensor may cause th e warning light to
flash and the warning buzzer to sound
even if a passenger is not sitting in the
seat.
●If a cushion is placed on the seat, the sen-
sor may not detect a passenger, and the
warning light may not operate properly.
■SRS warning light
This warning light system monitors the air-
bag sensor assembly, fr ont impact sensors,
side impact sensors (front door), side
impact sensors (front), side impact sensors
(rear), driver’s seat position sensor, driver’s
seat belt buckle switch, front passenger
occupant classification system (ECU and
sensors), “AIR BAG ON” indicator light,
“AIR BAG OFF” indicator light, front pas-
senger’s seat belt buc kle switch, seat belt
pretensioners, airbags, interconnecting wir-
ing and power sources. ( P.28)
■Electric power steering system warning
light (warning buzzer)
When the battery charge becomes insuffi-
cient or the voltage temporarily drops, the electric power steering system warning
light may come on and the warning buzzer
may sound.
■When the tire pressure warning light
comes on
Inspect the tires to check if a tire is punc-
tured.
If a tire is punctured: P.375
If none of the tires are punctured:
Turn the engine switch off then turn it to
IGNITION ON mode. Check if the tire
pressure warning light comes on or blinks.
If the tire pressure warning light blinks for
approximately 1 minute then stays on
There may be a malfunction in the tire pres-
sure warning system. Have the vehicle
inspected by your Lexus dealer immedi-
ately.
If the tire pressure warning light comes
on
1 After the temperature of the tires has
lowered sufficiently, check the inflation
pressure of each tire and adjust them to
the specified level.
2 If the warning light does not turn off
even after several minutes have
elapsed, check that the inflation pres-
sure of each tire is at the specified level
and perform initialization. ( P.332)
■The tire pressure warning light may
come on due to natural causes
The tire pressure wa rning light may come
on due to natural causes such as natural air
Warning lightDetails/Actions
(flashes)
Indicates a malfunction in the brake hold system
Have the vehicle inspected by your Lexus dealer immediately.
Warning lightDetails/Actions
A buzzer sounds and the warning ligh t comes on and flashes to indicate
that the master warning system has detected a malfunction.
P.371
Page 379 of 464

3797-2. Steps to take in an emergency
7
When trouble arises
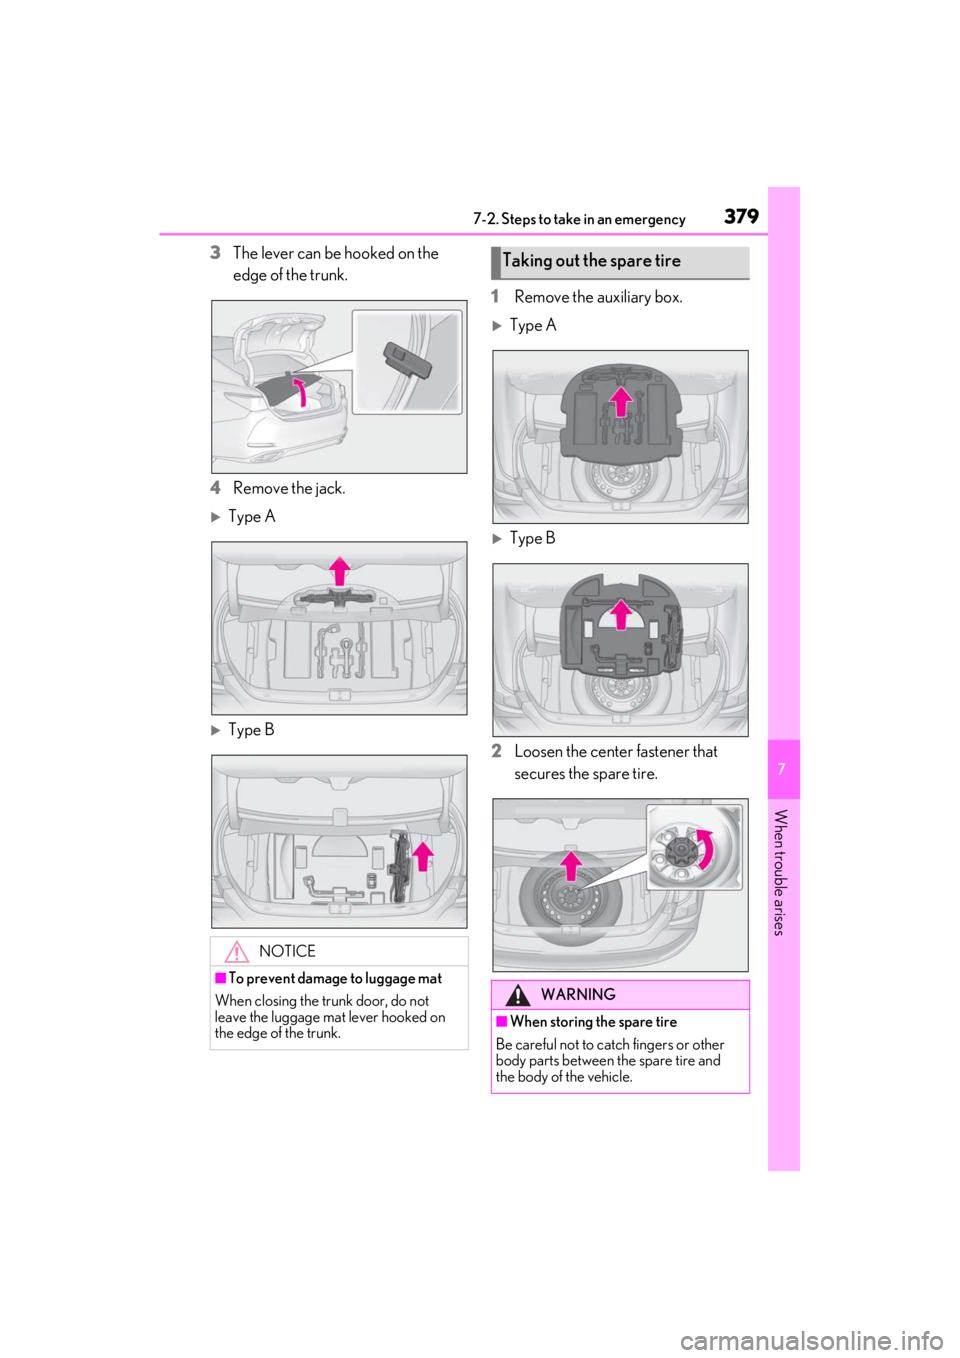
3The lever can be hooked on the
edge of the trunk.
4 Remove the jack.
Type A
Type B 1
Remove the auxiliary box.
Type A
Type B
2 Loosen the center fastener that
secures the spare tire.
NOTICE
■To prevent damage to luggage mat
When closing the trunk door, do not
leave the luggage mat lever hooked on
the edge of the trunk.
Taking out the spare tire
WARNING
■When storing the spare tire
Be careful not to catch fingers or other
body parts between the spare tire and
the body of the vehicle.
Page 383 of 464

3837-2. Steps to take in an emergency
7
When trouble arises
1Replace a rear tire with the compact
spare tire.
2 Replace the flat front tire with the tire
removed from the rear of the vehicle.
3 Fit tire chains to the front tires.
WARNING
■When using the compact spare tire
●Remember that the compact spare tire
provided is specifically designed for
use with your vehicle. Do not use your
compact spare tire on another vehicle.
●Do not use more than one compact
spare tire simultaneously.
●Replace the compact spare tire with a
standard tire as soon as possible.
●Avoid sudden acceleration, abrupt
steering, sudden braking and shifting
operations that cause sudden engine
braking.
■When the compact spare tire is
attached
The vehicle speed may not be correctly
detected, and the following systems may
not operate correctly:
• ABS & Brake assist
•VSC
•TRAC
• Dynamic radar cruise control with full- speed range
• PCS (Pre-Collision System)
•EPS
• LTA (Lane Tracing Assist)
• Panoramic view monitor (if equipped)
• Lexus parking assist monitor (if equipped)
• Intuitive parking assist (if equipped)
• Navigation system (if equipped)
• BSM (Blind spot monitor) (if equipped)
• Automatic high Beam
Also, not only can the following system
not be utilized fully, bu t it may even nega-
tively affect the drive-train components:
• AWD system (if equipped)
■Speed limit when using the compact
spare tire
Do not drive at speeds in excess of 50
mph (80 km/h) when a compact spare
tire is installed on the vehicle.
The compact spare tire is not designed
for driving at high speeds. Failure to
observe this precaution may lead to an
accident causing death or serious injury.
■After using the tools and jack
Before driving, make sure all the tools
and jack are securely in place in their
storage location to reduce the possibility
of personal injury during a collision or
sudden braking.
NOTICE
■Be careful when driving over bumps
with the compact spare tire installed
on the vehicle
The vehicle becomes lower when driving
with the compact spar e tire compared to
when driving with standard tires. Be
careful when driving over uneven road
surfaces.
■Driving with tire chains and the com-
pact spare tire
Do not fit tire chains to the compact
spare tire.
Tire chains may damage the vehicle
body and adversely affect driving perfor-
mance.
Page 391 of 464

3917-2. Steps to take in an emergency
7
When trouble arises
ing parts as shown in the illustration
4 Start the engine of the second vehi-
cle. Increase the engine speed
slightly and maintain at that level for
approximately 5 minutes to
recharge the battery of your vehi-
cle.
5 Open and close any of the doors of
your vehicle with the engine switch
off.
6 Maintain the engine speed of the
second vehicle and start the engine
of your vehicle by turning the
engine switch to IGNITION ON
mode.
7 Once the vehicle’s engine has
started, remove the jumper cables
in the exact reverse order from
which they were connected.
Once the engine starts, have the vehicle
inspected at your Lexus dealer as soon as
possible.
■Starting the engine when the battery is
discharged
The engine cannot be started by push-start-
ing.
■To prevent battery discharge
●Turn off the headlights and the audio sys-
tem while the engine is stopped.
●Turn off any unnecessary electrical com-
ponents when the vehicle is running at a
low speed for an extended period, such
as in heavy traffic.
■When the battery is removed or dis-
charged
●Information stored in the ECU is cleared.
When the battery is depleted, have the
vehicle inspected at your Lexus dealer.
●Some systems may require initialization.
( P.430)
■When removing the battery terminals
When the battery terminals are removed,
the information stored in the ECU is
cleared. Before removi ng the battery termi-
nals, contact your Lexus dealer.
■Charging the battery
The electricity stored in the battery will dis-
charge gradually even when the vehicle is
not in use, due to natural discharge and the
draining effects of certain electrical appli-
ances. If the vehicle is left for a long time,
the battery may discharge, and the engine
may be unable to start. (The battery
recharges automatically during driving.)
■When recharging or replacing the bat-
tery
●In some cases, it may not be possible to
unlock the doors using the smart access
system with push-button start when the
battery is discharged. Use the wireless
remote control or the mechanical key to
lock or unlock the doors.
●The engine may not start on the first
attempt after the battery has recharged
but will start normally after the second
attempt. This is not a malfunction.
●The engine switch mode is memorized by
the vehicle. When the battery is recon-
nected, the system will return to the
mode it was in before the battery was dis-
charged. Before disconnecting the bat-
tery, turn the engine switch off.
If you are unsure wh at mode the engine
switch was in before the battery dis-
charged, be especially careful when
reconnecting the battery.
■When replacing the battery
●Use a battery that conforms to European
regulations.
●Use a battery that the case size is same as
the previous one (LN3), 20 hour rate
capacity (20HR) is equivalent (70Ah) or
greater, and performance rating (CCA)
is equivalent (592A) or greater.
• If the sizes differ, the battery cannot be properly secured.
• Battery performance may decrease and
the engine may not be able to start.
Page 418 of 464

4188-1. Specifications
*:Table 1 Occupant loading and distribution for vehicle normal load for various desig-
nated seating capacities
Snow tire
A tire that attains a traction index equal to or greater than 110, com-
pared to the ASTM E-1136 Standa rd Reference Test Tire, when
using the snow traction test as de scribed in ASTM F-1805-00, Stan-
dard Test Method for Single Whee l Driving Traction in a Straight
Line on Snow-and Ice-Covered Surf aces, and which is marked with
an Alpine Symbol ( ) on at least one sidewall
Test rimThe rim on which a tire is fitted fo r testing, and may be any rim listed
as appropriate for use with that tire
TreadThat portion of a tire that comes into contact with the road
Tread ribA tread section running circumferentially around a tire
Tread separationPulling away of the tread from the tire carcass
Treadwear indica-
tors (TWI)The projections within th e principal grooves designed to give a visual
indication of the degree s of wear of the tread
Wheel-holding fix-
tureThe fixture used to hold the wheel and tire assembly securely during
testing
Designated seating capacity,
Number of occupantsVehicle normal load, Num- ber of occupantsOccupant distribution in a normally loaded vehicle
2 through 422 in front
5 through 1032 in front, 1 in second seat
11 through 1552 in front, 1 in second seat, 1 in
third seat, 1 in fourth seat
16 through 2072 in front, 2 in second seat, 2 in third seat, 1 in fourth seat
Tire related termMeaning
Page 422 of 464

4228-2. Customization
■Smart access system with push-button start and wireless remote control
( P.95, 106)
■Smart access system with push-button start ( P.95, 106)
■Wireless remote control ( P.92, 95, 106)
FunctionDefault settingCustomized setting
Operating signal (Buzzers)5OffOO1 to 7
Operation signal (Emergency
flashers)OnOffOO
Time elapsed before automatic
door lock function is activated if
door is not open ed after being
unlocked
60 seconds
Off
OO30 seconds
120 seconds
Open door warning buzzerOnOffO
FunctionDefault settingCustomized setting
Smart access system with push-
button startOnOffO
Smart door unlockingDriver’s doorAll the doorsOO
Time elapsed before unlocking all
the door when gripping and hold-
ing the driver’s door handle
2 seconds
Off
O1.5 seconds
2.5 seconds
Number of consecutive door lock
operations2 timesAs many as desiredO
FunctionDefault settingCustomized setting
Wireless remote controlOnOffO
Unlocking operation
Driver’s door
unlocked in one step, all doors
unlocked in two step
All doors unlocked in one stepOO
ABC
ABC
ABC
Page 434 of 464

4349-1. For owners
9-1.For owners
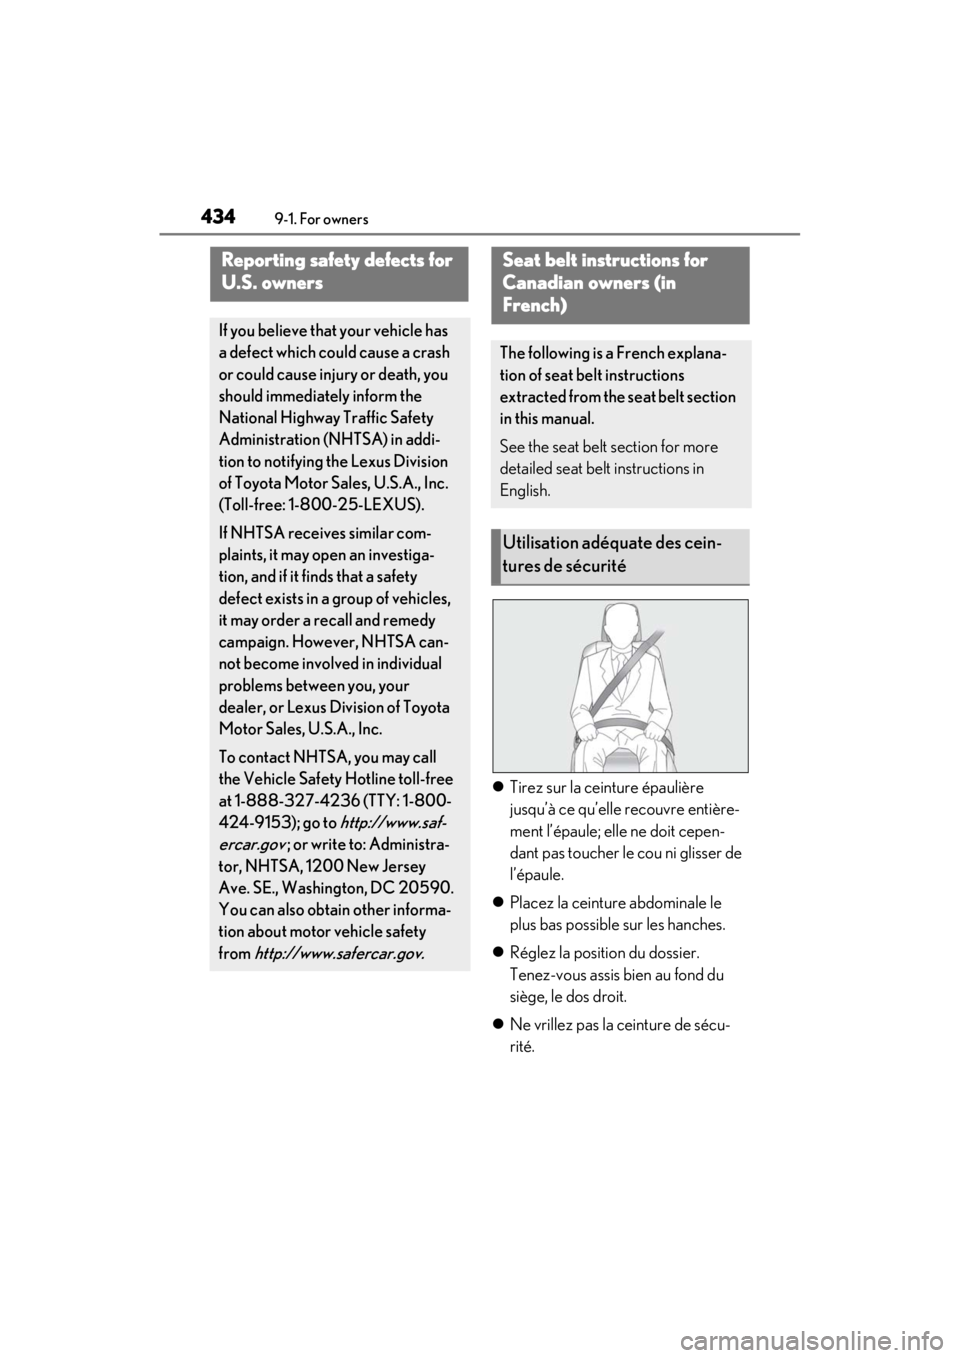
Tirez sur la ceinture épaulière
jusqu’à ce qu’elle recouvre entière-
ment l’épaule; elle ne doit cepen-
dant pas toucher le cou ni glisser de
l’épaule.
Placez la ceinture abdominale le
plus bas possible sur les hanches.
Réglez la position du dossier.
Tenez-vous assis bien au fond du
siège, le dos droit.
Ne vrillez pas la ceinture de sécu-
rité.
Reporting safety defects for
U.S. owners
If you believe that your vehicle has
a defect which could cause a crash
or could cause injury or death, you
should immediately inform the
National Highway Traffic Safety
Administration (NHTSA) in addi-
tion to notifying the Lexus Division
of Toyota Motor Sa les, U.S.A., Inc.
(Toll-free: 1-800-25-LEXUS).
If NHTSA receives similar com-
plaints, it may open an investiga-
tion, and if it finds that a safety
defect exists in a group of vehicles,
it may order a recall and remedy
campaign. However, NHTSA can-
not become involved in individual
problems between you, your
dealer, or Lexus Division of Toyota
Motor Sales, U.S.A., Inc.
To contact NHTS A, you may call
the Vehicle Safety Hotline toll-free
at 1-888-327-4236 (TTY: 1-800-
424-9153); go to
http://www.saf-
ercar.gov
; or write to: Administra-
tor, NHTSA, 1200 New Jersey
Ave. SE., Washington, DC 20590.
You can also obtain other informa-
tion about motor vehicle safety
from
http://www.sa fercar.gov.
Seat belt instructions for
Canadian owners (in
French)
The following is a French explana-
tion of seat belt instructions
extracted from the seat belt section
in this manual.
See the seat belt section for more
detailed seat belt instructions in
English.
Utilisation adéquate des cein-
tures de sécurité