2021 LEXUS ES350 engine
[x] Cancel search: enginePage 333 of 464

3336-3. Do-it-yourself maintenance
6
Maintenance and care
mation display. Also, “--” is displayed for
inflation pressure of each tire on the multi-
information display while the tire pressure
warning system determines the position.
8Drive at approximately 25 mph
(40 km/h) or more for approxi-
mately 10 to 30 minutes.
When initialization is complete, the infla-
tion pressure of each tire will be displayed
on the multi-information display.
Even if the vehicle is not driven at approxi-
mately 25 mph (40 km /h) or more, initial-
ization can be completed by driving for a
long time. However, if initialization does
not complete after driving for 1 hour or
more, park the vehicle in a safe place for
approximately 20 minutes and then drive
the vehicle again.
■When initializing
●Initialization is perfor med while driving at
a vehicle speed of approximately 25 mph
(40 km/h) or more.
●Make sure to carry ou t initialization after
adjusting the tire inflation pressure.
Also, make sure the tires are cold before
carrying out initializat ion or tire inflation
pressure adjustment.
●The tire pressure warning system can be
initialized by yourse lf, but depending on
the driving conditions and driving envi-
ronment, initialization may take some
time to complete.
■The initialization operation
●If you have accidentally turned the engine
switch off during initialization, it is not
necessary to manually restart the initial-
ization again, as initialization will restart automatically the next time the engine
switch is turned to IGNITION ON
mode.
●If you accidentally perform initialization
when initialization is
not necessary, adjust
the tire inflation pressure to the specified
level when the tires are cold, and conduct
initialization again.
●While the position of each tire is being
determined and the inflation pressures
are not being displayed on the multi-
information display, if the inflation pres-
sure of a tire drops, the tire pressure
warning light will come on.
■If the tire pressure warning system is not
initialized properly
●In the following situations, initialization
may take longer than usual to be com-
pleted or may not be possible. Normally,
initialization comple tes within approxi-
mately 30 minutes.
• Vehicle is not driven at approximately 25
mph (40 km/h) or more
• Vehicle is driven on unpaved roads
• Vehicle is driven near other vehicles and system cannot recognize tire pressure
warning valve and transmitters of your
vehicle over those of other vehicles
If initialization does no t complete after driv-
ing for 1 hour or more, park the vehicle in a
safe place for approximately 20 minutes
and then drive the vehicle again.
●If the vehicle is reversed during initializa-
tion, the data up to that point is reset, so
perform the initiali zation procedure
again from the beginning.
●In the following situations, initialization
will not be started or was not completed
properly and the system will not operate
properly. Perform th e initialization pro-
cedure again.
• If, when attempting to start initialization, the tire pressure warning light does not
blink 3 times.
• If, when the vehicle has been driven for
about 20 minutes afte r performing initial-
ization, the tire pr essure warning light
blinks for approximately 1 minute and
then illuminates.
If initialization canno t be completed after
Page 334 of 464

3346-3. Do-it-yourself maintenance
performing the above procedure, contact
your Lexus dealer.
Every tire pressure warning valve and
transmitter has a unique ID code.
When replacing a tire pressure warn-
ing valve and transmitter, it is neces-
sary to register the ID code.
When registering the ID codes, per-
form the following procedure.
1Park the vehicle in a safe place, wait
for approximately 20 minutes, and
then start the engine. ( P.144)
2 Press or of the meter con-
trol switches and select .
3 Press or of the meter con-
trol switches and select “Vehicle
Settings”, and then press “OK”.
4 Press or of the meter con-
trol switches an d select “TPWS”,
and then press “OK”.
5 Press or of the meter con-
trol switches and select “Change
Wheel Set”. Then press and hold
“OK” until the tire pressure warn- ing light starts slowly blinking 3
times.
Then a message will be displayed on the
multi-information display.
When registration is being performed, the
tire pressure warning light will blink for
approximately 1 minute then illuminate and
“--” will be displayed
for the inflation pres-
sure of each tire on the multi-information
display.
6 Drive at approximately 25 mph
(40 km/h) or more for approxi-
mately 10 to 30 minutes.
Registration is complete when the tire
pressure warning light turns off and the
inflation pressure of ea ch tire is displayed
on the multi-information display.
Even if the vehicle is not driven at approxi-
mately 25 mph (40 km/h) or more, regis-
tration can be completed by driving for a
long time. However, if registration does
not complete after driving for 1 hour or
more, perform the procedure again from
the beginning.
7 Initialize the tire pressure warning
system. ( P.332)
■When registering ID codes
●ID code registration is performed while
driving at a vehicle speed of approxi-
mately 25 mph (40 km/h) or more.
●Before performing ID code registration,
make sure that no wheels with tire pres-
sure warning valve and transmitters
installed are near the vehicle.
●Make sure to initializ e the tire pressure
WARNING
■When initializing the tire pressure
warning system
Do not initialize tire inflation pressure
without first adjusting the tire inflation
pressure to the spec ified level. Other-
wise, the tire pressure warning light may
not come on even if the tire inflation
pressure is low, or it may come on when
the tire inflation pressure is actually nor-
mal.
Registering ID codes
Page 335 of 464

3356-3. Do-it-yourself maintenance
6
Maintenance and care
warning system after registering the ID
codes. If the system is initialized before
registering the ID codes, the initialized
values will be invalid.
●ID codes can be registered by yourself,
but depending on the driving conditions
and driving environment, registration
may take some time to complete.
■Canceling ID code registration
●To cancel ID code registration after it has
been started, turn the engine switch off
before driving the vehicle.
If the vehicle is driven after ID code regis-
tration is started, to cancel registration,
perform the ID code registration start
procedure again and turn the engine
switch off before driving.
●If ID code registration has been can-
celed, the tire pressure warning light will
blink for approximately 1 minute when the
engine switch is turned to IGNITION
ON mode and then illuminate. The tire
pressure warning system will be opera-
tional when the tire pressure warning
light turns off.
●If the warning light does not turn off even
after several minutes have elapsed, ID
code registration may not have been
canceled correctly. To cancel registra-
tion, perform the ID code registration
start procedure again and then turn the
engine switch of f before driving.
■If ID codes are not registered properly
●In the following situations, ID code regis-
tration may take longer than usual to be
completed or may not be possible. Nor-
mally, registration completes within
approximately 30 minutes.
• Vehicle is not parked for approximately
20 minutes or more before driving
• Vehicle is not driven at approximately 25 mph (40 km/h) or more
• Vehicle is driven on unpaved roads
• Vehicle is driven near other vehicles and system cannot recognize tire pressure
warning valve and tran smitters of your
vehicle over those of other vehicles
• Wheel with tire pressure warning valve and transmitter installed is inside or near
the vehicle
If registration does not complete after driv- ing for 1 hour or more, perform the ID code
registration proced
ure again from the
beginning.
●If the vehicle is reve rsed during registra-
tion, the data up to that point is reset, so
perform the registration procedure again
from the beginning.
●In the following situations, ID code regis-
tration will not be started or was not com-
pleted properly and the system will not
operate properly. Pe rform the ID code
registration procedure again.
• If, when attempting to start ID code regis-
tration, the tire pressure warning light
does not blink slowly 3 times.
• If, when the vehicle has been driven for
about 20 minutes after performing ID
code registration, the tire pressure warn-
ing light blinks for approximately 1 minute
and then illuminates.
●If ID code registration cannot be com-
pleted after performing the above proce-
dure, contact your Lexus dealer.
Page 339 of 464

3396-3. Do-it-yourself maintenance
6
Maintenance and care
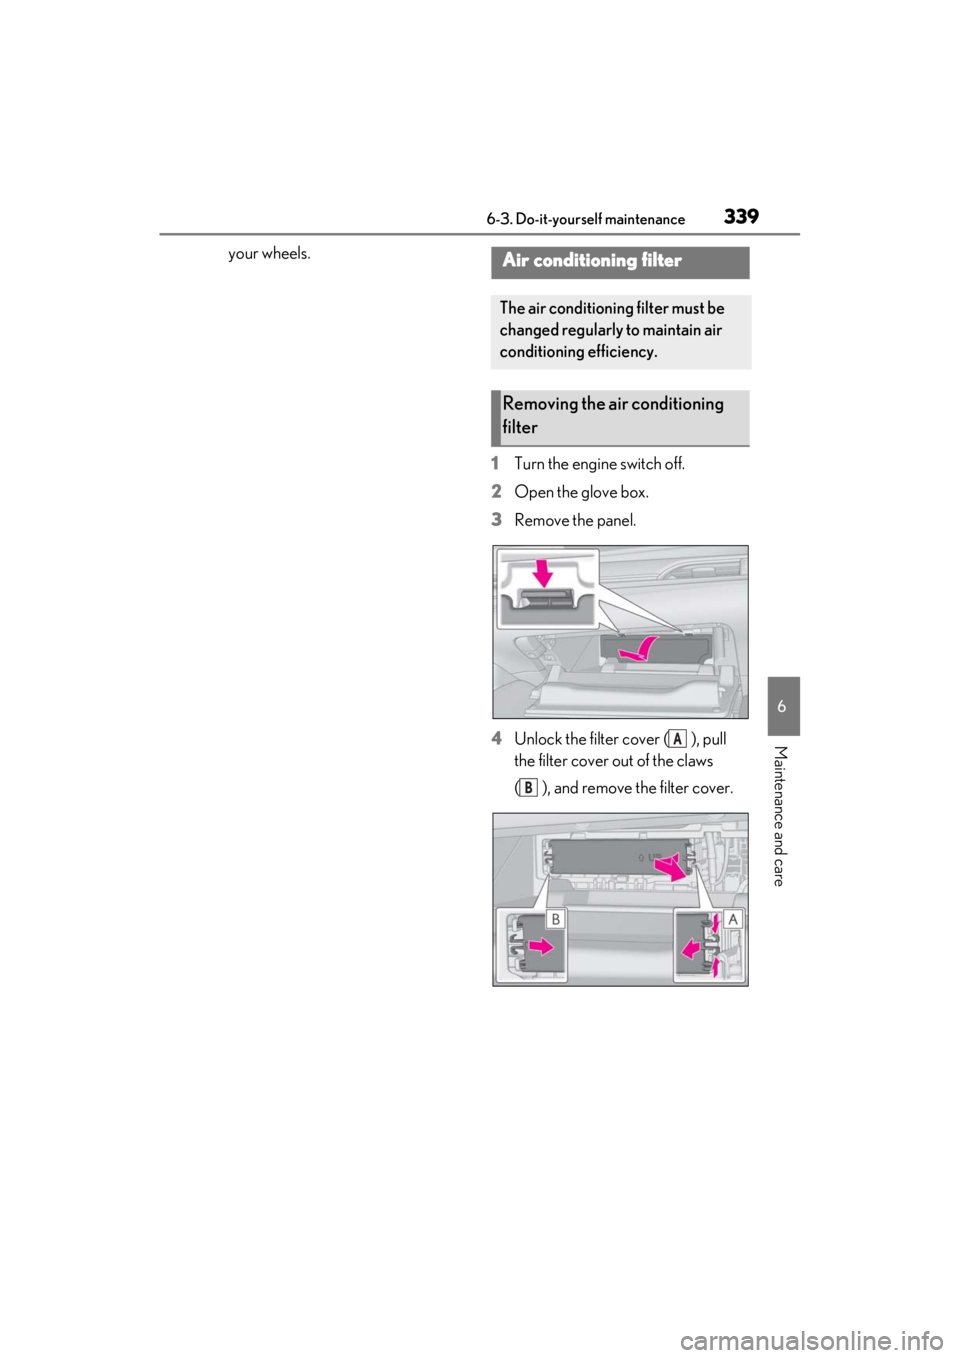
your wheels.1Turn the engine switch off.
2 Open the glove box.
3 Remove the panel.
4 Unlock the filter cover ( ), pull
the filter cover out of the claws
( ), and remove the filter cover.Air conditioning filter
The air conditioning filter must be
changed regularly to maintain air
conditioning efficiency.
Removing the air conditioning
filter
A
B
Page 342 of 464

3426-3. Do-it-yourself maintenance
1Turn the engine switch off.
2 Open the Fuse box cover.
Engine compartment: type A fuse
box
Push the tab in and lift the lid off.
Engine compartment: type B fuse
box
Push the tab in and lift the lid off.
Driver’s side instrument panel
Push the tab in and remove the lid.
WARNING
●If the cover cannot be firmly closed,
stop using the electronic key and stow
the key in the place where children
cannot reach, and then contact your
Lexus dealer.
●If you accidentally swallow a battery or
put a battery into a part of your body,
get emergency medical attention
immediately.
■To prevent battery explosion or leak-
age of flammable liquid or gas
●Replace the battery with a new battery
of the same type. If a wrong type of
battery is used, it may explode.
●Do not expose batteries to extremely
low pressure due to high altitude or
extremely high temperatures.
●Do not burn, break or cut a battery.
NOTICE
■When replacing the battery
Use a screwdriver of appropriate size.
Applying excessive force may deform or
damage the cover.
■For normal operation after replacing
the battery
Observe the following precautions to
prevent accidents:
●Always work with dry hands.
Moisture may cause the battery to
rust.
●Do not touch or move any other com-
ponent inside the remote control.
●Do not bend either of the battery ter-
minals.
Checking and replacing
fuses
If any of the electrical components
do not operate, a fuse may have
blown. If this happens, check and
replace the fuses as necessary.
Checking and replacing fuses
Page 351 of 464

351
7
7
When trouble arises
When trouble arises
7-1. Essential informationEmergency flashers.................. 352
If your vehicle has to be stopped in an emergency ..................... 352
If the vehicle is trapped in rising water............................................ 353
7-2. Steps to take in an emergency If your vehicle needs to be towed........................................................ 355
If you think something is wrong ........................................................ 359
Fuel pump shut off system ..... 360
If a warning light turns on or a warning buzzer sounds ........ 361
If a warning message is displayed ......................................................... 371
If you have a flat tire.................. 375
If the engine wi ll not start .......384
If you lose your keys ................. 386
If the fuel filler door cannot be opened........................................ 386
If the electronic key does not operate properly .................... 387
If the battery is discharged .... 389
If your vehicle overheats ........ 393
If the vehicle becomes stuck 395
Page 352 of 464

3527-1. Essential information
7-1.Essential information
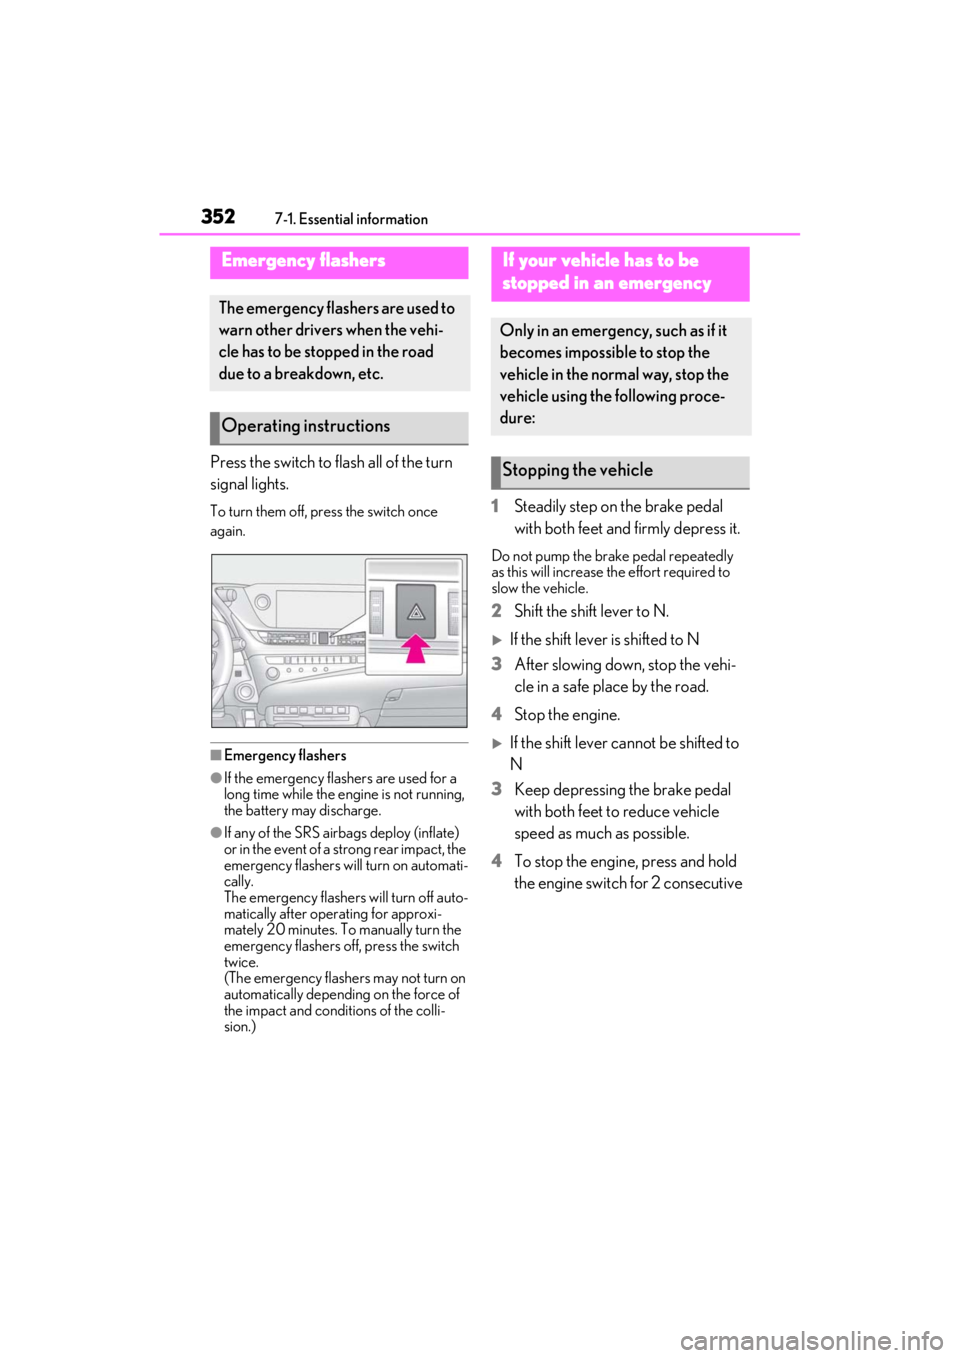
Press the switch to flash all of the turn
signal lights.
To turn them off, press the switch once
again.
■Emergency flashers
●If the emergency flashers are used for a
long time while the engine is not running,
the battery may discharge.
●If any of the SRS airbags deploy (inflate)
or in the event of a strong rear impact, the
emergency flashers will turn on automati-
cally.
The emergency flashers will turn off auto-
matically after operating for approxi-
mately 20 minutes. To manually turn the
emergency flashers off, press the switch
twice.
(The emergency flashers may not turn on
automatically depending on the force of
the impact and conditions of the colli-
sion.)
1 Steadily step on the brake pedal
with both feet and firmly depress it.
Do not pump the brake pedal repeatedly
as this will increase the effort required to
slow the vehicle.
2Shift the shift lever to N.
If the shift lever is shifted to N
3 After slowing down, stop the vehi-
cle in a safe place by the road.
4 Stop the engine.
If the shift lever cannot be shifted to
N
3 Keep depressing the brake pedal
with both feet to reduce vehicle
speed as much as possible.
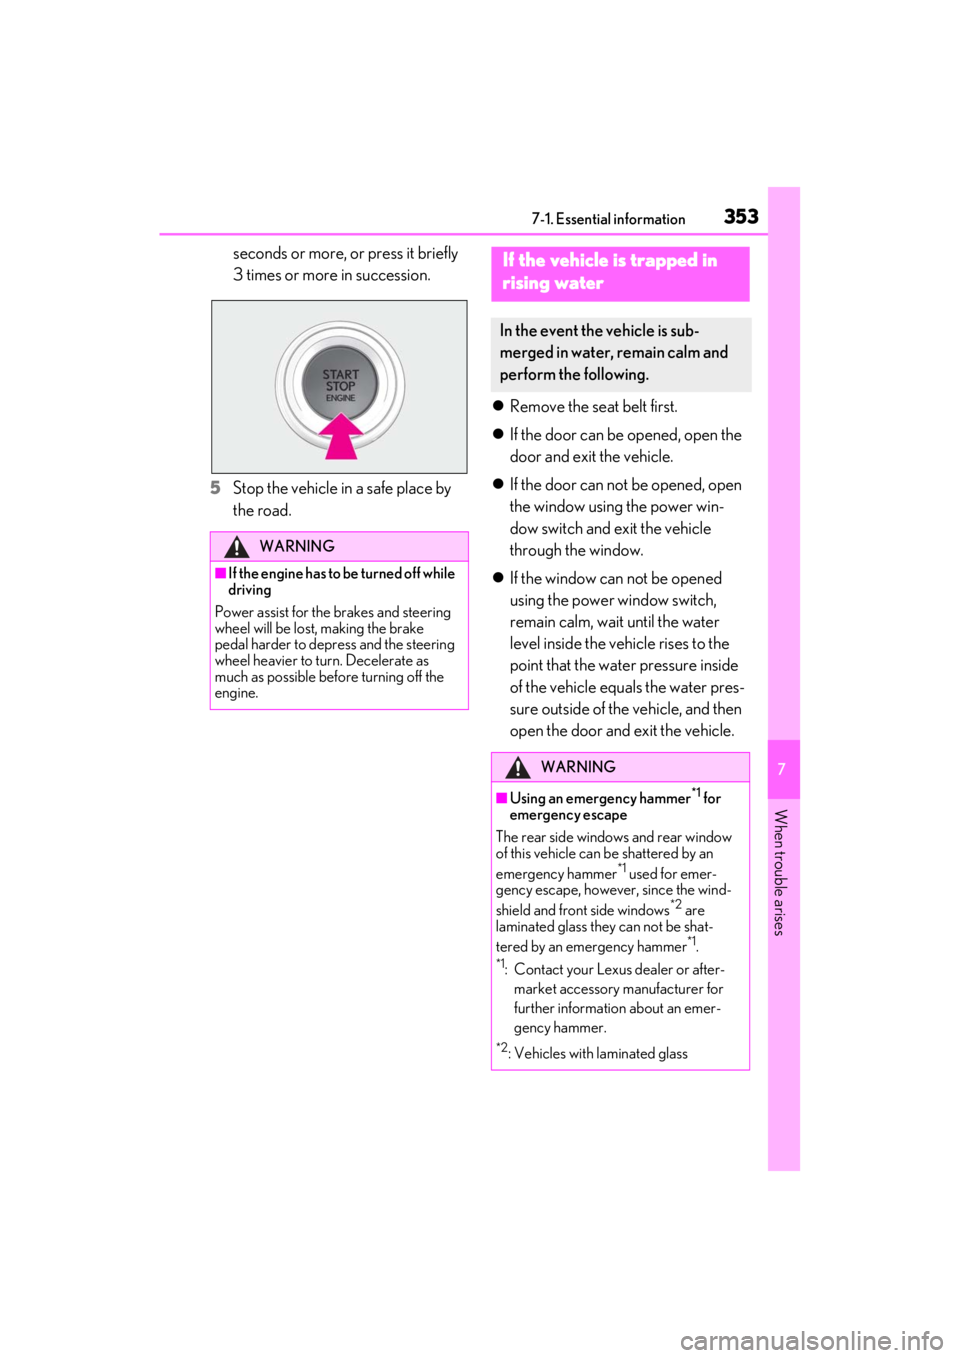
4 To stop the engine, press and hold
the engine switch for 2 consecutive
Emergency flashers
The emergency flashers are used to
warn other drivers when the vehi-
cle has to be stopped in the road
due to a breakdown, etc.
Operating instructions
If your vehicle has to be
stopped in an emergency
Only in an emergency, such as if it
becomes impossible to stop the
vehicle in the normal way, stop the
vehicle using the following proce-
dure:
Stopping the vehicle
Page 353 of 464

3537-1. Essential information
7
When trouble arises
seconds or more, or press it briefly
3 times or more in succession.
5 Stop the vehicle in a safe place by
the road.
Remove the seat belt first.
If the door can be opened, open the
door and exit the vehicle.
If the door can not be opened, open
the window using the power win-
dow switch and exit the vehicle
through the window.
If the window can not be opened
using the power window switch,
remain calm, wait until the water
level inside the vehicle rises to the
point that the water pressure inside
of the vehicle equals the water pres-
sure outside of the vehicle, and then
open the door and exit the vehicle.
WARNING
■If the engine has to be turned off while
driving
Power assist for the brakes and steering
wheel will be lost, making the brake
pedal harder to depress and the steering
wheel heavier to turn. Decelerate as
much as possible before turning off the
engine.
If the vehicle is trapped in
rising water
In the event the vehicle is sub-
merged in water, remain calm and
perform the following.
WARNING
■Using an emergency hammer*1 for
emergency escape
The rear side windows and rear window
of this vehicle can be shattered by an
emergency hammer
*1 used for emer-
gency escape, however, since the wind-
shield and front side windows
*2 are
laminated glass they can not be shat-
tered by an emergency hammer
*1.
*1: Contact your Lexus dealer or after-
market accessory manufacturer for
further information about an emer-
gency hammer.
*2: Vehicles with laminated glass