2021 KIA TELLURIDE change
[x] Cancel search: changePage 46 of 300
 on your iP\
hone, press th")
2-8
Using the Apple CarPlay
1 On the All Menus screen, press Apple CarPlay.
2 Perform the desired function.
\225To run any of functions (phone, messaging, navigation, etc.) on your iP\
hone, press the
corresponding function icon.
0000
A
When you are using your smartphone′s navigation via phone projection, sounds
from both the system′s radio/media function and the navigation will be output
through your vehicle′s speakers. When you turn the Volume knob while both
sounds are being output, the navigation volume is adjusted first.
\225To run the Siri voice recognition, press and hold the Voice Recognition button on the
steering wheel.
0000
A
To display the system Home screen, press
.
0000
A
By pressing the [ MODE] button on the steering wheel, you can run the media App on
your smartphone as well as the Radio/Media mode of the system.
0000
A
To specify which functions to run when the [ MODE] button on the steering wheel is
pressed, press and hold the [ MODE] button to display the settings screen.
0000
A
When you receive a call, press the Call button on the steering wheel to answer it.
0000
A
When phone projection is active, you cannot change the phone projection settings. To
change the settings, remove the USB cable from your system.
0000
A
Apps or functions used through Apple CarPlay are subject to change according to the
policy of Apple Corporation. For supportable functions, visit the Apple Corporation
website at http://www.apple.com/ios/carplay .
0000
A
To use the functions on your smartphone with the minimized system settings, update the
smartphone OS to the latest version.
0000
A
The recognition time may differ depending on the device type, firmware, and OS version.
0000
A
Charges may apply for any mobile data used while Apple CarPlay is running.
0000
A
Some functions may not work properly depending on the network signal strength.
0000
A
Avoid interacting with the smartphone while using Apple CarPlay.
0000
A
You cannot use the following functions when Apple CarPlay is in use.
000DBluetooth phone
000DUSB mode
000DAndroid Auto
000DBrowsing using the [TUNE/FILE] knob on the control panel (if equipped)
Page 48 of 300
2-10
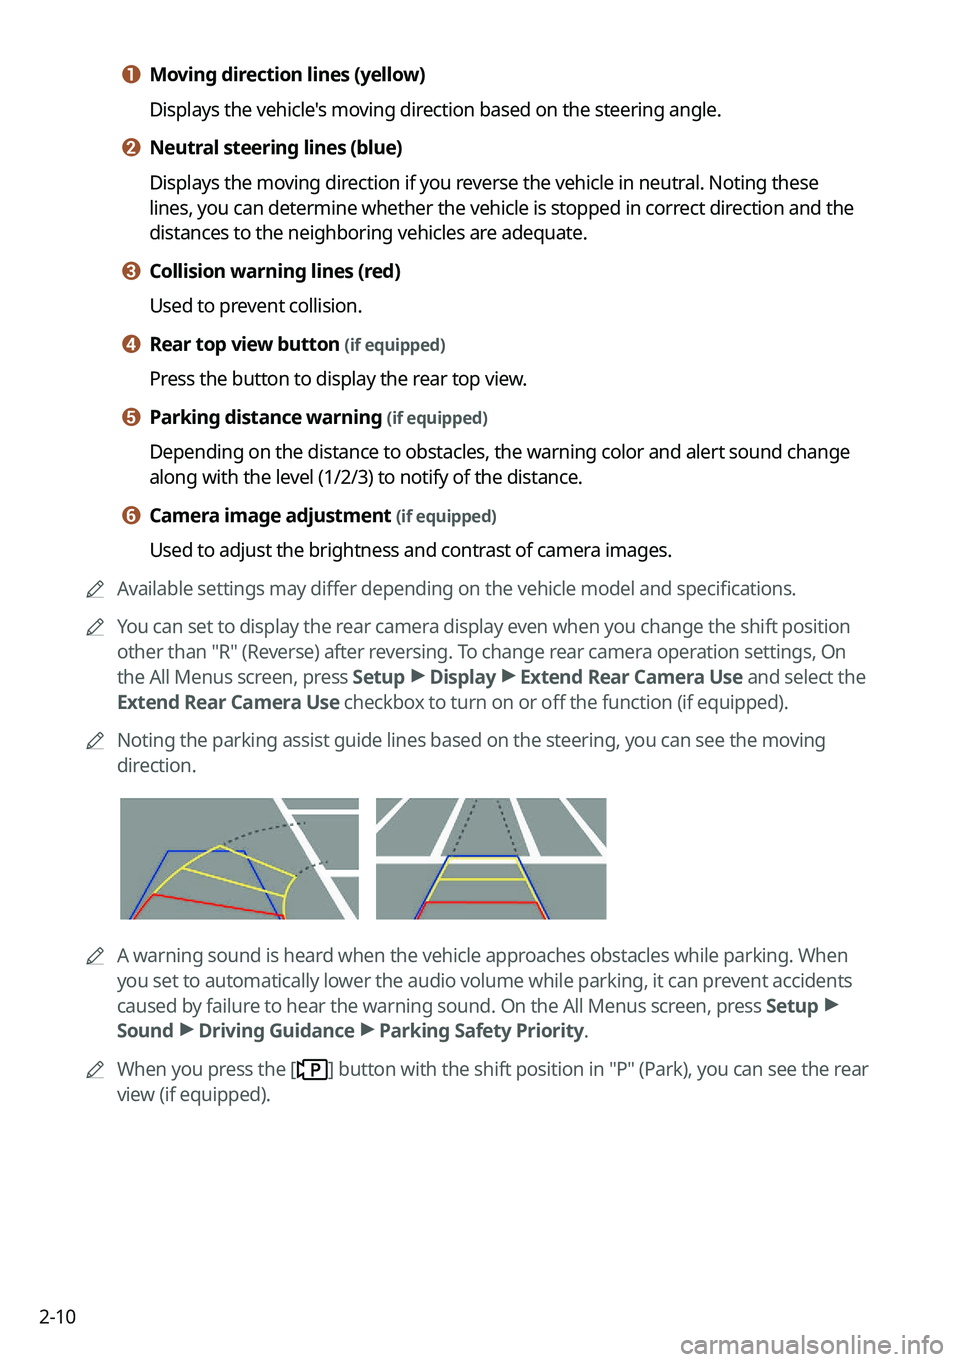
a a Moving direction lines (yellow)
Displays the vehicle's moving direction based on the steering angle.
b b Neutral steering lines (blue)
Displays the moving direction if you reverse the vehicle in neutral. Noting these
lines, you can determine whether the vehicle is stopped in correct direction and the
distances to the neighboring vehicles are adequate.
c c Collision warning lines (red)
Used to prevent collision.
d d Rear top view button (if equipped)
Press the button to display the rear top view.
e e Parking distance warning (if equipped)
Depending on the distance to obstacles, the warning color and alert soun\
d change
along with the level (1/2/3) to notify of the distance.
f f Camera image adjustment (if equipped)
Used to adjust the brightness and contrast of camera images.
0000
A
Available settings may differ depending on the vehicle model and specifications.
0000
A
You can set to display the rear camera display even when you change the shift position
other than "R" (Reverse) after reversing. To change rear camera operation settings, On
the All Menus screen, press Setup >
Display >
Extend Rear Camera Use and select the
Extend Rear Camera Use checkbox to turn on or off the function (if equipped).
0000
A
Noting the parking assist guide lines based on the steering, you can see\
the moving
direction.
0000AA warning sound is heard when the vehicle approaches obstacles while parking. When
you set to automatically lower the audio volume while parking, it can prevent accidents
caused by failure to hear the warning sound. On the All Menus screen, press Setup >
Sound >
Driving Guidance >
Parking Safety Priority.
0000
A
When you press the [
] button with the shift position in "P" (Park), you can see the rear
view (if equipped).
Page 49 of 300
2-11
Viewing the rear top view display (if equipped)
You can look down the rear view from the top through the rear-view display.
1 On the rear-view screen, press .
2 Check the top view display and assist guide lines.
0000
A
The guide lines appear on the rear top view.
000DDisplays the space required to open the trunk (tailgate). After a parking, check
whether the space is sufficient to open the trunk (tailgate) and there is no obstacle.
000DDisplays the extension line from the center of the vehicle. According to the steering
direction, the moving direction of the center is displayed on the screen.
Setting the rear view screen environment (if equipped)
1 On the surround view screen, press .
2 Select and then change the settings.
\225
To select the information to display on the screen, press Display Contents (Rear view
parking guidance).
\225To adjust the brightness and contrast of the rear-view screen, press Display Settings.
\225To set the information to display on the rear-view screen and adjust or reset the
brightness and contrast of the image, on the All Menus screen, press Setup >
Vehicle
> Driver Assistance >
Parking Safety >
Camera Settings.
Surround View Monitor (if equipped)
You can check the surroundings by using multiple cameras on the vehicle.
0000
A
Use the +/- button on the right of the screen to zoom in or out.
Viewing the surround view while driving
1 In order to see the surround view, press the [] or [] button.
The system displays both the front view and surround view.
0000
A
The surround view monitor function operates only when any of the following
conditions are met.
000DThe driving speed is below 9mph with the shift position in "D" (Drive).
000DThe vehicle is stationary and the shift position is in "D" (Drive) or \
"N" (Neutral).
0000
A
You can use Remote Smart Parking Assist by long pressing the [
] button. For more
information, refer to the owner’s manual that is separately provided (if equipped).
Page 50 of 300
2-12
2 Press the icon to get a view in the desired direction.
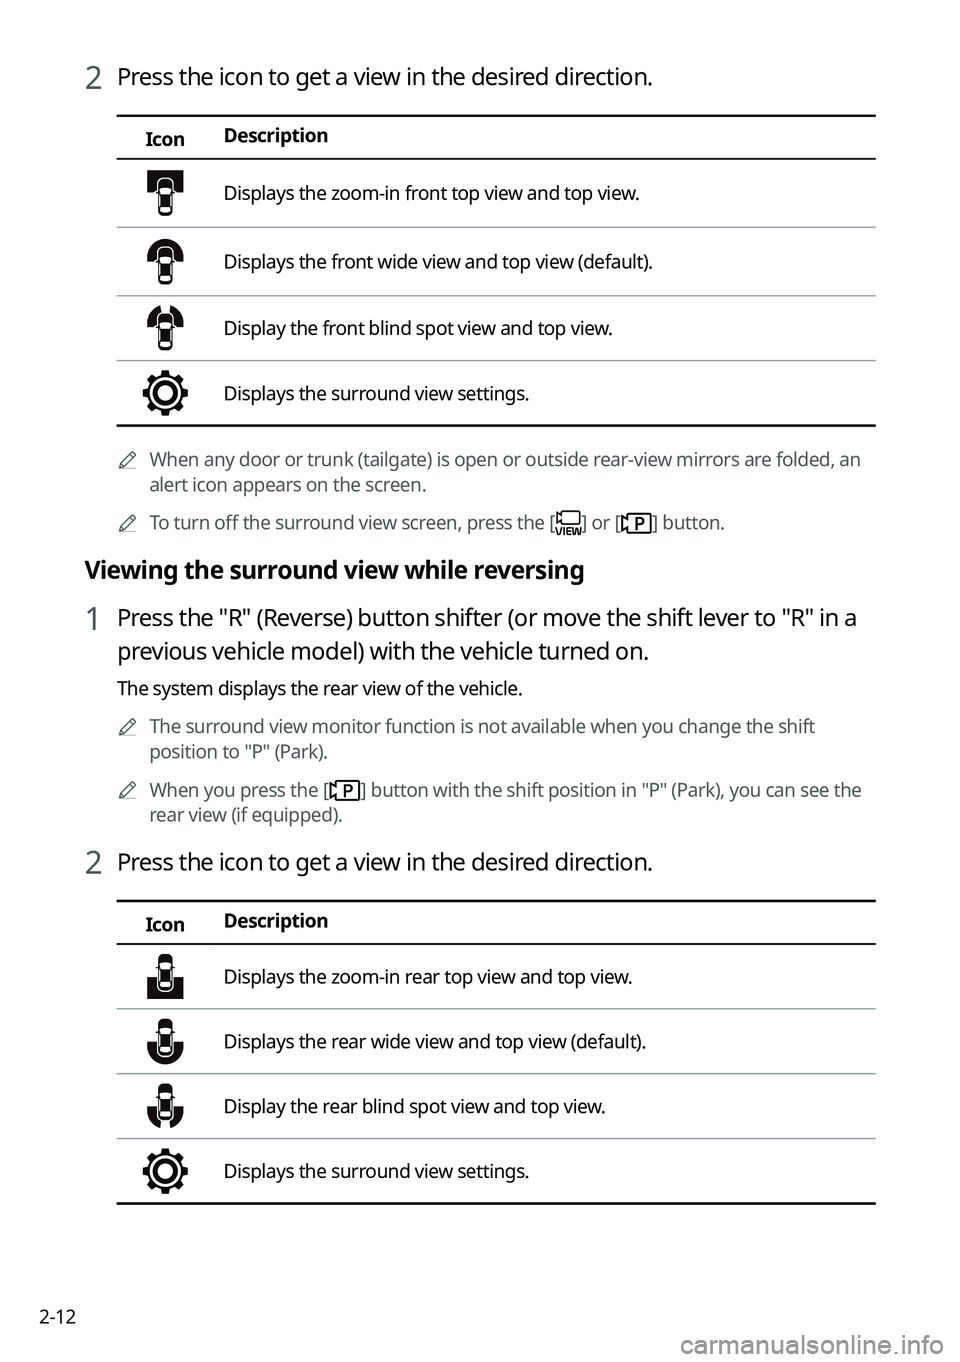
IconDescription
Displays the zoom-in front top view and top view.
Displays the front wide view and top view (default).
Display the front blind spot view and top view.
Displays the surround view settings.
0000
A
When any door or trunk (tailgate) is open or outside rear-view mirrors are folded, an
alert icon appears on the screen.
0000
A
To turn off the surround view screen, press the [
] or [] button.
Viewing the surround view while reversing
1 Press the "R" (Reverse) button shifter (or move the shift lever to "R" in a
previous vehicle model) with the vehicle turned on.
The system displays the rear view of the vehicle.
0000
A
The surround view monitor function is not available when you change the shift
position to "P" (Park).
0000
A
When you press the [
] button with the shift position in "P" (Park), you can see the
rear view (if equipped).
2 Press the icon to get a view in the desired direction.
Icon Description
Displays the zoom-in rear top view and top view.
Displays the rear wide view and top view (default).
Display the rear blind spot view and top view.
Displays the surround view settings.
Page 51 of 300
2-13
Configuring the surround view monitor settings
1 On the surround view screen, press .
2 Select and then change the settings.
\225To select the information to appear on the video, press Display Contents. (e.g. Top
view parking guidance, rear view parking guidance, parking distance warning) (if
equipped).
\225To select the default view for top view monitoring, press Top View Default Mode.
\225To select the default view for using the surround view monitor function while driving,
press
Front View Default Mode.
\225To set the information to display on the Surround View screen and adjust or reset the
brightness and contrast of the image, on the All Menus screen, press Setup >
Vehicle
> Driver Assistance >
Parking Safety >
Camera Settings (if equipped).
Using the climate control system (if equipped)
You can check and adjust the climate system settings on the screen.
Press the [ CLIMATE] button on the climate control system.
0000
A
For more information about how to use the heater and air conditioner, refer to Owner's
Manual of the vehicle.
\037
\036
\035
\034
\033
\032\031
\030
\027
\026\025
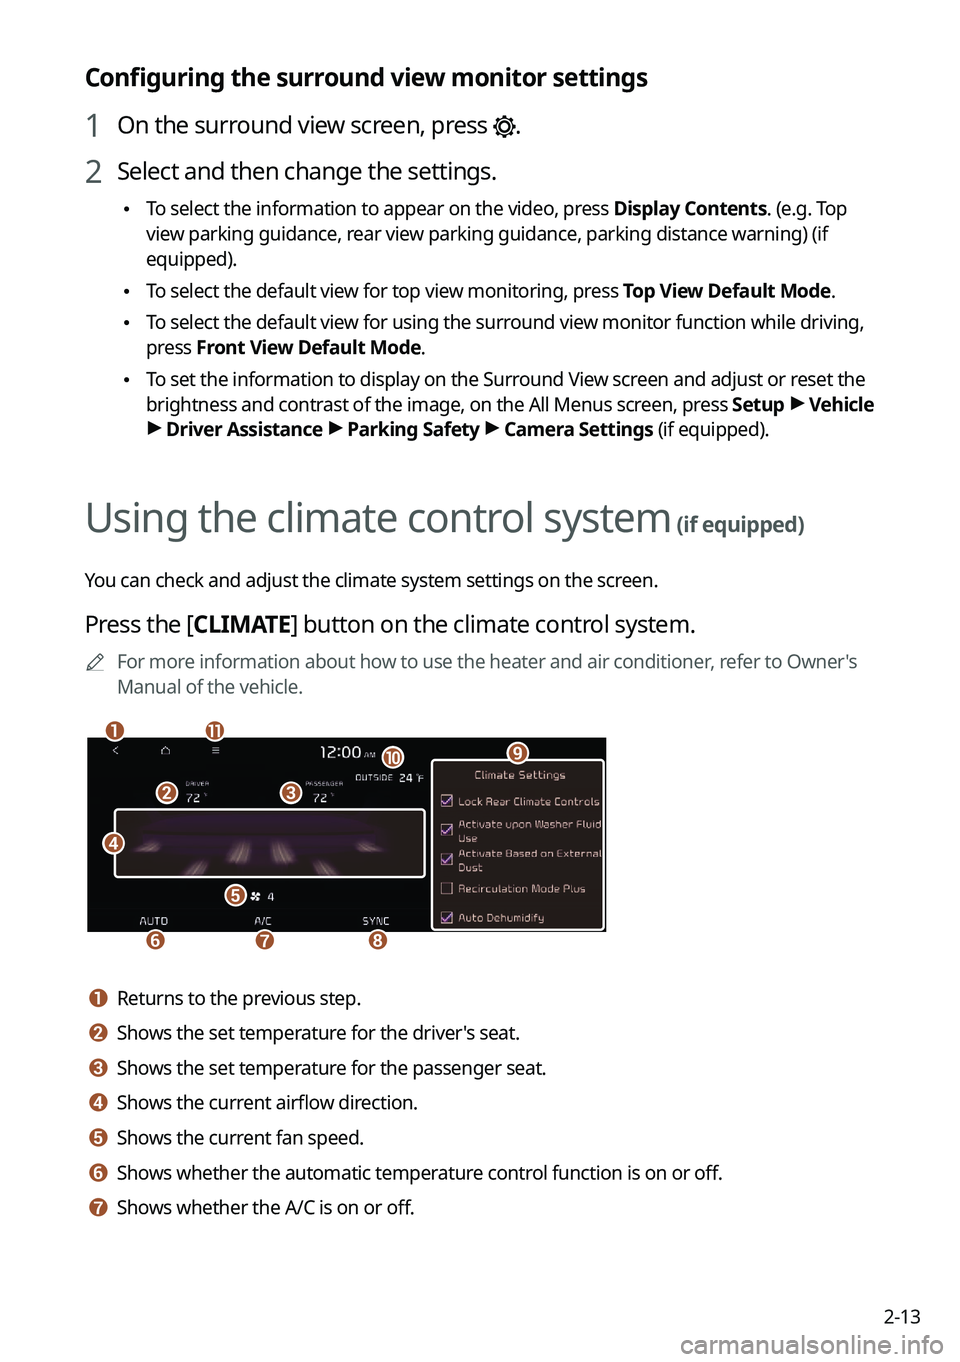
a a Returns to the previous step.
b b Shows the set temperature for the driver's seat.
c c Shows the set temperature for the passenger seat.
d d Shows the current airflow direction.
e e Shows the current fan speed.
f f Shows whether the automatic temperature control function is on or off.
g g Shows whether the A/C is on or off.
Page 52 of 300
2-14
h h Shows whether the SYNC function, which syncs the driver's seat temperature with the
passenger seat temperature, is on or off.
i i Configure specific climate control function settings. 0000
A
Available settings may differ depending on the vehicle model and specifications.
j j Shows the outside temperature of the vehicle.
k k The list of menu items appears.
\225Display Off: Turns off the screen. To switch the screen back on, press the screen or
briefly press the power knob.
\225User's Manual on Web (QR Code): Displays the QR code that provides access to the
online user manual for the system.
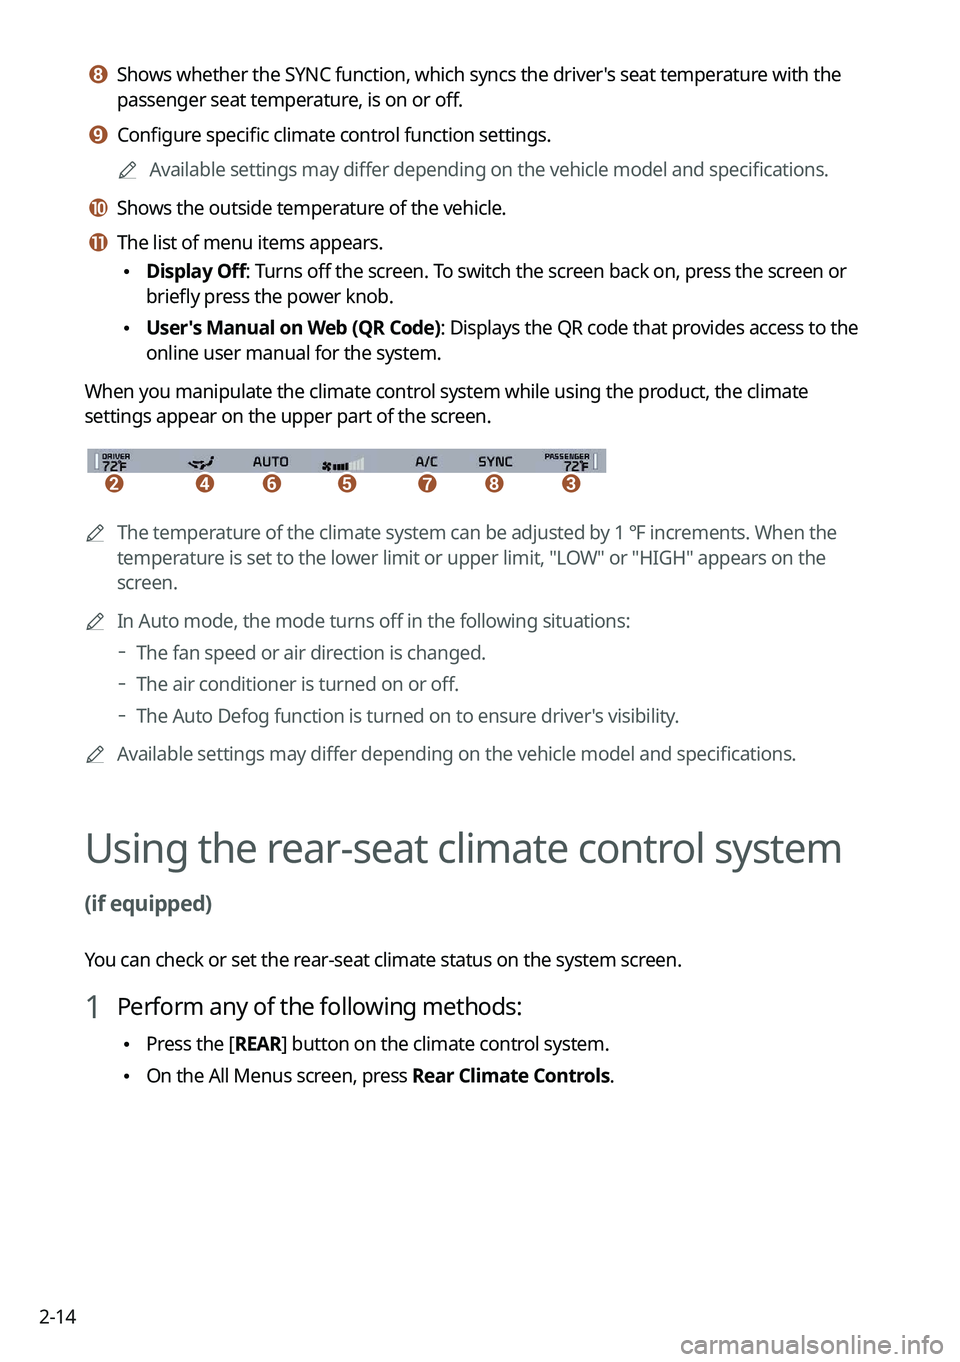
When you manipulate the climate control system while using the product, the climate
settings appear on the upper part of the screen.
\037\036\035\034\033\032\031
0000A The temperature of the climate system can be adjusted by 1 ℉ increments. When the
temperature is set to the lower limit or upper limit, "LOW" or "HIGH" appears on the
screen.
0000
A
In Auto mode, the mode turns off in the following situations:
000DThe fan speed or air direction is changed.
000DThe air conditioner is turned on or off.
000DThe Auto Defog function is turned on to ensure driver's visibility.
0000
A
Available settings may differ depending on the vehicle model and specifications.
Using the rear-seat climate control system
(if equipped)
You can check or set the rear-seat climate status on the system screen.
1 Perform any of the following methods:
\225Press the [
REAR] button on the climate control system.
\225On the All Menus screen, press Rear Climate Controls.
Page 53 of 300
2-15
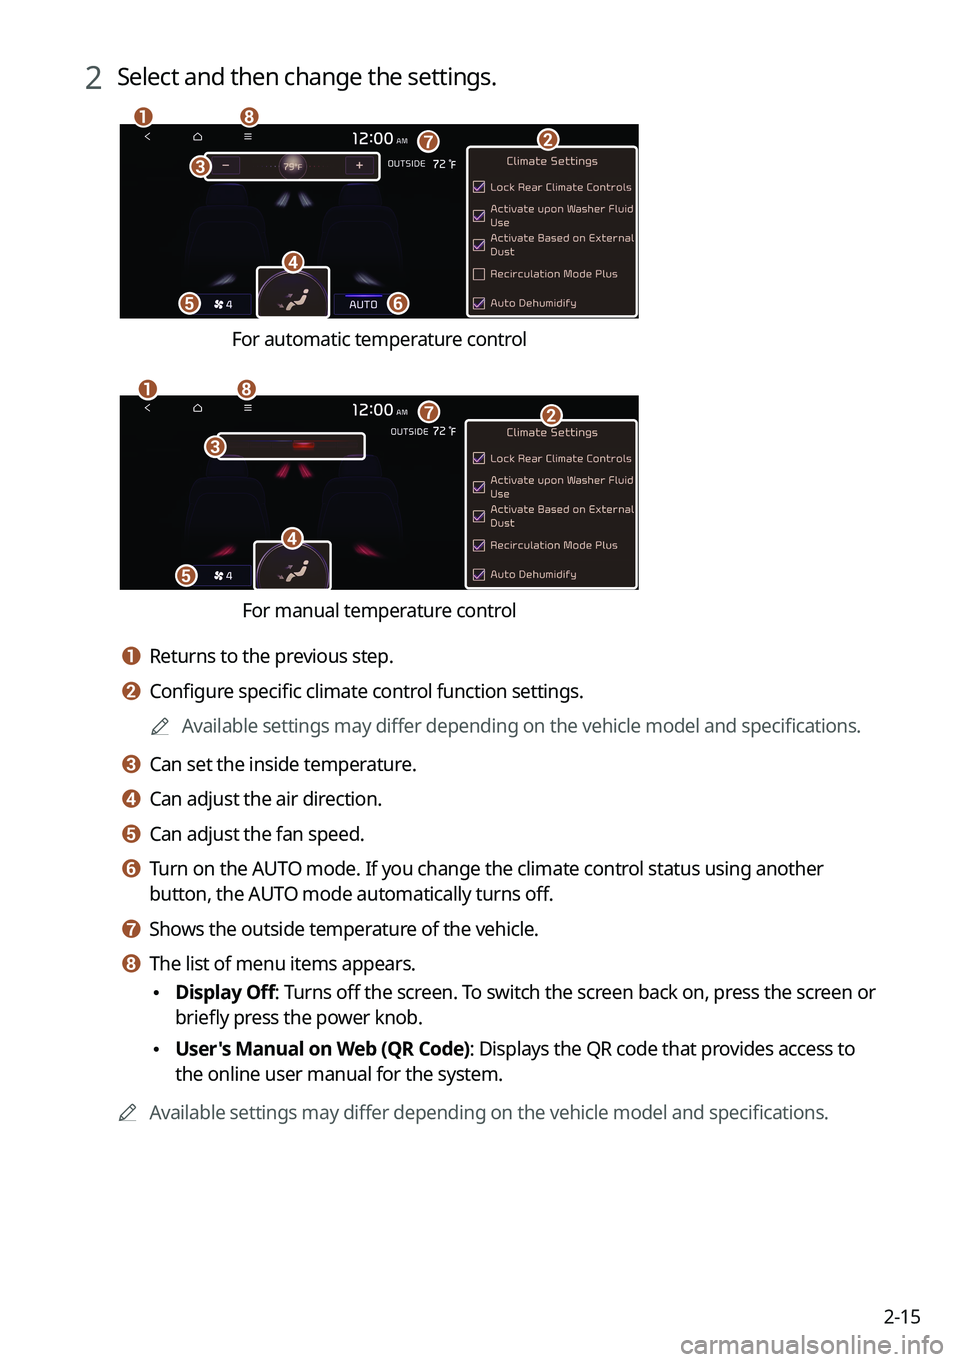
2 Select and then change the settings.
\037
\036
\035
\034
\033
\032\031
\030
For automatic temperature control
\037
\036\035\034
\033
\032
\031
For manual temperature control
a a Returns to the previous step.
b b Configure specific climate control function settings.0000
A
Available settings may differ depending on the vehicle model and specifications.
c c Can set the inside temperature.
d d Can adjust the air direction.
e e Can adjust the fan speed.
f f Turn on the AUTO mode. If you change the climate control status using another
button, the AUTO mode automatically turns off.
g g Shows the outside temperature of the vehicle.
h h The list of menu items appears.
\225Display Off
: Turns off the screen. To switch the screen back on, press the screen or
briefly press the power knob.
\225 User's Manual on Web (QR Code): Displays the QR code that provides access to
the online user manual for the system.
0000
A
Available settings may differ depending on the vehicle model and specifications.
Page 56 of 300
2-18
Using the sound mood lamp (if equipped)
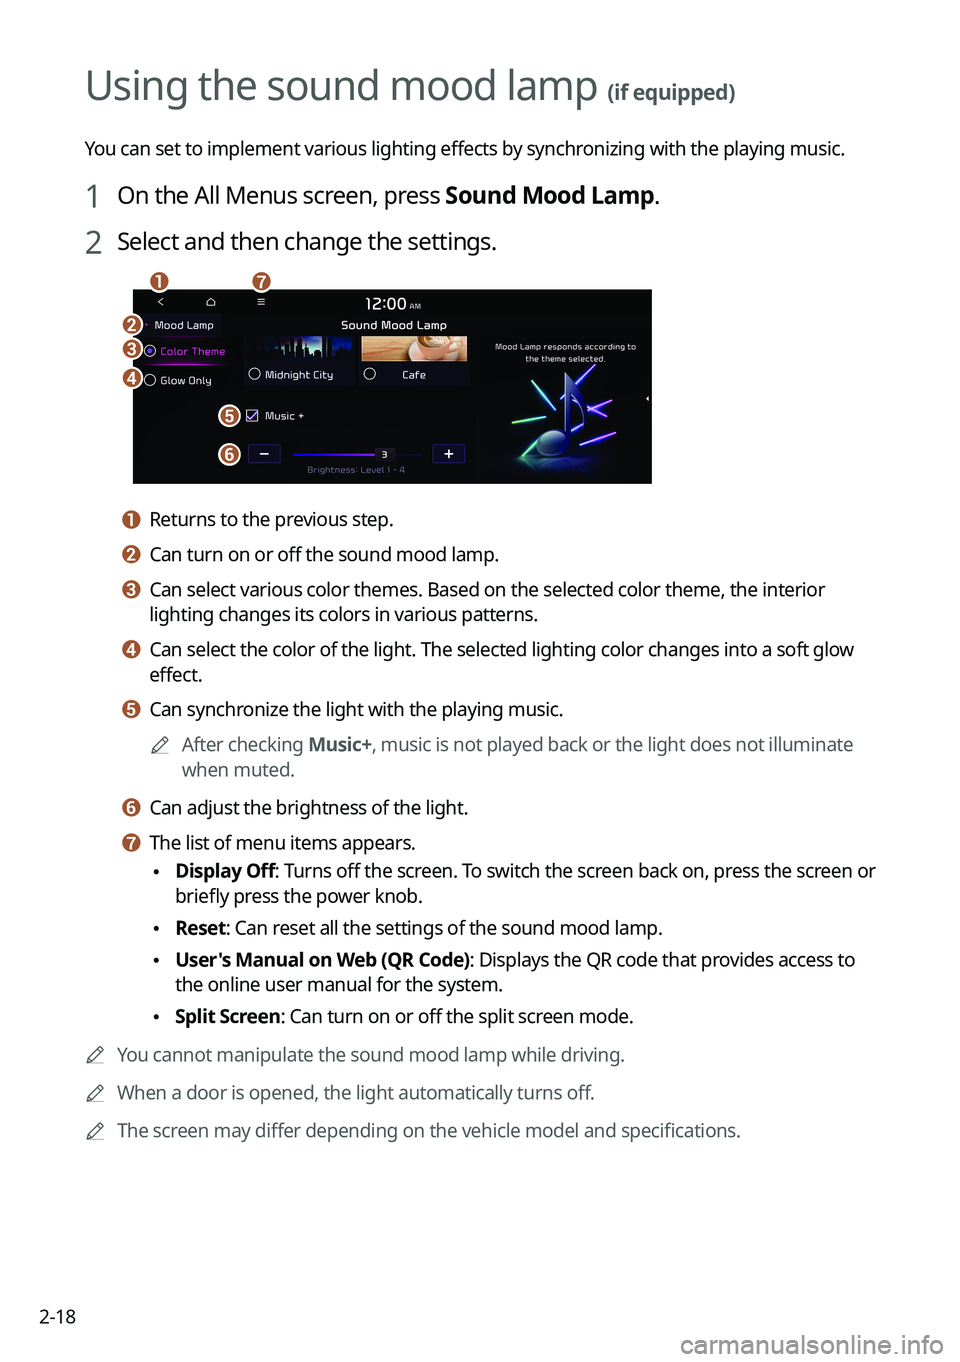
You can set to implement various lighting effects by synchronizing with the playing music.
1 On the All Menus screen, press Sound Mood Lamp.
2 Select and then change the settings.
\037
\036
\035
\034
\033
\032\031
a a Returns to the previous step.
b b Can turn on or off the sound mood lamp.
c c Can select various color themes. Based on the selected color theme, the \
interior
lighting changes its colors in various patterns.
d d Can select the color of the light. The selected lighting color changes i\
nto a soft glow
effect.
e e Can synchronize the light with the playing music.0000
A
After checking Music+, music is not played back or the light does not illuminate
when muted.
f f Can adjust the brightness of the light.
g g The list of menu items appears.
\225Display Off
: Turns off the screen. To switch the screen back on, press the screen or
briefly press the power knob.
\225 Reset: Can reset all the settings of the sound mood lamp.
\225User's Manual on Web (QR Code): Displays the QR code that provides access to
the online user manual for the system.
\225Split Screen: Can turn on or off the split screen mode.
0000
A
You cannot manipulate the sound mood lamp while driving.
0000
A
When a door is opened, the light automatically turns off.
0000
A
The screen may differ depending on the vehicle model and specifications.