2021 KIA NIRO HYBRID EV ESP
[x] Cancel search: ESPPage 531 of 667
75
Maintenance
MAINTENANCE SERVICES
You should exercise the utmost care
to prevent damage to your vehicle
and injury to yourself whenever per-
forming any maintenance or inspec-
tion procedures.
Should you have any doubts con-
cerning the inspection or servicing of
your vehicle, we strongly recom-
mend that you have an authorized
Kia dealer perform this work.
An authorized Kia dealer has factory-
trained technicians and genuine Kia
parts to service your vehicle proper-
ly. For expert advice and quality serv-
ice, see an authorized Kia dealer.
Inadequate, incomplete or insuffi-
cient servicing may result in opera-
tional problems with your vehicle that
could lead to vehicle damage, an
accident, or personal injury.Owner’s responsibility
✽ ✽
NOTICE
Maintenance Service and Record
Retention are the owner's responsi-
bility.
You should retain documents that
show proper maintenance has been
performed on your vehicle in accor-
dance with the scheduled mainte-
nance service charts shown on the
following pages. You need this infor-
mation to establish your compliance
with the servicing and maintenance
requirements of your vehicle war-
ranties.
Detailed warranty information is
provided in your Warranty &
Consumer Information manual.
Repairs and adjustments required as
a result of improper maintenance or
a lack of required maintenance are
not covered.
We recommend you have your vehi-
cle maintained and repaired by an
authorized Kia dealer. An authorized
Kia dealer meets Kia’s high service
quality standards and receives tech-
nical support from Kia in order to pro-
vide you with a high level of service
satisfaction.
Page 532 of 667
Maintenance
6 7
Owner maintenance precau-
tions
Improper or incomplete service may
result in problems. This section gives
instructions only for the maintenance
items that are easy to perform.
As explained earlier in this section,
several procedures can be done only
by an authorized Kia dealer with spe-
cial tools.
✽ ✽
NOTICE
Improper owner maintenance dur-
ing the warranty period may affect
warranty coverage. For details, read
the separate Warranty & Consumer
Information manual provided with
the vehicle. If you're unsure about
any servicing or maintenance proce-
dure, have it done by an authorized
Kia dealer.
WARNING- Maintenance
work
Do not wear jewelry or loose
clothing while working under
the hood of your vehicle with
the engine running. These can
become entangled in moving
parts, if you must run the
engine while working under the
hood, make certain that you
remove all jewelry (especially
rings, bracelets, watches, and
necklaces) and all neckties,
scarves, and similar loose
clothing before getting near the
engine or cooling fans.WARNING- Touching
metal parts
Do not touch metal parts
(including strut bars) while the
engine is operating or hot.
Doing so could result in serious
bodily injury. Turn the engine off
and wait until the metal parts
cool down to perform any main-
tenance work on the vehicle.
Page 544 of 667
Maintenance
18 7
Exhaust pipe and muffler
Visually inspect the exhaust pipes,
muffler and hangers for cracks, dete-
rioration, or damage. Start the
engine and listen carefully for any
exhaust gas leakage. Tighten con-
nections or replace parts as neces-
sary.
Suspension mounting bolts
Check the suspension connections
for looseness or damage. Retighten
to the specified torque.
Steering gear box, linkage &
boots/lower arm ball joint
With the vehicle stopped and engine
off, check for excessive free-play in
the steering wheel.
Check the linkage for bends or dam-
age. Check the dust boots and ball
joints for deterioration, cracks, or
damage. Replace any damaged
parts.
Drive shafts and boots
Check the drive shafts, boots and
clamps for cracks, deterioration, or
damage. Replace any damaged
parts and, if necessary, repack the
grease.
Air conditioning refrigerant
Check the air conditioning lines and
connections for leakage and dam-
age.When checking engine oil, engine
coolant, brake fluid, and washer fluid,
always be sure to clean the area
around any filler plug, drain plug, or
dipstick before checking or draining
any lubricant or fluid. This is espe-
cially important in dusty or sandy
areas and when the vehicle is used
on unpaved roads. Cleaning the plug
and dipstick areas will prevent dirt
and grit from entering the engine and
other mechanisms that could be
damaged.
CHECKING FLUID LEVELS
Page 575 of 667
749
Maintenance
Tire speed ratings
The chart below lists many of the dif-
ferent speed ratings currently being
used for passenger vehicles. The
speed rating is part of the tire size
designation on the sidewall of the
tire. This symbol corresponds to that
tire's designed maximum safe oper-
ating speed.3. Checking tire life (TIN : Tire
Identification Number)
Any tires that are over 6 years old,
based on the manufacturing date,
(including the spare tire) should be
replaced by new ones. You can find
the manufacturing date on the tire
sidewall (possibly on the inside of the
wheel), displaying the DOT Code.
The DOT Code is a series of num-
bers on a tire consisting of numbers
and English letters. The manufactur-
ing date is designated by the last four
digits (characters) of the DOT code.
DOT : XXXX XXXX OOOO
The front part of the DOT means a
plant code number, tire size and
tread pattern and the last four num-
bers indicate week and year manu-
factured.
For example:
DOT XXXX XXXX 1620 represents
that the tire was produced in the 16th
week of 2020.
4. Tire ply composition and mate-
rial
The number of layers or plies of rub-
ber-coated fabric in the tire. Tire
manufacturers also must indicate the
materials in the tire, which include
steel, nylon, polyester, and others.
The letter "R" means radial ply con-
struction; the letter "D" means diago-
nal or bias ply construction; and the
letter "B" means belted-bias ply con-
struction.
S 180 km/h (112 mph)
T 190 km/h (118 mph)
H 210 km/h (130 mph)
V 240 km/h (149 mph)
Z Above 240 km/h (149 mph)
Maximum Speed Speed
Rating
Symbol
WARNING - Tire age
Replace tires within the recom-
mended time frame. Failure to
replace tires as recommended
can result in sudden tire failure,
which could lead to a loss of
control and an accident.
Page 576 of 667
Maintenance
50
7
5. Maximum permissible inflation
pressure
This number is the greatest amount of
air pressure that should be put in the
tire. Do not exceed the maximum per-
missible inflation pressure. Refer to
the Tire and Loading Information label
for recommended inflation pressure.
6. Maximum load rating
This number indicates the maximum
load in kilograms and pounds that can
be carried by the tire. When replacing
the tires on the vehicle, always use a
tire that has the same load rating as
the factory installed tire.
7. Uniform Tire Quality Grading
Quality grades can be found where
applicable on the tire sidewall
between tread shoulder and maxi-
mum section width.
For example:
Treadwear 200
Traction AA
Temperature A Tread wear
The tread wear grade is a compara-
tive rating based on the wear rate of
the tire when tested under controlled
conditions on a specified govern-
ment test course. For example, a tire
graded 150 would wear one-and-a-
half times (1½) as well on the gov-
ernment course as a tire graded 100.
The relative performance of tires
depends upon the actual conditions
of their use, however, and may
depart significantly from the norm
due to variations in driving habits,
service practices and differences in
road characteristics and climate.
Tires degrade over time, even when
they are not being used. Regardless
of the remaining tread, we recom-
mend that tires be replaced after
approximately six (6) years of normal
service. Heat caused by hot climates
or frequent high loading conditions
can accelerate the aging process.
These grades are molded on the
side-walls of passenger vehicle tires.
The tires available as standard or
optional equipment on your vehicles
may vary with respect to grade.
Page 589 of 667
763
Maintenance
Main fuse (Plug-in Hybrid)
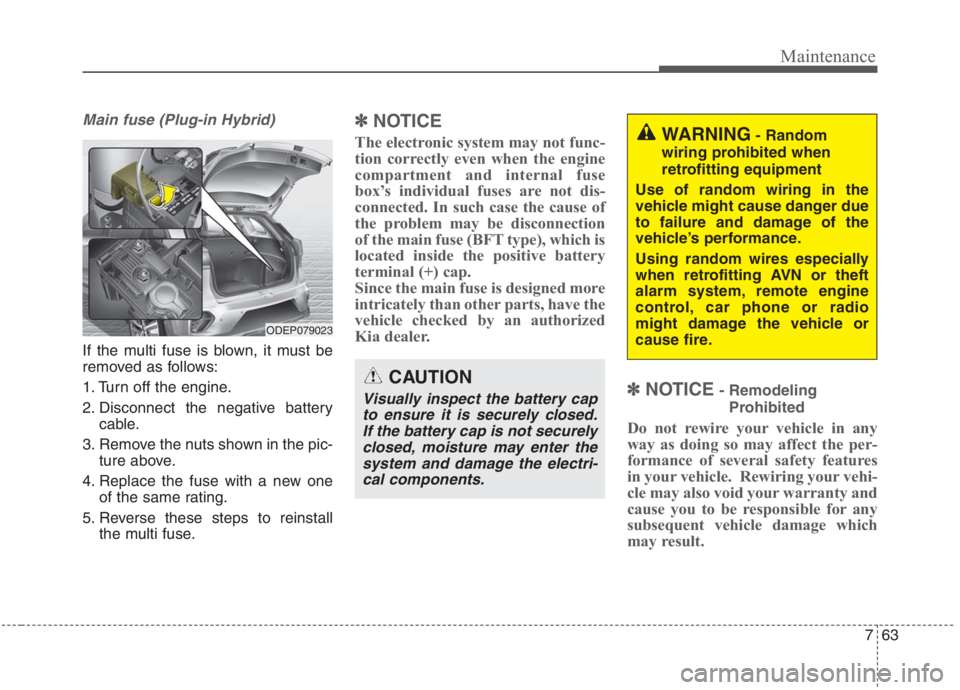
If the multi fuse is blown, it must be
removed as follows:
1. Turn off the engine.
2. Disconnect the negative battery
cable.
3. Remove the nuts shown in the pic-
ture above.
4. Replace the fuse with a new one
of the same rating.
5. Reverse these steps to reinstall
the multi fuse.
✽ ✽
NOTICE
The electronic system may not func-
tion correctly even when the engine
compartment and internal fuse
box’s individual fuses are not dis-
connected. In such case the cause of
the problem may be disconnection
of the main fuse (BFT type), which is
located inside the positive battery
terminal (+) cap.
Since the main fuse is designed more
intricately than other parts, have the
vehicle checked by an authorized
Kia dealer.
✽ ✽
NOTICE- Remodeling
Prohibited
Do not rewire your vehicle in any
way as doing so may affect the per-
formance of several safety features
in your vehicle. Rewiring your vehi-
cle may also void your warranty and
cause you to be responsible for any
subsequent vehicle damage which
may result.
CAUTION
Visually inspect the battery cap
to ensure it is securely closed.
If the battery cap is not securely
closed, moisture may enter the
system and damage the electri-
cal components.
WARNING- Random
wiring prohibited when
retrofitting equipment
Use of random wiring in the
vehicle might cause danger due
to failure and damage of the
vehicle’s performance.
Using random wires especially
when retrofitting AVN or theft
alarm system, remote engine
control, car phone or radio
might damage the vehicle or
cause fire.
ODEP079023
Page 613 of 667
787
Maintenance
✽ ✽
NOTICE
You can find moisture inside the lens
of lamps after a car wash or driving
in the rain. It is a natural event
caused by the temperature differ-
ence between the inside and the out-
side of the lamp and does not mean a
problem with its functions. The
moisture inside the lamp would dis-
appear if you drive the vehicle with
the headlamp turned on, however,
the level at which the moisture is
removed may differ depending on
the size/location/condition of the
lamp. If the moisture continues to
stay inside the lamp, we recommend
that you have the vehicle checked by
an authorized Kia dealer.
If you don’t have the necessary tools,
the correct bulbs and the expertise,
consult an authorized Kia dealer. In
many cases, it is difficult to replace
vehicle light bulbs because other
parts of the vehicle must be removed
before you can get to the bulb. This is
especially true if you have to remove
the headlamp assembly to get to the
bulb(s).
Removing/installing the headlamp
assembly can result in damage to
the vehicle.
If non-genuine parts or substandard
bulbs are used, it may lead to blow-
ing a fuse or other wiring damages.
Do not install extra lamps or LEDs to
the vehicle. If additional lights are
installed, it may lead to lamp mal-
functions and flickering. Additionally,
the fuse box and other writing may
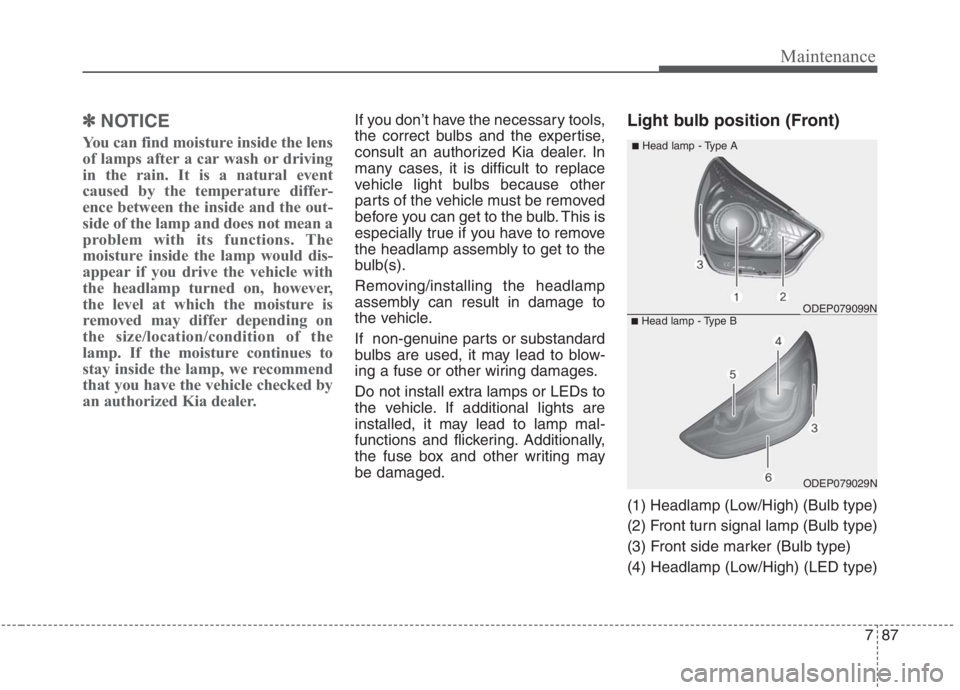
be damaged.Light bulb position (Front)
(1) Headlamp (Low/High) (Bulb type)
(2) Front turn signal lamp (Bulb type)
(3) Front side marker (Bulb type)
(4) Headlamp (Low/High) (LED type)
ODEP079029N
ODEP079099N
■Head lamp - Type A
■Head lamp - Type B
Page 639 of 667
7113
Maintenance
Window tinting precaution
Window tint(especially metallic film)
might cause communication disorder
or poor radio reception, and malfunc-
tion of the automatic lighting system
due to excessive change of illumina-
tion inside the vehicle. The solution
used might also flow into electric,
electronic devices causing disorder
and failure.