2021 KIA NIRO fuel type
[x] Cancel search: fuel typePage 5 of 66

ALWAYS CHECK THE OWNER’S MANUAL FOR COMPLETE OPER ATING INFORMATION AND SAFET Y WARNINGS. *IF EQUIPPED3
F
H
CHARGE POWER
ECO
EEPB
120miles
L
AUTOA Hybrid / Plug-In Hybrid system gauge
B Fuel gauge
C Speedometer
D Warning and indicator lights
E LCD display (including Trip computer)
F Hybrid / Plug-In Hybrid Battery SOC
(State of Charge) gauge
G Distance to empty
Instrument Cluster Overview
Your vehicle’s instrument cluster & indicator light locations may differ from those in the illustrations. For more information on the instrument cluster, the LCD Warning Messages and the function of all indicator and warning lights, please refer to section 4 of the Owner’s Manual.
This illustration is for demonstration purposes only. Some indicators and warning lights may not appear in illustration. On the vehicle, they may appear in the LCD.
A
FB
C
D
G
DDE
INSTRUMENT CLUSTERINSTRUMENT CLUSTER
(Type B shown)
Page 6 of 66

*IF EQUIPPED4NIRO HYBRID / PLUG-IN HYBRID FEATURES & FUNCTIONS GUIDE
Indicators & Warning Lights
High Beam Indicator
Light ON Indicator
Front Fog Light Indicator*
Master Warning Indicator
FCA /FCW Indicator*
Lane Keeping Assist (LK A) Indicator
Electronic Brake Force (EBD) System Warning Indicator( Two separate indicators on Instrument Cluster lit at same time)
Immobilizer Indicator*
READY Indicator
EVE V Mode Indicator
ECO Indicator
SPORT Mode Indicator
Hybrid System Warning Indicator
Engine Coolant Temperature Warning
Engine Oil Pressure Warning Indicator
Charging System Warning Indicator
Seat Belt Warning Indicator
Malfunction Indicator
Low Tire Pressure Light / Tire Pressure Monitoring System (TPMS) Malfunction IndicatorElectronic Stability Control (ESC) Indicator / ESC Malfunction Indicator
Electronic Stability Control (ESC) OFF Indicator
Parking Brake & Brake Fluid Warning Indicator
Electronic Power Steering (EPS) Warning Indicator
Airbag Warning Indicator
Parking Brake Indicator
Anti-lock Braking System (ABS) Warning Indicator
Low Fuel Level Warning Indicator
Cruise Indicator*
Trunk Open Warning Indicator
Door Ajar Warning Indicator
(red color)
(yellow color)
Regenerative Brake Warning Indicator (Two separate indicators on Instrument Cluster lit at same time)
SETCruise SET Indicator
❄Icy Road Warning Indicator
LED Headlamp Warning Indicator*
Charging Cable Connection Indicator (Plug-In Hybrid)*
Your vehicle’s instrument cluster & indicator light locations may differ from those in the illustrations. For more information on the instrument cluster, the LCD Warning Messages and the function of all indicator and warning lights, please refer to section 4 of the Owner’s Manual.
This illustration is for demonstration purposes only. Some indicators and warning lights may not appear in illustration. On the vehicle, they may appear in the LCD.
220200
20
20 12 0
1 40
40
10 0
60
80180
40 160
60 140
80 120
100
E
F
AUTO120miles
INSTRUMENT CLUSTER
INSTRUMENT CLUSTER
(Type A shown)
Page 8 of 66

*IF EQUIPPED6NIRO HYBRID / PLUG-IN HYBRID FEATURES & FUNCTIONS GUIDE
220200
20
20 12 0
1 40
40
10 0
60
80180
40 160
60 140
80 120
100
E
F
AUTO120miles
Hybrid/Plug-In Hybrid Indicators at Startup
A Hybrid System Gauge — Indicates how economically the vehicle is
being driven.
•CHARGE (Blue zone): High-efficiency range
•ECO (Green zone): Normal-efficiency range
•POWER (Grey zone): Low-efficiency range
B EV Mode — Illuminates when the electric motor is powering the vehicle.
C Ready — Illuminates when the hybrid system is operational. Even if the
engine is off, the vehicle can be driven.
D State of Charge (SOC) — Displays the hybrid battery charge status.
Hybrid/Plug-In Hybrid Modes
To change the Plug-In Hybrid Mode, press the EV/HEV button E (PHEV only);
switch between Electric (EV ) mode and Hybrid (HEV ) mode each time the
button is pressed. The LCD on the Instrument Cluster will display the following
messages:
•EV Electric Mode - Charge Depleting: The high-voltage
(hybrid) battery is being used to drive the vehicle.
•HEV Hybrid mode - Charge Sustaining: The high-voltage (hybrid)
battery and gasoline engine are being used to drive the vehicle.
REMINDER: Avoid starting or driving the vehicle when the fuel tank is empty. As the engine will be incapable of charging the high-voltage hybrid battery, the battery will lose its charge and may be damaged.
EV
HEV
INSTRUMENT CLUSTER
(Type A cluster shown)
For more information, refer to the Owner’s Manual.
For more information, refer to the Owner’s Manual.
INSTRUMENT CLUSTER
AB
C
D
E
Page 10 of 66

*IF EQUIPPED8NIRO HYBRID / PLUG-IN HYBRID FEATURES & FUNCTIONS GUIDE
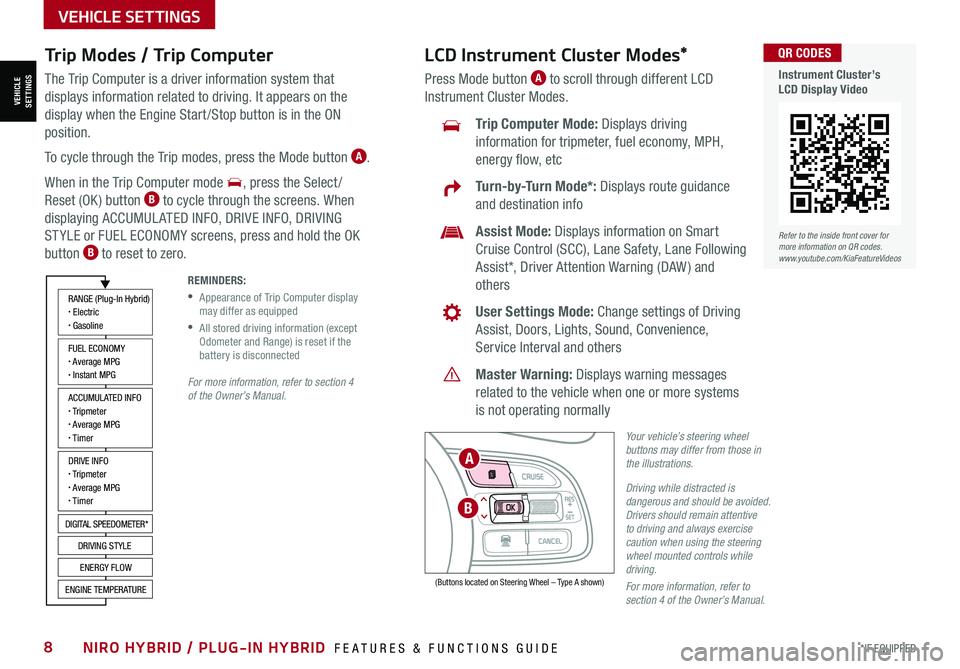
Trip Modes / Trip Computer
The Trip Computer is a driver information system that
displays information related to driving. It appears on the
display when the Engine Start /Stop button is in the ON
position.
To cycle through the Trip modes, press the Mode button A.
When in the Trip Computer mode , press the Select /
Reset (OK ) button B to cycle through the screens. When
displaying ACCUMUL ATED INFO, DRIVE INFO, DRIVING
ST YLE or FUEL ECONOMY screens, press and hold the OK
button B to reset to zero.
For more information, refer to section 4 of the Owner’s Manual.
REMINDERS:
•
Appearance of Trip Computer display may differ as equipped
•
All stored driving information (except Odometer and Range) is reset if the battery is disconnected
Refer to the inside front cover for more information on QR codes.www.youtube.com/KiaFeatureVideos
QR CODES
Instrument Cluster’s LCD Display Video
ACCUMULATED INFO• Tripmeter• Average MPG• T imer
RANGE (Plug-In Hybrid)• Electric• Gasoline
FUEL ECONOMY• Average MPG• Instant MPG
DRIVE INFO• Tripmeter• Average MPG• T imer
DIGITAL SPEEDOMETER*
DRIVING STYLE
ENERGY FLOW
ENGINE TEMPERATURE
LCD Instrument Cluster Modes*
Press Mode button A to scroll through different LCD
Instrument Cluster Modes.
Trip Computer Mode: Displays driving
information for tripmeter, fuel economy, MPH,
energy flow, etc
Turn-by-Turn Mode*: Displays route guidance
and destination info
Assist Mode: Displays information on Smart
Cruise Control (SCC), Lane Safety, Lane Following
Assist*, Driver Attention Warning (DAW ) and
others
User Settings Mode: Change settings of Driving
Assist, Doors, Lights, Sound, Convenience,
Service Interval and others
Master Warning: Displays warning messages
related to the vehicle when one or more systems
is not operating normally
Your vehicle’s steering wheel buttons may differ from those in the illustrations.
Driving while distracted is dangerous and should be avoided. Drivers should remain attentive to driving and always exercise caution when using the steering wheel mounted controls while driving.
For more information, refer to section 4 of the Owner’s Manual.
(Buttons located on Steering Wheel – Type A shown)
MODE
RES
CRUISE
CAN CELOKSET
MODE
RES
CRUISE
CAN CELOKSET
MODE
B
A
VEHICLESETTINGS
VEHICLE SETTINGS
Page 11 of 66

ALWAYS CHECK THE OWNER’S MANUAL FOR COMPLETE OPER ATING INFORMATION AND SAFET Y WARNINGS. *IF EQUIPPED9
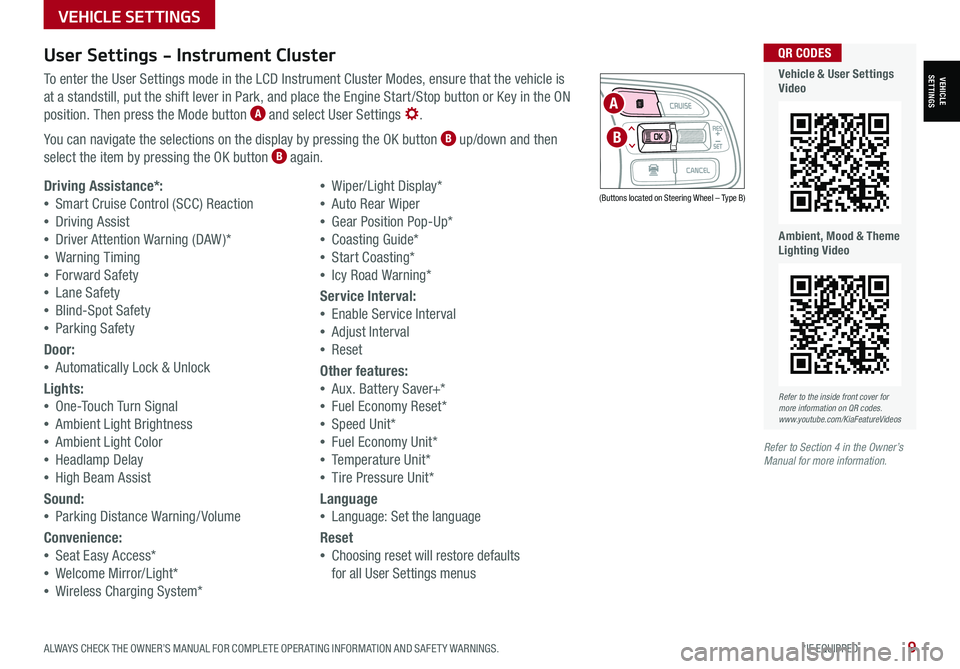
User Settings - Instrument Cluster
To enter the User Settings mode in the LCD Instrument Cluster Modes, ensure that the vehicle is
at a standstill, put the shift lever in Park, and place the Engine Start /Stop button or Key in the ON
position. Then press the Mode button A and select User Settings .
You can navigate the selections on the display by pressing the OK button B up/down and then
select the item by pressing the OK button B again.
Driving Assistance*:
•Smart Cruise Control (SCC) Reaction
•Driving Assist
•Driver Attention Warning (DAW )*
•Warning Timing
•Forward Safety
•Lane Safety
•Blind-Spot Safety
•Parking Safety
Door:
•Automatically Lock & Unlock
Lights:
•One-Touch Turn Signal
•Ambient Light Brightness
•Ambient Light Color
•Headlamp Delay
•High Beam Assist
Sound:
•Parking Distance Warning/ Volume
Convenience:
•Seat Easy Access*
•Welcome Mirror/Light*
•Wireless Charging System*
•Wiper/Light Display*
•Auto Rear Wiper
•Gear Position Pop-Up*
•Coasting Guide*
•Start Coasting*
•Icy Road Warning*
Service Interval:
•Enable Service Interval
•Adjust Interval
•Reset
Other features:
•Aux. Battery Saver+*
•Fuel Economy Reset*
•Speed Unit*
•Fuel Economy Unit*
•Temperature Unit*
•Tire Pressure Unit*
Language
•Language: Set the language
Reset
•Choosing reset will restore defaults
for all User Settings menus
(Buttons located on Steering Wheel – Type B)
MODE
RES
CRUISE
CAN CELOKSET
MODE
RES
CRUISE
CAN CELOKSET
MODE
A
B
Refer to the inside front cover for more information on QR codes.www.youtube.com/KiaFeatureVideos
QR CODES
Vehicle & User Settings Video
Ambient, Mood & Theme Lighting Video
Refer to Section 4 in the Owner’s Manual for more information.
VEHICLE SETTINGS
VEHICLESETTINGS
Page 13 of 66

ALWAYS CHECK THE OWNER’S MANUAL FOR COMPLETE OPER ATING INFORMATION AND SAFET Y WARNINGS. *IF EQUIPPED11
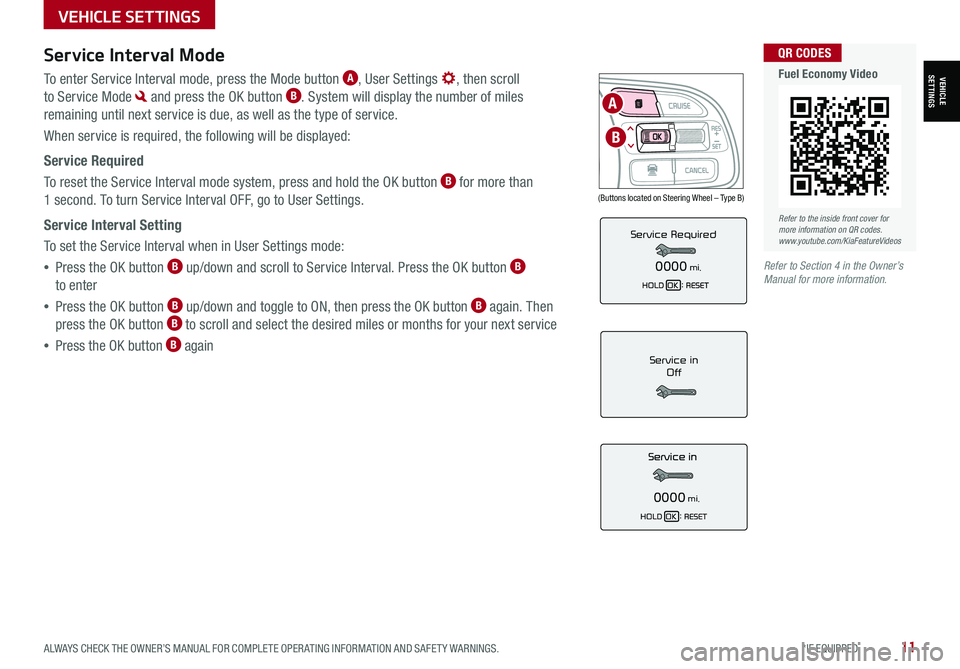
Service Interval Mode
To enter Service Interval mode, press the Mode button A, User Settings , then scroll
to Service Mode and press the OK button B. System will display the number of miles
remaining until next service is due, as well as the type of service.
When service is required, the following will be displayed:
Service Required
To reset the Service Interval mode system, press and hold the OK button B for more than
1 second. To turn Service Interval OFF, go to User Settings.
Service Interval Setting
To set the Service Interval when in User Settings mode:
•Press the OK button B up/down and scroll to Service Interval. Press the OK button B
to enter
•Press the OK button B up/down and toggle to ON, then press the OK button B again. Then
press the OK button B to scroll and select the desired miles or months for your next service
•Press the OK button B againService in
Off
0000mi.
Service Required
0000mi.
(Buttons located on Steering Wheel – Type B)
MODE
RES
CRUISE
CAN CELOKSET
MODE
RES
CRUISE
CAN CELOKSET
MODE
A
B
Refer to the inside front cover for more information on QR codes.www.youtube.com/KiaFeatureVideos
QR CODES
Fuel Economy Video
Refer to Section 4 in the Owner’s Manual for more information.
VEHICLESETTINGS
VEHICLE SETTINGS