2021 KIA NIRO check engine light
[x] Cancel search: check engine lightPage 7 of 66

ALWAYS CHECK THE OWNER’S MANUAL FOR COMPLETE OPER ATING INFORMATION AND SAFET Y WARNINGS. *IF EQUIPPED †LEGAL DISCL AIMERS ON BACK INSIDE COVER5
25
36 36
36
Tire Pressure Monitoring System (TPMS)†21
The TPMS indicator functions as both Low Tire Pressure Light
and TPMS Malfunction Indicator. The indicator will illuminate
if it detects one or more tires is significantly underinflated, the vehicle has
a spare tire installed without TPMS or the outside temperature becomes
significantly lower.
The LCD screen in the instrument cluster will display the Low Tire Pressure
indicator A showing which tires are underinflated. Inflate tire(s) to
specifications using an accurate digital tire pressure gauge to turn off Low
Tire Pressure Light . See front driver’s door jamb for PSI specification.
When there is a problem with the TPMS, the TPMS Malfunction Indicator
will blink for approximately one minute then illuminate – See dealer
for service.
•Even with TPMS, tire pressure should be checked manually at least once a month. Only adjust tire pressure on “cold tires” that have been sitting for 20 minutes, and tires that are not hot in temperature from direct sunlight or heat
•For proper maintenance and optimal fuel economy, maintain recommended tire inflation pressures and stay within the load limits and weight distribution recommended for your vehicle
•In winter or cold weather, the TPMS light may illuminate if the tire pressure was adjusted to the recommended tire inflation pressure during warm weather
QUICK TIP
REMINDERS:
• Check the recommended tire pressure label located on the left side of driver's door jamb, visible when the door is open
• Consult your dealer for service if Low Tire Pressure Light remains illuminated after inflating your tire(s)
Personal electronic devices (such as laptops, wireless chargers, remote start systems, etc.) may interfere with TPMS system, which may cause the Malfunction Warning Indicator (Check Engine Light) to illuminate.
For more information, refer to section 6 of the Owner’s Manual.
Refer to the inside front cover for more information on QR codes.www.youtube.com/KiaFeatureVideos
QR CODES
Tire Pressure Monitoring System Video
A
INSTRUMENT CLUSTERINSTRUMENT CLUSTER
Page 9 of 66
ALWAYS CHECK THE OWNER’S MANUAL FOR COMPLETE OPER ATING INFORMATION AND SAFET Y WARNINGS. *IF EQUIPPED7
INSTRUMENT CLUSTER
Fuel Economy
There are several factors that contribute
to your vehicle’s fuel economy, such as
maintenance of your vehicle, driving style,
environmental conditions, vehicle weight
and vehicle aerodynamics. Below are
some tips on how to help improve fuel
economy:
•Keep your vehicle in good condition
with regular maintenance
•Don’t let the engine idle longer than
necessary
•Drive at a moderate speed, accelerating
smoothly and at a moderate rate
•Keep tires inflated to the recommended
pressure
•Travel lightly, without carrying
unnecessary weight in your vehicles
•Avoid placing large or heavy items on
roof racks
•Avoid hilly, winding or poorly maintained roads
When the Instrument Cluster LCD screen is in the Trip Computer mode,
the screen displays fuel economy information related to the driving
range and average fuel economy.
To change modes, go to User Settings in the LCD Instrument Cluster
modes.
Average Fuel Consumption - Calculates average fuel consumption
from the distance driven and amount of fuel injected into the engine /
total fuel used.
(Hybrid screen shown)
Refer to the inside front cover for more information on QR codes.www.youtube.com/KiaFeatureVideos
QR CODES
Fuel Economy Video
Sport/ECO Modes
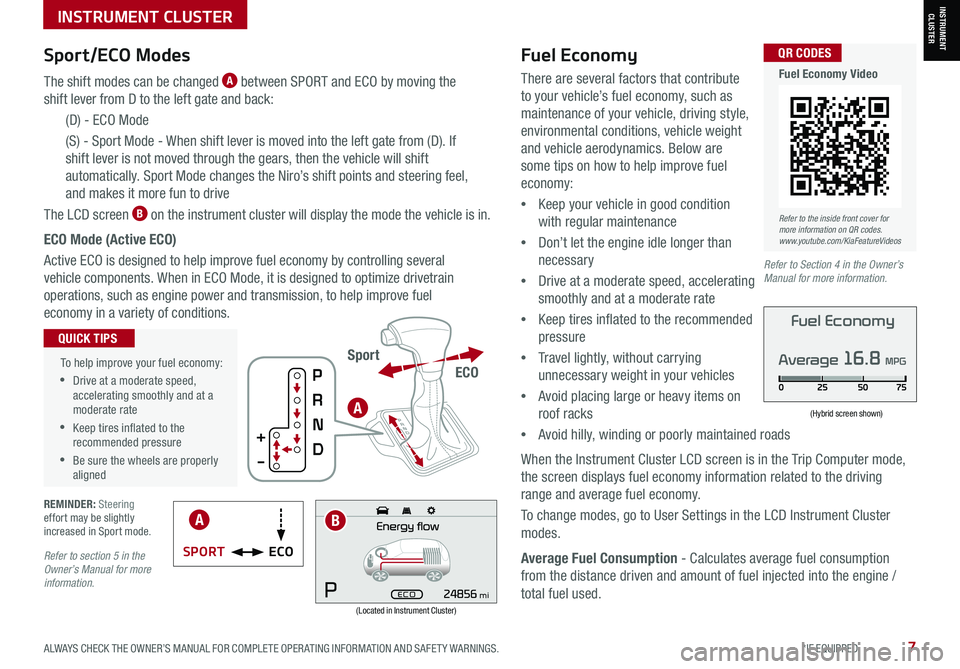
The shift modes can be changed A between SPORT and ECO by moving the
shift lever from D to the left gate and back:
(D) - ECO Mode
(S) - Sport Mode - When shift lever is moved into the left gate from (D). If
shift lever is not moved through the gears, then the vehicle will shift
automatically. Sport Mode changes the Niro’s shift points and steering feel,
and makes it more fun to drive
The LCD screen B on the instrument cluster will display the mode the vehicle is in.
ECO Mode (Active ECO)
Active ECO is designed to help improve fuel economy by controlling several
vehicle components. When in ECO Mode, it is designed to optimize drivetrain
operations, such as engine power and transmission, to help improve fuel
economy in a variety of conditions.
(Located in Instrument Cluster)mi
To help improve your fuel economy:
•Drive at a moderate speed, accelerating smoothly and at a moderate rate
•Keep tires inflated to the recommended pressure
•Be sure the wheels are properly aligned
QUICK TIPS
Refer to section 5 in the Owner’s Manual for more information.
ECOSPORT
ECO
Sport
REMINDER: Steering effort may be slightly increased in Sport mode.
A
AB
Refer to Section 4 in the Owner’s Manual for more information.
INSTRUMENT CLUSTER
Fuel Economy
Average 16.8 MPG
Page 11 of 66
ALWAYS CHECK THE OWNER’S MANUAL FOR COMPLETE OPER ATING INFORMATION AND SAFET Y WARNINGS. *IF EQUIPPED9
User Settings - Instrument Cluster
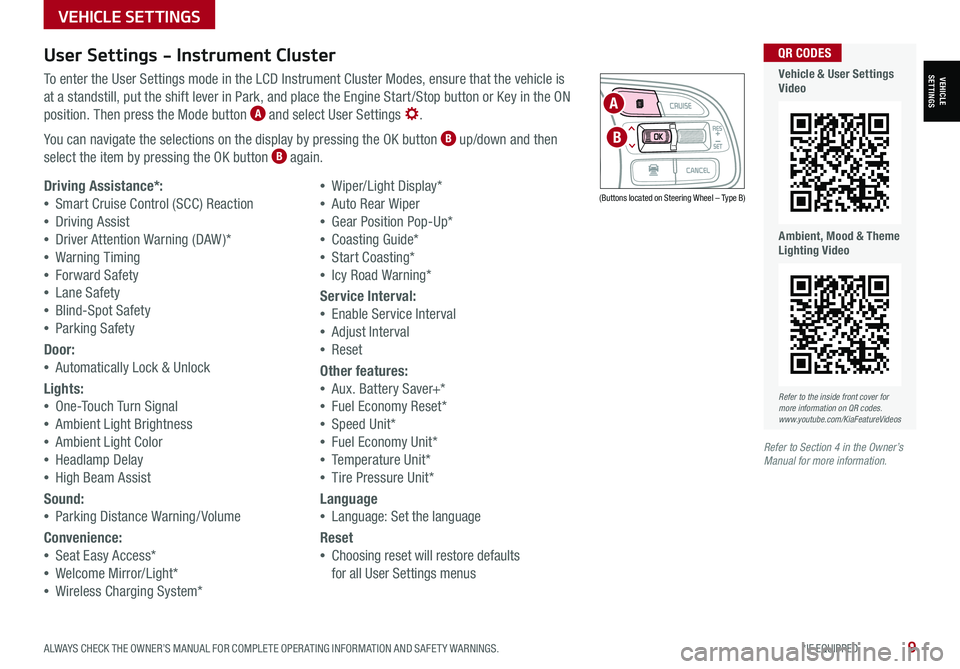
To enter the User Settings mode in the LCD Instrument Cluster Modes, ensure that the vehicle is
at a standstill, put the shift lever in Park, and place the Engine Start /Stop button or Key in the ON
position. Then press the Mode button A and select User Settings .
You can navigate the selections on the display by pressing the OK button B up/down and then
select the item by pressing the OK button B again.
Driving Assistance*:
•Smart Cruise Control (SCC) Reaction
•Driving Assist
•Driver Attention Warning (DAW )*
•Warning Timing
•Forward Safety
•Lane Safety
•Blind-Spot Safety
•Parking Safety
Door:
•Automatically Lock & Unlock
Lights:
•One-Touch Turn Signal
•Ambient Light Brightness
•Ambient Light Color
•Headlamp Delay
•High Beam Assist
Sound:
•Parking Distance Warning/ Volume
Convenience:
•Seat Easy Access*
•Welcome Mirror/Light*
•Wireless Charging System*
•Wiper/Light Display*
•Auto Rear Wiper
•Gear Position Pop-Up*
•Coasting Guide*
•Start Coasting*
•Icy Road Warning*
Service Interval:
•Enable Service Interval
•Adjust Interval
•Reset
Other features:
•Aux. Battery Saver+*
•Fuel Economy Reset*
•Speed Unit*
•Fuel Economy Unit*
•Temperature Unit*
•Tire Pressure Unit*
Language
•Language: Set the language
Reset
•Choosing reset will restore defaults
for all User Settings menus
(Buttons located on Steering Wheel – Type B)
MODE
RES
CRUISE
CAN CELOKSET
MODE
RES
CRUISE
CAN CELOKSET
MODE
A
B
Refer to the inside front cover for more information on QR codes.www.youtube.com/KiaFeatureVideos
QR CODES
Vehicle & User Settings Video
Ambient, Mood & Theme Lighting Video
Refer to Section 4 in the Owner’s Manual for more information.
VEHICLE SETTINGS
VEHICLESETTINGS
Page 23 of 66
ALWAYS CHECK THE OWNER’S MANUAL FOR COMPLETE OPER ATING INFORMATION AND SAFET Y WARNINGS. *IF EQUIPPED †LEGAL DISCL AIMERS ON BACK INSIDE COVER21
AUTOOFF(Buttons are located left of the Steering Wheel)
A
ADVANCED DRIVER ASSISTANCE SYSTEMS (ADAS)
ADAS
LK A User Settings:
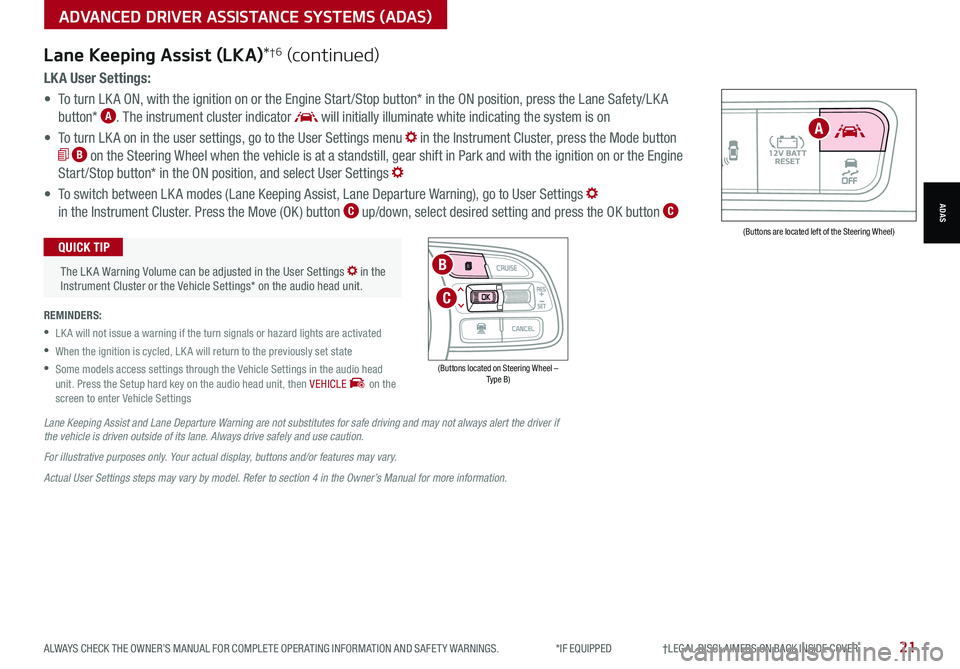
• To turn LK A ON, with the ignition on or the Engine Start /Stop button* in the ON position, press the Lane Safety/LK A
button* A. The instrument cluster indicator will initially illuminate white indicating the system is on
• To turn LK A on in the user settings, go to the User Settings menu in the Instrument Cluster, press the Mode button
B on the Steering Wheel when the vehicle is at a standstill, gear shift in Park and with the ignition on or the Engine
Start /Stop button* in the ON position, and select User Settings
• To switch between LK A modes (Lane Keeping Assist, Lane Departure Warning), go to User Settings
in the Instrument Cluster. Press the Move (OK ) button C up/down, select desired setting and press the OK button C
REMINDERS:
•
LK A will not issue a warning if the turn signals or hazard lights are activated
•
When the ignition is cycled, LK A will return to the previously set state
•
Some models access settings through the Vehicle Settings in the audio head unit. Press the Setup hard key on the audio head unit, then VEHICLE on the screen to enter Vehicle Settings
The LK A Warning Volume can be adjusted in the User Settings in the Instrument Cluster or the Vehicle Settings* on the audio head unit.
QUICK TIP
Lane Keeping Assist (LKA)*†6 (continued)
Lane Keeping Assist and Lane Departure Warning are not substitutes for safe driving and may not always alert the driver if the vehicle is driven outside of its lane. Always drive safely and use caution.
For illustrative purposes only. Your actual display, buttons and/or features may vary.
Actual User Settings steps may vary by model. Refer to section 4 in the Owner’s Manual for more information.
(Buttons located on Steering Wheel – Type B)
MODE
RES
CRUISE
CAN CELOKSET
MODE
RES
CRUISE
CAN CELOKSET
MODE
C
B
Page 33 of 66
ALWAYS CHECK THE OWNER’S MANUAL FOR COMPLETE OPER ATING INFORMATION AND SAFET Y WARNINGS. *IF EQUIPPED31
Refer to section 4 in the Owner’s Manual for more information.
Reverse Parking Aid Function*†6a
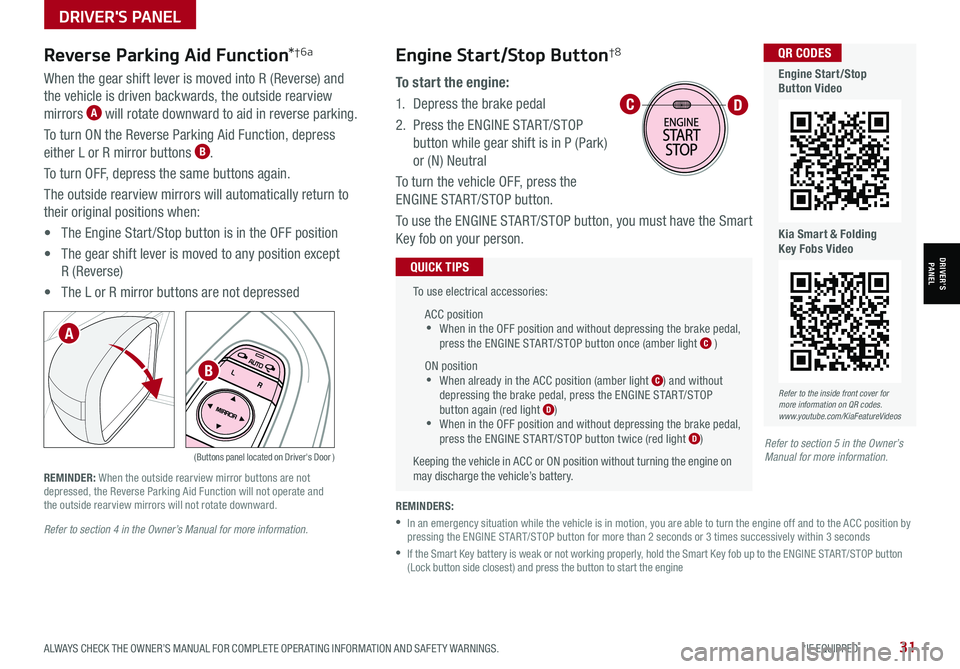
When the gear shift lever is moved into R (Reverse) and
the vehicle is driven backwards, the outside rearview
mirrors A will rotate downward to aid in reverse parking.
To turn ON the Reverse Parking Aid Function, depress
either L or R mirror buttons B.
To turn OFF, depress the same buttons again.
The outside rearview mirrors will automatically return to
their original positions when:
• The Engine Start /Stop button is in the OFF position
• The gear shift lever is moved to any position except
R (Reverse)
• The L or R mirror buttons are not depressed
(Buttons panel located on Driver's Door )
REMINDER: When the outside rearview mirror buttons are not depressed, the Reverse Parking Aid Function will not operate and the outside rearview mirrors will not rotate downward.
A
B
Refer to section 5 in the Owner’s Manual for more information.
To use electrical accessories:
ACC position •When in the OFF position and without depressing the brake pedal, press the ENGINE START/STOP button once (amber light C )
ON position •When already in the ACC position (amber light C) and without depressing the brake pedal, press the ENGINE START/STOP button again (red light D) •
When in the OFF position and without depressing the brake pedal, press the ENGINE START/STOP button twice (red light D)
Keeping the vehicle in ACC or ON position without turning the engine on may discharge the vehicle’s battery.
QUICK TIPS
REMINDERS:
•
In an emergency situation while the vehicle is in motion, you are able to turn the engine off and to the ACC position by pressing the ENGINE START/STOP button for more than 2 seconds or 3 times successively within 3 seconds
•
If the Smart Key battery is weak or not working properly, hold the Smart Key fob up to the ENGINE START/STOP button (Lock button side closest) and press the button to start the engine
CD
Refer to the inside front cover for more information on QR codes.www.youtube.com/KiaFeatureVideos
QR CODES
Engine Start/Stop Button Video
Kia Smart & Folding Key Fobs Video
Engine Start/Stop Button†8
To start the engine:
1. Depress the brake pedal
2.
Press the ENGINE START/STOP
button while gear shift is in P (Park)
or (N) Neutral
To turn the vehicle OFF, press the
ENGINE START/STOP button.
To use the ENGINE START/STOP button, you must have the Smart
Key fob on your person.
DRIVER'S PANEL
DRIVER’SPANEL
Page 35 of 66
ALWAYS CHECK THE OWNER’S MANUAL FOR COMPLETE OPER ATING INFORMATION AND SAFET Y WARNINGS. *IF EQUIPPED33
Refer to section 4 in the Owner’s Manual for more information.
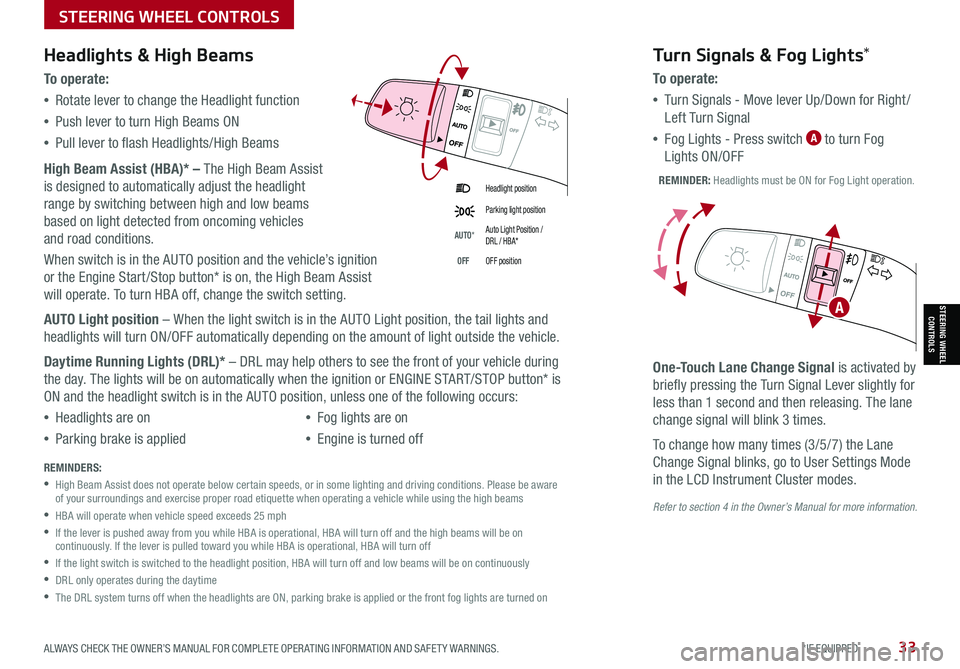
Headlight position
Parking light position
AUTO*Auto Light Position / DRL / HBA*
OFFOFF position
Headlights & High Beams
To o p e rate:
•Rotate lever to change the Headlight function
•Push lever to turn High Beams ON
•Pull lever to flash Headlights/High Beams
High Beam Assist (HBA)* – The High Beam Assist
is designed to automatically adjust the headlight
range by switching between high and low beams
based on light detected from oncoming vehicles
and road conditions.
When switch is in the AUTO position and the vehicle’s ignition
or the Engine Start /Stop button* is on, the High Beam Assist
will operate. To turn HBA off, change the switch setting.
AUTO Light position – When the light switch is in the AUTO Light position, the tail lights and
headlights will turn ON/OFF automatically depending on the amount of light outside the vehicle.
Daytime Running Lights (DRL)* – DRL may help others to see the front of your vehicle during
the day. The lights will be on automatically when the ignition or ENGINE START/STOP button* is
ON and the headlight switch is in the AUTO position, unless one of the following occurs:
•Headlights are on
•Parking brake is applied
•Fog lights are on
•Engine is turned off
Turn Signals & Fog Lights*
To o p e r a t e :
•Tu r n Signals - Move lever Up/Down for Right /
Left Turn Signal
•Fog Lights - Press switch A to turn Fog
Lights ON/OFF
One-Touch Lane Change Signal is activated by
briefly pressing the Turn Signal Lever slightly for
less than 1 second and then releasing. The lane
change signal will blink 3 times.
To change how many times (3/5/7) the Lane
Change Signal blinks, go to User Settings Mode
in the LCD Instrument Cluster modes.REMINDERS:
•
High Beam Assist does not operate below certain speeds, or in some lighting and driving conditions. Please be aware of your surroundings and exercise proper road etiquette when operating a vehicle while using the high beams
•HBA will operate when vehicle speed exceeds 25 mph
•
If the lever is pushed away from you while HBA is operational, HBA will turn off and the high beams will be on continuously. If the lever is pulled toward you while HBA is operational, HBA will turn off
•If the light switch is switched to the headlight position, HBA will turn off and low beams will be on continuously
•DRL only operates during the daytime
•
The DRL system turns off when the headlights are ON, parking brake is applied or the front fog lights are turned on
REMINDER: Headlights must be ON for Fog Light operation.
ASTEERING WHEEL CONTROLS
STEERING WHEEL CONTROLS
Page 47 of 66

CENTER PANEL
CENTERPANEL
ALWAYS CHECK THE OWNER’S MANUAL FOR COMPLETE OPER ATING INFORMATION AND SAFET Y WARNINGS. *IF EQUIPPED45
Digital Clock
Press SETUP, then select General,
and select Date/ Time from the menu
to adjust.
• Press the Return button on the audio head unit to ensure changes are saved
• When needed, Daylight Savings must be enabled in the Clock Settings screen
• To access manual date and time settings, turn GPS time OFF in the Clock Settings (UVO link with Navigation*)
QUICK TIPS
Multimedia USB Port, Charger Ports
The power outlets are inactive when ignition is in the OFF position.
QUICK TIP
REMINDERS:
• Using the power outlets (accessory plugs) for prolonged periods of time with the Engine Start /Stop button in the ACC position (Engine OFF ) may cause the battery to discharge
• The Multimedia USB data port A is located between the Power Outlet and USB Charger Port. The USB Charger Port does not support data transfer
Multimedia USB Port A Use the Multimedia USB Port to
connect USB audio devices and smartphone devices.
Power Outlets B
Use the power outlets for mobile phones and other devices
designed to operate on a 12V (180W max) power outlet.
(Rear of Center Console shown)
AC Inverter*
The AC inverter supplies 115V/150W electric
power to operate accessories or devices.
To use the AC inverter, open the AC inverter cover
and connect a plug to it.
The AC inverter is ON when the vehicle is on.
Refer to section 4 in the Owner’s Manual for more information.
Refer to section 4 in the Owner’s Manual for more information.
USB
12V 180W
12V 180W
USB Charger Ports C
Devices can be recharged using a USB cable. The Engine Start /Stop button
needs to be in the ACC/ON/START position to operate the USB Charger
Ports. They are located in the Center Panel and the Center Console.
A
B
C
Page 51 of 66

Electric Parking Brake (EPB)*
The Electric Parking Brake (EPB) system utilizes an
electric motor to engage the parking brake.
Applying the Parking Brake
Depress the brake pedal and pull up the EPB switch B. Ensure that the indicator light is illuminated
on the instrument cluster.
Releasing the Parking Brake
The EPB will automatically release when the shifter
is placed in Reverse or Drive.
To release EPB manually, depress the brake pedal,
then press the EPB switch B down, with the
ignition switch in the ON position. Ensure that the
indicator light i s O F F.
AUTO
HOLD
(Located on Center Panel)REMINDERS:
•
As a bulb check, the EPB malfunction indicator will illuminate for approximately 3 seconds when the ignition switch is turned ON
•
If the warning light does not illuminate temporarily, or continues to remain lit, take your vehicle to an authorized Kia dealer and have the system checked
•The EPB should not be operated while the vehicle is moving
•
A click or electric brake motor sound may be heard while operating or releasing the EPB, but these conditions are normal and indicate that the EPB is functioning properly
•When leaving your keys with parking lot attendants or valet, make sure to inform them how to operate the EPB
•If parked on a steep incline, pull up the EPB switch for more than 3 seconds for a firmer EPB application
•Pull up and hold EPB switch a second time to increase brake pressure if parked on a decline or incline
QUICK TIPS
A
B
Image is for illustrative purposes only and may not reflect actual feature or operation.
Auto Hold temporarily maintains the vehicle at a standstill even
though the brake pedal is not depressed after the driver brings the
vehicle to a complete stop by depressing the brake pedal. Auto
Hold can be turned On/Off using the AUTO HOLD button A on the
center panel below the gear shift. Before Auto Hold will operate,
the driver’s door, engine hood and liftgate must be closed, and the
driver’s seat belt must be fastened.
The AUTO HOLD indicator on the Instrument Cluster has four
states:
White: Standby – When vehicle is in Park and at a standstill, and
AUTO HOLD button A is pressed ON, the indicator will illuminate
white. While driving the vehicle (vehicle is not at a standstill), the
Auto Hold indicator will remain white.
Green: Engaged – When coming to a complete stop by depressing
the brake pedal, the Auto Hold indicator changes from white to
green.
Off (not illuminated) – The indicator will turn Off
when the AUTO HOLD button A is manually pressed
Off or when the EPB is manually turned On.
Yellow: Malfunction – When the indicator
is illuminated yellow, there may be a system
malfunction. Take your vehicle to a local Kia dealer.
Auto Hold*
REMINDERS:
•
Auto Hold only operates when vehicle is in Drive or Neutral
•
To reduce the risk of an accident, do not activate Auto Hold while driving downhill, backing up or parking your vehicle
•
Do not solely rely on the Auto Hold system to keep the vehicle stopped. Always pay attention to traf fic and road conditions, and be prepared to depress the brakes
Refer to the inside front cover for more information on QR codes.www.youtube.com/KiaFeatureVideos
QR CODES
Electric Parking Brake Video
Refer to section 5 in the Owner’s Manual for more information.
CENTER PANEL
CENTERPANEL
ALWAYS CHECK THE OWNER’S MANUAL FOR COMPLETE OPER ATING INFORMATION AND SAFET Y WARNINGS. *IF EQUIPPED49