Page 25 of 66
Video
Standard Cruise Control†1 8
D CRUISE Control O")
Refer to the inside front cover for more information on QR codes.www.youtube.com/KiaFeatureVideos
QR CODES
Leading Vehicle Departure Alert (LVDA)Video
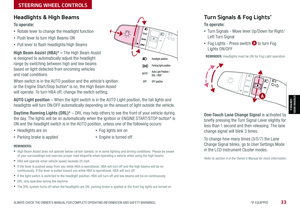
Standard Cruise Control†1 8
D CRUISE Control ON/OFF button: Press to turn the Cruise Control ON/OFF
E Resume Cruising Speed button: Press up to resume or increase Cruising Speed
Set Cruising Speed button: Press down to set or decrease Cruising Speed
F Cruise Control CANCEL button: To cancel Cruise Control setting, do one of the
following:
•Press the brake pedal
•Press the CANCEL button
•Cruise Control is designed to function above 20 mph
•The Cruise Control system will not activate until the brake pedal has been depressed at least once after ignition ON or engine start
QUICK TIPS
(Type A shown)
REMINDER: Standard Cruise Control is a part of Smart Cruise Control (SCC) and can be set as the operating mode. To switch from SCC to Standard Cruise Control, press and hold the Vehicle Distance button G for two seconds (the SCC system must not be activated to change modes). Repeat to switch back to SCC mode.
D
E
FG
Refer to section 5 in the Owner’s Manual for more information.
ALWAYS CHECK THE OWNER’S MANUAL FOR COMPLETE OPER ATING INFORMATION AND SAFET Y WARNINGS. *IF EQUIPPED †LEGAL DISCL AIMERS ON BACK INSIDE COVER23
ADVANCED DRIVER ASSISTANCE SYSTEMS (ADAS)
ADAS
Leading vehicle
is driving awayLeading Vehicle Departure Alert is designed to inform the driver when the vehicle in front starts
moving or departs from a stop. When LVDA is on, your vehicle is stopped, and LVDA detects that
the leading vehicle is driving away, LVDA sounds an alert to let you know you can start driving. If no
action is taken after the vehicle in front drives away, then a message A will appear on the Instrument
Cluster LCD.
LVDA User Settings:
• To turn LVDA on, press the Mode button B on the Steering Wheel, and go to User
Settings in the Instrument Cluster. Press the Move (OK ) button C up/down and select
Drive Assistance, then press the OK button C to select. Go to Driver Attention Warning and then
Leading Vehicle Departure Alert
• Some models access settings through the Vehicle Settings in the audio head unit. Press the Setup
hard key on the audio head unit, then press VEHICLE on the screen to enter Vehicle Settings
Leading Vehicle Departure Alert (LVDA)*†6a
REMINDERS:
•
When the ignition is cycled, the system returns to its previous state, on or off
•
Always check the front of the vehicle and road conditions before departure
The Leading Vehicle Departure Alert system is not a substitute for safe and proper driving. Always drive safely and use caution.
A
(Buttons located on Steering Wheel – Type B)
MODE
RES
CRUISE
CAN CELOKSET
MODE
RES
CRUISE
CAN CELOKSET
MODE
C
B
Images are for illustrative purposes only and may not reflect actual feature or operation.
Page 26 of 66

ADAS
The Smart Cruise Co")
*IF EQUIPPED †LEGAL DISCL AIMERS ON BACK INSIDE COVER24NIRO HYBRID / PLUG-IN HYBRID FEATURES & FUNCTIONS GUIDE
ADVANCED DRIVER ASSISTANCE SYSTEMS (ADAS)
ADAS
The Smart Cruise Control with Stop & Go* system is designed to maintain a predetermined distance from vehicles detected ahead
by automatically adjusting the driving speed as needed. When traffic is detected, the vehicle will automatically slow to maintain a
set distance between traffic without depressing the accelerator or brake pedal.
With the SCC on and activated and the vehicle distance set, when the system detects a vehicle slowing or stopping, it can bring
the vehicle to a complete stop. When the vehicle ahead starts to move forward, the SCC system re-engages. If the vehicle ahead
stops for more than 3 seconds, the accelerator pedal or the RES+ button must be pressed to start moving the vehicle.
On some models, press the Driving Assist Mode CRUISE button* on the Steering Wheel to activate and the speed will be set to the
current vehicle speed. SCC may decrease the speed to maintain the distance with the vehicle in front.
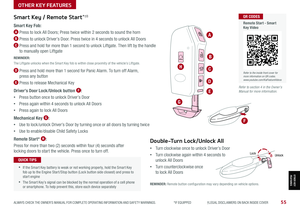
To set/adjust the SCC speed:
•Push the Driving Assist CRUISE button* A to turn the system ON & set the current speed (One-Touch Set). The cruise
indicator will illuminate on the instrument cluster
•Accelerate/decelerate to the desired speed and press lever B down to set the speed
•Press the RES+/SET- (+/-) button* B up/down to increase/decrease the set speed
•The SET indicator light, set speed and vehicle distance will illuminate on the instrument cluster’s LCD screen C
To set the vehicle distance: Press the Vehicle Distance button D on the steering wheel. The image on the LCD screen C will change when scrolling through
the settings. Each time the button is pressed, the vehicle distance changes.
To pause SCC operation: Press the RES+/-SE T button* B. The cruise indicator on the instrument cluster will turn OFF.
To turn SCC OFF: Press the Driving Assist CRUISE button A. The cruise indicator on the instrument cluster will turn OFF.
To adjust the sensitivity of the SCC system: Press the mode
button E on the Steering Wheel. With the OK button F, select
Driver Assistance, then SCC Response. Then select Fast, Normal or Slow.
To change the cruise control mode from SCC to standard cruise
control, press and hold button A. Repeat to switch back to SCC
mode ( The SCC system must not be activated to change modes.
Some Kia models use the CRUISE button).
Smart Cruise Control (SCC) with Stop & Go*†6a
The SCC system is a supplemental system and is not a substitute for safe driving. It is the responsibility of the driver to always check the speed and distance to the vehicle ahead.
See section 5 in the Owner’s Manual for more information. Images are for illustrative purposes only and may not reflect actual feature or operation.
CRUISE100 MPHCRUISE100 MPH
CRUISE60 MPHCRUISE100 MPHSmart Cruise Control
ModeCruise Control Mode
The distance settings are approximations and may vary depending on the vehicle speed at the time. See owner’s manual for more information.
17 2 f t13 0 f t
82ft
10 6 f t
( Type B Steering Wheel shown; buttons located on right side of Steering Wheel)
EA
F
D
B
C
Refer to the inside front cover for more information on QR codes.www.youtube.com/KiaFeatureVideos
QR CODES
Smart Cruise Control with Stop & Go Video
Page 27 of 66

ALWAYS CHECK THE OWNER’S MANUAL FOR COMPLETE OPER ATING INFORMATION AND SAFET Y WARNINGS. *IF EQUIPPED †LEGAL DISCL AIMERS ON BACK INSIDE COVER25
ADVANCED DRIVER ASSISTANCE SYSTEMS (ADAS)
ADAS
Smart Cruise Control (SCC) with Stop & Go*†6 (continued)
REMINDERS: •
The cruise control system will not activate until the brake pedal has been depressed at least once after the ignition is ON or engine starting •
When following a vehicle, the system will automatically adjust your cruise speed based on the vehicle detected in front •
SCC is also canceled when the driver’s door is opened, gear shift is changed out of D (Drive), EPB is activated, and various other conditions. See the Owner’s Manual for other conditions •
If SCC is left on, it can be activated inadvertently. Keep the system off when not in use to avoid setting a speed which the driver is not aware of •
SCC is a supplemental system and is not a substitute for safe driving. It is the responsibility of the driver to always check the speed and distance to the vehicle ahead
•
•The speed setting for SCC can be adjusted under the following conditions:
•You must be traveling at a minimum speed of 20 mph (may vary on newer models)
•
When following a vehicle, there is no minimum speed requirement
•
When following a vehicle, the system can automatically adjust your cruise speed based on the vehicle detected ahead. If the vehicle detected ahead remains at a standstill and your vehicle is also stopped for longer than 3 seconds, the system will need to be reactivated by pressing the gas pedal or pressing the RES button
QUICK TIPS
REMINDERS:
• NSCC-C requires an active navigation subscription
• NSCC-C is only available on controlled access roads and highways
Navigation-based Smart Cruise Control - Curve (NSCC-C) can automatically adjust the vehicle speed when it detects a
curved road ahead and when it receives road information from the navigation system.
To turn on NSCC-C, go to User Settings in the instrument cluster or Vehicle Settings* in the audio head unit, by selecting
Driving Convenience*, Highway Auto Speed Change. When SCC is on and operating, driving on limited/controlled access
highways and NSCC-C is turned on, then NSCC-C is enabled and the AUTO icon A will illuminate white on the Instrument
C lu s t er.
When NSCC-C detects a curve ahead, activates and reduces the vehicle speed, the AUTO icon A will turn green. When
the vehicle passes the curved road, the vehicle may return to its previously set SCC speed.
Autoset (Automatic change of set speed): If the set speed is set to the current speed limit on the highway during NSCC-C
operation, the set speed is changed automatically whenever the speed limit changes.
Navigation-based Smart Cruise Control - Curve (NSCC-C)*†6
CRUISE65mphAUTO
(Display on LCD screen)
See section 5 in the Owner’s Manual for more information. For more setting information, refer to the Car Infotainment System Quick Reference Guide.
NSCC-C is a supplemental system and is not a substitute for safe driving. It is the responsibility of the driver to always check the speed and distance to the vehicle ahead.
A
Page 28 of 66

ADAS
60mphCRUISE
MODE
RE")
*IF EQUIPPED †LEGAL DISCL AIMERS ON BACK INSIDE COVER26NIRO HYBRID / PLUG-IN HYBRID FEATURES & FUNCTIONS GUIDE
ADVANCED DRIVER ASSISTANCE SYSTEMS (ADAS)
ADAS
60mphCRUISE
MODE
RES
CRUISE
CAN CELOKSET
MODE
RES
CRUISE
CAN CELOKSET
MODE
Lane Following Assist (LFA)*†6
REMINDERS:
•
If the ignition is cycled, LFA returns to its previous state, on or off, if activated in the User Settings menu and when combined with SCC. If using the Steering Wheel LK A button, then LK A defaults to off
•
LFA is not a substitute for safe and proper driving. Always drive safely and use caution
Lane Following Assist (LFA) is designed to help ensure that the vehicle stays centered in its
lane A by monitoring the detected lane markings ahead and adjust the steering. When turned
on, the instrument cluster indicator will initially illuminate white when turned ON, and on
some vehicles, when SCC is engaged. It will remain white when the system does not detect the
lane markers. When the system detects the lane markers and can assist the steering, the LFA
icon will illuminate green B.
LFA will operate only when these conditions are met:
• When the SCC is on and operating
• LK A recognizes both sides of the lane markers the vehicle is traveling in
• The vehicle is traveling slower than 95 mph
LFA User Settings:
• To go to User Settings in the Instrument Cluster, press the Mode button C on the
Steering Wheel when the vehicle is at a standstill, gear shift is in Park and with the ignition
on or the Engine Start /Stop button* in the ON position, and select User Settings
• To enable LFA, when in User Settings, press the Move (OK ) button D up/down and
Select Driver Assistance, then Driving Assist, and then Lane Following Assist. Press the
OK button D
• Some models access settings through the Vehicle Settings in the audio head unit. Press the
SETUP hard key on the audio head unit, then VEHICLE on the screen to enter Vehicle
Settings
• Some vehicles have a Lane Driving Assist / Lane Safety button* on the Driver’s Panel or the
Steering Wheel . Press to activate Lane Following Assist
(Buttons located on steering wheel)
Images are for illustrative purposes only and may not reflect actual feature or operation.
LFA is supplemental. Do not solely rely on this system and always pay attention to the road and its conditions.
Actual User Settings steps may vary by model. See section 5 in the Owner’s Manual for more detailed information, limitations and conditions.
D
C
A
B
Refer to the inside front cover for more information on QR codes.www.youtube.com/KiaFeatureVideos
QR CODES
Lane Following Assist (LFA) Video
Page 29 of 66

ALWAYS CHECK THE OWNER’S MANUAL FOR COMPLETE OPER ATING INFORMATION AND SAFET Y WARNINGS. *IF EQUIPPED †LEGAL DISCL AIMERS ON BACK INSIDE COVER27
ADVANCED DRIVER ASSISTANCE SYSTEMS (ADAS)
ADAS
MODE
RES
CRUISE
CAN CELOKSET
MODE
RES
CRUISE
CAN CELOKSET
MODE
REMINDERS:
•
Current highway speeds and controlled or limited access road information may vary. Future navigation updates may change this information
•
If the driver changes the speed while in automatic speed setting mode, it deactivates and enters a manual mode
•
When the ignition is cycled, the system returns to its previous state, on or off
60mph
A
B
C
D
E
Refer to the inside front cover for more information on QR codes.www.youtube.com/KiaFeatureVideos
QR CODES
Highway Driving Assist (HDA) Video
Highway Driving Assist (HDA)*†6
Highway Driving Assist (HDA) is designed to adjust the speed of the vehicle when driving on limited/
controlled access highways/freeways. The system can adjust the vehicle’s speed based on available
highway speed information. The automatic speed setting mode is designed to set the speed
automatically by adjusting to the current speed limits of the highway the vehicle is traveling on.
To activate HDA, turn Smart Cruise Control (SCC) on by pressing the Driving Assist CRUISE /
Driving Assist Mode CRUISE button* A on the Steering Wheel. When HDA is activated and the
conditions are met, the Instrument Cluster indicator B will illuminate green. If the conditions are
not met, HDA will be in standby mode and the indicator light B will illuminate white. When in
operation, and if both lanes are recognized, the Instrument Cluster will show the lanes illuminated
white and the HDA indicator illuminated green B.
If HDA is activated, conditions are met and the SCC speed is set by the driver (at the posted
highway speed limit or slower), HDA will enter the automatic speed setting mode. The set speed
and AUTO will be displayed C in green and an audible alert will sound.
HDA will operate only when these conditions are met:
• The vehicle is traveling slower than 95 mph or the highway speed limit
• When driving on limited/controlled access highways/freeways
• When the SCC is on and operating
• When the SCC speed is set to current posted highway speed or slower
HDA User Settings:
To enable HDA, press the Mode button D on the Steering Wheel and go to User Settings
in the Instrument Cluster. Press the Move (OK ) button E up/down and press Driver Assistance,
then Driving Assist, Highway Driving Assist. Then press the OK button E to enable.
Some models access settings through the Vehicle Settings in the audio head unit. Press the Setup
hard key on the audio head unit, then press VEHICLE on the screen to enter Vehicle Settings.
Highway Driving Assist is not a substitute for safe driving, may not detect all objects around the vehicle, and only functions on certain federal highways. Always drive safely and use caution.
See section 5 in the Owner’s Manual for more detailed information, limitations and conditions.
Page 30 of 66
*†6a
If the RCCW syst")
*IF EQUIPPED †LEGAL DISCL AIMERS ON BACK INSIDE COVER28NIRO HYBRID / PLUG-IN HYBRID FEATURES & FUNCTIONS GUIDE
Rear Cross-Traffic Collision Warning (RCCW)*†6a
If the RCCW system sensors detect approaching vehicles from the rear left
or rear right side of the vehicle A, the system will sound an audible alert,
the warning indicators on the outside rearview mirror will illuminate and a
message will appear on the LCD screen. The RCCW system is active under
the following conditions:
•When gear shift is in Reverse
•When the vehicle is moving slower than 6 mph
REMINDERS:
•The RCCW feature can be turned OFF/ON in User Settings
•
The RCCW system will show a warning if the approaching vehicle speed is between 2.5-22 mph within sensing range. See Owner’s Manual for other conditions
RCCW is a supplemental system. Do not rely solely on this system, and always drive safely.
Refer to section 4/5 in the Owner’s Manual for more information.
Illustration is for demonstration purposes only. Actual images or buttons on vehicle may vary.
A
ADVANCED DRIVER ASSISTANCE SYSTEMS (ADAS)
ADAS
Rear View Monitor (RVM)*†6a
Rear View Monitor is a supplemental system that displays the view behind
the vehicle through the rearview display mirror* while the vehicle is in
Reverse.
Rear View Monitor activates when the:
•Engine Start /Stop button is in the ON/RE ADY position
•Gear Shift Lever is in the R (Reverse) position
REMINDERS:
•
UVO link — While camera is active, only the audio controls on the Audio System can be operated
•
UVO link with Navigation — While camera is active, only the Audio System can be operated on the Steering Wheel and Audio Control Unit. All other features are disabled
•RVM may not display every object behind the vehicle
Rear View Monitor is not a substitute for proper and safe backing-up procedures.
Rear View Monitor may not display every object behind the vehicle. Always drive safely and use caution when backing up.
Refer to section 4 in the Owner’s Manual for more information.
Page 31 of 66

ALWAYS CHECK THE OWNER’S MANUAL FOR COMPLETE OPER ATING INFORMATION AND SAFET Y WARNINGS. *IF EQUIPPED †LEGAL DISCL AIMERS ON BACK INSIDE COVER29
ADVANCED DRIVER ASSISTANCE SYSTEMS (ADAS)
ADAS
Reverse Parking Distance Warning (PDW)*†6a
Reverse Parking Distance Warning (PDW )* is a supplemental system that is designed to assist the driver by chiming if any object
is detected within the sensing area in the rear and rear side of the vehicle when backing up.
PDW is activated when the ignition is ON/RE ADY and the vehicle is in R (Reverse). To deactivate PDW, press the Reverse Parking
Distance Warning (PDW ) button A (LED NOT illuminated), when vehicle is in Drive or Reverse.
To activate, press button A again (LED illuminated).
REMINDERS:
•
If the vehicle is moving at speeds over 3 mph, PDW may not activate correctly
•
When more than two objects are sensed at the same time, the closest one will be recognized first
•
Images are for illustration purposes only and may not reflect actual operation
EV
HEV
Refer to the inside front cover for more information on QR codes.www.youtube.com/KiaFeatureVideos
QR CODES
Forward/Reverse Parking Distance Warning (PDW) Video
A
Reverse Parking Distance Warning (PDW) is not a substitute for proper and safe parking and backing-up procedures. Always drive safely and use caution when backing up. Reverse Parking Distance Warning (PDW) may not detect every object in front of or behind the vehicle.
Refer to section 4 in the Owner’s Manual for more information.
Page 32 of 66
†7
The ESC system is designed")
*IF EQUIPPED †LEGAL DISCL AIMERS ON BACK INSIDE COVER30NIRO HYBRID / PLUG-IN HYBRID FEATURES & FUNCTIONS GUIDE
Electronic Stability Control (ESC)†7
The ESC system is designed to help stabilize the vehicle during certain cornering
maneuvers. It is a good idea to keep the ESC turned ON whenever possible.
Press ESC OFF button B to disable Traction Control in ESC (ESC OFF indicator
will illuminate).
To turn both Traction Control and Stability Control†7 off, press and hold ESC OFF
button B (ESC OFF indicator will illuminate, and an alert sounds).
REMINDERS:
•ESC is active by default at vehicle startup
•
The ESC Indicator Light in the instrument cluster will illuminate whenever the ESC is in operation
Refer to section 5 in the Owner’s Manual for more information.
HAC does not replace the need to apply brakes while the vehicle is stopped on an incline.
Refer to section 5 in the Owner’s Manual for more information.
(Located left of Steering Wheel)
Instrument Cluster Control
Press switch A up or down to adjust display brightness of the instrument
panel illumination.
REMINDERS:
• The dimmer does not change brightness when lights are turned off
• The dimmer does not adjust brightness on the audio system screens; use the system’s setup menu to adjust brightness on the screens
Hill-Start Assist Control (HAC)†7
HAC is designed to help prevent the vehicle from rolling
backward when accelerating from a stop while on a steep
incline.
HAC automatically activates whether the ESC is OFF or ON but
does NOT activate when the ESC has malfunctioned.
REMINDERS:
•
HAC does not operate when the gear shift is in the P (Park) or the N (Neutral) position
•In the event of HAC system malfunction, see Authorized Kia Dealer for service
•
•When HAC is active (e.g., accelerating from a stop on an incline), you may notice that the brakes will momentarily remain engaged after you depress the accelerator. This is normal HAC operation
•HAC provides a 2-second delay before the vehicle may start rolling backward
QUICK TIPS
AUTOOFF
DRIVER'S PANEL
DRIVER’SPANELAB