2021 KIA NIRO engine
[x] Cancel search: enginePage 14 of 66
*IF EQUIPPED12NIRO HYBRID / PLUG-IN HYBRID FEATURES & FUNCTIONS GUIDE
Plug-In Hybrid Display*
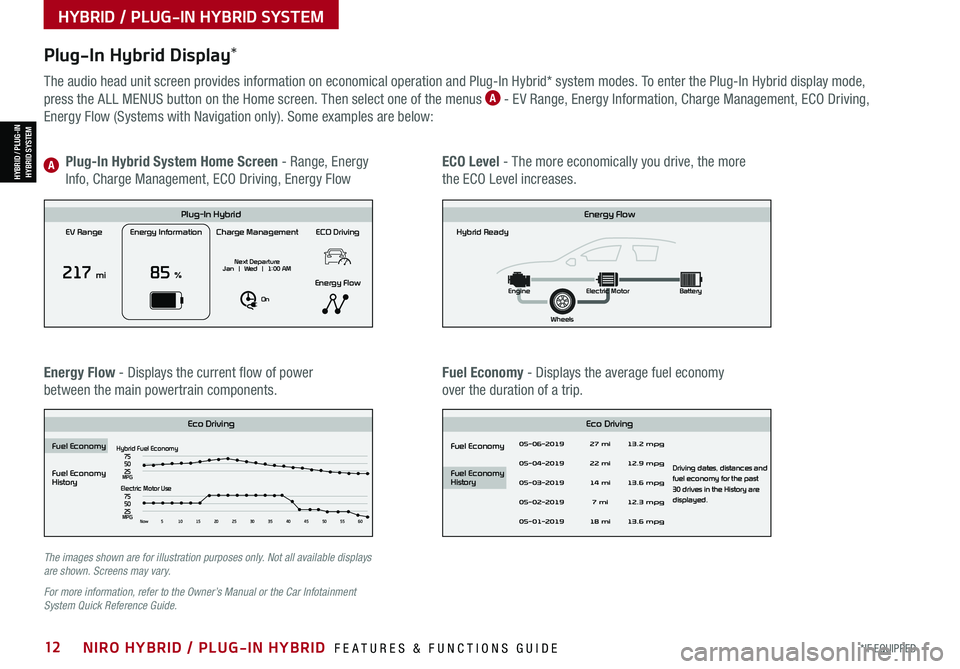
The audio head unit screen provides information on economical operation and Plug-In Hybrid* system modes. To enter the Plug-In Hybrid display mode,
press the ALL MENUS button on the Home screen. Then select one of the menus A - EV Range, Energy Information, Charge Management, ECO Driving,
Energy Flow (Systems with Navigation only). Some examples are below:
Energy Flow - Displays the current flow of power
between the main powertrain components.
ECO Level - The more economically you drive, the more
the ECO Level increases.
Plug-In Hybrid System Home Screen - Range, Energy
Info, Charge Management, ECO Driving, Energy FlowA
Fuel Economy - Displays the average fuel economy
over the duration of a trip.
EV Range
217 mi
Energy Information
85 %
Charge Management
Next Departure
Jan | Wed | 1:00 AM
On
ECO Driving
Energy Flow
Plug-In Hybrid
Hybrid Ready
Energy Flow
Wheels
Engine
Electric Motor Battery
Fuel Economy
History
Eco Driving Eco Driving
Fuel Economy
Fuel Economy
History
Fuel EconomyHybrid Fuel Economy05-06-2019
05-04-2019
05-03-2019
05-02-2019
05-01-2019 27 mi
13.2 mpg
12.9 mpg
13.6 mpg
Driving dates, distances and
fuel economy for the past
30 drives in the History are
displayed.
12.3 mpg
13.6 mpg
22 mi
14 mi 7 mi
18 mi
75
50
25
MPGElectric Motor Use
75
50
25
MPGNow 510 15202530354045505560
EV Range
217 mi
Energy Information
85 %
Charge Management
Next Departure
Jan | Wed | 1:00 AM
On
ECO Driving
Energy Flow
Plug-In Hybrid
Hybrid Ready
Energy Flow
Wheels
Engine
Electric Motor Battery
Fuel Economy
History
Eco DrivingEco Driving
Fuel Economy
Fuel Economy
History
Fuel Economy
Hybrid Fuel Economy05-06-2019
05-04-2019
05-03-2019
05-02-2019
05-01-2019 27 mi
13.2 mpg
12.9 mpg
13.6 mpg
Driving dates, distances and
fuel economy for the past
30 drives in the History are
displayed.
12.3 mpg
13.6 mpg
22 mi
14 mi 7 mi
18 mi
75
50
25
MPGElectric Motor Use
75
50
25
MPGNow 510 15202530354045505560
EV Range
217 mi
Energy Information
85 %
Charge Management
Next Departure
Jan | Wed | 1:00 AM
On
ECO Driving
Energy Flow
Plug-In Hybrid
Hybrid Ready
Energy Flow
Wheels
Engine
Electric Motor Battery
Fuel Economy
History
Eco Driving Eco Driving
Fuel Economy
Fuel Economy
History
Fuel EconomyHybrid Fuel Economy05-06-2019
05-04-2019
05-03-2019
05-02-2019
05-01-2019 27 mi
13.2 mpg
12.9 mpg
13.6 mpg
Driving dates, distances and
fuel economy for the past
30 drives in the History are
displayed.
12.3 mpg
13.6 mpg
22 mi
14 mi 7 mi
18 mi
75
50
25
MPGElectric Motor Use
75
50
25
MPGNow 510 15202530354045505560
EV Range
217 mi
Energy Information
85 %
Charge Management
Next Departure
Jan | Wed | 1:00 AM
On
ECO Driving
Energy Flow
Plug-In Hybrid
Hybrid Ready
Energy Flow
Wheels
Engine
Electric Motor Battery
Fuel Economy
History
Eco DrivingEco Driving
Fuel Economy
Fuel Economy
History
Fuel Economy
Hybrid Fuel Economy05-06-2019
05-04-2019
05-03-2019
05-02-2019
05-01-2019 27 mi
13.2 mpg
12.9 mpg
13.6 mpg
Driving dates, distances and
fuel economy for the past
30 drives in the History are
displayed.
12.3 mpg
13.6 mpg
22 mi
14 mi 7 mi
18 mi
75
50
25
MPGElectric Motor Use
75
50
25
MPGNow 510 15202530354045505560
The images shown are for illustration purposes only. Not all available displays are shown. Screens may vary.
For more information, refer to the Owner’s Manual or the Car Infotainment System Quick Reference Guide.
HYBRID / PLUG-IN HYBRID SYSTEM
HYBRID / PLUG-INHYBRID SYSTEM
Page 15 of 66

ALWAYS CHECK THE OWNER’S MANUAL FOR COMPLETE OPER ATING INFORMATION AND SAFET Y WARNINGS. *IF EQUIPPED13
Plug-In Hybrid displays shown. The images shown are for illustration purposes only. Not all available displays are shown. Screens may vary.
For more information, refer to the Owner’s Manual.
Instrument Cluster - Energy Flow
The instrument cluster LCD screen displays the following plug-in hybrid system modes to inform the driver of its
status. To change modes, go to User Settings in the LCD Instrument Cluster modes.
EV Propulsion - The electric motor is moving
the vehicle.
Engine-Only Propulsion - The engine is moving
your vehicle.
Power Assist - Both the electric motor AND the
engine are moving the vehicle.
Engine Generation - While the vehicle is stopped,
the engine is charging the hybrid battery.
HYBRID / PLUG-IN HYBRID SYSTEM
HYBRID / PLUG-INHYBRID SYSTEM
mi
mi
mi
mi
Page 16 of 66

*IF EQUIPPED14NIRO HYBRID / PLUG-IN HYBRID FEATURES & FUNCTIONS GUIDE
Plug-In Hybrid displays shown. The images shown are for illustration purposes only. Not all available displays are shown. Screens may vary.
For more information, refer to the Owner’s Manual.
Instrument Cluster - Energy Flow
The instrument cluster LCD screen displays the following plug-in hybrid system modes to inform the driver of its
status. To change modes, go to User Settings in the LCD Instrument Cluster modes.
Vehicle Stop - The vehicle’s hybrid system is
standing by.
Engine Generation/Regeneration - The engine
and the regenerative braking system are both
recharging the hybrid battery.
Power Reserve - While the engine powers the
vehicle, it is also recharging the hybrid battery.
Engine Brake/Regeneration - The regenerative
braking system is recharging the hybrid battery.
HYBRID / PLUG-IN HYBRID SYSTEM
HYBRID / PLUG-INHYBRID SYSTEM
mi
mi
mi
mi
Page 17 of 66
ALWAYS CHECK THE OWNER’S MANUAL FOR COMPLETE OPER ATING INFORMATION AND SAFET Y WARNINGS. *IF EQUIPPED15
HYBRID / PLUG-IN HYBRID SYSTEM
HYBRID / PLUG-INHYBRID SYSTEM
Emergency Starting* (Hybrid only)
Before Jump-Starting:
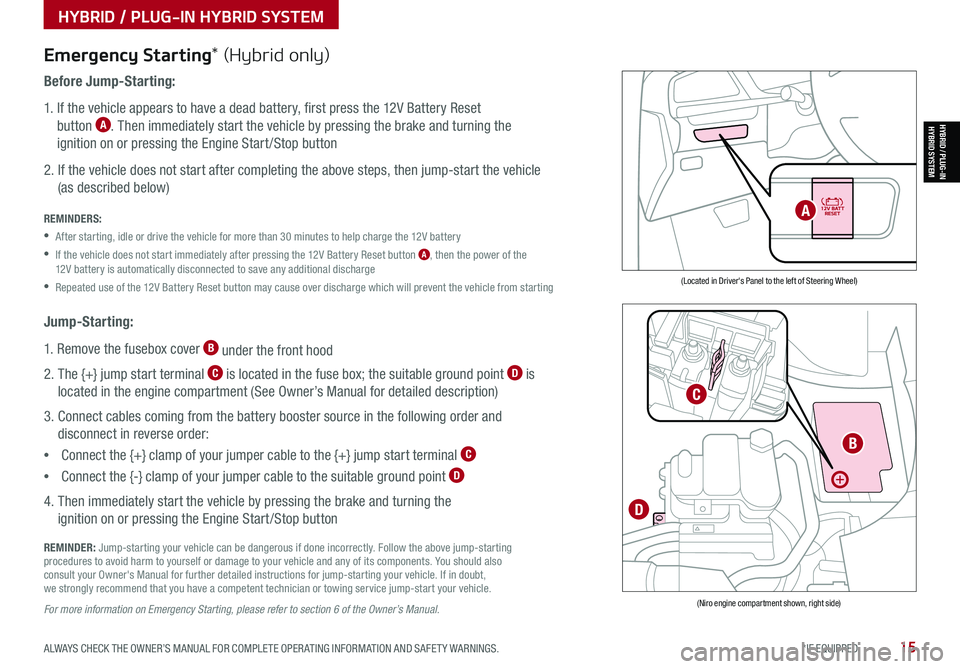
1. If the vehicle appears to have a dead battery, first press the 12V Battery Reset
button A. Then immediately start the vehicle by pressing the brake and turning the
ignition on or pressing the Engine Start /Stop button
2. If the vehicle does not start after completing the above steps, then jump-start the vehicle
(as described below)
REMINDERS:
•After starting, idle or drive the vehicle for more than 30 minutes to help charge the 12V battery
•
If the vehicle does not start immediately after pressing the 12V Battery Reset button A, then the power of the 12V battery is automatically disconnected to save any additional discharge
•Repeated use of the 12V Battery Reset button may cause over discharge which will prevent the vehicle from starting
Jump-Starting:
1. Remove the fusebox cover B under the front hood
2. The {+} jump start terminal C is located in the fuse box; the suitable ground point D is
located in the engine compartment (See Owner’s Manual for detailed description)
3. Connect cables coming from the battery booster source in the following order and
disconnect in reverse order:
•Connect the {+} clamp of your jumper cable to the {+} jump start terminal C
•Connect the {-} clamp of your jumper cable to the suitable ground point D
4. Then immediately start the vehicle by pressing the brake and turning the
ignition on or pressing the Engine Start /Stop button
REMINDER: Jump-starting your vehicle can be dangerous if done incorrectly. Follow the above jump-starting procedures to avoid harm to yourself or damage to your vehicle and any of its components. You should also consult your Owner's Manual for further detailed instructions for jump-starting your vehicle. If in doubt, we strongly recommend that you have a competent technician or towing service jump-start your vehicle.
For more information on Emergency Starting, please refer to section 6 of the Owner’s Manual.
(Located in Driver's Panel to the left of Steering Wheel)
(Niro engine compartment shown, right side)
B
C
D
A
Page 21 of 66
ALWAYS CHECK THE OWNER’S MANUAL FOR COMPLETE OPER ATING INFORMATION AND SAFET Y WARNINGS. *IF EQUIPPED †LEGAL DISCL AIMERS ON BACK INSIDE COVER19
ADVANCED DRIVER ASSISTANCE SYSTEMS (ADAS)
ADASEMERGENCY BRAKING
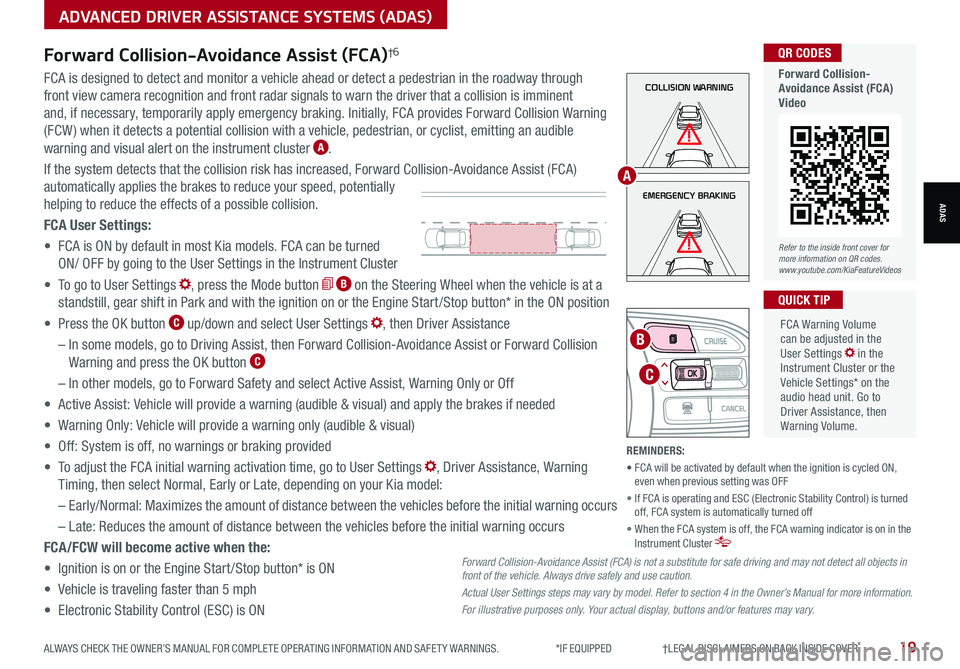
COLLISION WARNINGFCA is designed to detect and monitor a vehicle ahead or detect a pedestrian in the roadway through
front view camera recognition and front radar signals to warn the driver that a collision is imminent
and, if necessary, temporarily apply emergency braking. Initially, FCA provides Forward Collision Warning
(FCW ) when it detects a potential collision with a vehicle, pedestrian, or cyclist, emitting an audible
warning and visual alert on the instrument cluster A.
If the system detects that the collision risk has increased, Forward Collision-Avoidance Assist (FCA)
automatically applies the brakes to reduce your speed, potentially
helping to reduce the effects of a possible collision.
FCA User Settings:
• FCA is ON by default in most Kia models. FCA can be turned
ON/ OFF by going to the User Settings in the Instrument Cluster
• To go to User Settings , press the Mode button B on the Steering Wheel when the vehicle is at a
standstill, gear shift in Park and with the ignition on or the Engine Start /Stop button* in the ON position
• Press the OK button C up/down and select User Settings , then Driver Assistance
– In some models, go to Driving Assist, then Forward Collision-Avoidance Assist or Forward Collision
Warning and press the OK button C
– In other models, go to Forward Safety and select Active Assist, Warning Only or Off
• Active Assist: Vehicle will provide a warning (audible & visual) and apply the brakes if needed
• Warning Only: Vehicle will provide a warning only (audible & visual)
• Off: System is off, no warnings or braking provided
• To adjust the FCA initial warning activation time, go to User Settings , Driver Assistance, Warning
Timing, then select Normal, Early or Late, depending on your Kia model:
–
Early/Normal: Maximizes the amount of distance between the vehicles before the initial warning occurs
– Late: Reduces the amount of distance between the vehicles before the initial warning occurs
FCA/FCW will become active when the:
• Ignition is on or the Engine Start /Stop button* is ON
• Vehicle is traveling faster than 5 mph
• Electronic Stability Control (ESC) is ON
MODE
RES
CRUISE
CAN CELOKSET
MODE
RES
CRUISE
CAN CELOKSET
MODE
C
B
FCA Warning Volume can be adjusted in the User Settings in the Instrument Cluster or the Vehicle Settings* on the audio head unit. Go to Driver Assistance, then Warning Volume.
QUICK TIP
A
Refer to the inside front cover for more information on QR codes.www.youtube.com/KiaFeatureVideos
QR CODES
Forward Collision- Avoidance Assist (FCA)Video
Forward Collision-Avoidance Assist (FCA)†6
Forward Collision-Avoidance Assist (FCA) is not a substitute for safe driving and may not detect all objects in front of the vehicle. Always drive safely and use caution.
Actual User Settings steps may vary by model. Refer to section 4 in the Owner’s Manual for more information.
For illustrative purposes only. Your actual display, buttons and/or features may vary.
REMINDERS:
• FCA will be activated by default when the ignition is cycled ON, even when previous setting was OFF
• If FCA is operating and ESC (Electronic Stability Control) is turned off, FCA system is automatically turned off
• When the FCA system is off, the FCA warning indicator is on in the Instrument Cluster
Page 23 of 66
ALWAYS CHECK THE OWNER’S MANUAL FOR COMPLETE OPER ATING INFORMATION AND SAFET Y WARNINGS. *IF EQUIPPED †LEGAL DISCL AIMERS ON BACK INSIDE COVER21
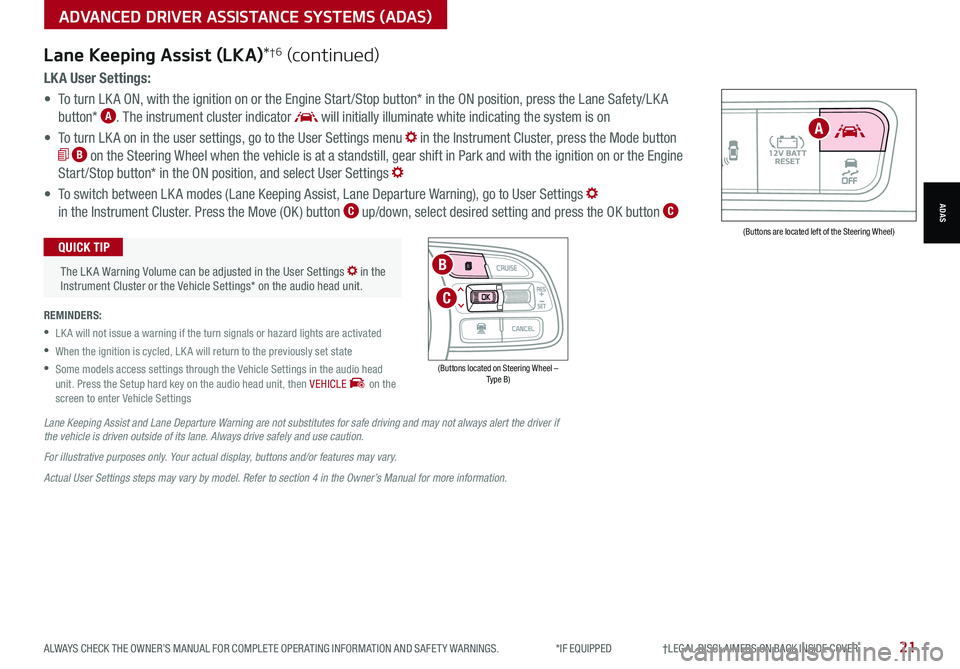
AUTOOFF(Buttons are located left of the Steering Wheel)
A
ADVANCED DRIVER ASSISTANCE SYSTEMS (ADAS)
ADAS
LK A User Settings:
• To turn LK A ON, with the ignition on or the Engine Start /Stop button* in the ON position, press the Lane Safety/LK A
button* A. The instrument cluster indicator will initially illuminate white indicating the system is on
• To turn LK A on in the user settings, go to the User Settings menu in the Instrument Cluster, press the Mode button
B on the Steering Wheel when the vehicle is at a standstill, gear shift in Park and with the ignition on or the Engine
Start /Stop button* in the ON position, and select User Settings
• To switch between LK A modes (Lane Keeping Assist, Lane Departure Warning), go to User Settings
in the Instrument Cluster. Press the Move (OK ) button C up/down, select desired setting and press the OK button C
REMINDERS:
•
LK A will not issue a warning if the turn signals or hazard lights are activated
•
When the ignition is cycled, LK A will return to the previously set state
•
Some models access settings through the Vehicle Settings in the audio head unit. Press the Setup hard key on the audio head unit, then VEHICLE on the screen to enter Vehicle Settings
The LK A Warning Volume can be adjusted in the User Settings in the Instrument Cluster or the Vehicle Settings* on the audio head unit.
QUICK TIP
Lane Keeping Assist (LKA)*†6 (continued)
Lane Keeping Assist and Lane Departure Warning are not substitutes for safe driving and may not always alert the driver if the vehicle is driven outside of its lane. Always drive safely and use caution.
For illustrative purposes only. Your actual display, buttons and/or features may vary.
Actual User Settings steps may vary by model. Refer to section 4 in the Owner’s Manual for more information.
(Buttons located on Steering Wheel – Type B)
MODE
RES
CRUISE
CAN CELOKSET
MODE
RES
CRUISE
CAN CELOKSET
MODE
C
B
Page 25 of 66
Refer to the inside front cover for more information on QR codes.www.youtube.com/KiaFeatureVideos
QR CODES
Leading Vehicle Departure Alert (LVDA)Video
Standard Cruise Control†1 8
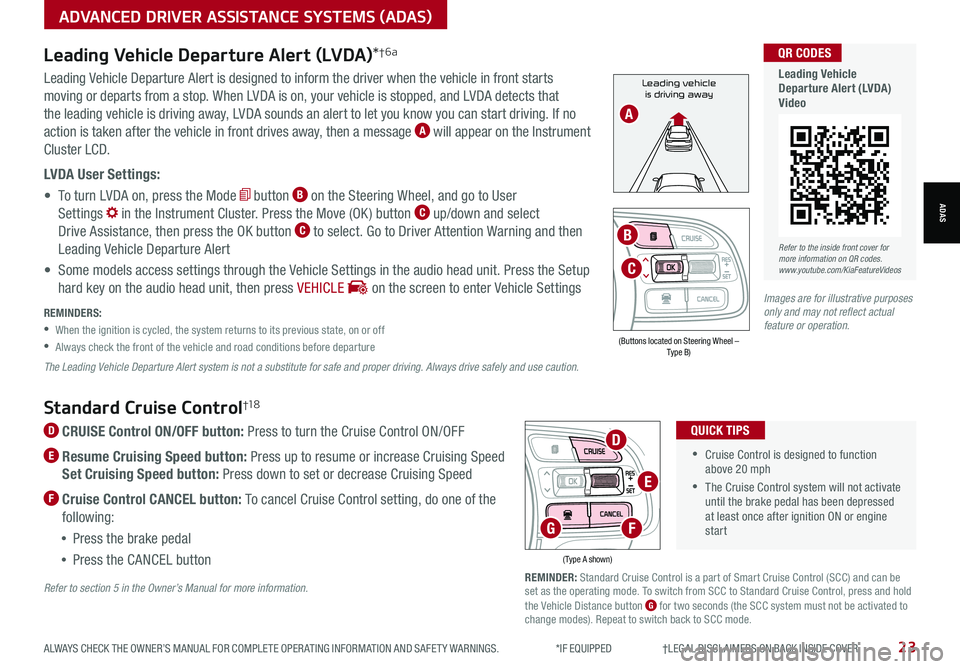
D CRUISE Control ON/OFF button: Press to turn the Cruise Control ON/OFF
E Resume Cruising Speed button: Press up to resume or increase Cruising Speed
Set Cruising Speed button: Press down to set or decrease Cruising Speed
F Cruise Control CANCEL button: To cancel Cruise Control setting, do one of the
following:
•Press the brake pedal
•Press the CANCEL button
•Cruise Control is designed to function above 20 mph
•The Cruise Control system will not activate until the brake pedal has been depressed at least once after ignition ON or engine start
QUICK TIPS
(Type A shown)
REMINDER: Standard Cruise Control is a part of Smart Cruise Control (SCC) and can be set as the operating mode. To switch from SCC to Standard Cruise Control, press and hold the Vehicle Distance button G for two seconds (the SCC system must not be activated to change modes). Repeat to switch back to SCC mode.
D
E
FG
Refer to section 5 in the Owner’s Manual for more information.
ALWAYS CHECK THE OWNER’S MANUAL FOR COMPLETE OPER ATING INFORMATION AND SAFET Y WARNINGS. *IF EQUIPPED †LEGAL DISCL AIMERS ON BACK INSIDE COVER23
ADVANCED DRIVER ASSISTANCE SYSTEMS (ADAS)
ADAS
Leading vehicle
is driving awayLeading Vehicle Departure Alert is designed to inform the driver when the vehicle in front starts
moving or departs from a stop. When LVDA is on, your vehicle is stopped, and LVDA detects that
the leading vehicle is driving away, LVDA sounds an alert to let you know you can start driving. If no
action is taken after the vehicle in front drives away, then a message A will appear on the Instrument
Cluster LCD.
LVDA User Settings:
• To turn LVDA on, press the Mode button B on the Steering Wheel, and go to User
Settings in the Instrument Cluster. Press the Move (OK ) button C up/down and select
Drive Assistance, then press the OK button C to select. Go to Driver Attention Warning and then
Leading Vehicle Departure Alert
• Some models access settings through the Vehicle Settings in the audio head unit. Press the Setup
hard key on the audio head unit, then press VEHICLE on the screen to enter Vehicle Settings
Leading Vehicle Departure Alert (LVDA)*†6a
REMINDERS:
•
When the ignition is cycled, the system returns to its previous state, on or off
•
Always check the front of the vehicle and road conditions before departure
The Leading Vehicle Departure Alert system is not a substitute for safe and proper driving. Always drive safely and use caution.
A
(Buttons located on Steering Wheel – Type B)
MODE
RES
CRUISE
CAN CELOKSET
MODE
RES
CRUISE
CAN CELOKSET
MODE
C
B
Images are for illustrative purposes only and may not reflect actual feature or operation.
Page 27 of 66
ALWAYS CHECK THE OWNER’S MANUAL FOR COMPLETE OPER ATING INFORMATION AND SAFET Y WARNINGS. *IF EQUIPPED †LEGAL DISCL AIMERS ON BACK INSIDE COVER25
ADVANCED DRIVER ASSISTANCE SYSTEMS (ADAS)
ADAS
Smart Cruise Control (SCC) with Stop & Go*†6 (continued)
REMINDERS: •
The cruise control system will not activate until the brake pedal has been depressed at least once after the ignition is ON or engine starting •
When following a vehicle, the system will automatically adjust your cruise speed based on the vehicle detected in front •
SCC is also canceled when the driver’s door is opened, gear shift is changed out of D (Drive), EPB is activated, and various other conditions. See the Owner’s Manual for other conditions •
If SCC is left on, it can be activated inadvertently. Keep the system off when not in use to avoid setting a speed which the driver is not aware of •
SCC is a supplemental system and is not a substitute for safe driving. It is the responsibility of the driver to always check the speed and distance to the vehicle ahead
•
•The speed setting for SCC can be adjusted under the following conditions:
•You must be traveling at a minimum speed of 20 mph (may vary on newer models)
•
When following a vehicle, there is no minimum speed requirement
•
When following a vehicle, the system can automatically adjust your cruise speed based on the vehicle detected ahead. If the vehicle detected ahead remains at a standstill and your vehicle is also stopped for longer than 3 seconds, the system will need to be reactivated by pressing the gas pedal or pressing the RES button
QUICK TIPS
REMINDERS:
• NSCC-C requires an active navigation subscription
• NSCC-C is only available on controlled access roads and highways
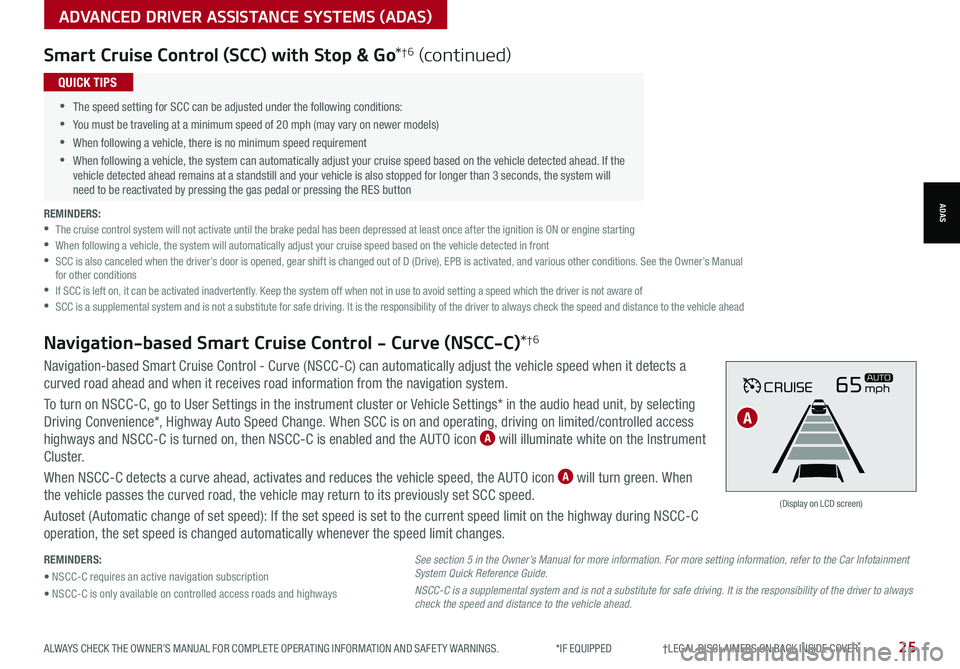
Navigation-based Smart Cruise Control - Curve (NSCC-C) can automatically adjust the vehicle speed when it detects a
curved road ahead and when it receives road information from the navigation system.
To turn on NSCC-C, go to User Settings in the instrument cluster or Vehicle Settings* in the audio head unit, by selecting
Driving Convenience*, Highway Auto Speed Change. When SCC is on and operating, driving on limited/controlled access
highways and NSCC-C is turned on, then NSCC-C is enabled and the AUTO icon A will illuminate white on the Instrument
C lu s t er.
When NSCC-C detects a curve ahead, activates and reduces the vehicle speed, the AUTO icon A will turn green. When
the vehicle passes the curved road, the vehicle may return to its previously set SCC speed.
Autoset (Automatic change of set speed): If the set speed is set to the current speed limit on the highway during NSCC-C
operation, the set speed is changed automatically whenever the speed limit changes.
Navigation-based Smart Cruise Control - Curve (NSCC-C)*†6
CRUISE65mphAUTO
(Display on LCD screen)
See section 5 in the Owner’s Manual for more information. For more setting information, refer to the Car Infotainment System Quick Reference Guide.
NSCC-C is a supplemental system and is not a substitute for safe driving. It is the responsibility of the driver to always check the speed and distance to the vehicle ahead.
A