Page 9 of 66

ALWAYS CHECK THE OWNER’S MANUAL FOR COMPLETE OPER ATING INFORMATION AND SAFET Y WARNINGS. *IF EQUIPPED7
Unplug vehicle to start – When starting
the vehicle while the charging connector is
still connected, this warning message will
appear. Remove the charging connector and
then start the vehicle.
Charge Warning Messages on LCD Display (Continued)
Unplug vehicle to start
Charging Door Open
OPEN
Charging Stopped.Check the AC charger
Charging Stopped.Check the cable connector
Charging Stopped.Check the DC charger
Charging Door Open – When starting the
vehicle while the charging door is still open,
this warning message will appear. Close the
charging door after charging is complete and
then start the vehicle.
Charging Stopped. Check the AC/DC charger – When
there is a problem with the external AC or DC charger, when
the AC charger stops charging or when the charging cable is
damaged, this message will appear. Check whether there is a
problem with the charger or cable. If no problem is found, see
an authorized Kia dealer for further assistance.
Charging Stopped. Check the cable connector – When
the charging connector is not correctly connected to the
charging inlet or the charging connector lock release button is
pressed, this message will appear. If this occurs, separate the
charging connector and re-connect it. Check whether there
is any problem (external damage, foreign substances, etc.)
with the charging connector and charging inlet. If the problem
continues, see an authorized Kia dealer for assistance.
Illustrations are for demonstration purposes only. Some messages may appear differently. See your Owner’s Manual for more information.
REMINDERS:
•
When these warning messages are displayed, do not accelerate or start the vehicle suddenly
•
All stored driving information (except Odometer and Range) is reset if the battery is disconnected
INSTRUMENT CLUSTERINSTRUMENT CLUSTER
Page 10 of 66
†2 3
The TPMS indicator functions as both Low")
*IF EQUIPPED †LEGAL DISCL AIMERS ON BACK INSIDE COVER8NIRO EV FEATURES & FUNCTIONS GUIDE
A
Tire Pressure Monitoring System (TPMS)†2 3
The TPMS indicator functions as both Low Tire Pressure Light and TPMS Malfunction Indicator. The indicator will illuminate if it detects one or more tires is significantly underinflated, the vehicle has a spare tire installed without
TPMS or the outside temperature becomes significantly lower.
The LCD screen in the instrument cluster will display the Low Tire Pressure indicator A showing which tire(s) is underinflated.
Inflate tire(s) to specifications using an accurate digital tire pressure gauge to turn off Low Tire Pressure Light . See front
driver’s door jamb for PSI specification.
When there is a problem with the TPMS, the TPMS Malfunction Indicator will blink for
approximately one minute then illuminate – see dealer for service.25
36 36
PSI
36
•Even with TPMS, tire pressure should be checked manually at least once a month. Only adjust tire pressure on “cold tires” that have been sitting for 20 minutes, and tires that are not hot in temperature from direct sunlight or heat •For proper maintenance and optimal fuel economy, maintain recommended tire inflation pressures and stay within the load limits and weight distribution recommended for your vehicle •In winter or cold weather, the TPMS light may illuminate if the tire pressure was adjusted to the recommended tire inflation pressure during warm weather
QUICK TIP
REMINDERS:
• Check the recommended tire pressure label located on the left side of driver's door jamb, visible when the door is open
• Consult your dealer for service if Low Tire Pressure Light remains illuminated after inflating your tire(s)
Personal electronic devices (such as laptops, wireless chargers, remote start systems, etc.) may interfere with TPMS system, which may cause the Malfunction Warning Indicator (Check Engine Light) to illuminate.
For more information, refer to the Owner’s Manual.
Refer to the inside front cover for more information on QR codes.www.youtube.com/KiaFeatureVideos
QR CODES
Tire Pressure Monitoring System Video
INSTRUMENT CLUSTER
INSTRUMENT CLUSTER
Page 11 of 66

ALWAYS CHECK THE OWNER’S MANUAL FOR COMPLETE OPER ATING INFORMATION AND SAFET Y WARNINGS. *IF EQUIPPED9
Trip Modes / Trip Computer
The Trip Computer is a driver information
system that displays information related
to driving, such as Average and Instant
accumulated info, drive info, driving style
and energy flow. It appears on the display
when the Engine Start /Stop button is in the
ON position.
To cycle through the cluster modes, press
the Mode button A.
When in the Trip Computer mode ,
press the Select /Reset (OK ) button B to
cycle through the screens. When displaying
ACCUMUL ATED INFO or DRIVE INFO
screens, press and hold the OK button B to
reset to zero.
LCD Instrument Cluster Modes
Press Mode button A to scroll through different LCD Instrument Cluster
Modes.
Trip Computer Mode: Displays driving information for
consumption info, accumulated info, drive info, driving style
and energy flow
Turn-by-Turn Mode*: Displays the route guidance, destination info
Driving Assist: Displays Lane Safety, Driver Attention Warning
(DAW ) and TPMS
User Settings Mode: Change settings for driver assistance, doors,
lights, sound, convenience, service interval, other, reset
Master Warning Mode: Informs and only appears when vehicle
systems such as Forward Collision Assist (FCA), Blind-Spot
Collision Warning (BCW ), Smart Cruise Control (SCC), High Beam
Assist (HBA) or others have malfunctioned
Your vehicle’s steering wheel buttons may differ from those in the illustrations.
Driving while distracted is dangerous and should be avoided. Drivers should remain attentive to driving and always exercise caution when using the steering-wheel-mounted controls while driving.
REMINDERS:
•
Appearance of Trip Computer display may differ as equipped
•
All stored driving information (except Odometer and Range) is reset if the battery is disconnected
DRIVING STYLE• Economical %• Normal %• Aggressive %
CONSUMPTION INFO• Average Energy Consumption• Instant Energy Consumption
ACCUMULATED INFO• Tripmeter• Average Energy Consumption• Timer
DRIVE INFO• Tripmeter• Average Energy Consumption• Timer
ENERGY FLOW
Accumulated Info
T rip
Average
Ti mer 247.5
15.7
17:42mi
MPG
h
(Buttons located on Steering Wheel – Type A shown)
MODE
RES
CRUISE
CAN CELOKSET
MODE
RES
CRUISE
CAN CELOKSET
MODE
Refer to the inside front cover for more information on QR codes.www.youtube.com/KiaFeatureVideos
QR CODES
Instrument Cluster’s LCD Display VideoVEHICLESETTINGS
VEHICLE SETTINGS
A
B
Page 12 of 66

*IF EQUIPPED10NIRO EV FEATURES & FUNCTIONS GUIDE
User Settings - Instrument Cluster
To enter the User Settings mode in the LCD Instrument Cluster Modes, press the Mode button A when the vehicle is at a
standstill, Rotary Dial Shifter Knob in Park while the Engine Start /Stop button is in the ON position. Then select User Settings by pressing the Move/Reset (OK ) button.
You can navigate the selections on the display by pressing the OK button B up/down, and then selecting the item by pressing
the OK button B again.
Driving Assistance*:
•Lane Safety
•Driver Attention Warning (DAW )*
•Smart Cruise Control (SCC) Reaction
•Leading Vehicle Departure Alert*
•Lane Follow Assist
•Forward Collision-Avoidance Assist
(FCA)*
•Forward Collision Warning (FCW )*
•Blind-Spot Collision Warning (BCW )
•Rear Cross-Traffic Collision Warning
(RCCW )*
Door:
•Automatically Lock
•Automatically Unlock
•Two Press Unlock
Lights:
•One Touch Turn Signal
•Ambient Light
Brightness
•Ambient Light Color
•Headlamp Delay*
Sound:
•Parking Distance Warning-Forward
Volume*
Convenience:
•Seat Easy Access*
•Utility Mode
•Welcome Mirror/Light
•Wireless Charging System*
•Wiper/Lights Display*
•Auto Rear Wiper
•Smart Regeneration
•Icy Road Warning
Service Interval:
•Enable Service Interval
•Adjust Interval
•Reset
Other features:
•Aux. Battery Saver+
•Energy Consumption Reset
•Temperature Unit
•Tire Pressure Unit
•Instrument Cluster Layout*
Reset
•Choosing reset will restore defaults for all
User Settings menusRefer to the inside front cover for more information on QR codes.www.youtube.com/KiaFeatureVideos
QR CODES
Vehicle & User Settings Video
Ambient, Mood & Theme Lighting Video
VEHICLE SETTINGS
(Buttons located on Steering Wheel – Type B)
MODE
RES
CRUISE
CAN CELOKSET
MODE
RES
CRUISE
CAN CELOKSET
MODE
A
B
VEHICLESETTINGS
Page 13 of 66

ALWAYS CHECK THE OWNER’S MANUAL FOR COMPLETE OPER ATING INFORMATION AND SAFET Y WARNINGS. *IF EQUIPPED11
Service Interval Mode
To enter Service Interval mode, press the Mode button B,
User Settings , then scroll to Service Interval Mode
and press the OK button C. The system will display the
number of miles remaining until next service is due, as
well as type of service.
When service is required, the
following will be displayed:
Service Required
To reset the Service Interval mode
system, press and hold the OK
button C for more than 1 second.
To turn Service In OFF, go to
User Settings.
Service Interval Setting
To set the service interval when in
User Settings mode:
•Press the OK button C up/down
and scroll to Service Interval.
Press the OK button C to enter
•Press the OK button C up/down
and toggle to ON, then press
the OK button C again. Then
press the OK button C to scroll
and select the desired miles or
months for your next service
•Press the OK button C again
(Buttons located on Steering Wheel – Type B)
MODE
RES
CRUISE
CAN CELOKSET
MODE
RES
CRUISE
CAN CELOKSET
MODE
Service in
Off
Service Required
0000mi.
0000mi.
Refer to the inside front cover for more information on QR codes.www.youtube.com/KiaFeatureVideos
QR CODES
Vehicle & User Settings Video
Ambient, Mood & Theme Lighting Video
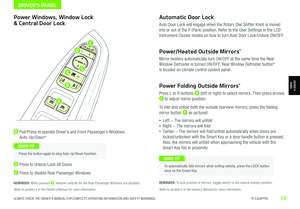
VEHICLESETTINGSVehicle Settings* - Audio Head Unit
To enter the Vehicle Settings mode in the audio head unit A,
press the SETUP hard key on the audio head unit. Then press
VEHICLE onscreen, which will take you to Vehicle Settings.
Use the touchscreen to navigate through the menus.
Vehicle Settings:
Driver Assistance*: Driving
Convenience*, Warning Time*,
Warning Volume*, Driver Attention
Warning*, Forward Safety*, Lane
Safety*, Blind-Spot Safety*,
Parking Safety*
Drive Mode: Drive Mode Alert*
Climate*: Recirculate Air*, Automatic Ventilation*, Defog/Defrost
Options*, Climate Features*
Lights*: Ambient Light*, One Touch Turn Signal*, Headlight
Display*, High Beam Assist*
Door*: Auto Lock*, Auto Unlock*, Walk-Away Lock*, Two-Press
Unlock*, Smart Trunk*
Cluster*: Service Interval*, Energy Consumption Reset*, Content
Selection*, Cluster Voice Guidance Volume*, Welcome Sound*,
Theme Selection*
Convenience*: Rear Occupant Alert*, Welcome Mirror Light*,
Wireless Charging System*, Vehicle Auto-Shut Off*
Seat*: Seat Position Change Alert*, Smart Posture Care*,
Heated/ Ventilated Features*, Seat East Access*, Rear Seat
Heating Control*
Reset*: Reset Vehicle Settings to Factory Defaults
12:00 AM Jan. 1MenuVehicle SettingsDriving Convenience
Drive Mode
Climate
LightsDriver
AssistanceWarning TimingLateWarning VolumeOffDriver Attention Warning
A
C
B
VEHICLE SETTINGS
Page 14 of 66

*IF EQUIPPED12NIRO EV FEATURES & FUNCTIONS GUIDE
C
D
To help reduce energy consumption:
•Drive at a moderate speed, accelerating smoothly and at a moderate rate
•Keep tires inflated to the recommended pressure and wheels aligned properly
QUICK TIP
For more information on Driving Modes, refer to your Owner’s Manual or contact your local dealership.
Drive Modes
Niro EV is equipped with four distinct and customizable driving modes. Press
the Drive Mode button A to select the desired mode.
•ECO+ – This super power-saving mode is designed to help maximize
battery energy. Press and hold the Drive Mode button A to select the
ECO+ mode
•ECO – This mode can help enhance efficiency by managing battery usage
•NORMAL – This mode balances drivability and efficiency
•SPORT – This mode provides enhanced acceleration and dynamic
drivability
An indicator in the instrument cluster will illuminate to show which drive
mode you have selected (no indicator will appear for the NORMAL mode).
Smart ECO pedal guide – When
ECO mode is selected, the instrument
cluster will show 3 efficiency zones
to keep you informed of your power
usage with accelerator pedal input.
B Variable ECO zone
C Variable power zone
D Regeneration/charge zone
NP
PRELEASE
AUTO
HOLD
D
R
DRIVE
MODE
(Button located at right below Rotary Dial Shifter Knob)
Refer to the inside front cover for more information on QR codes.www.youtube.com/KiaFeatureVideos
QR CODES
Drive Mode Integrated Control Video
B
ELECTRIC VEHICLE (EV) FEATURES
ELECTRIC VEHICLE (EV) FEATURES
Power Range
Regeneration Range
Variable ECO Range
A
Page 15 of 66

ALWAYS CHECK THE OWNER’S MANUAL FOR COMPLETE OPER ATING INFORMATION AND SAFET Y WARNINGS. *IF EQUIPPED13
Refer to the inside front cover for more information on QR codes.www.youtube.com/KiaFeatureVideos
QR CODES
Niro EV Charging – Connecting & Disconnecting Video
AUTO
OFF
AUTO
OFF
(Buttons are located left of the Steering Wheel)
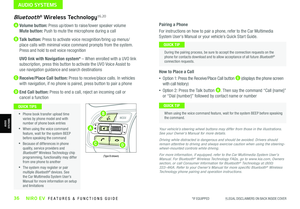
Scheduled Charging*Charging Connector Auto/Lock Mode
Charging times can be set using UVO link with
Navigation* system screen. You can also use the
Scheduled Charging* App on your smartphone.
Charging with the UVO link smartphone app:
The Kia Access with UVO link smartphone app can
help you find the nearest charging station, and also
displays charging status and Scheduled Charging
information. On your smartphone, go to an app store or
marketplace to download the Kia Access with UVO link
smartphone app.
REMINDER: When Scheduled Charging is set and the charger is plugged in, charging of the electric vehicle will not begin until the time and date set.
Deactivate Scheduled Charging - Depress the
Deactivate Scheduled Charging button B to
temporarily disable the scheduled charging feature
when immediate charging is required.
The Charging Connector can be set to be locked or unlocked
while in the charging inlet and charging. Press the AUTO
button A (LED lit) for the connector to lock while charging and
unlock automatically when charging is complete.
When the AUTO button A is not pressed (LED not lit), the
mode will be set to LOCK. The connector will be locked when
charging and remain locked until all doors are unlocked.
REMINDER: For more detail and/or subsequent steps in charging your vehicle, including safety precautions that should be taken, please see the Owner’s Manual.
When you press the Deactivate Scheduled Charging button the reserved charging setting will temporarily disable, and start immediate charging mode. If you need to completely deactivate the scheduled charge setting, change the setting from the audio control unit, or the smartphone Kia Access with UVO link app.
QUICK TIP
• If in lock mode & the doors are unlocked, the charging connector unlocks, but if the charging cable is not disconnected within 10 seconds, the connector will be automatically locked again
• If the charging connector is unlocked but all the doors are locked again, immediately, the connector will be automatically locked again
QUICK TIPS
AB
ELECTRIC VEHICLE (EV) FEATURES
ELECTRIC VEHICLE (EV) FEATURES
Page 16 of 66

*IF EQUIPPED14NIRO EV FEATURES & FUNCTIONS GUIDE
A
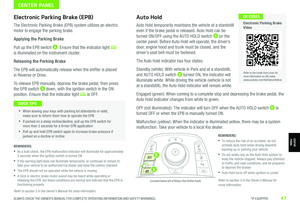
Level 1 Charging – “Trickle” Charge
A Level 1 or “trickle” charger is the most common type of charging system for an electric vehicle.
This type of charger uses 120 volts/12 amps of household electricity and takes up to 60 hours for a
full charge.
Trickle Charger Indicators:
A 12 0 VA C plug
B Power – Indicates that the charger and AC plug
is plugged in and functioning
C Charge – Indicates that the vehicle is charging
D Fault – Indicates charge failure
E Charge Level – Indicates the level of charge
– L (8A), M (10A), or H (12A)
F ICCB – In-Cable Control Box
REMINDER: Do not use an extension cord. Plug trickle charger directly into wall socket. Do not charge to a receptacle that is not a dedicated circuit, old, damaged, corroded or cracked.
Level 2 Charging – “Normal” Charge
A Level 2 or “normal” 240-volt /32-amp charger is the recommended charging system for your
electric vehicle. This type of charger uses 240 volts of electricity and takes approximately 9.6 hours
for a full charge. This charger may be able to be installed at your home or can be found at a public
charging station.
REMINDER: Shape of charger and how to use the charger may be different for each manufacturer. Please see Owner’s Manual for more information.
Level 3 Charging* – “Quick” Charge (DC)
A Level 3 or “quick” DC charger is usually found at public charging stations. This type of DC charge
may charge an electric vehicle in as little as 60 minutes to about an 80% charge.
Charging Your Electric Vehicle
A Level 2 or “normal” 240-volt /32-amp charger is recommended for regular charging of the vehicle.
QUICK TIP
REMINDER: For more detail and/or subsequent steps in charging your vehicle, including safety precautions that should be taken, please see the Owner’s Manual.
For more information on Level 3 Charging, refer to the Owner’s Manual.
POWER
CHARGE
FA U LT!
LEVELLMH
Refer to the inside front cover for more information on QR codes.www.youtube.com/KiaFeatureVideos
QR CODES
Niro EV Charging – Connecting & Disconnecting Video
ELECTRIC VEHICLE (EV) FEATURES
ELECTRIC VEHICLE (EV) FEATURES
C
D
E
F
B