Page 17 of 58
�")
15ALWAYS CHECK THE OWNER’S MANUAL FOR COMPLETE OPER ATING INFORMATION AND SAFET Y WARNINGS. *IF EQUIPPED †LEGAL DISCL AIMERS ON BACK INSIDE COVER
Lane Following Assist (LFA)†6a
Lane Following Assist monitors lane lines and adjusts the steering to help
position the vehicle in the center of the lane.
To enable or disable LFA, go to the User Settings* on the Instrument Cluster
LCD or the Vehicle Settings* on the audio head unit. Go to Vehicle
> Driver Assistance > Driving Assist > Lane Following Assist.
To activate or deactivate the LFA system press the LFA button A on the
Steering Wheel.
When LFA is activated and detects lane markers and/or a preceding vehicle,
the LFA indicator will illuminate green if the steering assist mode is on, or
white if the steering assist mode is off.
LFA will operate only when these conditions are met:
•When Smart Cruise Control is on and operating
•The vehicle is traveling slower than 110 mph
•LFA recognizes the lane the vehicle is traveling in
Image is for illustrative purposes only and may not reflect actual feature or operation.
REMINDERS:
•
If the ignition is cycled, the LFA returns to its previous state, on or off
•
LFA is not a substitute for safe and proper driving. Always drive safely and use caution
See section 5 in the Owner’s Manual for more detailed information, limitations and conditions.
( Type B; Buttons located on Steering Wheel)
A
ADVANCED DRIVER ASSISTANCE SYSTEMS (ADAS)
ADAS
Page 18 of 58

16*IF EQUIPPED †LEGAL DISCL AIMERS ON BACK INSIDE COVERK5 FEATURES & FUNCTIONS GUIDE
Images are for illustrative purposes only and may not reflect actual feature or operation.
See section 5 in the Owner’s Manual for more information.
mph
60mph
REMINDERS:
• Current highway speeds and controlled or limited access roads information may vary. Future navigation updates may change this information. See owner’s manual for more information
• When the ignition is cycled, the system returns to its previous state, on or off
Highway Driving Assist is not a substitute for safe driving, may not detect all objects around the vehicle, and only functions on certain federal highways. Always drive safely and use caution. See the Owner’s Manual for more detailed information, limitations and conditions.
Highway Driving Assist (HDA)*†6a
Highway Driving Assist (HDA) is designed to adjust the speed of the vehicle when driving on limited/controlled access
highways. The system can adjust the vehicle’s speed based on available highway speed information. The automatic speed
setting mode is designed to set the speed automatically by adjusting to the current speed limits of the highway vehicle is
travelling on.
To enable HDA, go to User Settings in the Instrument cluster or the Vehicle Settings* in the audio head unit. Go to Driver
Assistance > Driving Assist > Highway Driving Assist.
To activate HDA, turn Smart Cruise Control (SCC) on by pressing the Driving Assist (Cruise) button A on the Steering
Wheel controls.
HDA will operate only when these conditions are met:
• When the SCC speed is set to current highway and controlled/limited access roads
•The vehicle is traveling slower than 110 mph
•
When driving on limited access highways, such as, Interstate, Federal and State freeways
•
When SCC is on and operating
When HDA is activated and the conditions are met, the Instrument Cluster indicator light B will illuminate green. If the
conditions are not met, HDA will be in standby mode and the indicator light B will illuminate white.
When in operation, and if both lanes are recognized, a display C will show the lanes illuminated white and the steering
wheel indicator illuminated green.
If HDA is activated, conditions are met and the SCC speed is set by the driver (at the posted highway speed limit), HDA
will enter the automatic speed setting mode. The set speed and AUTO will be displayed D in green and an audible alert
will sound.
ADVANCED DRIVER ASSISTANCE SYSTEMS (ADAS)
ADAS
( Type B Steering Wheel controls)
A
E
B
C
D
Page 19 of 58

17ALWAYS CHECK THE OWNER’S MANUAL FOR COMPLETE OPER ATING INFORMATION AND SAFET Y WARNINGS. *IF EQUIPPED †LEGAL DISCL AIMERS ON BACK INSIDE COVER
ADVANCED DRIVER ASSISTANCE SYSTEMS (ADAS)
ADAS
Driver Attention Warning (DAW)†6b
DAW is designed to detect inattentive driving practices and, in certain situations, can give a
warning signal to take a break from driving.
DAW is set to ON by default. To turn DAW OFF, turn the ignition on and then select User
Settings in the LCD Display on the Instrument Cluster or Vehicle Settings* in the audio head
unit. Go to Driver Assist and select Driver Attention Warning. Set Warning Timing to Normal or
Late Warning Timing.
Driver Attention Warning modes:
OFF: The Driver Attention Warning system is deactivated
Normal: The Driver Attention Warning system alerts the
driver of inattentive driving practices
Late: The Driver Attention Warning system alerts the driver of inattentive driving practices later
than in Normal mode
If the DAW System is activated, the DAW information will appear on the LCD Display A when
you select the Driving Assist mode .
A message, “Consider taking a break,” appears on the LCD display and a warning sounds to
advise the driver to take a break when the driver’s attention level is below one bar.
REMINDERS:
•
The setup of the DAW system will be maintained, as selected, when the ignition is cycled
•
When activated, the DAW system does not display the “Consider taking a break” message when the total trip driving time is less than 10 minutes
Driver Attention Warning is not a substitute for safe driving and may not detect all instances of inattentive driving practices. Failure to pay attention to travel conditions and vehicle operation could result in loss of vehicle control. Always drive safely and use caution.
For illustrative purposes only. Your actual display, buttons and/or features may vary.
0
20
40 60
80
100
120
140
160
180
200
220
240
260
0
1 2
3
4
5
6
7
8km/h
EPB
C H
x1000rpm
0
20 40
60
80
100
120
1 40
1 60
E
F
MPHP
Check Driver
Attention Warning (DAW) System
59
Page 20 of 58
*†6a
Safe Exit Assist (SE A) can help prevent passengers from openin")
18*IF EQUIPPED †LEGAL DISCL AIMERS ON BACK INSIDE COVERK5 FEATURES & FUNCTIONS GUIDE
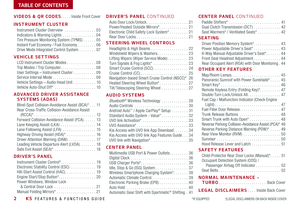
Safe Exit Assist (SEA)*†6a
Safe Exit Assist (SE A) can help prevent passengers from opening their
door by displaying a warning message on the Instrument Cluster and
sounding an audible warning when a vehicle is detected, approaching
from behind, and after your vehicle has stopped.
To turn on SE A, go to User Settings in the Instrument cluster or the
Vehicle Settings* in the audio head unit, select Driver Assistance, then
Blind-Spot Safety, and select Safe Exit Assist.
See section 4 in the Owner’s Manual for more information.
Image is for illustrative purposes only and may not reflect actual feature or operation.
Watch for traffic
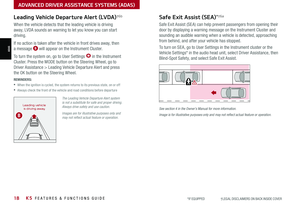
Leading Vehicle Departure Alert (LVDA)†6b
When the vehicle detects that the leading vehicle is driving
away, LVDA sounds an warning to let you know you can start
driving.
If no action is taken after the vehicle in front drives away, then
a message B will appear on the Instrument Cluster.
To turn the system on, go to User Settings in the Instrument
Cluster. Press the MODE button on the Steering Wheel, go to
Driver Assistance > Leading Vehicle Departure Alert and press
the OK button on the Steering Wheel.
REMINDERS:
•
When the ignition is cycled, the system returns to its previous state, on or off
•Always check the front of the vehicle and road conditions before departure
The Leading Vehicle Departure Alert system is not a substitute for safe and proper driving. Always drive safely and use caution.
Images are for illustrative purposes only and may not reflect actual feature or operation.
Leading vehicleis driving away
B
ADVANCED DRIVER ASSISTANCE SYSTEMS (ADAS)
ADAS
Page 21 of 58

19ALWAYS CHECK THE OWNER’S MANUAL FOR COMPLETE OPER ATING INFORMATION AND SAFET Y WARNINGS. *IF EQUIPPED †LEGAL DISCL AIMERS ON BACK INSIDE COVER
(Located left of Steering Wheel)
Instrument Cluster Control
Press left /right side of switch A to adjust the display brightness of the
instrument panel illumination.
REMINDER: Instrument Cluster Control does not change brightness when lights are turned off.
See section 5 in the Owner’s Manual for more information.
Electronic Stability Control (ESC)†7
ESC is designed to help stabilize the vehicle during certain cornering maneuvers.
It is a good idea to keep ESC turned ON for daily driving whenever possible.
Press ESC OFF button B to disable Traction Control in ESC (ESC OFF indicator
will illuminate).
To turn both Traction Control and Stability Control off, press and hold ESC OFF
button B (ESC OFF indicator will illuminate, and an alert sounds).
REMINDERS:
•ESC is active by default at vehicle startup. When ignition is cycled, ESC will turn ON again
•
The ESC Indicator Light in the Instrument Cluster will illuminate whenever ESC is in operation
See section 5 in the Owner’s Manual for more information.
For illustrative purposes only. Your actual display, buttons and/or features may vary.
Hill-Start Assist Control (HAC)†7
HAC can help prevent the vehicle from rolling backward, for two seconds,
when accelerating from a stop while on a steep incline.
HAC automatically activates whether the ESC is OFF or ON but does NOT
activate when the ESC has malfunctioned.
REMINDERS:
•HAC does not operate when the gear shift is in the P (Park) or the N (Neutral) position
•In the event of HAC system malfunction, see an authorized Kia dealer for service
•HAC does not replace the need to apply brakes while the vehicle is stopped on an incline
•When HAC is active (e.g., accelerating from a stop on an incline), you may notice that the brakes will momentarily remain engaged after you depress the accelerator
•HAC provides a two-second delay before the vehicle may start rolling backward
QUICK TIPS
AB
See section 5 in the Owner’s Manual for more information.
DRIVER'S PANEL
DRIVER’SPANEL
Page 22 of 58

Engine Start/Stop Button*†8
To start the engine:
1. Dep")
20K5 FEATURES & FUNCTIONS GUIDE*IF EQUIPPED †LEGAL DISCL AIMERS ON BACK INSIDE COVER
(Located right of Steering Wheel)
Engine Start/Stop Button*†8
To start the engine:
1. Depress the brake pedal
2.
Press the ENGINE START/STOP button A while the gear shift is in
P (Park) or N (Neutral)
To turn the engine OFF, press the ENGINE START/STOP button.
To use the ENGINE START/STOP button, you must have the Smart Key
fob on your person.
REMINDERS:
•
In an emergency situation while the vehicle is in motion, you are able to turn the engine off and to the ACC position by pressing the ENGINE START/STOP button for more than 2 seconds or 3 times successively within 3 seconds
•
If the Smart Key battery is weak or not working properly, hold the Smart Key fob up to the ENGINE START/STOP button (Lock button side closest) and press to start engine
For illustrative purposes only. Your actual display, buttons and/or features may vary.
See section 5 in the Owner’s Manual for more information.
To use electrical accessories:
ACC position
•When in the OFF position and without depressing the brake pedal, press the ENGINE START/STOP button once
ON position
•When already in the ACC position and without depressing the brake pedal, press the ENGINE START/STOP button again
•
When in the OFF position and without depressing the brake pedal, press the ENGINE START/STOP button twice
Keeping the vehicle in ACC or ON position without turning the engine on may discharge the vehicle’s battery
QUICK TIPS
To view a video on your mobile device, snap these QR Codes or visit the listed website. Refer to inside front cover information.
Engine Start/Stop Button & Smart Key Video
Kia Key Fob Video
www.youtube.com/KiaFeatureVideos
www.youtube.com/KiaFeatureVideos
QR CODES
ENGINE
START
STOP
A
DRIVER'S PANEL
DRIVER’SPANEL
Page 23 of 58

21ALWAYS CHECK THE OWNER’S MANUAL FOR COMPLETE OPER ATING INFORMATION AND SAFET Y WARNINGS. *IF EQUIPPED
DRIVER'S PANEL
DRIVER’SPANEL
Power Windows, Window Lock & Central Door Lock
A Pull/Press to operate Driver’s and Front Passenger’s Windows Auto-Up/Down*
B Press to Unlock /Lock All Doors
C Press to disable Rear Passenger Windows / activate Electronic
Child Safety Lock System
REMINDER: When C is pressed, window controls for the Rear Passenger Windows are disabled
See section 4 in the Owner’s Manual for more information.
Auto Door Lock/Unlock
Auto Door Lock /Unlock will engage when the gear shift is
moved into or out of the P (Park) position. Refer to the User
Settings in the LCD Instrument Cluster modes on how to
turn Auto Door Lock /Unlock ON/OFF.
See section 4 in the Owner’s Manual for more information.
Power/Heated Outside Mirrors*
Mirror heaters controlled with Rear Defroster. Use mirror to
defog/deice side mirrors.
Move toggle switch D left or right to select mirror. Then
press arrows E left /right or up/down to adjust mirror
position.
See section 4 in the Owner’s Manual for more information.
Electronic Child Safety Lock System
Press button C to lock the rear passenger doors. An
indicator will illuminate showing the system is active.
This system is on by default, and then activated once the
button C is pressed. To deactivate, press the button again.
See section 4 in the Owner’s Manual for more information.
Rear Door Locks
If the inner door handle is pulled once when the door is
locked, the door will unlock. If the inner door handle is
pulled once more, the door will open.
Press button again to stop Auto-Up/Down function.
QUICK TIP
To open the Rear Doors, pull the inner door handles two times.
QUICK TIPButton configuration may vary depending on vehicle model.
Manual Folding Mirrors*
To fold the mirrors in manually, pull the
mirror towards the window.
If needed, pull the mirror firmly until it folds
QUICK TIP
L RL R
A
B
C
D
E
See section 4 in the Owner’s Manual for more information.
See section 4 in the Owner’s Manual for more information.
•
While driving with the rear windows down or with the sunroof* in an open or partially open position, a wind buffeting or pulsation noise may be heard. This noise is a normal occurrence and can be reduced or eliminated by the following:
• If the noise occurs with one or both of the rear windows down, partially lower both front windows approximately 1 inch
• If the noise occurs with the sunroof open, slightly reduce the size of the sunroof opening
QUICK TIPS
Page 24 of 58
 - DRL may help others to see the
front of your vehicle during the day. The l")
STEERING WHEEL CONTROLS
STEERING WHEEL CONTROLS
*IF EQUIPPED22K5 FEATURES & FUNCTIONS GUIDE
Daytime Running Lights (DRL) - DRL may help others to see the
front of your vehicle during the day. The lights will turn on automatically
when the ignition or Engine Start /Stop button is ON and the headlight
switch is in the AUTO position, unless one of the following occurs:
• Headlights are on
• Parking brake is applied
• Engine is turned off
• Switch is in the DRL OFF position
Headlight position
Parking light position
AUTO*Auto Light / HBA
OFFOFF position
Headlights & High Beams
To o p e r a t e :
•Rotate lever A to change the Headlight function
•Push lever to turn High Beams ON B
•Pull lever to flash Headlights/High Beams B
REMINDERS:
• High Beam Assist does not operate below certain speeds, or in some lighting and driving conditions. Please be aware of your surroundings and exercise proper road etiquette when operating a vehicle using the high beams
• DRL only operates during the daytime
• HBA will operate when vehicle speed exceeds 25 mph
• If the lever is pushed away from you while HBA is operational, HBA will turn off and the high beams will be on continuously. If the lever is pulled toward you while HBA is operational, HBA will turn off
• If the light switch is switched to the headlight position, HBA will turn off and low beams will be on continuously
• When the HBA indicator illuminates on the instrument cluster, the HBA is not working properly. See an authorized Kia dealer for service
See section 4 in the Owner’s Manual for more information.
AUTO Light position – When the light switch is in the AUTO Light position, the taillights and headlights
will turn ON/OFF automatically depending on the amount of light outside the vehicle.
High Beam Assist (HBA) – High Beam Assist is designed to automatically adjust the headlight range by
switching between high and low beams based on light detected from other vehicles and road conditions.
To enable HBA, toggle the light switch to the AUTO Light position and turn on the high beams by pushing
the lever away from you. The High Beam Assist indicator will illuminate.
OFFAUTO
OFFAUTO
0
20
40 60
80
100
120
140
160
180
200
220
240
260
0
1 2
3
4
5
6
7
8km/h
EPB
C H
x1000rpm
0
20 40
60
80
100
120
1 40
1 60
E
F
MPHP
One Touch Turn Si...
Back
Off
3 flashes
5 flashes
7 flashes
59