Page 327 of 378
NOTE:
• To view a Blu-ray disc on the radio, press
the “Media” button on the touchscreen,
and then press the “Disc” button. Press the
“Play” button, and then the “full screen”
button.
• Viewing a Blu-ray disc on the radio screen is
not available in all states/provinces. The
vehicle must be stopped, and the gear se-
lector must be in the PARK position for
vehicles with automatic transmission.
325
Page 328 of 378
Using The Touchscreen Radio
Rear Media Control Screen
MULTIMEDIA
326
Page 329 of 378

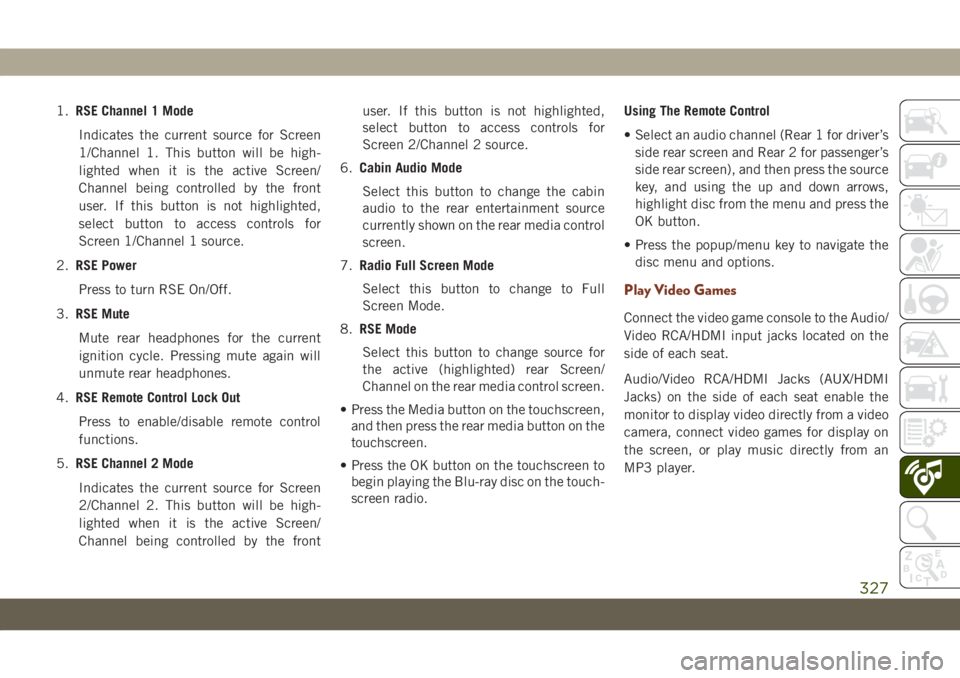
1.RSE Channel 1 Mode
Indicates the current source for Screen
1/Channel 1. This button will be high-
lighted when it is the active Screen/
Channel being controlled by the front
user. If this button is not highlighted,
select button to access controls for
Screen 1/Channel 1 source.
2.RSE Power
Press to turn RSE On/Off.
3.RSE Mute
Mute rear headphones for the current
ignition cycle. Pressing mute again will
unmute rear headphones.
4.RSE Remote Control Lock Out
Press to enable/disable remote control
functions.
5.RSE Channel 2 Mode
Indicates the current source for Screen
2/Channel 2. This button will be high-
lighted when it is the active Screen/
Channel being controlled by the frontuser. If this button is not highlighted,
select button to access controls for
Screen 2/Channel 2 source.
6.Cabin Audio Mode
Select this button to change the cabin
audio to the rear entertainment source
currently shown on the rear media control
screen.
7.Radio Full Screen Mode
Select this button to change to Full
Screen Mode.
8.RSE Mode
Select this button to change source for
the active (highlighted) rear Screen/
Channel on the rear media control screen.
• Press the Media button on the touchscreen,
and then press the rear media button on the
touchscreen.
• Press the OK button on the touchscreen to
begin playing the Blu-ray disc on the touch-
screen radio.Using The Remote Control
• Select an audio channel (Rear 1 for driver’s
side rear screen and Rear 2 for passenger’s
side rear screen), and then press the source
key, and using the up and down arrows,
highlight disc from the menu and press the
OK button.
• Press the popup/menu key to navigate the
disc menu and options.
Play Video Games
Connect the video game console to the Audio/
Video RCA/HDMI input jacks located on the
side of each seat.
Audio/Video RCA/HDMI Jacks (AUX/HDMI
Jacks) on the side of each seat enable the
monitor to display video directly from a video
camera, connect video games for display on
the screen, or play music directly from an
MP3 player.
327
Page 335 of 378
UCONNECT PHONE
Uconnect Phone (Bluetooth Hands Free Calling)
Uconnect 4 With 7–inch Display Radio Phone Menu
1 — Favorite Contacts
2 — Mobile Phone Battery Life
3 — Currently Paired Mobile Phone
4 — Siri
5 — Mute Microphone
6 — Transfer To/From Uconnect System
7 — Conference Call*
8 — Phone Settings
9 — Text Messaging**10 — Direct Dial Pad
11 — Recent Call Log
12 — Browse Phone Book Entries
13 — End Call
14 — Call/Redial/Hold
15 — Do Not Disturb
16 — Reply with Text Message
*—
Conference call feature only available on GSM mobile devices
** — Text messaging feature not available on all mobile phones (re-
quires Bluetooth MAP profile)
333
Page 337 of 378

The Uconnect Phone feature enables you to
place and receive hands-free mobile phone
calls. Drivers can also place mobile phone
calls using their voice or by using the buttons
on the touchscreen (see Voice Command sec-
tion).
The hands-free calling feature is made pos-
sible through Bluetooth technology — the
global standard that enables different elec-
tronic devices to connect to each other wire-
lessly.
If the Uconnect Phone Button
exists on
your steering wheel, you then have the
Uconnect Phone features.
NOTE:
• The Uconnect Phone requires a mobile
phone equipped with the Bluetooth Hands-
Free Profile, Version 1.0 or higher.
• Most mobile phones/devices are compat-
ible with the Uconnect system, however
some mobile phones/devices may not be
equipped with all of the required features to
utilize all of the Uconnect system features.
For Uconnect Customer Care:
• Visit DriveUconnect.eu
Pairing (Wirelessly Connecting) Your
Mobile Phone To The Uconnect System
Mobile phone pairing is the process of estab-
lishing a wireless connection between a cel-
lular phone and the Uconnect system.
NOTE:
• To use the Uconnect Phone feature, you
first must determine if your mobile phone
and software are compatible with the
Uconnect system. Please visit
DriveUconnect.eu for complete mobile
phone compatibility information.
• Mobile phone pairing is not available while
the vehicle is in motion.
• A maximum of ten mobile phones can be
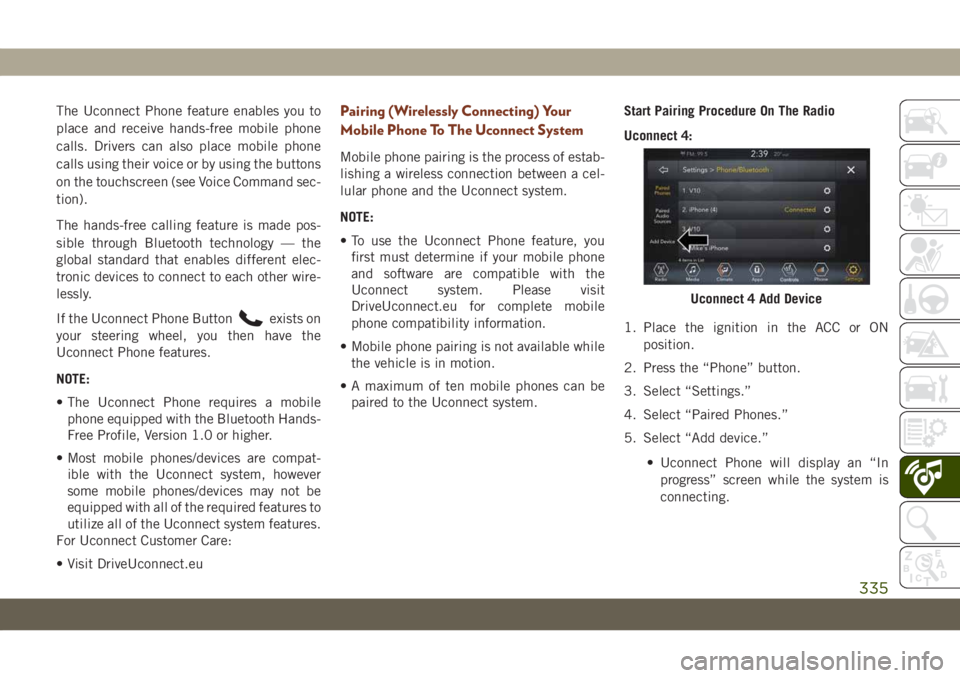
paired to the Uconnect system.Start Pairing Procedure On The Radio
Uconnect 4:
1. Place the ignition in the ACC or ON
position.
2. Press the “Phone” button.
3. Select “Settings.”
4. Select “Paired Phones.”
5. Select “Add device.”
• Uconnect Phone will display an “In
progress” screen while the system is
connecting.
Uconnect 4 Add Device
335
Page 341 of 378

Voice Command Tips
• Speaking complete names (i.e; Call John
Doe vs. Call John) will result in greater
system accuracy.
• You can “link” commands together for
faster results. Say “Call John Doe, mobile,”
for example.
• If you are listening to available voice com-
mand options, you do not have to listen to
the entire list. When you hear the command
that you need, push the
button on the
steering wheel, wait for the beep and say
your command.
Changing The Volume
• Use the radio VOLUME rotary knob to ad-
just the volume to a comfortable level while
the Uconnect system is speaking.
NOTE:
The volume setting for Uconnect is different
than the audio system.
• Start a dialogue by pushing the VR button
, then say a command. For example,
"Help".NOTE:
To access help, push the Uconnect VR button
(if active) on the steering wheel and say,
"Help." Push the Uconnect VR Pickup button
(if active) or the VR button(if
active) and say, "Cancel" to cancel the help
session.
Using Do Not Disturb
With Do Not Disturb, you can disable notifi-
cations from incoming calls and texts, allow-
ing you to keep your eyes on the road and
hands on the wheel. For your convenience,
there is a counter display to keep track of your
missed calls and text messages while you
were using Do Not Disturb.
Do Not Disturb can automatically reply with a
text message, a call, or both, when declining
an incoming call and send it to voicemail.
Automatic reply messages can be:
• “I am driving right now, I will get back to
you shortly.”
• Create a custom auto reply message up to
160 characters.While in Do Not Disturb, Conference Call can
be selected so you can still place a second
call without being interrupted by incoming
calls.
NOTE:
• Only the beginning of your custom message
will be seen on the touchscreen.
• Reply with text message is not compatible
with iPhones.
• Auto reply with text message is only avail-
able on phones that support Bluetooth
MAP.
Incoming Text Messages
After pairing your Uconnect system with a
Bluetooth enabled mobile device with the
Message Access Profile (MAP), the Uconnect
system can announce a new incoming text
message and read it to you over the vehicle’s
audio system.
NOTE:
Only incoming text messages received during
the current ignition cycle can be viewed/read.
339
Page 344 of 378

If you see the NAV icon on the bottom bar, or
in the Apps menus, of your 8.4-inch touch-
screen, you have the Uconnect 4C NAV sys-
tem. If not, you have a Uconnect 4C with
8.4-inch display system.
Get Started
All you need to control your Uconnect system
with your voice are the buttons on your steer-
ing wheel.
Helpful hints for using Voice Recognition:
• Visit DriveUconnect.eu or see an autho-
rized dealer to check mobile device and
feature compatibility and to find phone
pairing instructions.
• Reduce background noise. Wind and pas-
senger conversations are examples of noise
that may impact recognition.
• Speak clearly at a normal pace and volume
while facing straight ahead. The micro-
phone is positioned on the rearview mirror
and aimed at the driver.
• Each time you give a Voice Command, you
must first push either the Voice Recogni-
tion (VR) or Phone button, wait untilafter
the beep, then say your Voice Command.
• You can interrupt the help message or sys-
tem prompts by pushing the VR or Phone
button and saying a Voice Command from
the current category.
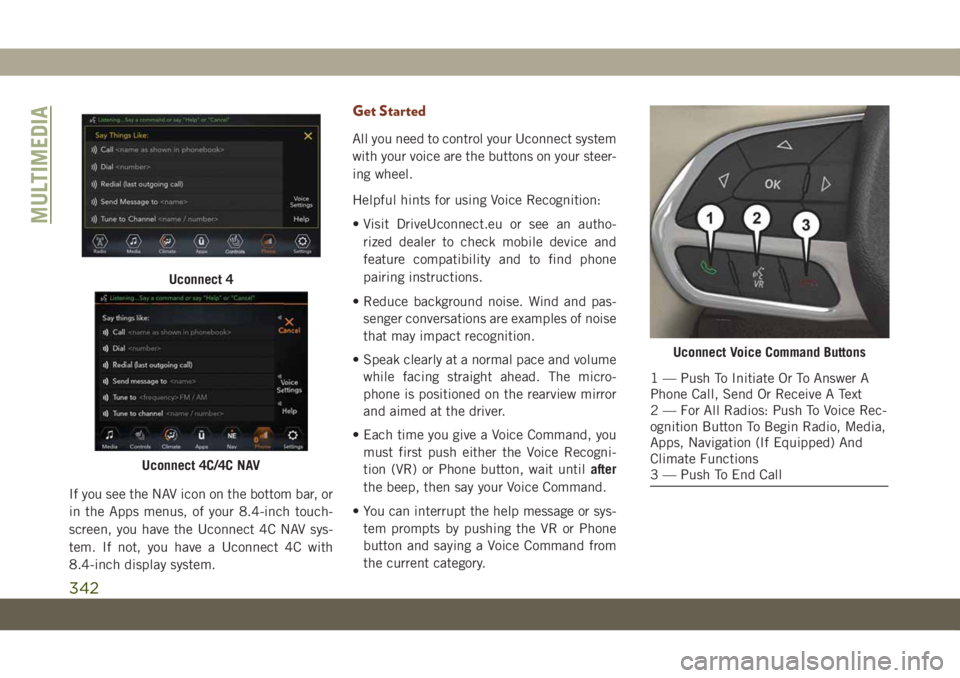
Uconnect 4
Uconnect 4C/4C NAV
Uconnect Voice Command Buttons
1 — Push To Initiate Or To Answer A
Phone Call, Send Or Receive A Text
2 — For All Radios: Push To Voice Rec-
ognition Button To Begin Radio, Media,
Apps, Navigation (If Equipped) And
Climate Functions
3 — Push To End Call
MULTIMEDIA
342
Page 345 of 378

Basic Voice Commands
The basic Voice Commands below can be
given at any point while using your Uconnect
system.
Push the VR button
. After the beep,
say:
•“Cancel” to stop a current voice session
•“Help” to hear a list of suggested Voice
Commands
•“Repeat” to listen to the system prompts
again
Notice the visual cues that inform you of your
voice recognition system’s status. Cues ap-
pear on the touchscreen.
Radio
Use your voice to quickly get to the AM, FM or
DAB radio stations you would like to hear.
Push the VR button
. After the beep,
say:
•“Tune toninety-five-point-five FM”TIP:At any time, if you are not sure of what to
say or want to learn a Voice Command, push
the VR button
and say “Help.” The
system provides you with a list of commands.
Media
Uconnect offers connections via USB,
Bluetooth and auxiliary ports (If Equipped).
Voice operation is only available for con-
nected USB and AUX devices.
Push the VR button
. After the beep, say
one of the following commands and follow
the prompts to switch your media source or
choose an artist.
•“Change source toBluetooth”
•“Change source toAUX”
•“Change source toUSB”
•“Play artistBeethoven”; “Play albumGreat-
est Hits”; “Play songMoonlight Sonata”;
“Play genreClassical”
TIP:Press the Browse button on the touch-
screen to see all of the music on your USB
device. Your Voice Command must match
exactlyhow the artist, album, song and genre
information is displayed.
Uconnect 4 Radio
Uconnect 4C/4C NAV Radio
343