Page 9 of 36
6
Meters and Gauges
Tachometer
Engine coolant temperature gauge
Shift lever indicator
Vehicle information display
Speedometer
Fuel gauge
Page 10 of 36

The remote engine start system must be enabled in the vehicle settings within the lower display. To start your
vehicle remotely:
1. Press the lock button")
7
REMOTE ENGINE START (IF SO EQUIPPED)
The remote engine start system must be enabled in the vehicle settings within the lower display. To start your
vehicle remotely:
1. Press the lock button to lock the vehicle.
2. Press and hold the remote engine start button within 5 seconds of pressing the lock button and the
engine will start.
To start driving, depress the brake pedal and push the ignition switch START/STOP button to the ON position.
State laws may apply, review local laws before using.
LOCKING AND UNLOCKING THE VEHICLE
• The lock and unlock operating range of the Intelligent Key is within 31.5 in (80 cm) from each request switch.
• To lock the vehicle, push either door handle request switch once or press the lock button on the key fob.
• To unlock the vehicle, perform one of the following procedures:
• Push either door handle request switch once; the corresponding door will unlock. Push the door handle
request switch again within 60 seconds; all other doors will unlock, or
• Press the unlock button on the key fob to unlock the driver’s side door. Press the unlock button again;
all other doors will unlock.Please see your Owner’s Manual for important safety information, system limitations, and additional operating and feature information.
Infiniti Intelligent Key System
Page 11 of 36
8
• To slide the seat forward or backward, push the switch forward or backward.
• To recline the seatback, push the switch forward or backward.
SEAT LIFTER
• To adjust the angle of the front portion or height of the seat, push the front or rear end of the switch up or down.
LUMBAR SUPPORT
• Push each side of the adjusting switch to adjust the seat lumbar area until the desired position is achieved.
SEAT/STEERING POSITIONING ON EXIT
• The shift lever must be in P (PARK) position with the ignition switch in the OFF position.
• The entry/exit function can be activated by pushing SET switch , located on the driver’s side door, and then
the corresponding seat switch .
Please see your Owner’s Manual for important safety information, system limitations, and additional operating and feature information.
Seat Adjustments
Page 12 of 36
. The system is
activated when a rear door is opened and closed within 10")
9
The Rear Door Alert functions under certain conditions to indicate
there may be an object or passenger in the rear seat(s). The system is
activated when a rear door is opened and closed within 10 minutes of
the vehicle being driven.
TURNING THE REAR DOOR ALERT SYSTEM ON:
• Push the Rear Door Alert switch . The Rear Door Alert switch indicator light will illuminate.
TURNING THE REAR DOOR ALERT SYSTEM OFF:
• Push the Rear Door Alert Switch again. The Rear Door Alert Switch Indicator light
will go off.
TO DISABLE THE REAR DOOR ALERT SYSTEM:
• When the vehicle is in the P (Park) position, a
message will appear in the vehicle information
display
. The options “DISMISS” o r “ DISABLE
ALERT” will be listed.
• Push the switch to select “DISMISS” to
clear the display. If no selection is made, the
message turns off after a period of time.
• Push the switch to select “DISABLE ALERT” to disable the horn alert for
the remainder of the current trip.
Please see your Owner’s Manual for important safety information,
system limitations, and additional operating and feature information.
Rear Door Alert Head Restraint Adjustment
To raise the head restraint: Pull the head restraint up.
To lower the head restraint: Push and hold the lock
knob
and push the head restraint down.
Make sure the head restraint is fully engaged in
position after any adjustment.
Please see your Owner’s Manual for important safety information,
system limitations, and additional operating and feature information.
Page 13 of 36

10
All power windows can be operated through the main
switch on the driver’s door.
Power windows open/close
Disable passengers’ window operation
POWER WINDOW CONVENIENCE OPENING/
CLOSING FEATURE
To unlock the vehicle and open the windows
simultaneously, press and hold the
button on
the Intelligent Key for about 3 seconds after the door
is unlocked.
To stop opening, release the
button .
The window cannot be closed using the Intelligent Key.
Using the mechanical key:
Insert the mechanical key and turn the driver’s door key cylinder
to the rear of the vehicle for longer than 1 second. The door is
unlocked and the window keeps opening while turning the key.
To close the windows, turn the driver’s door key cylinder to the
front of the vehicle for longer than 1 second. The door is locked and
the window keeps closing while turning the key.
Please see your Owner’s Manual for important safety information, system limitations, and
additional operating and feature information.
Windows
You can switch between the conventional rearview mirror mode and Smart Rear View Mirror mode
(camera view mode) by using the mode select lever
.
• When the Smart Rear View Mirror mode is on,
the settings menu can be selected by pressing the
menu button
.
• Press the adjustment buttons to adjust the
following settings:
• Brightness • Down/Up • Left/right
• Indication • Language • Rotation
• Dimming Mirror
Please see your Owner’s Manual for important safety information,
system limitations, and additional operating and feature information.
Smart Rear View Mirror
(if so equipped)
Page 14 of 36

11
To complete HomeLink® programing, you can download the HomeLink app or read the
instructions below.
Before you start programing HomeLink
®, park outside and within range of your garage.
Then, clear the area around your garage door, place the ignition switch in the ON or
ACC position and locate the remote control transmitter, ensuring a fresh battery is
installed. Please note, a ladder and secondary person may be needed.
To program HomeLink:
1. Position the handheld transceiver within 3 in (8 cm) from the HomeLink surface.
2. Press and hold the desired HomeLink and garage door opener button. Release both when the indicator
flashes rapidly (if so equipped) or “TRAINED” (if so equipped) is displayed in the status area of the mirror.
Before proceeding to the next steps, be sure your garage door is not moving.
• Press the HomeLink button for 2 seconds up to 3 times. If the garage door responds, training is complete.
If the garage door doesn’t respond:
• Press the “learn” or “set” button on the garage opener until an indicator illuminates. Within 30 seconds, press the
HomeLink button
in your vehicle for 2 seconds up to 3 times.
If the garage door doesn’t respond, please see your owner’s manual, go to www.HomeLink.com/infiniti or call 1-800-355-3515.
Please see your Owner’s Manual for important safety information, system limitations, and additional operating and feature information.
HomeLink® Garage Door Opener
Page 15 of 36
12
OFF position
Automatic (AUTO) headlight mode ON position (headlights switch on/
off automatically depending on ambient light conditions/daytime running
light system)
Headlight ON position
Side lights, license plate lights and combination meter lighting ON position
Front fog light switch
Push the headlight switch forward for the high beams.
For High Beam Auto-Dimming (Auto position):
• When the vehicle speed is less than 17 mph (27 km/h), the headlight returns to low beam.
• To disable high beam auto-dimming, turn headlight switch to headlight
ON position .
Pull the headlight swit ch rearward to flash the high beams.
For normal headlight operation, leave the exterior light switch in the AUTO position.Please see your Owner’s Manual for important safety information, system limitations, and additional operating and
feature information.
Exterior Light Operation
Page 16 of 36
 — Rear wiper operates intermittently.
Low (ON) — Rear wiper operates at a
continuous low-speed.
Push the lever forward to")
13
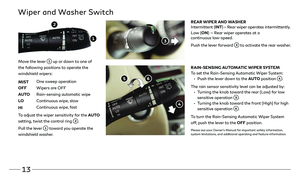
Wiper and Washer Switch
REAR WIPER AND WASHER
Intermittent (INT) — Rear wiper operates intermittently.
Low (ON) — Rear wiper operates at a
continuous low-speed.
Push the lever forward to activate the rear washer.
RAIN-SENSING AUTOMATIC WIPER SYSTEM
To set the Rain-Sensing Automatic Wiper System:
• Push the lev er down to the AUTO position .
The rain sensor sensitivity level can be adjusted by:
• Turning the knob toward the rear (Low) for low
sensitive operation .
• Turning the knob toward the front (High) for high
sensitive operation .
To turn the Rain-Sensing Automatic Wiper System
off, push the lever to the OFF position.
Please see your Owner’s Manual for important safety information,
system limitations, and additional operating and feature information.
Move the lever up or down to one of
the following positions to operate the
windshield wipers:
MIST
One sweep oper ation
OFF Wipers are OFF
AUTO Rain-sensing automatic wipe
LO Continuous wipe, slow
HI Continuous wipe, fast
To adjust the wiper sensitivity for the AUTO
setting, twist the control ring
.
Pull the lever toward you operate the
windshield washer.


 headlight mode ON position (headlights switch on/
off automatically depending on ambient light conditions/daytime running
light system)
Headlight ON position")