Page 78 of 482
2-59
Safety system of your vehicle
2
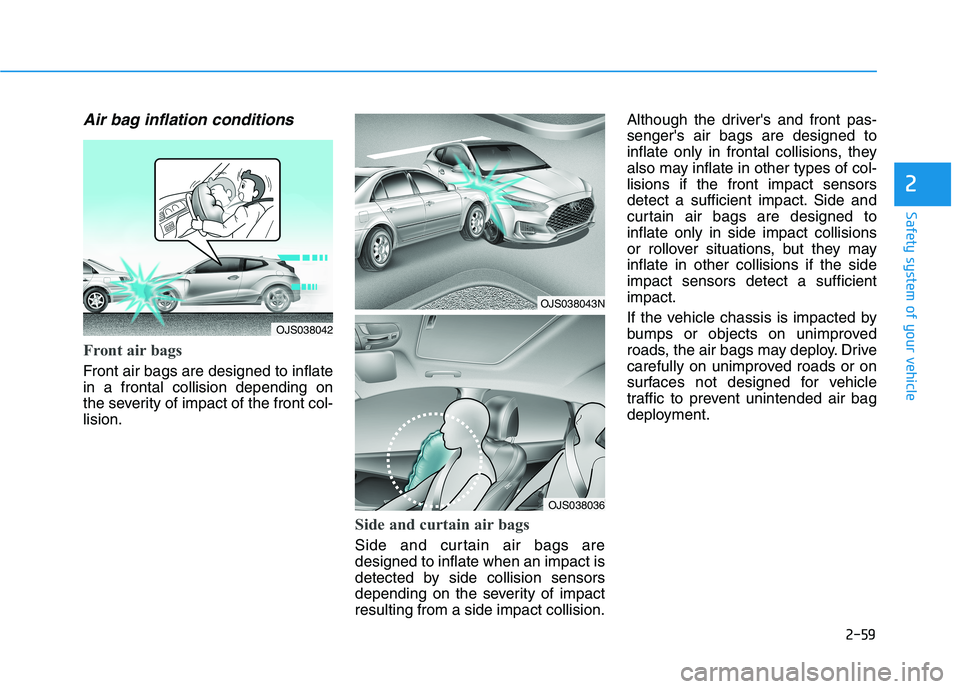
Air bag inflation conditions
Front air bags
Front air bags are designed to inflate
in a frontal collision depending on
the severity of impact of the front col-
lision.
Side and curtain air bags
Side and curtain air bags are
designed to inflate when an impact is
detected by side collision sensors
depending on the severity of impact
resulting from a side impact collision.Although the driver's and front pas-
senger's air bags are designed to
inflate only in frontal collisions, they
also may inflate in other types of col-
lisions if the front impact sensors
detect a sufficient impact. Side and
curtain air bags are designed to
inflate only in side impact collisions
or rollover situations, but they may
inflate in other collisions if the side
impact sensors detect a sufficient
impact.
If the vehicle chassis is impacted by
bumps or objects on unimproved
roads, the air bags may deploy. Drive
carefully on unimproved roads or on
surfaces not designed for vehicle
traffic to prevent unintended air bag
deployment.
OJS038042
OJS038043N
OJS038036
Page 80 of 482
2-61
Safety system of your vehicle
2
In an angled collision, the force of
impact may direct the occupants in a
direction where the air bags would
not be able to provide any additional
benefit, and thus the sensors may
not deploy any air bags.Just before impact, drivers often
brake heavily. Such heavy braking
lowers the front portion of the vehicle
causing it to "ride" under a vehicle
with a higher ground clearance. Air
bags may not inflate in this "under-
ride" situation because deceleration
forces that are detected by sensors
may be significantly reduced by such
"underride" collisions.Front air bags may not inflate in
rollover accidents because air bag
deployment could not provide protec-
tion to the occupants.
However, side and curtain air bags
may inflate when the vehicle is rolled
over by a side impact collision.
OTL035069OJS038047OTL035068
Page 138 of 482
3-56
Convenient features of your vehicle
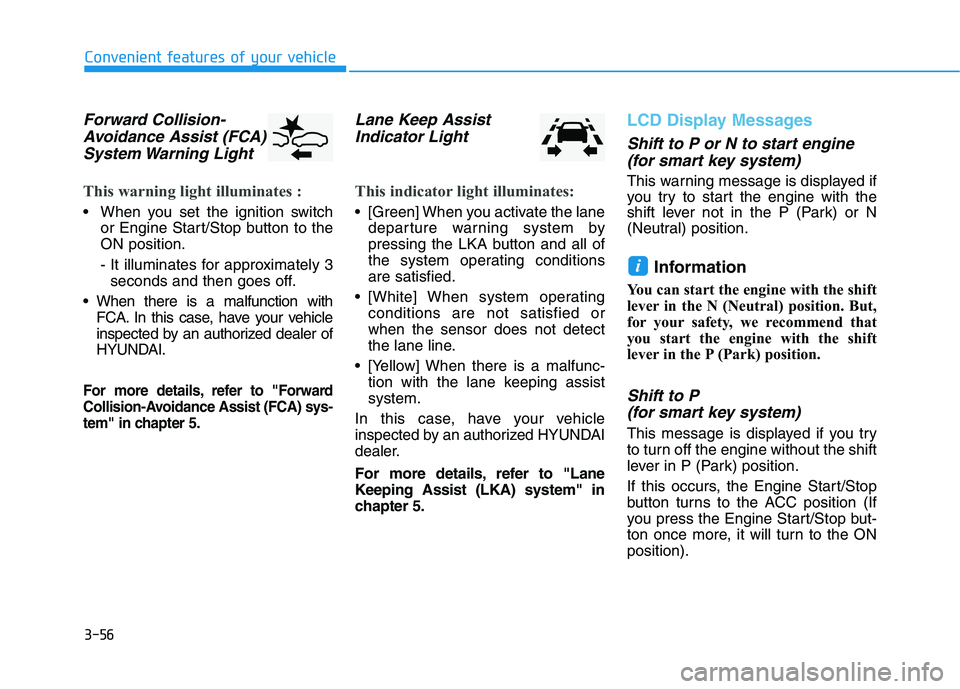
Forward Collision-
Avoidance Assist (FCA)
System Warning Light
This warning light illuminates :
When you set the ignition switch
or Engine Start/Stop button to the
ON position.
- It illuminates for approximately 3
seconds and then goes off.
When there is a malfunction with
FCA. In this case, have your vehicle
inspected by an authorized dealer of
HYUNDAI.
For more details, refer to "Forward
Collision-Avoidance Assist (FCA) sys-
tem" in chapter 5.
Lane Keep Assist
Indicator Light
This indicator light illuminates:
[Green] When you activate the lane
departure warning system by
pressing the LKA button and all of
the system operating conditions
are satisfied.
[White] When system operating
conditions are not satisfied or
when the sensor does not detect
the lane line.
[Yellow] When there is a malfunc-
tion with the lane keeping assist
system.
In this case, have your vehicle
inspected by an authorized HYUNDAI
dealer.
For more details, refer to "Lane
Keeping Assist (LKA) system" in
chapter 5.
LCD Display Messages
Shift to P or N to start engine
(for smart key system)
This warning message is displayed if
you try to start the engine with the
shift lever not in the P (Park) or N
(Neutral) position.
Information
You can start the engine with the shift
lever in the N (Neutral) position. But,
for your safety, we recommend that
you start the engine with the shift
lever in the P (Park) position.
Shift to P
(for smart key system)
This message is displayed if you try
to turn off the engine without the shift
lever in P (Park) position.
If this occurs, the Engine Start/Stop
button turns to the ACC position (If
you press the Engine Start/Stop but-
ton once more, it will turn to the ON
position).
i
Page 162 of 482
3-80
Convenient features of your vehicle
L LI
IG
GH
HT
TI
IN
NG
G
Exterior Lights
Lighting control
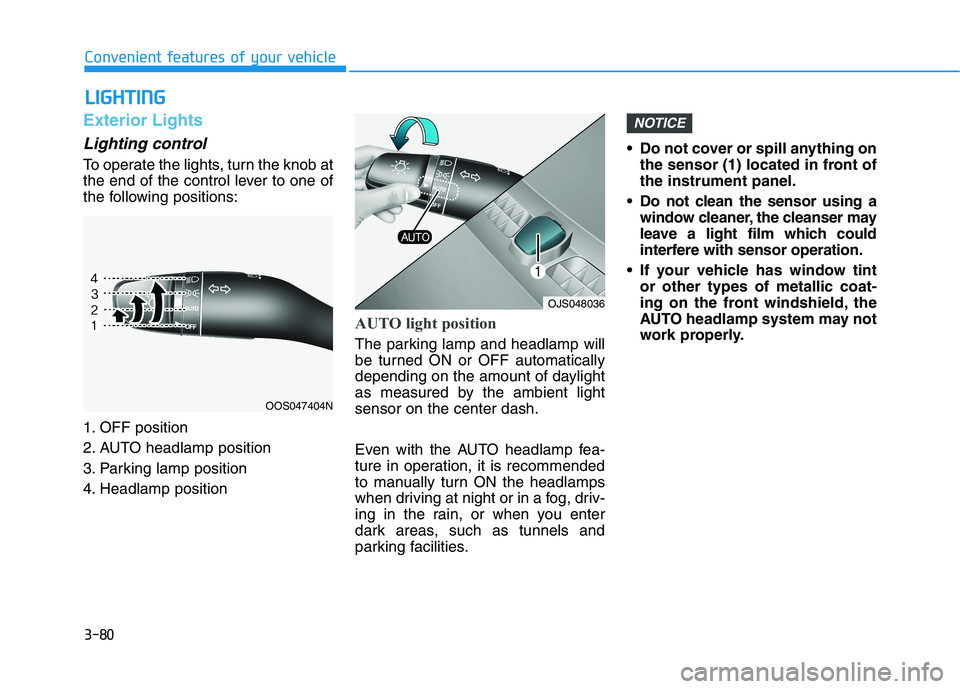
To operate the lights, turn the knob at
the end of the control lever to one of
the following positions:
1. OFF position
2. AUTO headlamp position
3. Parking lamp position
4. Headlamp position
AUTO light position
The parking lamp and headlamp will
be turned ON or OFF automatically
depending on the amount of daylight
as measured by the ambient light
sensor on the center dash.
Even with the AUTO headlamp fea-
ture in operation, it is recommended
to manually turn ON the headlamps
when driving at night or in a fog, driv-
ing in the rain, or when you enter
dark areas, such as tunnels and
parking facilities.• Do not cover or spill anything on
the sensor (1) located in front of
the instrument panel.
Do not clean the sensor using a
window cleaner, the cleanser may
leave a light film which could
interfere with sensor operation.
If your vehicle has window tint
or other types of metallic coat-
ing on the front windshield, the
AUTO headlamp system may not
work properly.
NOTICE
OOS047404N
OJS048036
Page 173 of 482
3-91
Convenient features of your vehicle
3
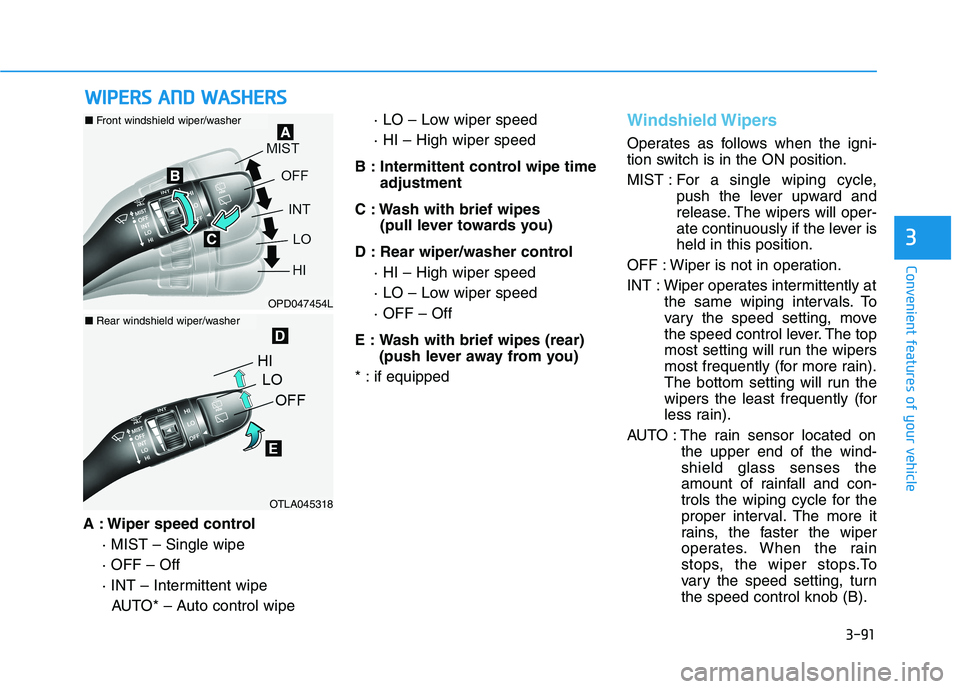
A : Wiper speed control
· MIST – Single wipe
· OFF – Off
· INT – Intermittent wipe
AUTO* – Auto control wipe· LO – Low wiper speed
· HI – High wiper speed
B : Intermittent control wipe time
adjustment
C : Wash with brief wipes
(pull lever towards you)
D : Rear wiper/washer control
· HI – High wiper speed
· LO – Low wiper speed
· OFF – Off
E : Wash with brief wipes (rear)
(push lever away from you)
* : if equipped
Windshield Wipers
Operates as follows when the igni-
tion switch is in the ON position.
MIST : For a single wiping cycle,
push the lever upward and
release. The wipers will oper-
ate continuously if the lever is
held in this position.
OFF : Wiper is not in operation.
INT : Wiper operates intermittently at
the same wiping intervals. To
vary the speed setting, move
the speed control lever. The top
most setting will run the wipers
most frequently (for more rain).
The bottom setting will run the
wipers the least frequently (for
less rain).
AUTO : The rain sensor located on
the upper end of the wind-
shield glass senses the
amount of rainfall and con-
trols the wiping cycle for the
proper interval. The more it
rains, the faster the wiper
operates. When the rain
stops, the wiper stops.To
vary the speed setting, turn
the speed control knob (B).
W WI
IP
PE
ER
RS
S
A
AN
ND
D
W
WA
AS
SH
HE
ER
RS
S
OPD047454L
OTLA045318
■Front windshield wiper/washer
■Rear windshield wiper/washer
Page 174 of 482
3-92
Convenient features of your vehicle
LO : The wiper runs at a lower speed.
HI : The wiper runs at a higher speed.
Information
If there is heavy accumulation of snow
or ice on the windshield, defrost the
windshield for about 10 minutes, or
until the snow and/or ice is removed
before using the windshield wipers to
ensure proper operation.
If you do not remove the snow and/or
ice before using the wiper and washer,
it may damage the wiper and washer
system.
AUTO (Automatic) control
(if equipped)
The rain sensor located on the upper
end of the windshield glass senses
the amount of rainfall and controls
the wiping cycle for the proper inter-
val.
The wiper operation time will be
automatically controlled depends on
rainfall.
When the rain stops, the wiper stops.
To vary the sensitivity setting, turn
the sensitivity control knob.
If the wiper switch is set in AUTO
mode when the ignition switch is in
the ON position, the wiper will oper-
ate once to perform a self-check of
the system. Set the wiper to OFF
position when the wiper is not in use.
i
To avoid personal injury from
the windshield wipers, when the
engine is running and the wind-
shield wiper switch is placed in
the AUTO mode:
Do not touch the upper end of
the windshield glass facing
the rain sensor.
Do not wipe the upper end of
the windshield glass with a
damp or wet cloth.
Do not put pressure on the
windshield glass.
WARNING
Page 175 of 482
3-93
Convenient features of your vehicle
3
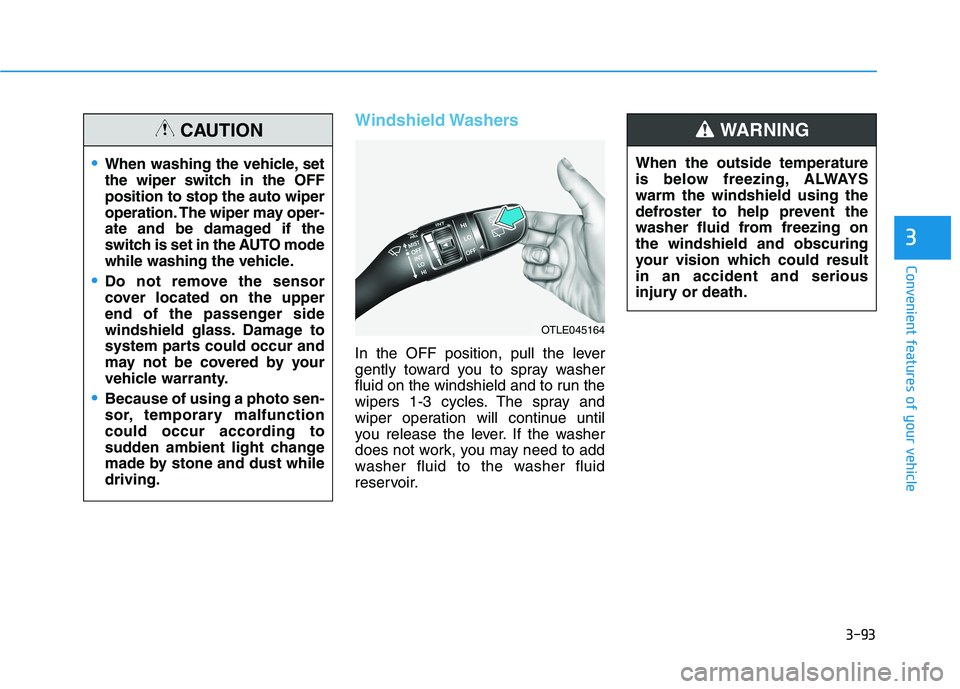
Windshield Washers
In the OFF position, pull the lever
gently toward you to spray washer
fluid on the windshield and to run the
wipers 1-3 cycles. The spray and
wiper operation will continue until
you release the lever. If the washer
does not work, you may need to add
washer fluid to the washer fluid
reservoir.When the outside temperature
is below freezing, ALWAYS
warm the windshield using the
defroster to help prevent the
washer fluid from freezing on
the windshield and obscuring
your vision which could result
in an accident and serious
injury or death.
WARNING
OTLE045164
When washing the vehicle, set
the wiper switch in the OFF
position to stop the auto wiper
operation. The wiper may oper-
ate and be damaged if the
switch is set in the AUTO mode
while washing the vehicle.
Do not remove the sensor
cover located on the upper
end of the passenger side
windshield glass. Damage to
system parts could occur and
may not be covered by your
vehicle warranty.
Because of using a photo sen-
sor, temporary malfunction
could occur according to
sudden ambient light change
made by stone and dust while
driving.
CAUTION
Page 187 of 482
3-105
Convenient features of your vehicle
3
Automatic Temperature
Control Mode
The Automatic Climate Control
System is controlled by setting the
desired temperature.
1. Press the AUTO button (3).
The modes, fan speeds, air intake
and air-conditioning will be con-
trolled automatically by the tem-
perature setting you select.
2. Turn the temperature control knob
(1) to the desired temperature. If
the temperature is set to the low-
est setting (Lo), the air condition-
ing system will operate continu-
ously. After the interior has cooled
sufficiently, adjust the knob to a
higher temperature set point
whenever possible.
To turn the automatic operation off,
select any button of the following:
- Mode selection button
- Front windshield defroster button
(Press the button one more time
to deselect the front windshield
defroster function. The 'AUTO'
sign will illuminate on the infor-
mation display once again.)
- Fan speed control buttonThe selected function will be con-
trolled manually while other functions
operate automatically.
For your convenience and to improve
the efficiency of the climate control,
use the AUTO button and set the
temperature to 72°F (22°C).
To change the temperature unit from
°F to °C or °C to °F:
Press and hold the AUTO and OFF
buttons on the climate control unit for
3 seconds.
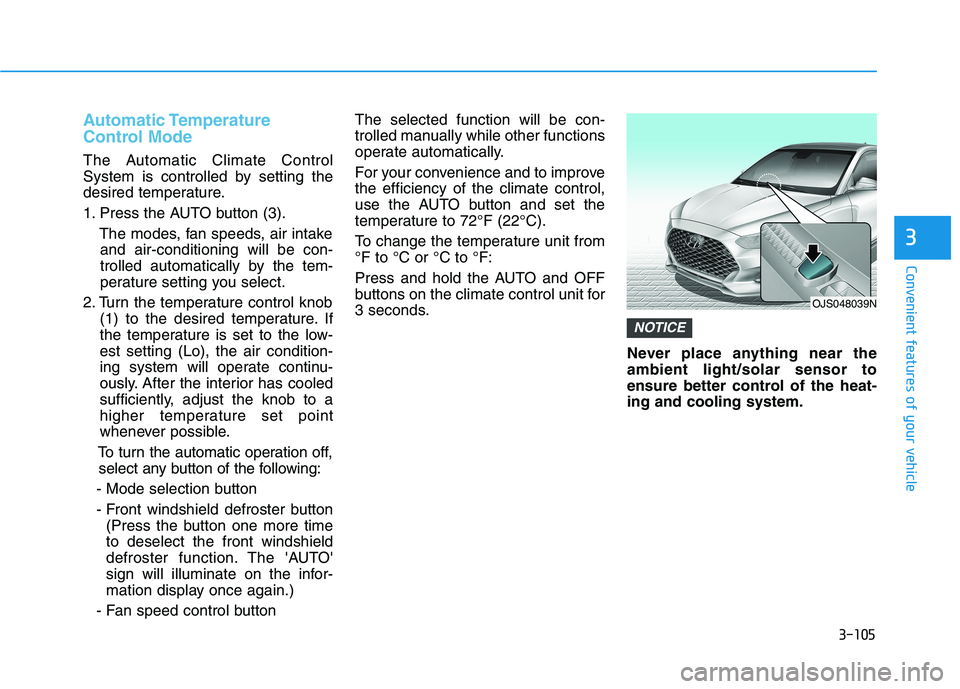
Never place anything near the
ambient light/solar sensor to
ensure better control of the heat-
ing and cooling system.
NOTICE
OJS048039N