2021 HYUNDAI TUCSON drive mode
[x] Cancel search: drive modePage 206 of 546
3-115
Convenient features of your vehicle
3
Headlamp delay function
If the key is removed from the ignition
switch or placed in the ACC position
or the LOCK/OFF position with the
headlamps ON, the headlamps
(and/or parking lamps) remain on for
about 5 minutes. However, if the dri-
ver's door is opened and closed, the
headlights are turned off after 15
seconds. Also, with the engine off if
the driver's door is opened and
closed, the headlamps (and/or park-
ing lamps) are turned off after 15
seconds.
The headlamps (and/or parking
lamps) can be turned off by pressing
the lock button on the remote key or
smart key twice or turning the light
switch to the OFF or AUTO position.
However, if you turn the light switch
to the AUTO position when it is dark
outside, the headlamps will not be
turned off.You can activate or deactivate the
Headlamp Delay function from the
User Settings Mode on the LCD dis-
play.
For more details, refer to the "LCD
Display" section in this chapter.
If the driver gets out of the vehicle
through other doors (except dri-
ver’s door), the battery saver func-
tion does not operate and the
headlamp delay function does not
turn off automatically. Therefore, It
causes the battery to be dis-
charged. In this case, make sure
to turn off the headlamp switch
before getting out of the vehicle.
Welcome System (if equipped)
Welcome light
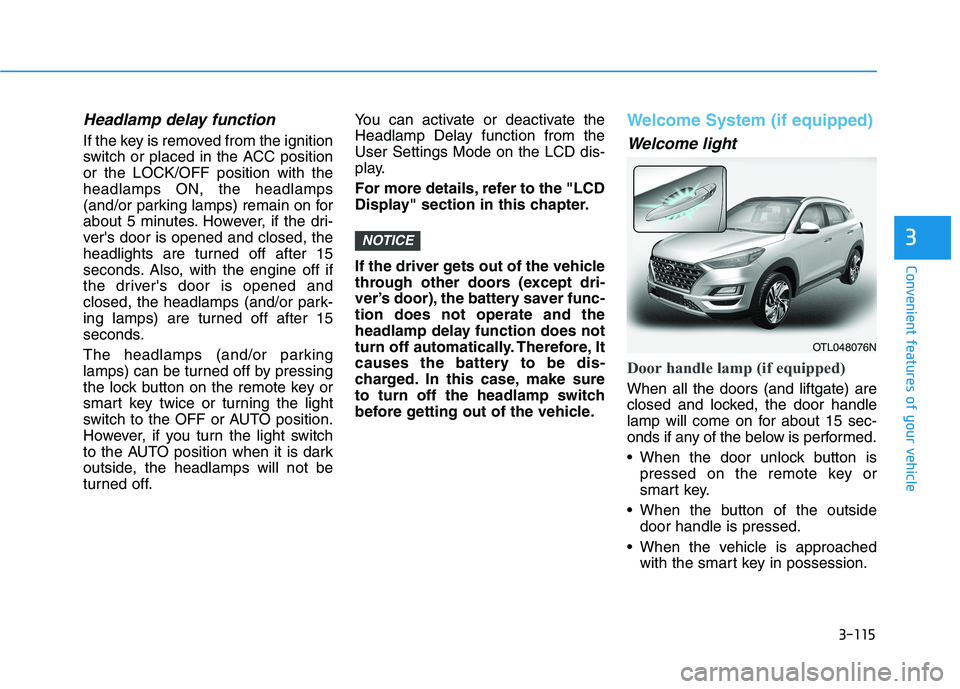
Door handle lamp (if equipped)
When all the doors (and liftgate) are
closed and locked, the door handle
lamp will come on for about 15 sec-
onds if any of the below is performed.
When the door unlock button is
pressed on the remote key or
smart key.
When the button of the outside
door handle is pressed.
When the vehicle is approached
with the smart key in possession.
NOTICE
OTL048076N
Page 224 of 546
3-133
Convenient features of your vehicle
3
Air conditioning (if equipped)
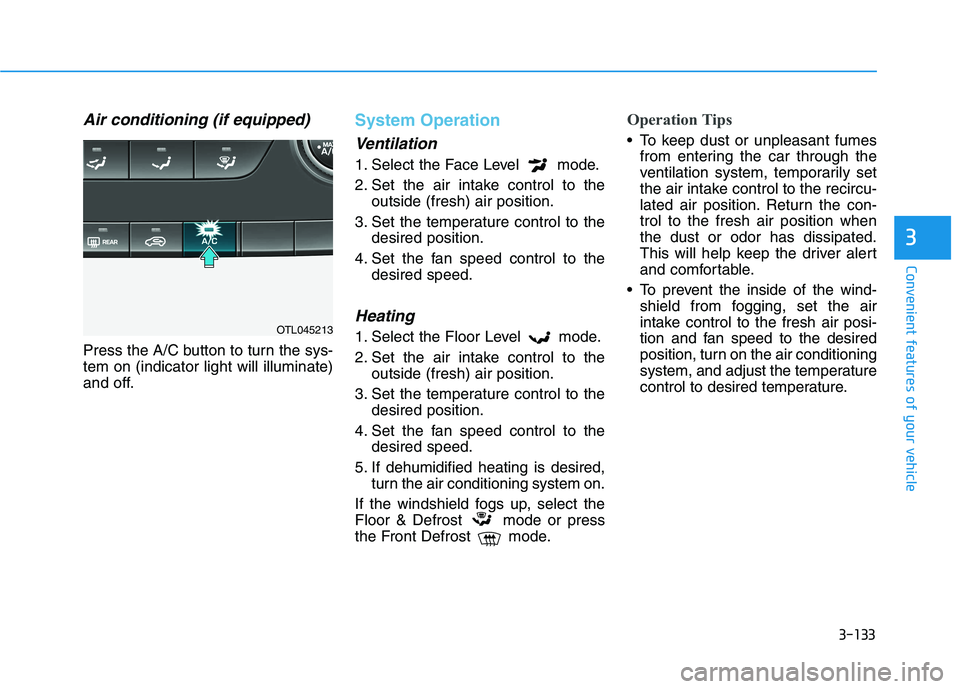
Press the A/C button to turn the sys-
tem on (indicator light will illuminate)
and off.
System Operation
Ventilation
1. Select the Face Level mode.
2. Set the air intake control to the
outside (fresh) air position.
3. Set the temperature control to the
desired position.
4. Set the fan speed control to the
desired speed.
Heating
1. Select the Floor Level mode.
2. Set the air intake control to the
outside (fresh) air position.
3. Set the temperature control to the
desired position.
4. Set the fan speed control to the
desired speed.
5. If dehumidified heating is desired,
turn the air conditioning system on.
If the windshield fogs up, select the
Floor & Defrost mode or press
the Front Defrost mode.
Operation Tips
To keep dust or unpleasant fumes
from entering the car through the
ventilation system, temporarily set
the air intake control to the recircu-
lated air position. Return the con-
trol to the fresh air position when
the dust or odor has dissipated.
This will help keep the driver alert
and comfortable.
To prevent the inside of the wind-
shield from fogging, set the air
intake control to the fresh air posi-
tion and fan speed to the desired
position, turn on the air conditioning
system, and adjust the temperature
control to desired temperature.
OTL045213
Page 228 of 546
3-137
Convenient features of your vehicle
3
A AU
UT
TO
OM
MA
AT
TI
IC
C
C
CL
LI
IM
MA
AT
TE
E
C
CO
ON
NT
TR
RO
OL
L
S
SY
YS
ST
TE
EM
M
OTLE045267R/OTLE045266R
■ ■Type A
■
■Type B
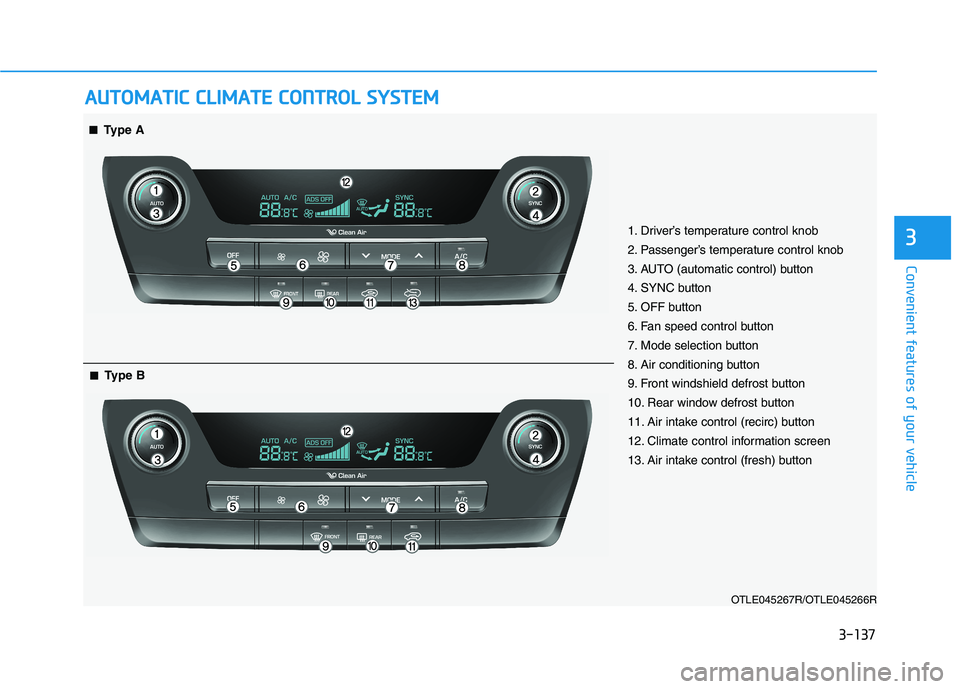
1. Driver’s temperature control knob
2. Passenger’s temperature control knob
3. AUTO (automatic control) button
4. SYNC button
5. OFF button
6. Fan speed control button
7. Mode selection button
8. Air conditioning button
9. Front windshield defrost button
10. Rear window defrost button
11. Air intake control (recirc) button
12. Climate control information screen
13. Air intake control (fresh) button
Page 234 of 546
3-143
Convenient features of your vehicle
3
Adjusting the driver and passenger
side temperature equally
Press the "SYNC" button to oper-
ate the driver and passenger side
temperature equally.
The passenger side temperature
will be set to the same temperature
as the driver side temperature.
Turn the left temperature control
knob. The driver and passenger
side temperature will be adjusted
equally.
Adjusting the driver and passenger
side temperature individually
Press the "SYNC" button again to
operate the driver and passenger
side temperature individually. The
button indicator will turn off.
Temperature conversion
If the battery has been discharged or
disconnected, the temperature mode
display will reset to Fahrenheit.
To change the temperature unit from
°F to °C or °C to °F:
- On the instrument cluster, go to
User Settings ➝Other ➝
Temperature Unit.
- Press the AUTO button while press-
ing the OFF button on the climate
control unit for 3 seconds.
The temperature unit on both the
cluster LCD display and climate con-
trol screen will change.
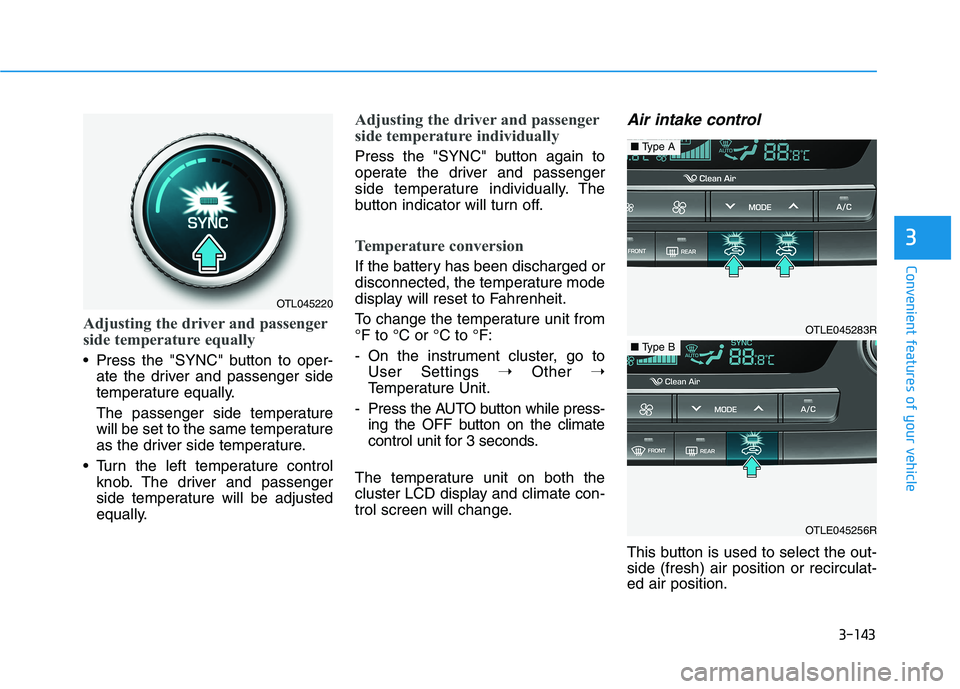
Air intake control
This button is used to select the out-
side (fresh) air position or recirculat-
ed air position.
OTL045220
OTLE045283R
■Type A
OTLE045256R
■Type B
Page 237 of 546
3-146
Convenient features of your vehicle
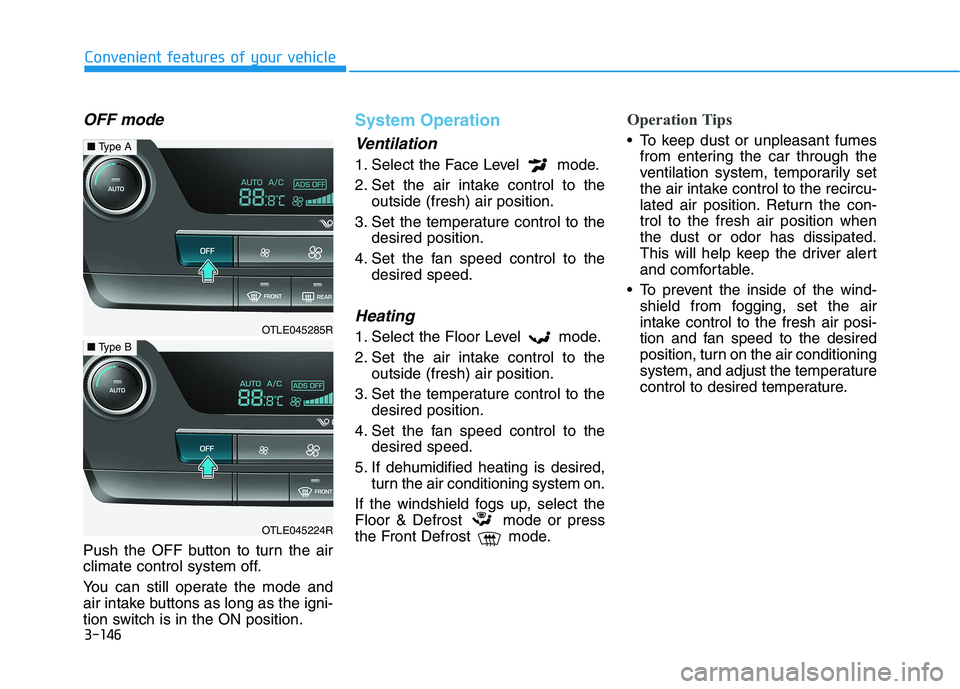
OFF mode
Push the OFF button to turn the air
climate control system off.
You can still operate the mode and
air intake buttons as long as the igni-
tion switch is in the ON position.
System Operation
Ventilation
1. Select the Face Level mode.
2. Set the air intake control to the
outside (fresh) air position.
3. Set the temperature control to the
desired position.
4. Set the fan speed control to the
desired speed.
Heating
1. Select the Floor Level mode.
2. Set the air intake control to the
outside (fresh) air position.
3. Set the temperature control to the
desired position.
4. Set the fan speed control to the
desired speed.
5. If dehumidified heating is desired,
turn the air conditioning system on.
If the windshield fogs up, select the
Floor & Defrost mode or press
the Front Defrost mode.
Operation Tips
To keep dust or unpleasant fumes
from entering the car through the
ventilation system, temporarily set
the air intake control to the recircu-
lated air position. Return the con-
trol to the fresh air position when
the dust or odor has dissipated.
This will help keep the driver alert
and comfortable.
To prevent the inside of the wind-
shield from fogging, set the air
intake control to the fresh air posi-
tion and fan speed to the desired
position, turn on the air conditioning
system, and adjust the temperature
control to desired temperature.
OTLE045285R
■Type A
OTLE045224R
■Type B
Page 239 of 546
3-148
Convenient features of your vehicle
If you operate the air conditioner
excessively, the difference
between the temperature of the
outside air and that of the wind-
shield could cause the outer sur-
face of the windshield to fog up,
causing loss of visibility. In this
case, toggle the mode selection
button to the position and set
the fan speed control knob to the
lowest speed setting.
System Maintenance
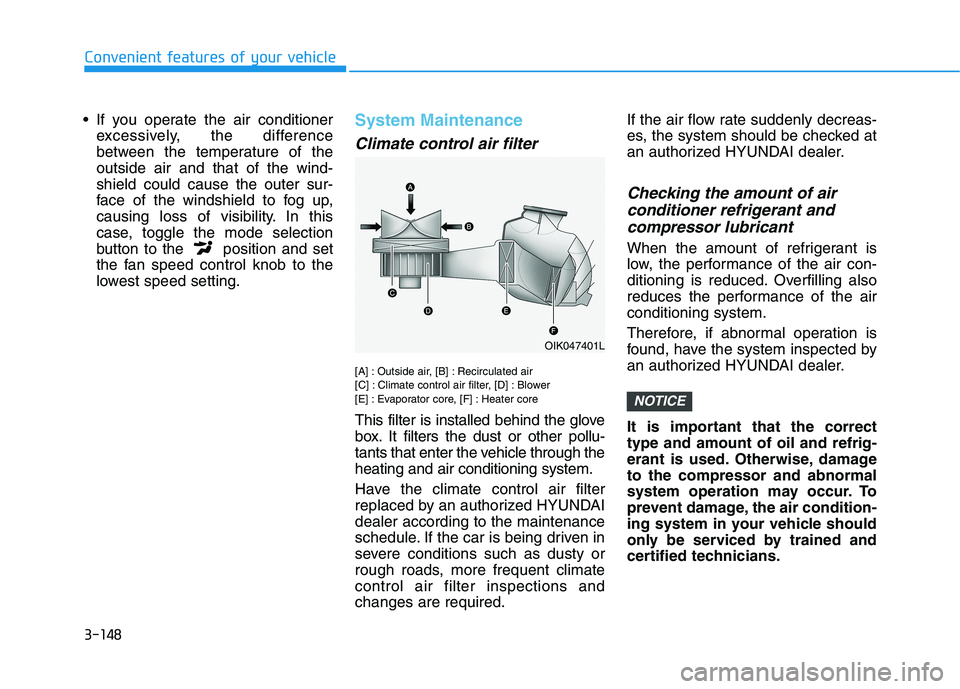
Climate control air filter
[A] : Outside air, [B] : Recirculated air
[C] : Climate control air filter, [D] : Blower
[E] : Evaporator core, [F] : Heater core
This filter is installed behind the glove
box. It filters the dust or other pollu-
tants that enter the vehicle through the
heating and air conditioning system.
Have the climate control air filter
replaced by an authorized HYUNDAI
dealer according to the maintenance
schedule. If the car is being driven in
severe conditions such as dusty or
rough roads, more frequent climate
control air filter inspections and
changes are required.If the air flow rate suddenly decreas-
es, the system should be checked at
an authorized HYUNDAI dealer.
Checking the amount of air
conditioner refrigerant and
compressor lubricant
When the amount of refrigerant is
low, the performance of the air con-
ditioning is reduced. Overfilling also
reduces the performance of the air
conditioning system.
Therefore, if abnormal operation is
found, have the system inspected by
an authorized HYUNDAI dealer.
It is important that the correct
type and amount of oil and refrig-
erant is used. Otherwise, damage
to the compressor and abnormal
system operation may occur. To
prevent damage, the air condition-
ing system in your vehicle should
only be serviced by trained and
certified technicians.
NOTICE
OIK047401L
Page 267 of 546
Driving your vehicle
5
Before Driving ........................................................5-4
Before Entering the Vehicle ...........................................5-4
Before Starting ..................................................................5-4
Ignition Switch ........................................................5-6
Key Ignition Switch ...........................................................5-6
Engine Start/Stop Button................................................5-9
Automatic Transmission ......................................5-14
Automatic transmission operation ..............................5-14
Good Driving Practices ..................................................5-19
Braking System ....................................................5-21
Power Brakes ...................................................................5-21
Disc Brakes Wear Indicator ..........................................5-22
Parking Brake...................................................................5-22
Electronic Parking Brake (EPB)...................................5-24
Auto Hold ..........................................................................5-30
Anti-lock Brake System (ABS) ....................................5-33
Electronic Stability Control (ESC)................................5-35
Vehicle Stability Management (VSM).........................5-39
Hill-Start Assist Control (HAC) ....................................5-40
Downhill Brake Control (DBC) ......................................5-40
Good Braking Practices .................................................5-42
All Wheel Drive (AWD) ........................................5-43
AWD operation.................................................................5-45
Emergency precautions .................................................5-49
Drive Mode Integrated Control System ............5-51
Blind-Spot Collision Warning (BCW) System...5-52
BCW (Blind-Spot Collision Warning) ..........................5-53
RCCW (Rear Cross-Traffic Collision Warning) .........5-55
Blind-Spot Collision Warning - Sensor Location ....5-57
Limitations of the System .............................................5-58
Declaration of conformity .................................5-59
The radio frequency components
(Rear Corner Radar) complies: ....................................5-59
Forward Collision-Avoidance Assist (FCA)
System - Camera Type........................................5-60
System Setting and Activation.....................................5-60
FCA Warning Message and System Control ............5-63
FCA Sensor .......................................................................5-65
System Not Operating....................................................5-67
Limitations of the System .............................................5-68
Forward Collision-Avoidance Assist (FCA)
System - Sensor Fusion Type
(Front Radar + Front Camera) ...........................5-73
System Setting and Activation.....................................5-73
FCA Warning Message and System Control ............5-76
FCA Sensor .......................................................................5-77
System Not Operating....................................................5-79
Limitations of the System .............................................5-81
Page 268 of 546
5
Lane Keeping Assist (LKA) System ...................5-87
LKA System Operation...................................................5-89
Warning Light and Message.........................................5-91
Limitations of the System .............................................5-93
LKA System Function Change......................................5-95
Driver Attention Warning (DAW) System .........5-96
System Setting and Activation.....................................5-96
Resetting the System .....................................................5-97
System Standby ...............................................................5-98
System Malfunction .......................................................5-98
Cruise Control .....................................................5-100
Cruise Control operation .............................................5-100
Smart Cruise Control With Stop &
Go System ...........................................................5-105
Smart Cruise Control Switch ......................................5-105
Smart Cruise Control Speed .......................................5-106
Smart Cruise Control Vehicle-to-Vehicle
Distance ...........................................................................5-110
Smart Cruise Control Radar Sensor .........................5-114
To Adjust the Sensitivity of
Smart Cruise Control ....................................................5-115
Conventional Cruise Control Mode ...........................5-116
Limitations of the System...........................................5-117
Special Driving Conditions ................................5-122
Hazardous driving conditions ....................................5-122
Rocking the vehicle ......................................................5-122
Smooth cornering .........................................................5-123
Driving at night ..............................................................5-123
Driving in the rain .........................................................5-123
Driving in flooded areas..............................................5-124
Highway driving .............................................................5-124
Reducing the risk of a rollover .................................5-125
Winter Driving ....................................................5-126
Snow or Icy Conditions................................................5-126
Winter Precautions .......................................................5-128
Trailer Towing .....................................................5-130
If you decide to pull a trailer .....................................5-130
Trailer towing equipment ............................................5-132
Driving with a trailer ....................................................5-133
Maintenance when trailer towing.............................5-136
Vehicle Load Limit..............................................5-138
Tire Loading Information Label .................................5-139