2021 HYUNDAI TUCSON HYBRID ignition
[x] Cancel search: ignitionPage 545 of 630
08
8-25
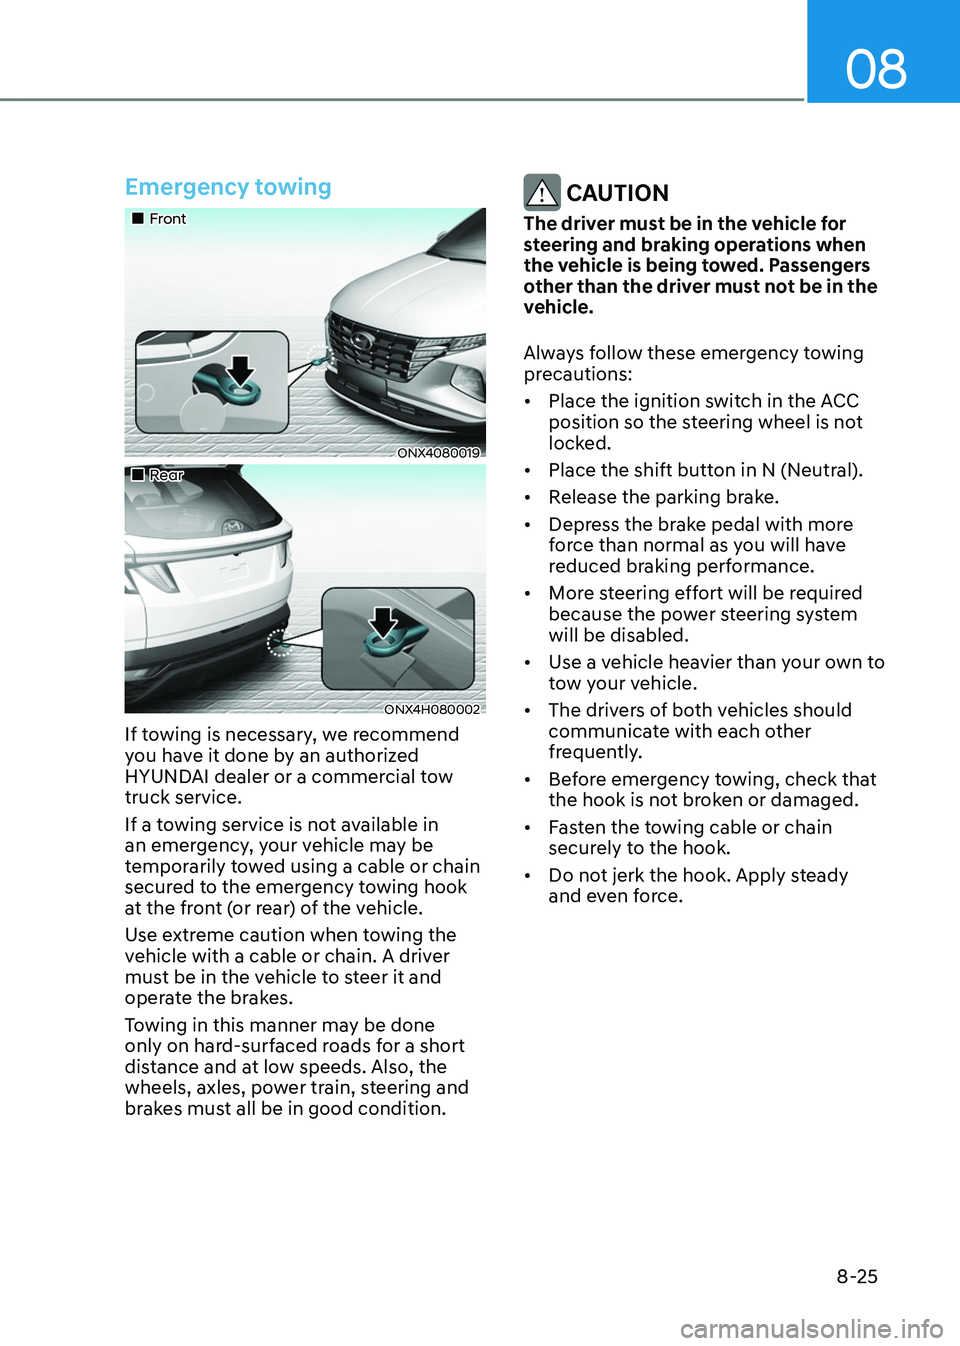
Emergency towing
„„Front
ONX4080019
„„Rear
ONX4H080002
If towing is necessary, we recommend
you have it done by an authorized
HYUNDAI dealer or a commercial tow
truck service.
If a towing service is not available in
an emergency, your vehicle may be
temporarily towed using a cable or chain
secured to the emergency towing hook
at the front (or rear) of the vehicle.
Use extreme caution when towing the
vehicle with a cable or chain. A driver
must be in the vehicle to steer it and
operate the brakes.
Towing in this manner may be done
only on hard-surfaced roads for a short
distance and at low speeds. Also, the
wheels, axles, power train, steering and
brakes must all be in good condition.
CAUTION
The driver must be in the vehicle for
steering and braking operations when
the vehicle is being towed. Passengers
other than the driver must not be in the
vehicle.
Always follow these emergency towing
precautions:
• Place the ignition switch in the ACC
position so the steering wheel is not
locked.
• Place the shift button in N (Neutral).
• Release the parking brake.
• Depress the brake pedal with more
force than normal as you will have
reduced braking performance.
• More steering effort will be required
because the power steering system
will be disabled.
• Use a vehicle heavier than your own to
tow your vehicle.
• The drivers of both vehicles should
communicate with each other
frequently.
• Before emergency towing, check that
the hook is not broken or damaged.
• Fasten the towing cable or chain
securely to the hook.
• Do not jerk the hook. Apply steady
and even force.
Page 552 of 630
09
9-5
WARNING
Performing maintenance work on a
vehicle can be dangerous. If you lack
sufficient knowledge and experience or
the proper tools and equipment to do
the work, we recommend that having it
done by an authorized HYUNDAI dealer.
ALWAYS follow these precautions for
performing maintenance work:
• Park your vehicle on level ground,
move the shift button into the P
(Park) position, apply the parking
brake, and place the ignition switch
in the LOCK/OFF position.
• Block the tires (front and back) to
prevent the vehicle from moving.
Remove loose clothing or jewelry
that can become entangled in
moving parts.
• If you must run the engine during
maintenance, do so out doors or in
an area with plenty of ventilation.
• Keep flames, sparks, or smoking
materials away from the battery and
fuel-related parts. The following lists are vehicle checks and
inspections that should be performed
by the owner or an authorized HYUNDAI
dealer at the frequencies indicated to
help ensure safe, dependable operation
of your vehicle.
Any adverse conditions should be
brought to the attention of your dealer as
soon as possible.
These Owner Maintenance vehicle
checks are generally not covered by
warranties and you may be charged for
labor, parts and lubricants used.
Owner maintenance schedule
When you stop for fuel:
•
Check the coolant level in the engine
coolant reservoir.
• Check the windshield washer fluid
level.
• Check for low or under-inflated tires.
WARNING
Be careful when checking your engine
coolant/inverter coolant level when the
engine is hot. This may result in coolant
being blown out of the opening and
cause serious burns and other injuries.
ownEr maintEnancE
Page 560 of 630

09
9-13
Engine oil and filter
The engine oil and filter should be
changed at the intervals specified in the
maintenance schedule. If the vehicle
is being driven in severe conditions,
more frequent oil and filter changes are
required.
HSG (Hybrid Starter & Generator)
belt
The HSG belt should be changed at the
intervals specified in the maintenance
schedule.
Fuel lines, fuel hoses and
connections
Check the fuel lines, fuel hoses and
connections for leakage and damage.
We recommend an authorized HYUNDAI
dealer replace any damaged or leaking
parts immediately.
Fuel filter
A clogged filter can limit the speed
at which the vehicle may be driven,
damage the emission system and cause
multiple issues such as hard starting. If
an excessive amount of foreign matter
accumulates in the fuel tank, the
filter may require replacement more
frequently. After installing a new filter,
run the engine for several minutes,
and check for leaks at the connections.
Fuel filters should be installed by an
authorized HYUNDAI dealer.
Vapor hose and fuel filler cap
The vapor hose and fuel filler cap should
be inspected at those intervals specified
in the maintenance schedule. Your
HYUNDAI dealer will help to determine if
replacement is needed.
Air cleaner filter
A genuine HYUNDAI air cleaner filter
is recommended when the filter is
replaced.
Spark plugs
Make sure to install new spark plugs of
the correct heat range.
When installing new spark plugs, be sure
that the ignition coils are clean and free
of any oil or debris. Clean and wipe off
the bottom portion of the ignition coil in
order to prevent any contamination with
the spark plug during installation.
WARNING
Do not remove spark plugs from the
vehicle when the engine is hot. You
may damage the engine and may also
risk burn injury.
Cooling system
Check cooling system components, such
as radiator, coolant reservoir, hoses and
connections for leakage and damage.
Replace any damaged parts.
Engine coolant/inverter coolant
The coolant should be changed at the
intervals specified in the maintenance
schedule.
Automatic transmission fluid
The automatic transmission fluid level
does not need to be checked under
normal usage conditions.
We recommend that the automatic
transmission fluid is changed by an
authorized HYUNDAI dealer according to
the maintenance schedule.
Explanation of schEdulEd maintEnancE itEms
Page 573 of 630
Maintenance
9-26
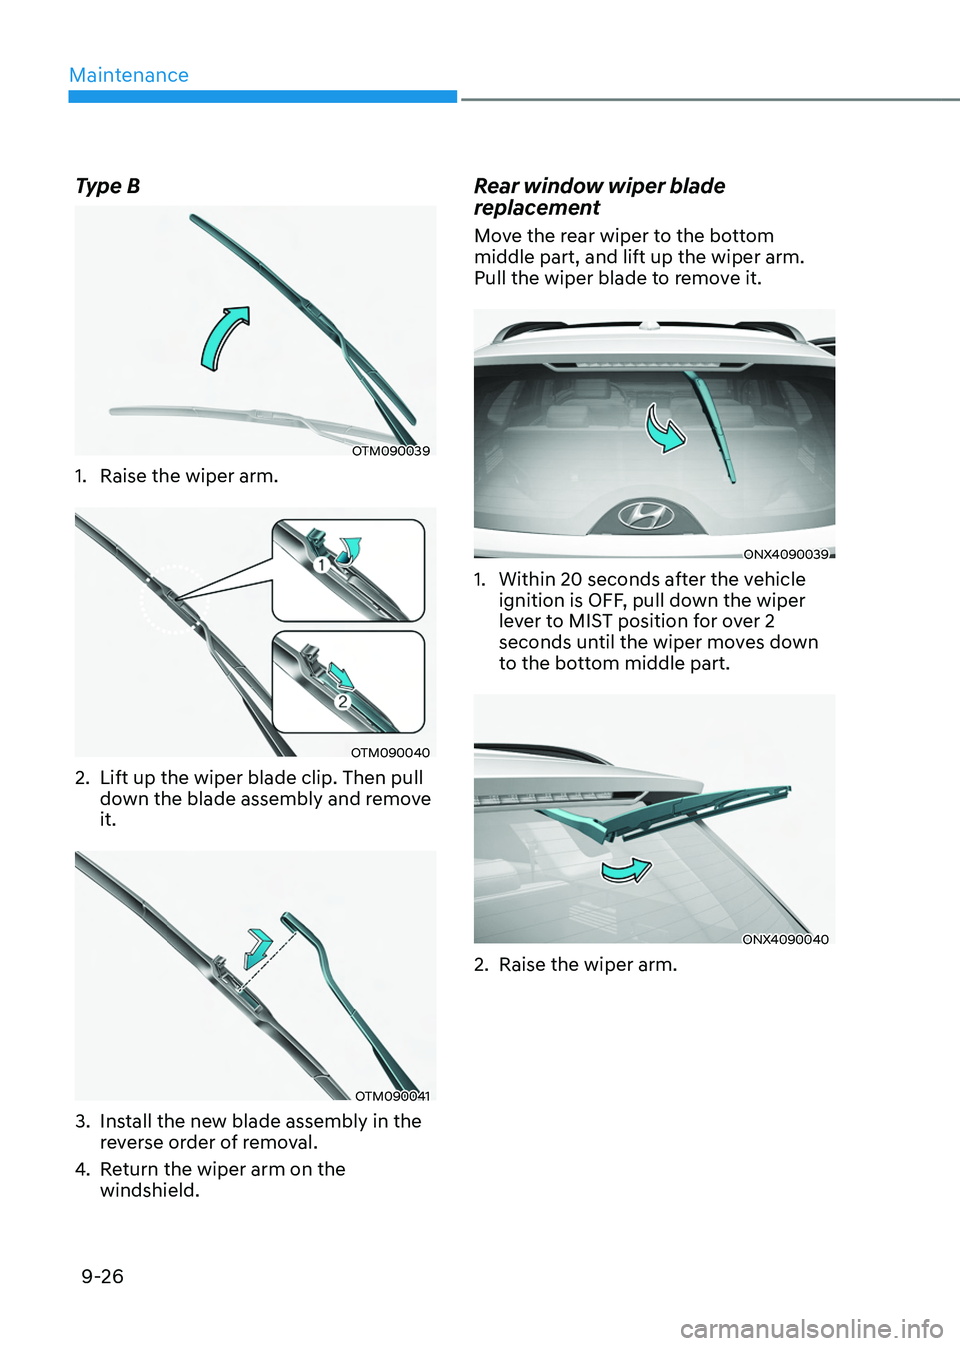
Type B
OTM090039
1. Raise the wiper arm.
OTM090040
2. Lift up the wiper blade clip. Then pull
down the blade assembly and remove
it.
OTM090041
3. Install the new blade assembly in the
r everse order of removal.
4.
Re
turn the wiper arm on the
windshield.
Rear window wiper blade
replacement
Move the rear wiper to the bottom
middle part, and lift up the wiper arm.
Pull the wiper blade to remove it.
ONX4090039
1. Within 20 seconds aft er the vehicle
ignition is OFF, pull down the wiper
lever to MIST position for over 2
seconds until the wiper moves down
to the bottom middle part.
ONX4090040
2. Raise the wiper arm.
Page 574 of 630
09
9-27
ONX4E090051
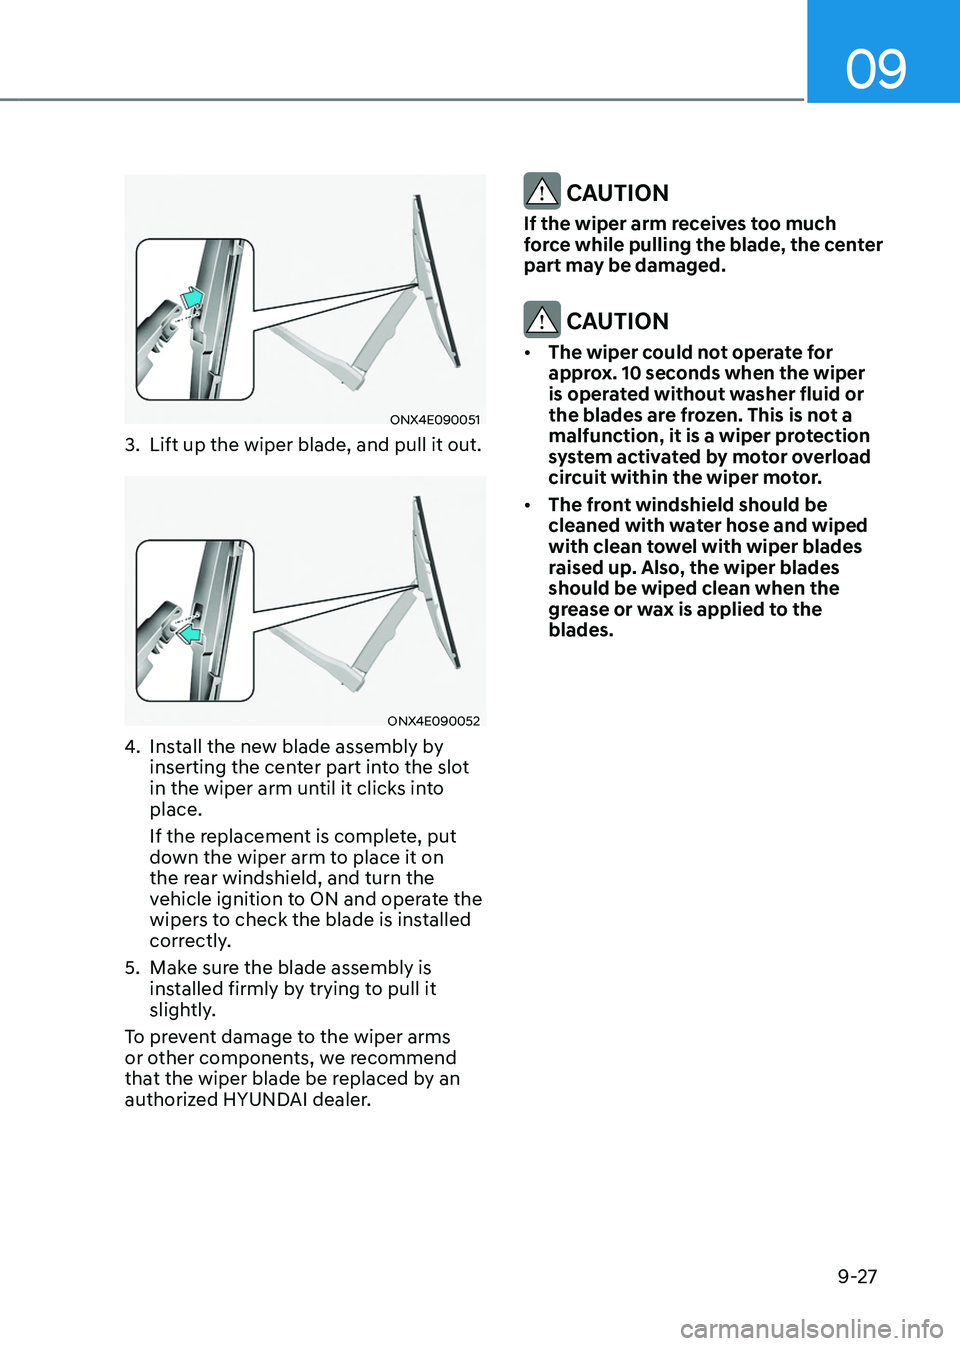
3. Lift up the wiper blade, and pull it out.
ONX4E090052
4. Install the new blade assembly by
inserting the center part into the slot
in the wiper arm until it clicks into
place.
If the replacement is complete, put
down the wiper arm to place it on
the rear windshield, and turn the
vehicle ignition to ON and operate the
wipers to check the blade is installed
correctly.
5.
Make sur
e the blade assembly is
installed firmly by trying to pull it
slightly.
To prevent damage to the wiper arms
or other components, we recommend
that the wiper blade be replaced by an
authorized HYUNDAI dealer.
CAUTION
If the wiper arm receives too much
force while pulling the blade, the center
part may be damaged.
CAUTION
• The wiper could not operate for
approx. 10 seconds when the wiper
is operated without washer fluid or
the blades are frozen. This is not a
malfunction, it is a wiper protection
system activated by motor overload
circuit within the wiper motor.
• The front windshield should be
cleaned with water hose and wiped
with clean towel with wiper blades
raised up. Also, the wiper blades
should be wiped clean when the
grease or wax is applied to the
blades.
Page 575 of 630
Maintenance
9-28
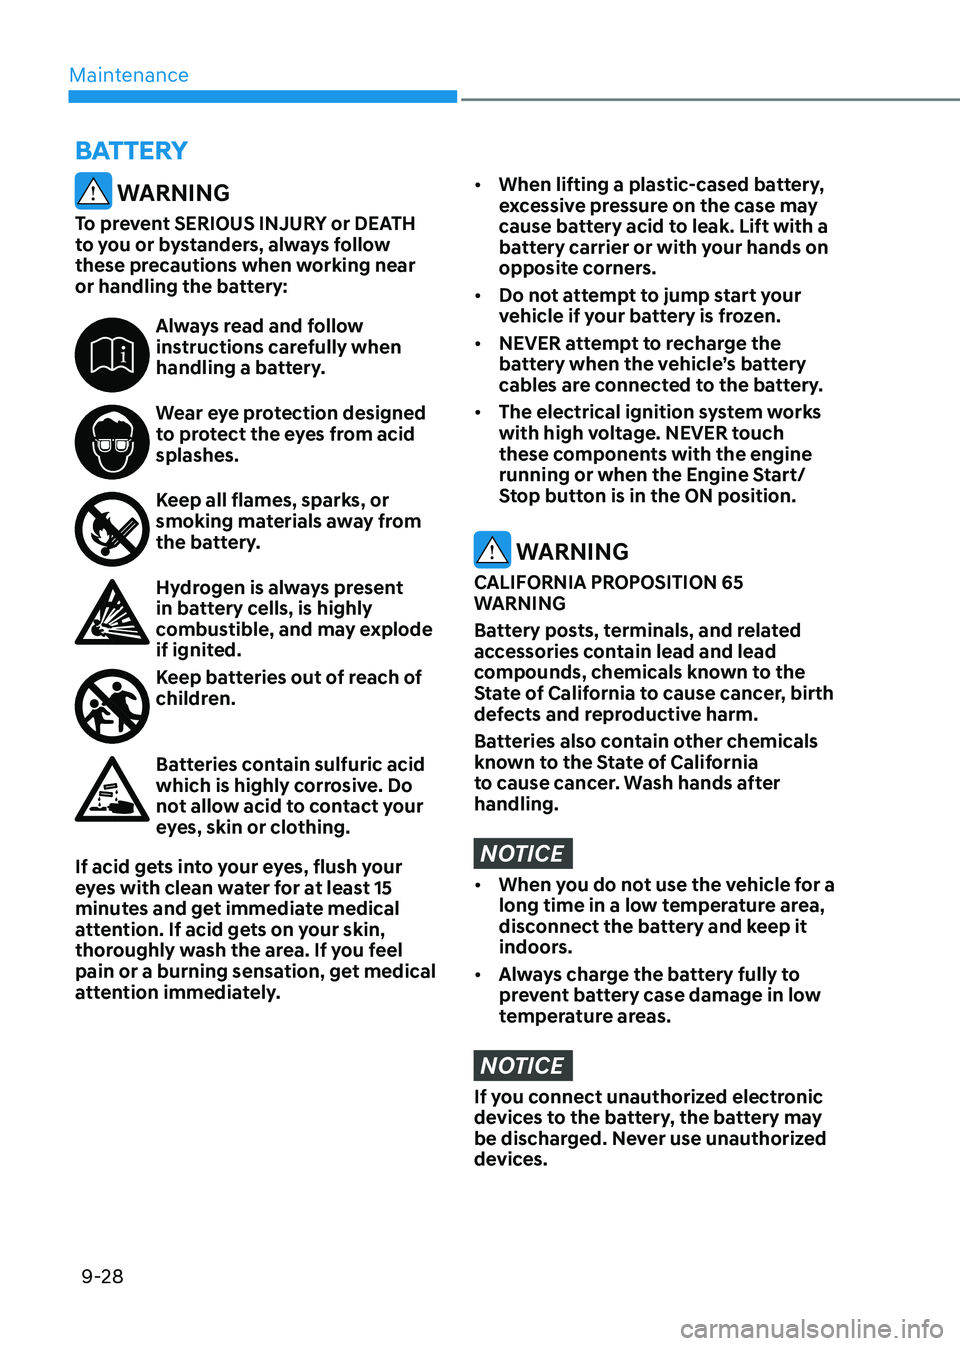
battEry
WARNING
To prevent SERIOUS INJURY or DEATH
to you or bystanders, always follow
these precautions when working near
or handling the battery:
Always read and follow
instructions carefully when
handling a battery.
Wear eye protection designed
to protect the eyes from acid
splashes.
Keep all flames, sparks, or
smoking materials away from
the battery.
Hydrogen is always present
in battery cells, is highly
combustible, and may explode
if ignited.
Keep batteries out of reach of
children.
Batteries contain sulfuric acid
which is highly corrosive. Do
not allow acid to contact your
eyes, skin or clothing.
If acid gets into your eyes, flush your
eyes with clean water for at least 15
minutes and get immediate medical
attention. If acid gets on your skin,
thoroughly wash the area. If you feel
pain or a burning sensation, get medical
attention immediately.
• When lifting a plastic-cased battery,
excessive pressure on the case may
cause battery acid to leak. Lift with a
battery carrier or with your hands on
opposite corners.
• Do not attempt to jump start your
vehicle if your battery is frozen.
• NEVER attempt to recharge the
battery when the vehicle’s battery
cables are connected to the battery.
• The electrical ignition system works
with high voltage. NEVER touch
these components with the engine
running or when the Engine Start/
Stop button is in the ON position.
WARNING
CALIFORNIA PROPOSITION 65
WARNING
Battery posts, terminals, and related
accessories contain lead and lead
compounds, chemicals known to the
State of California to cause cancer, birth
defects and reproductive harm.
Batteries also contain other chemicals
known to the State of California
to cause cancer. Wash hands after
handling.
NOTICE
• When you do not use the vehicle for a
long time in a low temperature area,
disconnect the battery and keep it
indoors.
• Always charge the battery fully to
prevent battery case damage in low
temperature areas.
NOTICE
If you connect unauthorized electronic
devices to the battery, the battery may
be discharged. Never use unauthorized
devices.
Page 591 of 630

Maintenance
9-44
Instrument panel fuse panel
Fuse Name Fuse ratingCircuit Protected
DR Lock 20ADead Lock Relay, Data Link Connector, Door Unlock/Lock
Relay
P/WDW RH 25A Power Window Main Switch, Passenger Power Window
Switch (LHD)
P/WDW LH 25A Power Window Main Switch, Passenger Power Window
Switch (RHD)
Seat Warmer (RR) 20A
Rear Seat Warmer Control Module
Seat Warmer (DR/PS) 20AFront Seat Warmer Control Module, Front Air Ventilation
Seat Control Module
P/Seat(PS) 30APassenger Power Seat Switch, Passenger Seat Relay Unit
ECS 15A ECS Unit
Safety
Window RH 25ADriver(LHD)/Passenger(RHD) Safety Power Window Module,
Rear Safety Power Window Module RH
Sunroof1 20ASunroof Control Unit (Blind)
P/Seat(DR) 30ADriver Power Seat Switch, Driver IMS Control Module
A/BAG2 10ASRS Control Module
AMP 25A AMP
Module17 10A"Driver/Passenger Smart Key Outside Handle, Crash Pad
Switch, Hazard Switch, UIP Sensor
UIP Siren, Data Link Connector, Rain Sensor"
Sunroof1 20ASunroof Control Unit (Glass)
IBU2 10AIBU, Ignition Switch
Safety
Window LH 25ADriver(RHD)/Passenger(LHD) Safety Power Window Module,
Rear Safety Power Window Module LH
10A 10AOutside Mirror Folding/Unfolding Relay, ROA Sensor, Driver
IMS Control Module, Power Tailgate Unit, Driver/Passenger
Door Mood Lmap, A/C Control Module, Console Mood
Lamp, Instrument Cluster, Mood Lamp Unit, A/C Control
Switch, Crash Pad Mood Lamp
Brake Switch 10AIBU, Stop Lamp Switch
Page 596 of 630

09
9-49
Fuse Name Fuse ratingCircuit Protected
OPCU 20AOPU
BATT C/FAN 15A E/R Junction Block (RLY.2) E-Shifter2 10ASCU, Electronic Shift Switch (SBW)
HPCU1 10AHPCU
Trailer2 20ATrailer Connector Unit
RR HTD 10ADriver Power Outside Mirror, Passenger Power Outside
Mirror
IG1 30APCB Block (PDM(IG1) Relay)
IG2 30APCB Block (PDM(IG2) Relay)
ECU3 10ACVVD Actuator, ECM
TCU2 15A TCM, OPU
IEB4 10AIEB Unit
Module 7.5A Electronic Water Pump (Engine) AEB 10AFront Radar
HPCU2 10AHCPU
Sensor1 20AIgnition Coil #1~#4
Sensor2 15A Oxygen Sensor (Up/Down) ECU1 20AECM
Sensor4 10AE/R Junction Block (RLY.7)
Sensor3 10AOil Control Valve #1~#2, Purge Control Solenoid Valve,
RCV Control Solenoid Valve, Variable Oil Pump, Cooling
Fan Motor
B/Horn 15A PCB Block (Burglar Alarm Horn Relay)