2021 HYUNDAI TUCSON HYBRID tow
[x] Cancel search: towPage 489 of 630
![HYUNDAI TUCSON HYBRID 2021 Owners Manual Driver assistance system
7-130
• Pulling into the parking space where
there is a structure
OJX1079115[A] : Structure, [B] :Wall
Rear Cross-Traffic Safety system
may detect vehicles passing by in HYUNDAI TUCSON HYBRID 2021 Owners Manual Driver assistance system
7-130
• Pulling into the parking space where
there is a structure
OJX1079115[A] : Structure, [B] :Wall
Rear Cross-Traffic Safety system
may detect vehicles passing by in](/manual-img/35/56199/w960_56199-488.png)
Driver assistance system
7-130
• Pulling into the parking space where
there is a structure
OJX1079115[A] : Structure, [B] :Wall
Rear Cross-Traffic Safety system
may detect vehicles passing by in
front of you when parking in reverse
into a parking space with a wall or
structure in the rear or side area.
If this occurs, the function may
unnecessarily warn the driver and
control the brake.
Always check your surroundings
while backing up. •
When the vehicle is parked rearward
OJX1079116
Rear Cross-Traffic Safety system may
detect vehicles passing by behind
you when parking in reverse into
a parking space. If this occurs, the
function may unnecessarily warn the
driver and control the brake.
Always check your surroundings
while backing up.
WARNING
• When you are towing a trailer or
another vehicle, we recommend that
Rear Cross-Traffic Safety system is
turned off due to safety reasons.
• Rear Cross-Traffic Safety system may
not operate normally if interfered by
strong electromagnetic waves.
• Rear Cross-Traffic Safety system may
not operate for 3 seconds after the
vehicle is started, or the rear corner
radars are initialized.
Page 504 of 630
07
7-145
• The pedestrian is near the rear edge of
the vehicle
• The pedestrian is not standing upright
• The pedestrian is either very short or
very tall for Reverse Parking Collision-
Avoidance Assist to detect
• The pedestrian or cyclist is wearing
clothing that easily blends into the
background, making it difficult to
detect
• The pedestrian is wearing clothing
that does not reflect ultrasonic waves
well
• Size, thickness, height, or shape of
the object does not reflect ultrasonic
waves well (e.g., pole, bush, curbs,
carts, edge of a wall, etc.)
• The pedestrian or the object is moving
• The pedestrian or the object is very
close to the rear of the vehicle
• A wall is behind the pedestrian or the
object
• The object is not located at the rear
center of your vehicle
• The object is not parallel to the rear
bumper
• The road is slippery or inclined
• The driver backs up the vehicle
immediately after shifting to R
(Reverse)
• The driver accelerates or circles the
vehicle Reverse Parking Collision-Avoidance
Assist may unnecessarily warn the driver
or assist with braking even if there are
no pedestrians or objects under the
following circumstances:
•
Any non-factory equipment or
accessory is installed
• Your vehicle is unstable due to an
accident or other causes
• Bumper height or rear ultrasonic
sensor installation has been modified
• Your vehicle height is low or high
due to heavy loads, abnormal tire
pressure, etc.
• Rear view camera or the rear
ultrasonic sensor(s) is stained with
foreign material, such as snow, dirt,
etc.
• The pattern on the road is mistaken
for a pedestrian
• There is shadow or light reflecting on
the ground
• Pedestrians or objects are around the
path of the vehicle
• Objects generating excessive
noise, such as vehicle horns, loud
motorcycle engines or truck air
brakes, are near your vehicle
• Your vehicle is backing towards a
narrow passage or parking space
• Your vehicle is backing towards an
uneven road surface, such as an
unpaved road, gravel, bump, gradient,
etc.
• A trailer or carrier is installed on the
rear of your vehicle
• An ultrasonic sensor with similar
frequency is near your vehicle
Page 505 of 630
Driver assistance system
7-146
WARNING
Take the following precautions when
using Reverse Parking Collision-
Avoidance Assist:
• Always pay extreme caution while
driving. The driver is responsible for
controlling the brake for safe driving.
• Always pay attention to road and
traffic conditions while driving,
whether or not there is a warning.
• Always look around your vehicle to
make sure there are no pedestrians
or objects before moving the vehicle.
• The performance of Reverse Parking
Collision-Avoidance Assist may
vary under certain conditions. If
vehicle speed is above 2 mph (4
km/h), Reverse Parking Collision-
Avoidance Assist will provide
collision avoidance assist only when
pedestrians are detected. Always
look around and pay attention when
backing up your vehicle.
• Some objects may not be detected
by the rear ultrasonic sensors due
to the objects distance, size or
material, all of which can limit the
effectiveness of the sensor.
• Reverse Parking Collision-Avoidance
Assist may not operate properly
or may operate unnecessarily
depending on the road conditions
and the surroundings.
• Do not solely rely on Reverse Parking
Collision-Avoidance Assist. Doing
so may lead to vehicle damage or
injuries.
CAUTION
• Noise may be heard when sudden
braking occurs to avoid a collision.
• If any other warning sound such
as the seat belt warning chime is
already generated, Reverse Parking
Collision-Avoidance Assist warning
may not sound.
• Reverse Parking Collision-Avoidance
Assist may not work properly if the
bumper has been damaged, replaced
or repaired.
• Reverse Parking Collision-Avoidance
Assist may not operate normally if
interfered by strong electromagnetic
waves.
• Playing the vehicle audio system at
high volume may prevent passengers
from hearing Reverse Parking
Collision-Avoidance Assist warning
sounds.
• Turn off Reverse Parking Collision-
Avoidance Assist when towing a
trailer. If towing and moving in
reverse, Reverse Parking Collision-
Avoidance Assist will activate as it
detects the trailer.
Page 511 of 630
Driver assistance system
7-152
• 'Agree' must be selected on the
infotainment system screen and the
infotainment system has to operate
properly to use Remote Forward/
Backward function.
• Method (2) can be used after the
vehicle has been driven above 3
mph (5 km/h).
• If the function is turned on again
after parallel parking is completed
by Remote Smart Parking Assist,
Remote Forward/Backward function
can be used with Method (2).
• Check that all smart keys are
outside the vehicle when using
Remote Forward/Backward
function.
2. Remotely moving forward/backward
OTM070084
(1) Press and hold one of the Forward
() or Backward () button on
the smart key. Remote Smart
Parking Assist will automatically
control the steering wheel, vehicle
speed and gearshift. The vehicle
will move in the direction of the
button pressed.
(2)
While Remo
te Forward/Backward
function is operating, if the you do
not hold down the Forward (
) or
Backward () button, the vehicle
will stop and system control will
pause. The function will start
operating again when the button is
pressed and held again. (3)
When the vehicle r
eaches the
target location, release the smart
key Forward or Backward button.
(4)
When the driver ge
ts in the vehicle
with the smart key, a message
will appear informing the driver
Remote Forward/Backward
function is complete on the
infotainment system screen and
the engine will remain on.
In addition, when the Remote Start
(
) button is pressed on the smart
key from outside the vehicle, a
message will appear informing the
driver Remote Forward/Backward
function is complete and the
engine will turn off.
• Check that all smart keys are
outside the vehicle when using
Remote Forward/Backward
function.
• Remote Forward/Backward
function will operate only when the
smart key is within 13 ft. (4 m) from
the vehicle. If there is no vehicle
movement even when the Forward
or Backward button is pressed on
the smart key, check the distance
to the vehicle and press the button
again.
• The detecting range of the smart
key may vary depending on the
surroundings that are affected by
radio waves such as transmission
tower, broadcast station, etc.
• When remotely moving forward
using method (1), it is recognized
as an exit situation, and the
vehicle moves 13 ft. (4 m) to
check for pedestrians, animals or
objects around the vehicle. After
confirmation, the steering wheel
is controlled according to the
condition ahead.
Page 521 of 630
8. Emergency situations
Hazard warning flasher........................................................................\
.............8-2
In case of an emergency while driving
............................................................ 8
-3
If the engine stalls while driving ........................................................................\
.........8-3
If the engine s talls at a crossroad or crossing ............................................................ 8
-3
If you have a flat tire while driving
........................................................................\
...... 8
-3
If the engine will not start ........................................................................\
........8-4
If the 12 Volt Ba ttery Is Discharged
.................................................................. 8-5
Before Jump Starting ........................................................................\
........................... 8-5
Jump Starting ........................................................................\
...................................... 8-6
If the Engine Overheats ........................................................................\
............8-8
Tire Pr essure Monitoring System (TPMS)
....................................................... 8-
10
Check tire pressure ........................................................................\
............................8-10
Tir e pressure monitoring system ........................................................................\
........ 8-11
L
ow tire pressure warning light
........................................................................\
......... 8-
12
Low tire pressure position and tire pressure indicator
............................................ 8-
12
TPMS (Tire Pressure Monitoring System) malfunction indicator
............................ 8-
13
Changing a tire with TPMS
........................................................................\
................ 8-
13
If you have a flat tire (with Tire Mobility Kit) ..................................................8-15Introduction ........................................................................\
........................................ 8-15
N otes on the safe use of the Tire Mobility Kit .......................................................... 8-
16
Components of the Tire Mobility Kit
........................................................................\
.. 8-
17
Using the Tire Mobility Kit
........................................................................\
................. 8-
18
Checking the tire inflation pressure
........................................................................\
.. 8-
21
Towing ........................................................................\
.....................................8-23Towing service ........................................................................\
....................................8-23
R emovable towing hook ........................................................................\
.................... 8
-24
Emergency towing
........................................................................\
............................. 8-
25
Emergency / Roadside assistance accessories ............................................8-27Fire extinguisher ........................................................................\
................................. 8-27
Fir st aid kit ........................................................................\
..................................... .....8-27
Triangle reflector
........................................................................\
................................ 8-
27
Tire pressure gauge
........................................................................\
........................... 8-
27
Emergency situations
8
Page 526 of 630
Emergency situations
8-6
NOTICE
External power source using 12V battery
The use of external power accessories
may reduce performance and function
of the vehicle. Especially, the use of
dash cameras may shut off the power of
the vehicle prior to the dash camera’s
automatic shut-down.
If the power of the vehicle is shut off,
start the vehicle as explained. (refer to
“Using the 12V Battery Reset Switch”)
Jump Starting
In the event vehicle still does not have a
functional 12V battery (check if interior
lights will not turn on) then you can try
a jump start to the engine compartment
jumper terminals using a 12V booster
pack or jumper cables from another
vehicle’s 12V battery according to the
following instructions.
CAUTION
Jump starting can be dangerous if
done incorrectly. Follow the jump
starting procedure in this section to
avoid serious injury or damage to
your vehicle. If in doubt about how to
properly jump start your vehicle, we
strongly recommend that you have a
service technician or towing service do
it for you.
1.
Position the v
ehicles close enough
that the jumper cables will reach, but
do not allow the vehicles to touch.
Avoid fans or any moving parts in the
engine compartment at all times, even
when the vehicles are turned off.
2.
Turn o
ff all electrical devices such as
radios, lights, air conditioning, etc.
Put the vehicles in P (Park) and set the
parking brake. Turn both vehicles OFF.
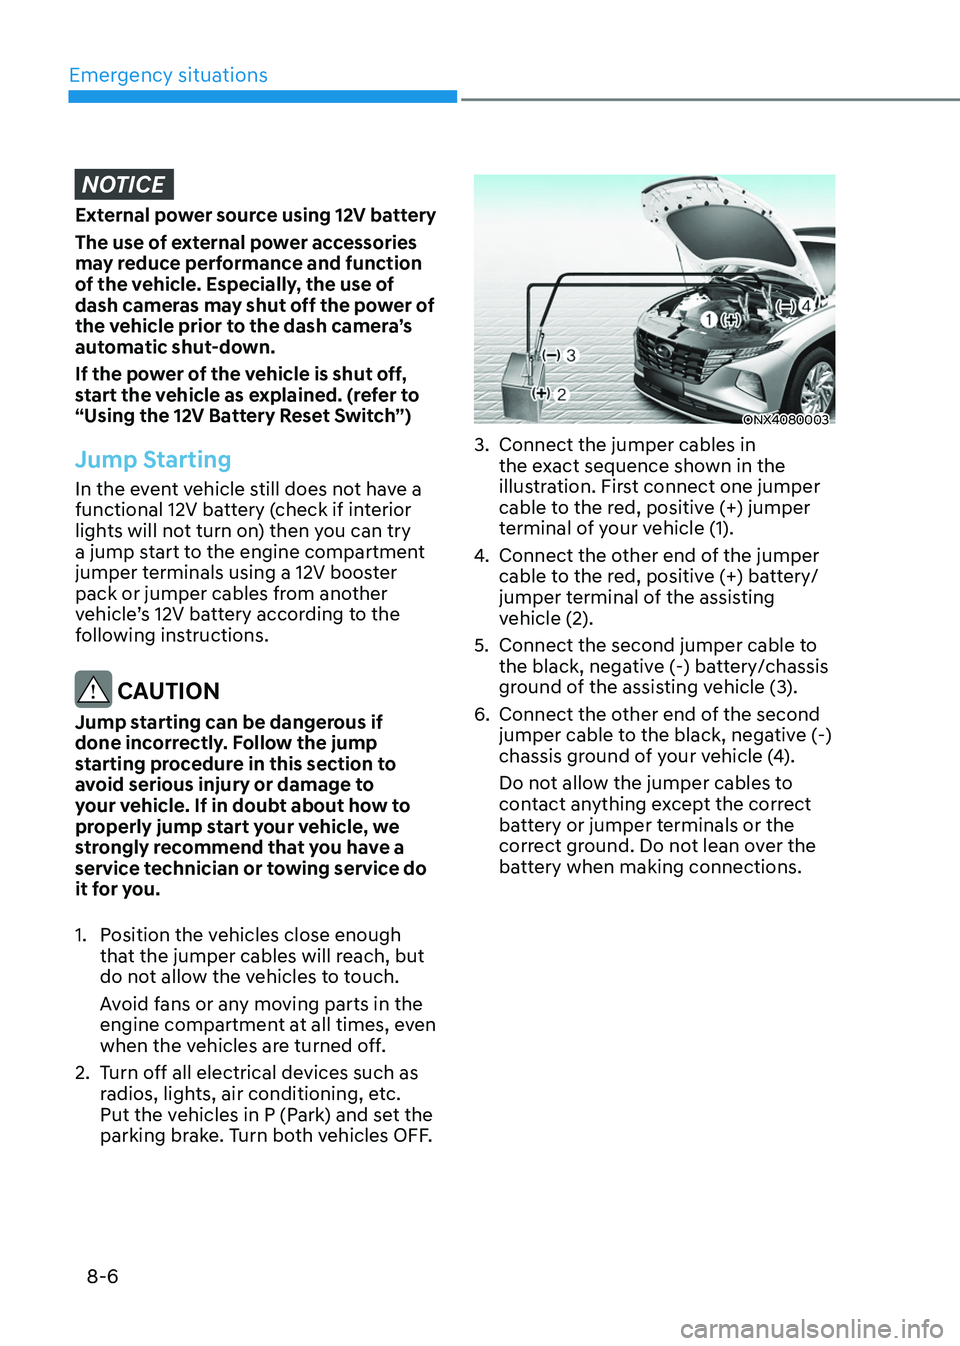
ONX4080003
3. Connect the jumper cables in
the ex act sequence shown in the
illustration. First connect one jumper
cable to the red, positive (+) jumper
terminal of your vehicle (1).
4.
Connect the other end o
f the jumper
cable to the red, positive (+) battery/
jumper terminal of the assisting
vehicle (2).
5.
Connect the second jumper cable to
the black, nega
tive (-) battery/chassis
ground of the assisting vehicle (3).
6.
Connect the other end o
f the second
jumper cable to the black, negative (-)
chassis ground of your vehicle (4).
Do not allow the jumper cables to
contact anything except the correct
battery or jumper terminals or the
correct ground. Do not lean over the
battery when making connections.
Page 529 of 630
08
8-9
WARNING
Never remove the engine
coolant cap and/or inverter
coolant cap or the drain plug
while the engine and radiator
are hot.
Hot coolant and steam may blow out
under pressure, causing serious injury.
Turn the hybrid system off and wait until
the engine cools down. Use extreme
care when removing the engine coolant
cap and/or inverter coolant cap. Wrap
a thick towel around it, and turn it
counterclockwise slowly to the first
stop. Step back while the pressure is
released from the cooling system. When
you are sure all the pressure has been
released, press down on the cap, using
a thick towel, and continue turning
counterclockwise to remove it.
CAUTION
• Serious loss of coolant indicates a
leak in the cooling system and should
be checked as soon as possible by an
authorized HYUNDAI dealer.
• When the engine overheats from
low engine coolant, suddenly adding
engine coolant may cause cracks
in the engine. To prevent damage,
add engine coolant slowly in small
quantities.
Page 533 of 630
08
8-13
TPMS (Tire Pressure
Monitoring System)
malfunction indicator
The TPMS Malfunction Indicator
will illuminate after it blinks for
approximately one minute when there
is a problem with the Tire Pressure
Monitoring System.
We recommend that you have the
system checked by an authorized
HYUNDAI dealer as soon as possible.
NOTICE
If there is a malfunction with the TPMS,
the Low Tire Pressure Position Indicator
will not be displayed even though the
vehicle has an under-inflated tire.
NOTICE
The TPMS Malfunction Indicator may
illuminate after blinking for one minute
if the vehicle is near electric power
supply cables or radio transmitters
such as police stations, government
and public offices, broadcasting
stations, military installations, airports,
transmitting towers, etc.
Additionally, the TPMS Malfunction
Indicator may illuminate if snow chains
are used or electronic devices such as
computers, chargers, remote starters,
navigation, etc. This may interfere with
normal operation of the TPMS.
Changing a tire with TPMS
If you have a flat tire, the Low Tire
Pressure and Position indicators will
come on. We recommend that you have
the flat tire repaired by an authorized
HYUNDAI dealer as soon as possible or
replace the flat tire with the spare tire.
NOTICE
It is recommended that you do not
use a puncture-repairing agent not
approved by HYUNDAI dealer or the
equivalent specified for your vehicle to
repair and/or inflate a low pressure tire.
Tire sealant not approved by HYUNDAI
dealer or the equivalent specified for
your vehicle may damage the tire
pressure sensor.
The spare tire (if equipped) does not
come with a tire pressure monitoring
sensor. When the low pressure tire or
the flat tire is replaced with the spare
tire, the Low Tire Pressure Indicator will
remain on. Also, the TPMS Malfunction
Indicator will illuminate after blinking
for one minute if the vehicle is driven
at speed above 15.5 mph (25 km/h) for
approximately 10 minutes.
Once the original tire equipped with
a tire pressure monitoring sensor is
reinflated to the recommended pressure
and reinstalled on the vehicle, the
Low Tire Pressure Indicator and TPMS
Malfunction Indicator will go off within a
few minutes of driving.
If the indicators do not extinguish after
a few minutes, we recommend that you
contact an authorized HYUNDAI dealer.
Each wheel is equipped with a tire
pressure sensor mounted inside the tire
behind the valve stem (except for the
spare tire). You must use TPMS specific
wheels. It is recommended that you
always have your tires serviced by an
authorized HYUNDAI dealer.