2021 HYUNDAI TUCSON HYBRID ECO mode
[x] Cancel search: ECO modePage 204 of 630
05
5-47
1. Programming HomeLink®
The following steps show how to
program HomeLink. If you have any
questions or are having difficulty
programming your HomeLink buttons,
refer to the HomeLink website or call the
HomeLink customer support toll-free
number. Do this before going back to the
dealer who sold you the car.
• Visit the HomeLink website at: www.
homelink.com. Then at the top of the
page, choose your vehicle make. Then
watch the You Tube video, and/or
access additional website information.
• If you choose to access the website
via your cell phone, scan the QR code.
• Or call HomeLink customer support
at 1-800-355-3515 (Please have the
vehicle make/model and the opener
device make/model readily available.)
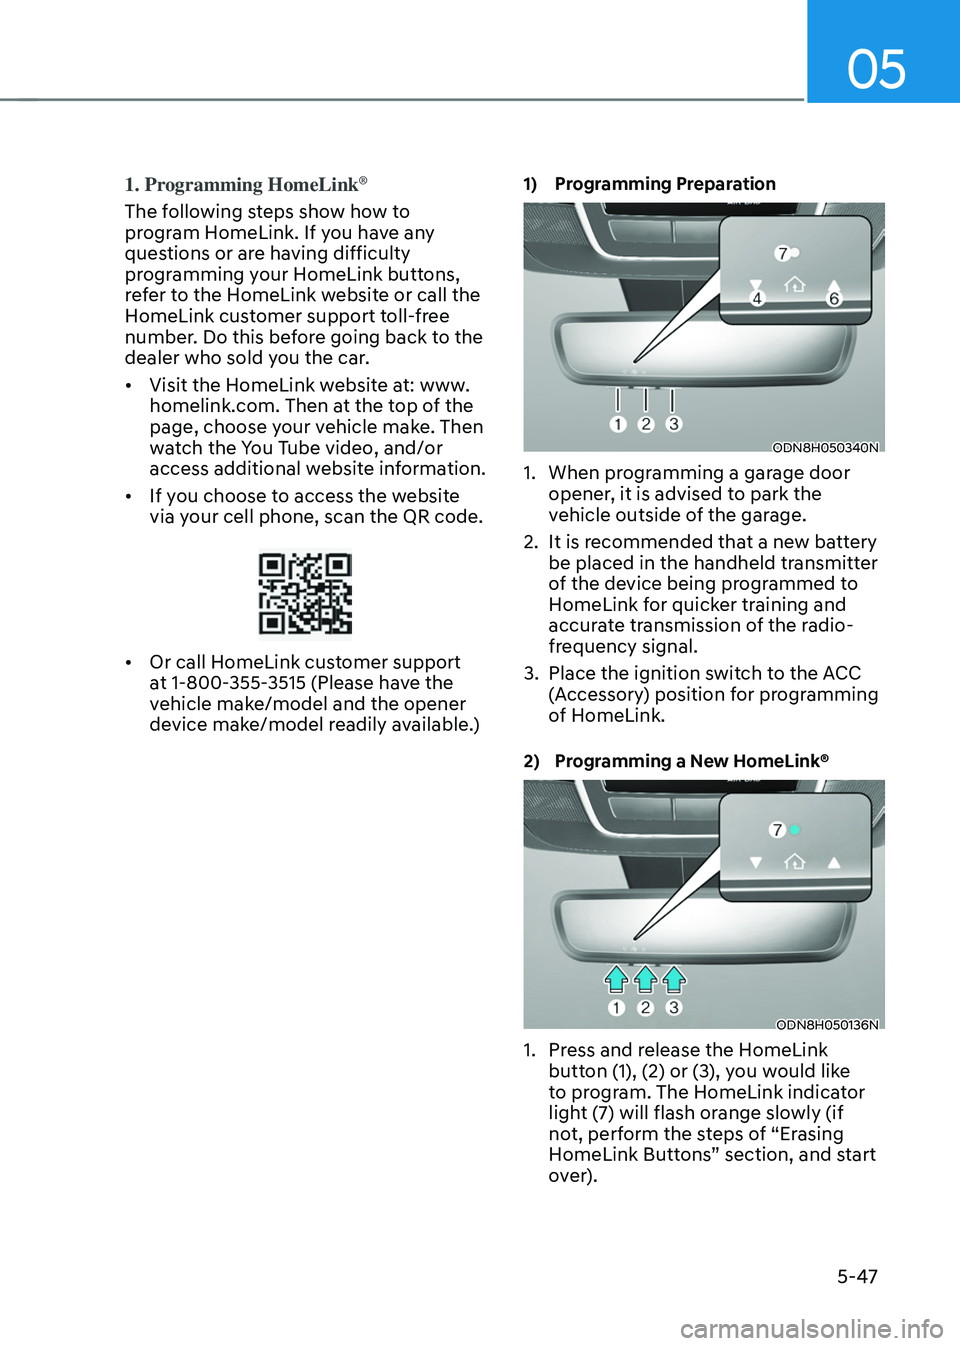
1) Programming Preparation
ODN8H050340N
1. When progr amming a garage door
opener, it is advised to park the
vehicle outside of the garage.
2.
It is recommended tha
t a new battery
be placed in the handheld transmitter
of the device being programmed to
HomeLink for quicker training and
accurate transmission of the radio-
frequency signal.
3.
Place the ignition swit
ch to the ACC
(Accessory) position for programming
of HomeLink.
2) Programming a New HomeLink®
ODN8H050136N
1. Press and release the HomeLink
butt on (1), (2) or (3), you would like
to program. The HomeLink indicator
light (7) will flash orange slowly (if
not, perform the steps of “Erasing
HomeLink Buttons” section, and start
over).
Page 232 of 630
05
5-75
If ‘User Height Setting’ is selected, follow
the instructions below to set the height
of the power liftgate manually.
Position the liftgate manually to the
height you prefer.
ONX4E050062R
Press the power liftgate open/close
button located inside the liftgate for
more than 3 seconds. Close the liftgate
manually after hearing the buzzer sound.
The liftgate will open to the automatically
adjusted height that was set.
Power liftgate opening speed
You can adjust the power liftgate
opening speed from the User Settings
mode
on the L
CD
displa
y.
‘Door → P
ower
Liftga
te
Opening Speed → F
ast/Slow’.
For more details, refer to “LCD Display”
In chapter 4
WARNING
Always keep the liftgate completely
closed while the vehicle is in motion. If
it is left open or ajar, poisonous exhaust
gases containing carbon monoxide
(CO) may enter the vehicle and serious
illness or death may result.
WARNING
Occupants should never ride in the
rear cargo area where no restraints are
available. To avoid injury in the event of
an accident or sudden stops, occupants
should always be properly restrained.
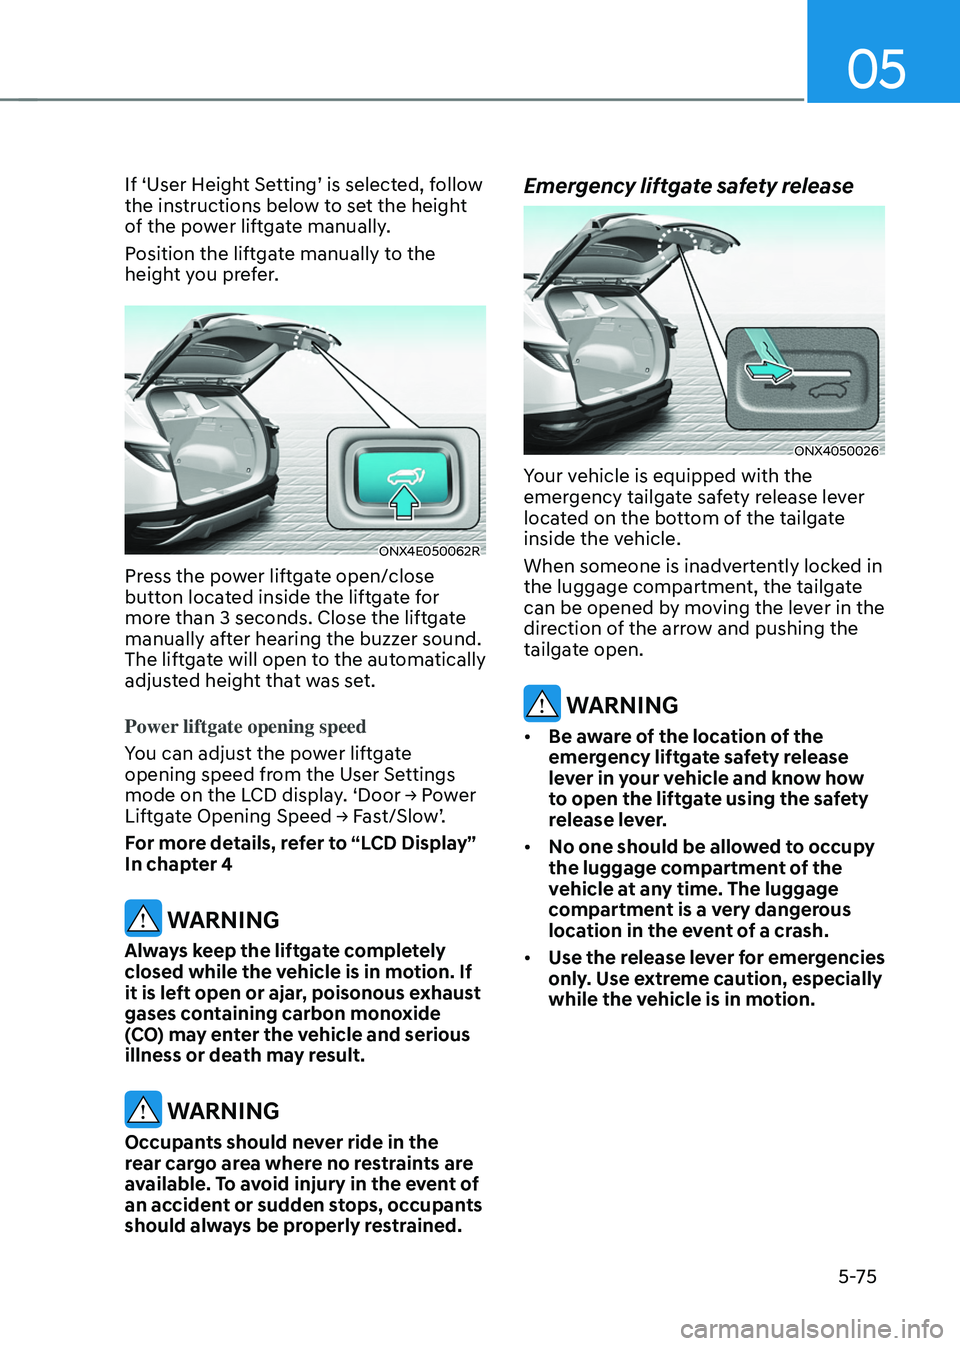
Emergency liftgate safety release
ONX4050026
Your vehicle is equipped with the
emergency tailgate safety release lever
located on the bottom of the tailgate
inside the vehicle.
When someone is inadvertently locked in
the luggage compartment, the tailgate
can be opened by moving the lever in the
direction of the arrow and pushing the
tailgate open.
WARNING
• Be aware of the location of the
emergency liftgate safety release
lever in your vehicle and know how
to open the liftgate using the safety
release lever.
• No one should be allowed to occupy
the luggage compartment of the
vehicle at any time. The luggage
compartment is a very dangerous
location in the event of a crash.
• Use the release lever for emergencies
only. Use extreme caution, especially
while the vehicle is in motion.
Page 233 of 630
Convenient features
5 -76
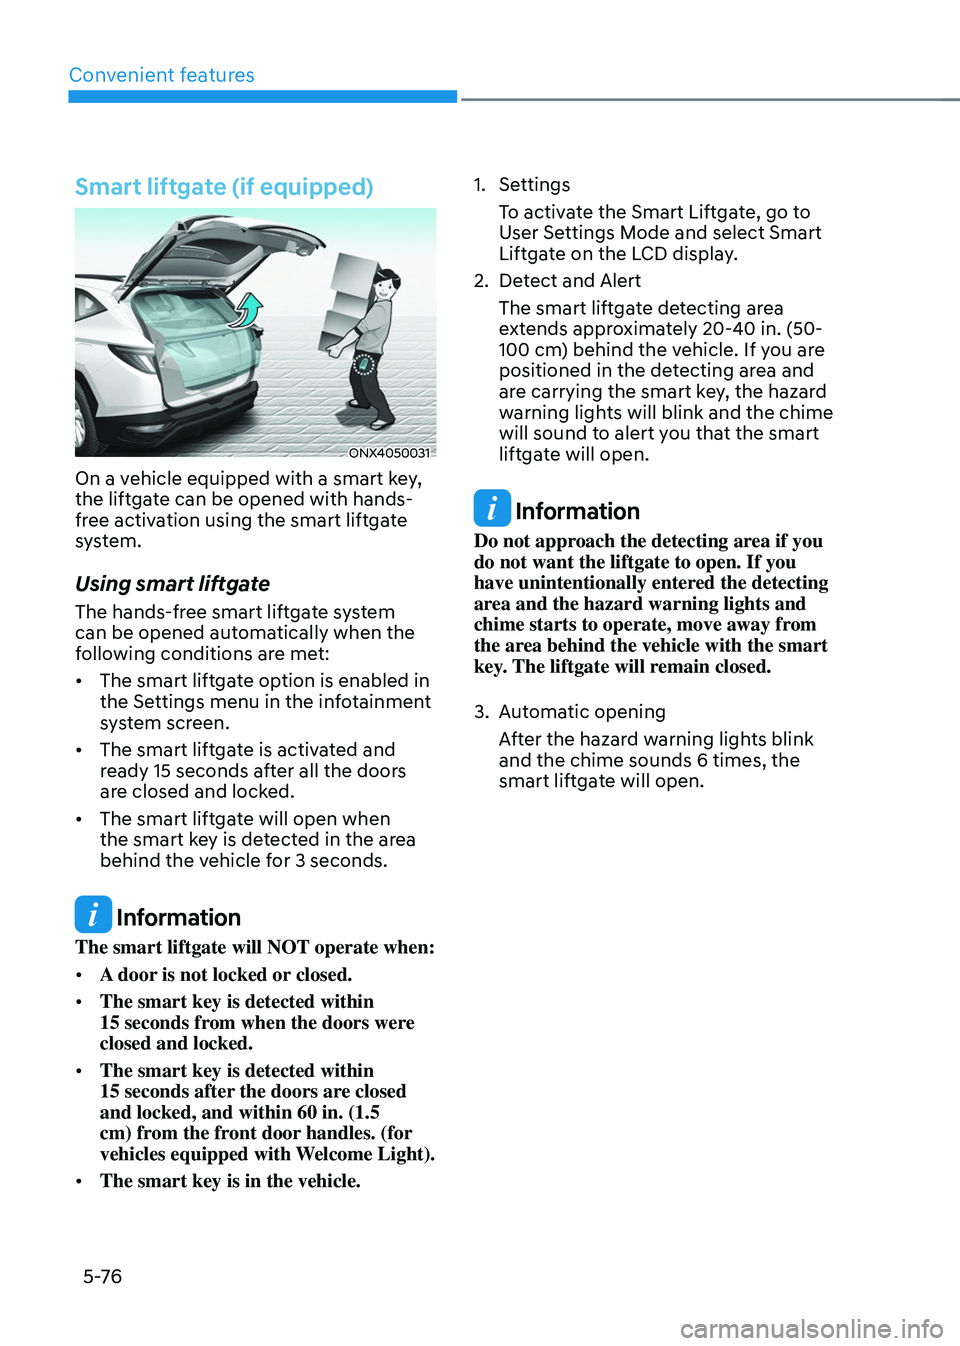
Smart liftgate (if equipped)
ONX4050031
On a vehicle equipped with a smart key,
the liftgate can be opened with hands-
free activation using the smart liftgate
system.
Using smart liftgate
The hands-free smart liftgate system
can be opened automatically when the
following conditions are met:
• The smart liftgate option is enabled in
the Settings menu in the infotainment
system screen.
• The smart liftgate is activated and
ready 15 seconds after all the doors
are closed and locked.
• The smart liftgate will open when
the smart key is detected in the area
behind the vehicle for 3 seconds.
Information
The smart liftgate will NOT operate when:
• A door is not locked or closed.
• The smart key is detected within
15
seconds fr
om when the doors were
closed and locked.
• The smart key is detected within
15
seconds after
the doors are closed
and locked, and within 60 in. (1.5
cm) from the front door handles. (for
vehicles equipped with Welcome Light).
• The smart key is in the vehicle. 1.
Settings
T
o activate the Smart Liftgate, go to
User Settings Mode and select Smart
Liftgate on the LCD display.
2.
Det
ect and Alert
The smart liftgate detecting area
extends approximately 20-40 in. (50-
100 cm) behind the vehicle. If you are
positioned in the detecting area and
are carrying the smart key, the hazard
warning lights will blink and the chime
will sound to alert you that the smart
liftgate will open.
Information
Do not approach the detecting area if you
do not want the liftgate to open. If you
have unintentionally entered the detecting
area and the hazard warning lights and
chime starts to operate, move away from
the area behind the vehicle with the smart
key. The liftgate will remain closed.
3.
Aut
omatic opening
After the hazard warning lights blink
and the chime sounds 6 times, the
smart liftgate will open.
Page 248 of 630
05
5-91
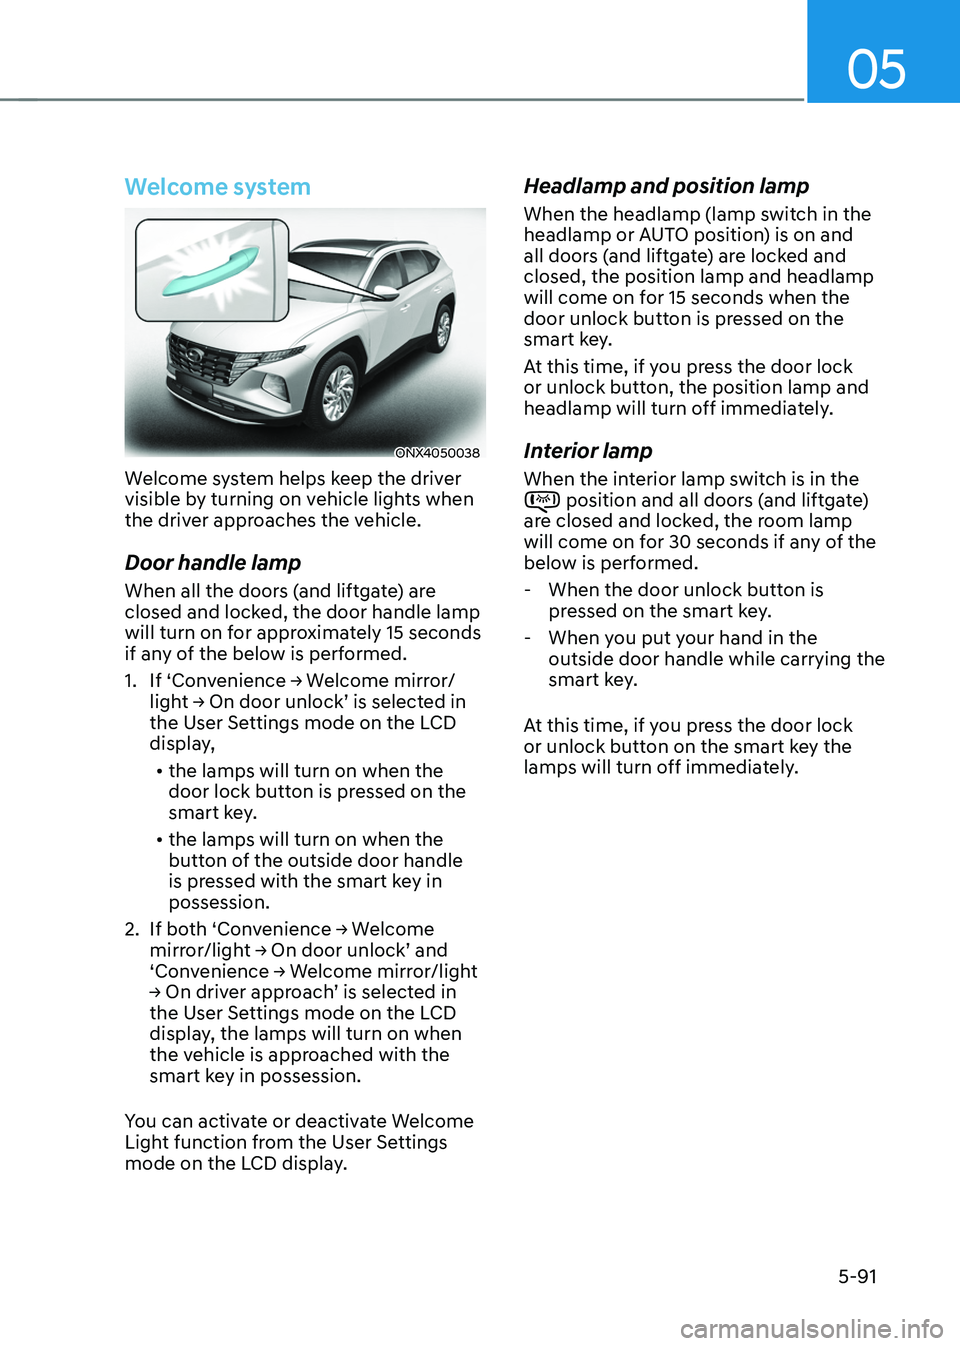
Welcome system
ONX4050038
Welcome system helps keep the driver
visible by turning on vehicle lights when
the driver approaches the vehicle.
Door handle lamp
When all the doors (and liftgate) are
closed and locked, the door handle lamp
will turn on for approximately 15 seconds
if any of the below is performed.
1.
If ‘Con
venience
→ W
elcome
mirr
or/
light
→ On door unlock’ is select
ed
in the User Se
ttings mode on the LCD
display,
• the lamps will turn on when the
door lock button is pressed on the
smart key.
• the lamps will turn on when the
button of the outside door handle
is pressed with the smart key in
possession.
2.
If bo
th
‘Con
venience
→ W
elcome
mirror/ligh
t
→ On door unlock’ and ‘Conv
enience
→ W
elcome
mirr
or/light
→ On driv
er
appr
oach’
is select
ed
in the User Se
ttings mode on the LCD
display, the lamps will turn on when
the vehicle is approached with the
smart key in possession.
You can activate or deactivate Welcome
Light function from the User Settings
mode on the LCD display.
Headlamp and position lamp
When the headlamp (lamp switch in the
headlamp or AUTO position) is on and
all doors (and liftgate) are locked and
closed, the position lamp and headlamp
will come on for 15 seconds when the
door unlock button is pressed on the
smart key.
At this time, if you press the door lock
or unlock button, the position lamp and
headlamp will turn off immediately.
Interior lamp
When the interior lamp switch is in the position and all doors (and liftgate)
are closed and locked, the room lamp
will come on for 30 seconds if any of the
below is performed.
- When the door unlock button is pr
essed on the smart key.
- When you put y
our hand in the
outside door handle while carrying the
smart key.
At this time, if you press the door lock
or unlock button on the smart key the
lamps will turn off immediately.
Page 265 of 630
Convenient features
5-108
Air conditioning system operation tips
• If the vehicle has been parked in
direct sunlight during hot weather,
open the windows for a short time
to let the hot air inside the vehicle
escape.
• After sufficient cooling has been
achieved, switch back from the
recirculated air to the fresh outside air
position.
• To help reduce moisture inside of
the windows on rainy or humid
days, decrease the humidity inside
the vehicle by operating the air
conditioning system with the windows
and sunroof closed.
• Use the air conditioning system every
month for a few minutes to ensure
maximum system performance.
• If you operate the air conditioner
excessively, the difference between
the temperature of the outside air and
that of the windshield could cause
the outer surface of the windshield to
fog up, causing loss of visibility. In this
case, set the mode selection button to
the
position and set the fan speed
control knob to the lowest speed
setting.
System maintenance
Cabin air filter
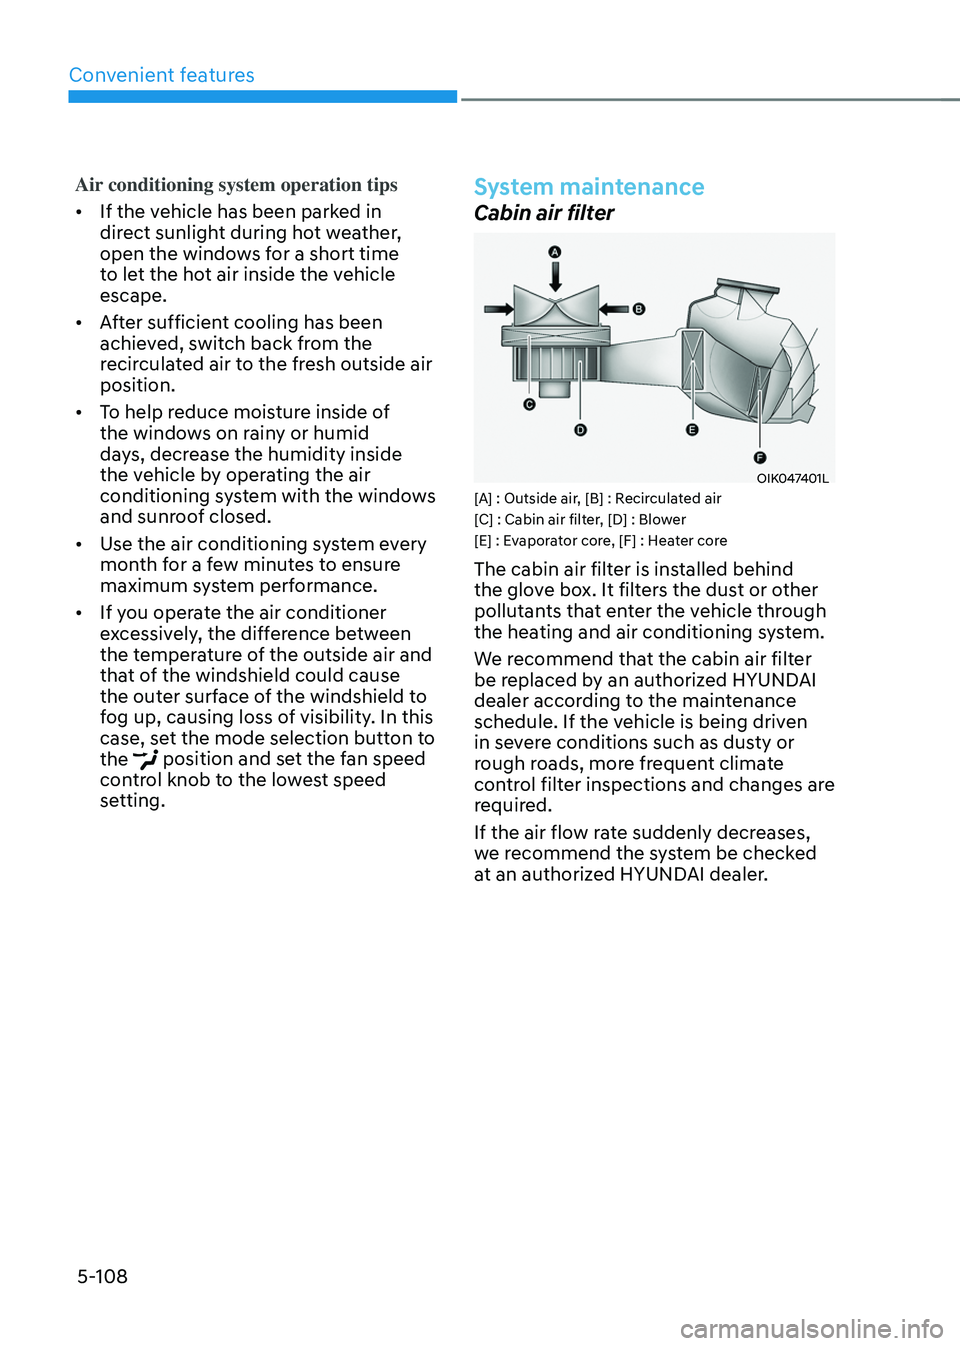
OIK047401L[A] : Outside air, [B] : Recirculated air
[C] : Cabin air filter, [D] : Blower
[E] : Evaporator core, [F] : Heater core
The cabin air filter is installed behind
the glove box. It filters the dust or other
pollutants that enter the vehicle through
the heating and air conditioning system.
We recommend that the cabin air filter
be replaced by an authorized HYUNDAI
dealer according to the maintenance
schedule. If the vehicle is being driven
in severe conditions such as dusty or
rough roads, more frequent climate
control filter inspections and changes are
required.
If the air flow rate suddenly decreases,
we recommend the system be checked
at an authorized HYUNDAI dealer.
Page 267 of 630
Convenient features5-110
winDshielD Defr osting AnD Def ogging
WARNING
Windshield heating
Do not use the
position during
cooling operation in extremely humid
weather. The difference between the
temperature of the outside air and that
of the windshield could cause the outer
surface of the windshield to fog up,
causing loss of visibility could cause
an accident resulting in serious injury
or death. In this case, set the mode
selection button to the
position
and fan speed control knob to a lower
speed.
• For maximum defrost performance,
set the temperature control to the
highest temperature setting and
the fan speed control to the highest
setting.
• If warm air to the floor is desired while
defrosting or defogging, set the mode
to the floor-defrost position.
• Before driving, clear all snow and ice
from the windshield, rear window,
side view mirrors, and all side
windows.
• Clear all snow and ice from the
hood and air inlet in the cowl grill
to improve heater and defroster
efficiency and to reduce the
probability of fogging up the inside of
the windshield.
NOTICE
If the engine temperature is still cold
after starting, then a brief engine warm
up period may be required for the
vented air flow to become warm or hot.
Automatic climate control
system
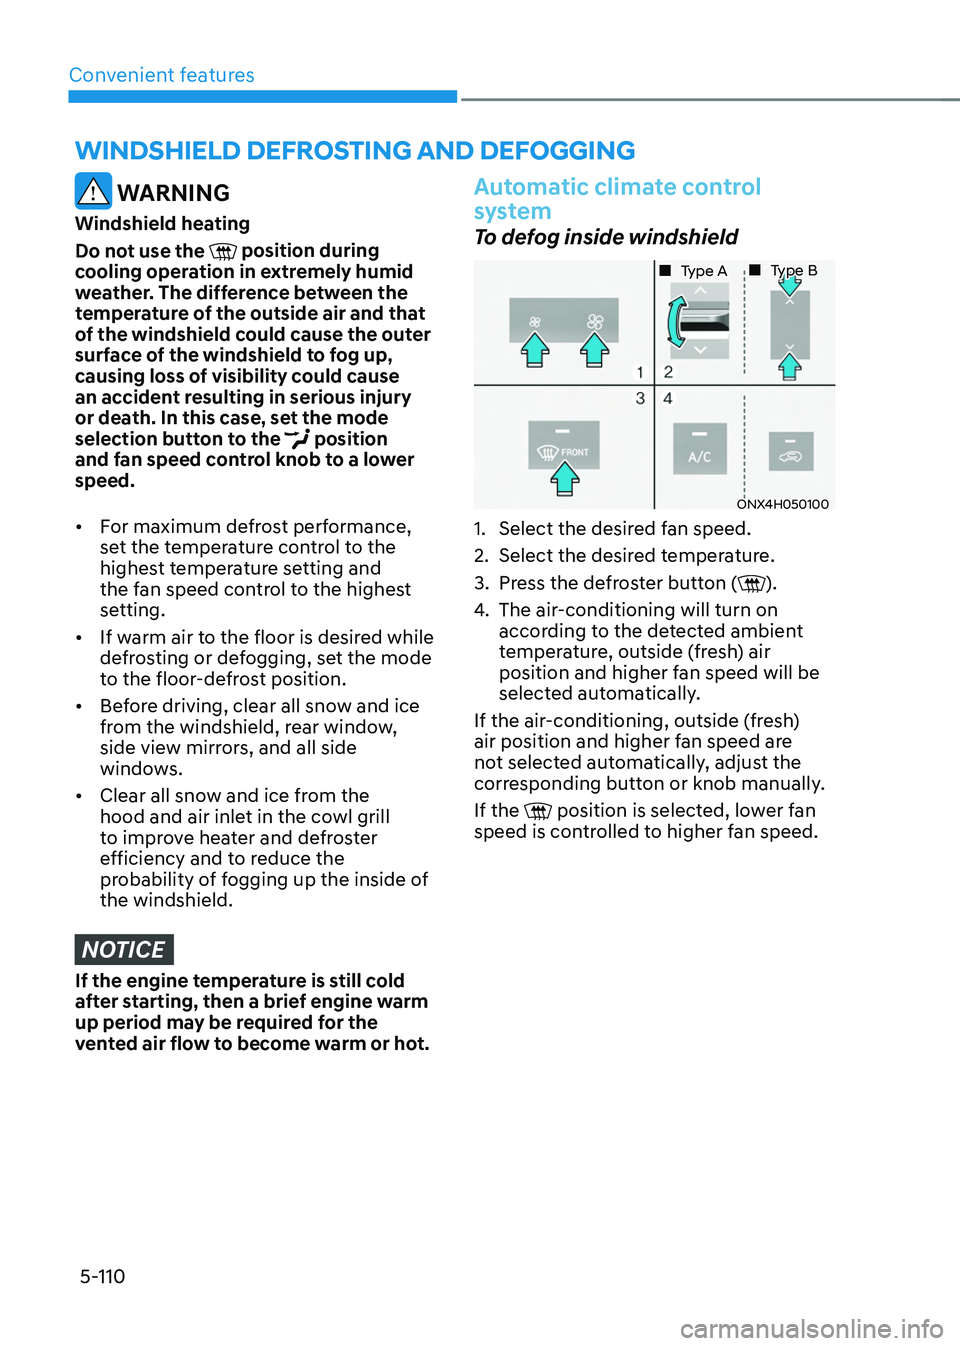
To defog inside windshield
ONX4H050100
„„ Type A „„ Type B
1. Select the desired f
an speed.
2.
Select the desired t
emperature.
3.
Press the de
froster button (
).
4.
The air-conditioning will turn on
accor
ding to the detected ambient
temperature, outside (fresh) air
position and higher fan speed will be
selected automatically.
If the air-conditioning, outside (fresh)
air position and higher fan speed are
not selected automatically, adjust the
corresponding button or knob manually.
If the
position is selected, lower fan
speed is controlled to higher fan speed.
Page 268 of 630
05
5-111
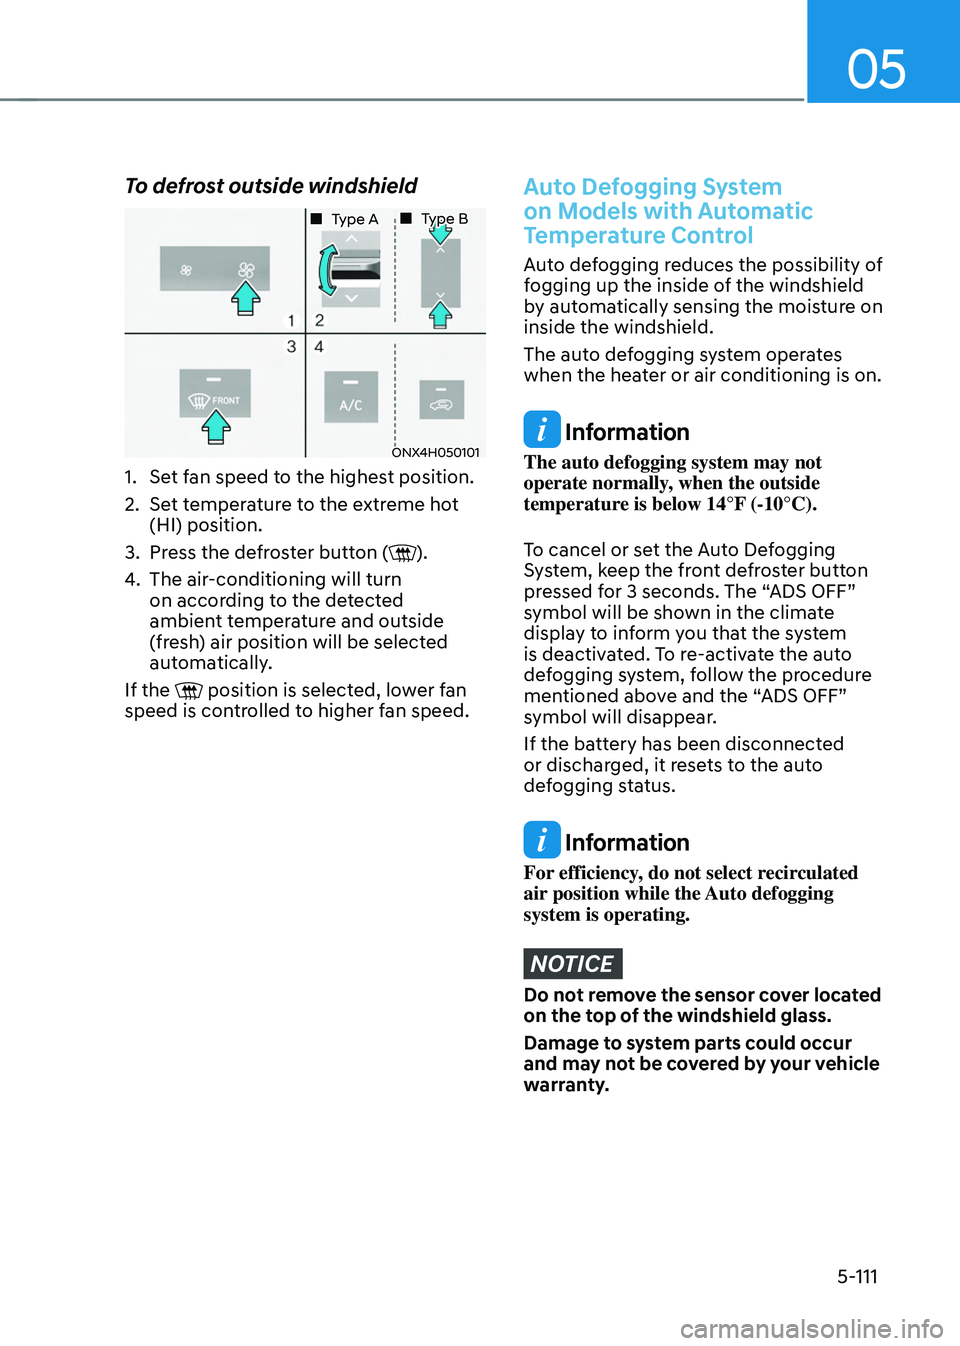
To defrost outside windshield
ONX4H050101
„„ Type A„„ Type B
1. Set fan speed to the highest position.
2.
Set t
emperature to the extreme hot
(HI) position.
3.
Press the de
froster button (
).
4.
The air-conditioning will turn
on accor
ding to the detected
ambient temperature and outside
(fresh) air position will be selected
automatically.
If the
position is selected, lower fan
speed is controlled to higher fan speed.
Auto Defogging System
on Models with Automatic
Temperature Control
Auto defogging reduces the possibility of
fogging up the inside of the windshield
by automatically sensing the moisture on
inside the windshield.
The auto defogging system operates
when the heater or air conditioning is on.
Information
The auto defogging system may not
operate normally, when the outside
temperature is below 14°F (-10°C).
To cancel or set the Auto Defogging
System, keep the front defroster button
pressed for 3 seconds. The “ADS OFF”
symbol will be shown in the climate
display to inform you that the system
is deactivated. To re-activate the auto
defogging system, follow the procedure
mentioned above and the “ADS OFF”
symbol will disappear.
If the battery has been disconnected
or discharged, it resets to the auto
defogging status.
Information
For efficiency, do not select recirculated
air position while the Auto defogging
system is operating.
NOTICE
Do not remove the sensor cover located
on the top of the windshield glass.
Damage to system parts could occur
and may not be covered by your vehicle
warranty.
Page 271 of 630
Convenient features
5-114
Turning the Auto Defogging System
ON or OFF
Climate control system
Press the front windshield defroster
button for 3 seconds when the Engine
Start/Stop button is in the ON position.
When the Auto Defogging System is
turned off, the ADS OFF symbol will blink
3 times and ADS OFF will be displayed on
the climate control information screen.
When the Auto Defogging System is
turned on, the ADS OFF symbol will blink
6 times without a signal.
Infotainment system
Auto Defogging System can be turned
on
and o
ff
b
y
selecting ‘Se
tup
→ Vehicle Se
ttings
→ Clima
te
→ De
fog/
Defrost
Op
tions
→ A
uto
De
fog’
fr
om
the inf
otainment system screen.
For detailed information, refer to the
separately supplied infotainment
system manual.
Information
• When the air conditioning is turned
on by Auto Defogging System, if you
try to turn off the air conditioning, the
indicator will blink 3 times and the air
conditioning will not be turned off.
• To maintain the effectiveness and
efficiency of the Auto Defogging
System, do not select Recirculation
mode while the system is operating.
• When Auto Defogging System is
operating, fan speed adjustment,
temperature adjustment, and air intake
control selection are all disabled.
NOTICE
Do not remove the sensor cover located
on the upper end of the windshield
glass.
Damage to system parts could occur
and may not be covered by your vehicle
warranty.
Auto dehumidify (if equipped)
To increase cabin air quality and reduce
windshield misting, recirculation mode
switches off automatically after about 5
to 30 minutes, depending on the outside
temperature, and the air intake will
change to fresh mode.
Turning Auto Dehumidify ON or OFF
Climate control system
To turn the Auto Dehumidify feature
on or off, select Face level (
) mode
and press the air intake control ()
button at least five times within three
seconds. When Auto Dehumidify is
turned on, the air intake control button
indicator will blink 6 times. When turned
off, the indicator will blink 3 times.
Infotainment system
Auto Dehumidify can be turned on and
off
b
y
selecting ‘Se
tup
→ V
ehicle
Se
ttings
→ Clima
te
→ A
utomatic
V
entilation
→ Aut
o Dehumidify’ from the infotainment
system screen.
For detailed information, refer to the
separately supplied infotainment
system manual.