2021 HYUNDAI TUCSON HYBRID ABS
[x] Cancel search: ABSPage 600 of 630
09
9-53
Rear combination lamp
replacement
Type A
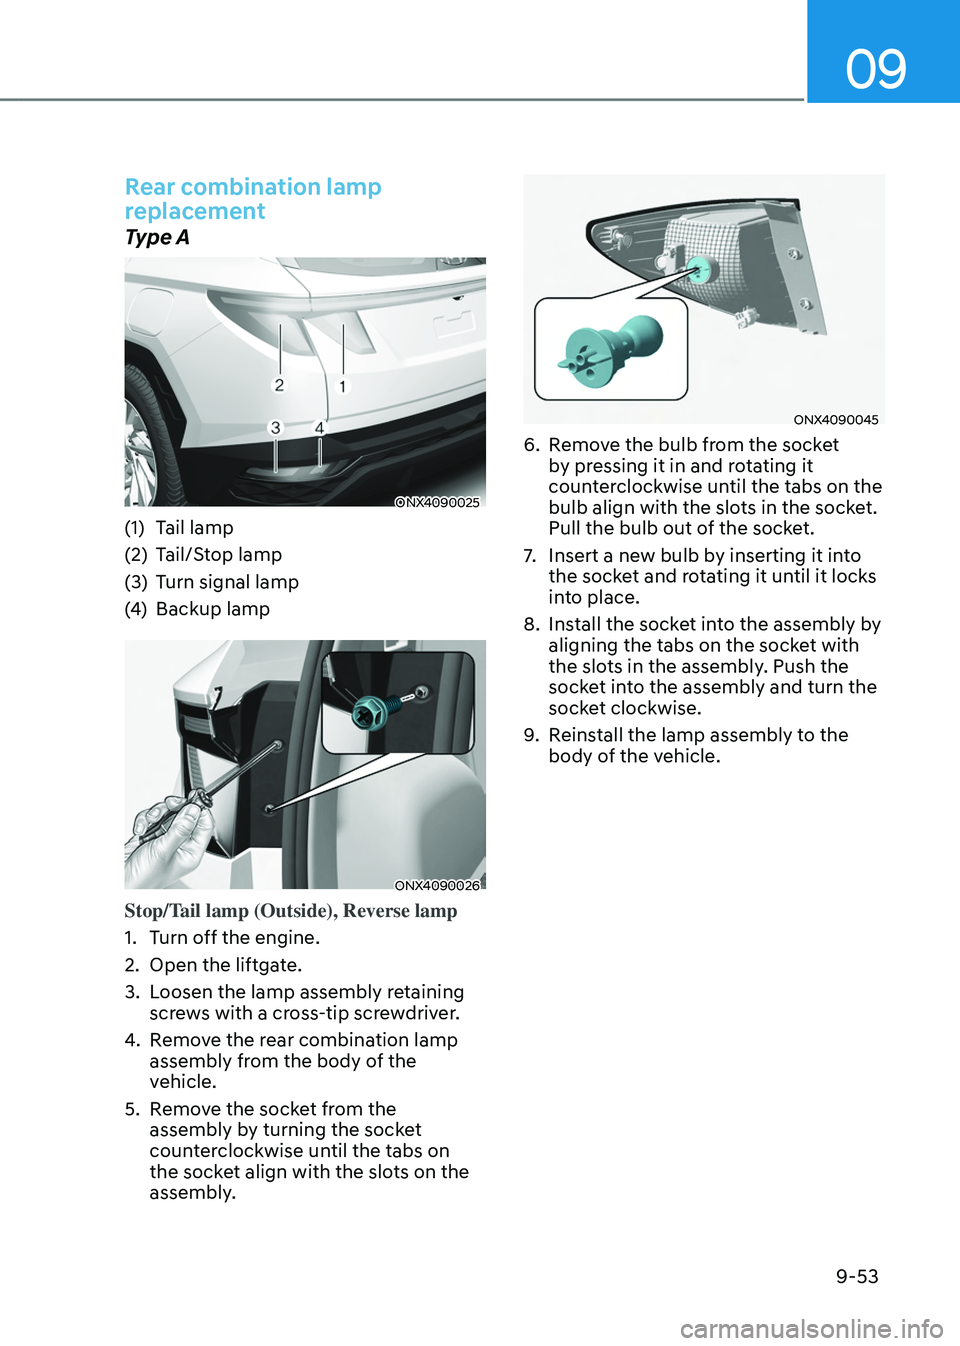
ONX4090025
(1) Tail lamp
(2)
Tail/S
top lamp
(3)
Turn signal lamp
(4
)
Backup lamp
ONX4090026
Stop/Tail lamp (Outside), Reverse lamp
1.
Turn o
ff the engine.
2.
Open the liftga
te.
3.
Loosen the lamp assembly r
etaining
screws with a cross-tip screwdriver.
4.
Remo
ve the rear combination lamp
assembly from the body of the
vehicle.
5.
Remo
ve the socket from the
assembly by turning the socket
counterclockwise until the tabs on
the socket align with the slots on the
assembly.
ONX4090045
6. Remove the bulb from the socket
b y pressing it in and rotating it
counterclockwise until the tabs on the
bulb align with the slots in the socket.
Pull the bulb out of the socket.
7.
Insert a new bulb b
y inserting it into
the socket and rotating it until it locks
into place.
8.
Install the sock
et into the assembly by
aligning the tabs on the socket with
the slots in the assembly. Push the
socket into the assembly and turn the
socket clockwise.
9.
Reins
tall the lamp assembly to the
body of the vehicle.
Page 601 of 630
Maintenance
9-54
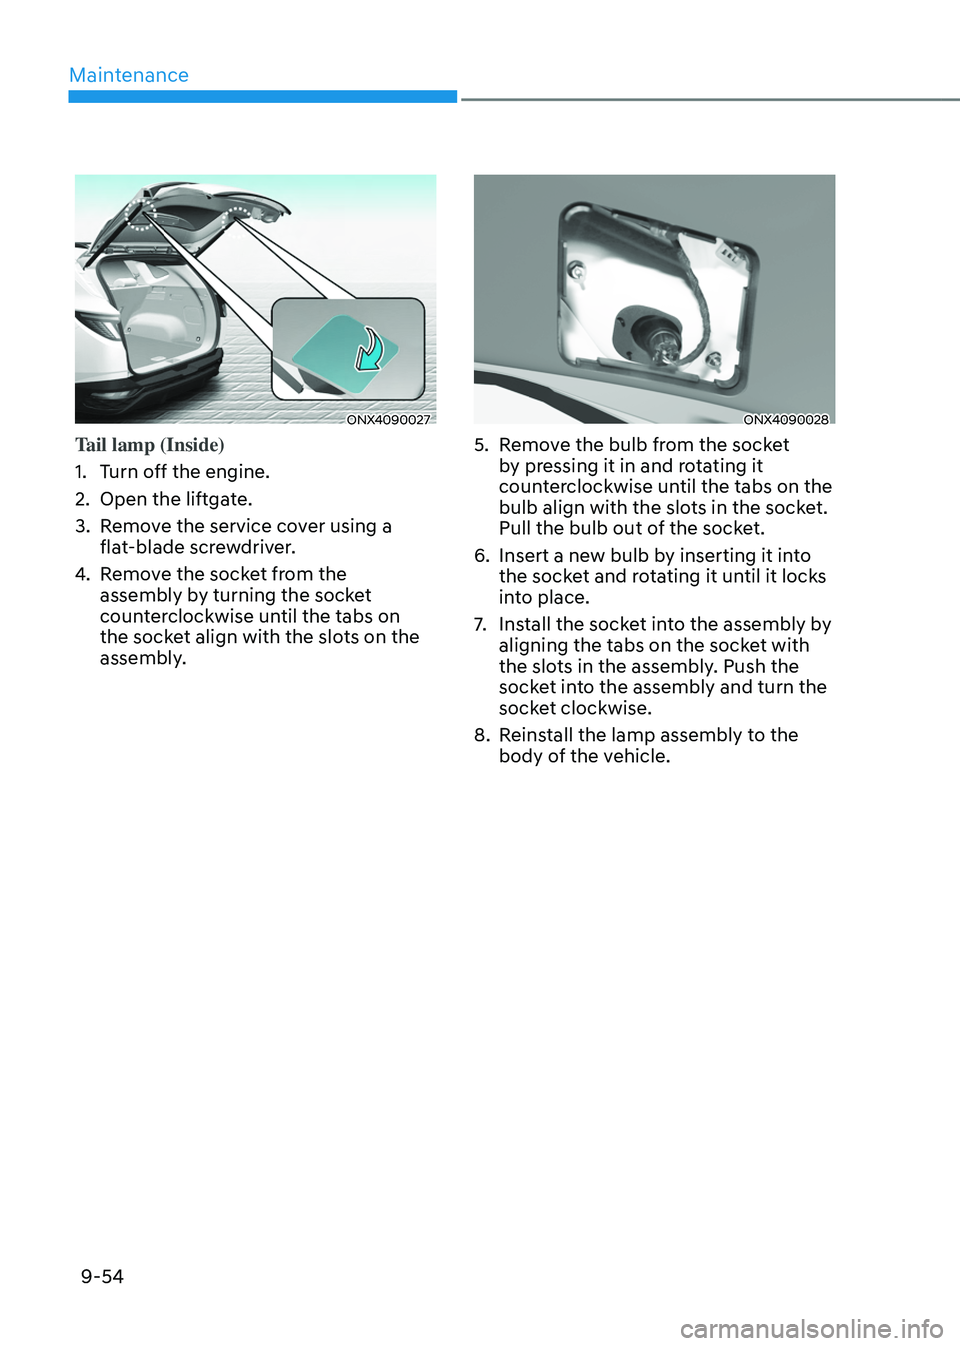
ONX4090027
Tail lamp (Inside)
1.
Turn o
ff the engine.
2.
Open the liftga
te.
3.
Remo
ve the service cover using a
flat-blade screwdriver.
4.
Remo
ve the socket from the
assembly by turning the socket
counterclockwise until the tabs on
the socket align with the slots on the
assembly.
ONX4090028
5. Remove the bulb from the socket
b y pressing it in and rotating it
counterclockwise until the tabs on the
bulb align with the slots in the socket.
Pull the bulb out of the socket.
6.
Insert a new bulb b
y inserting it into
the socket and rotating it until it locks
into place.
7.
Install the sock
et into the assembly by
aligning the tabs on the socket with
the slots in the assembly. Push the
socket into the assembly and turn the
socket clockwise.
8.
Reins
tall the lamp assembly to the
body of the vehicle.
Page 602 of 630
09
9-55
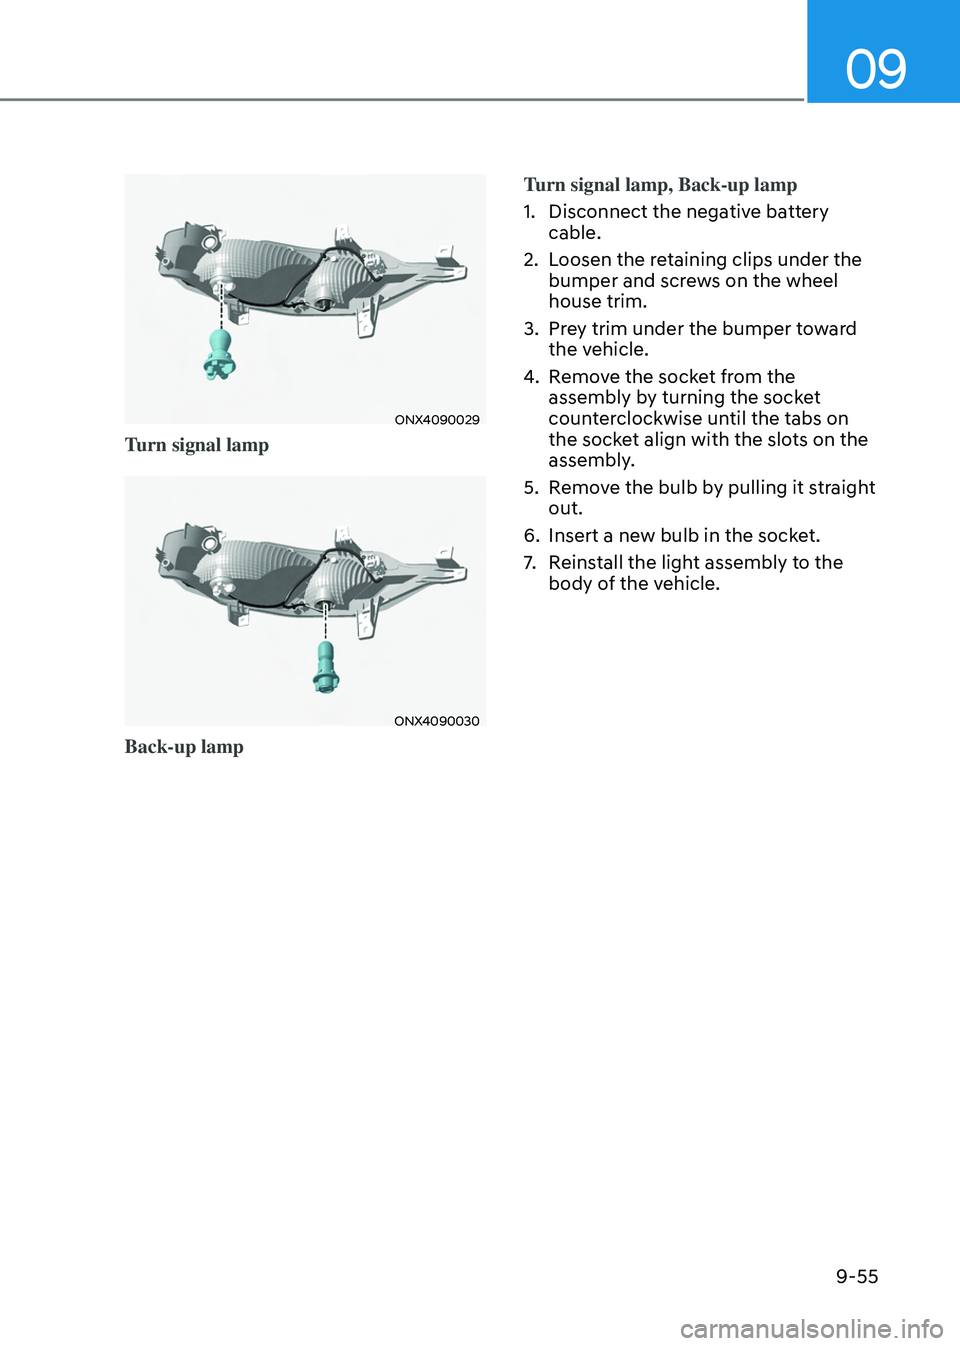
ONX4090029
Turn signal lamp
ONX4090030
Back-up lampTurn signal lamp, Back-up lamp
1.
Disconnect the negativ
e battery
cable.
2.
Loosen the r
etaining clips under the
bumper and screws on the wheel
house trim.
3.
Pre
y trim under the bumper toward
the vehicle.
4.
Remo
ve the socket from the
assembly by turning the socket
counterclockwise until the tabs on
the socket align with the slots on the
assembly.
5.
Remo
ve the bulb by pulling it straight
out.
6.
Insert a new bulb in the sock
et.
7.
Reins
tall the light assembly to the
body of the vehicle.
Page 605 of 630
Maintenance
9-58
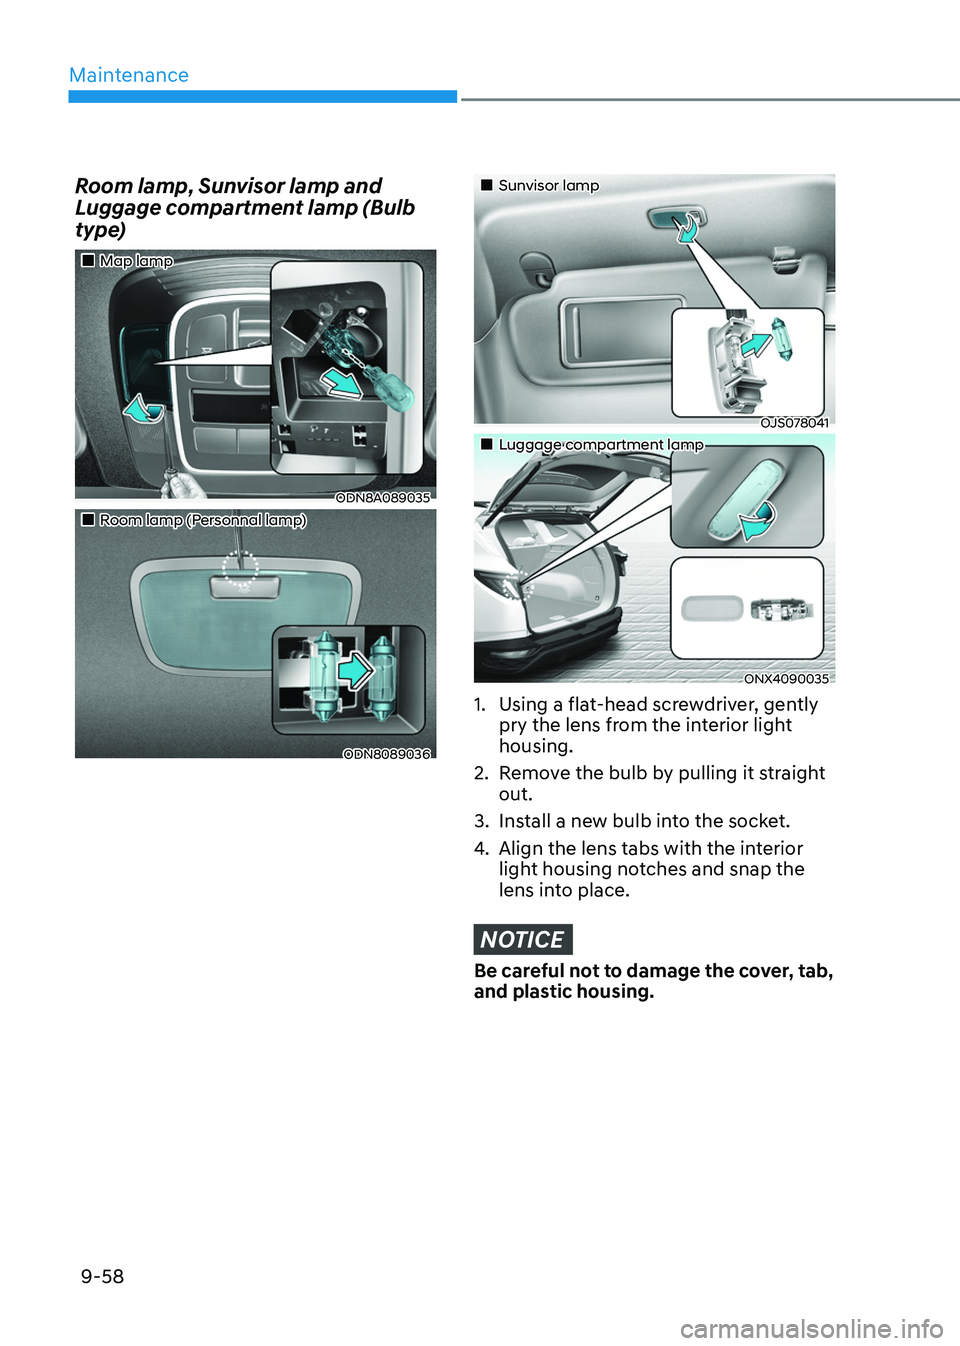
Room lamp, Sunvisor lamp and
Luggage compartment lamp (Bulb
type)
„„Map lamp
ODN8A089035
„„Room lamp (Personnal lamp)
ODN8089036
„„Sunvisor lamp
OJS078041
„„Luggage compartment lamp
ONX4090035
1. Using a flat-head screwdriver, gently
pry the lens from the interior light
housing.
2.
Remo
ve the bulb by pulling it straight
out.
3.
Install a ne
w bulb into the socket.
4.
Align the lens tabs with the int
erior
light housing notches and snap the
lens into place.
NOTICE
Be careful not to damage the cover, tab,
and plastic housing.
Page 612 of 630
09
9-65
• Caring for the leather seats
- Vacuum the sea
t periodically to
remove dust and sand on the seat. It
will prevent abrasion or damage of
the leather and maintain its quality.
- Wipe the natur
al leather seat cover
often with dry or soft cloth.
- Use o
f proper leather protector may
prevent abrasion of the cover and
helps maintain the color. Be sure to
read the instructions and consult
a specialist when using leather
coating or protective agent.
- Light color
ed (beige, cream beige)
leather is easily contaminated and
the stain is noticeable. Clean the
seats frequently.
- Av
oid wiping with wet cloth. It may
cause the surface to crack.
• Cleaning the leather seats
- Remo
ve all contaminations
instantly. Refer to instructions below
for removal of each contaminant.
- Cosmetic pr
oducts (sunscreen,
foundation, etc.)
Apply cleansing cream on a cloth
and wipe the contaminated spot.
Wipe off the cream with a wet cloth
and remove water with a dry cloth. - Beverages (coffee, soft drink, etc.)
Apply a small amoun t of neutral
detergent and wipe until
contaminations do not smear.
- Oil
Remo
ve oil instantly with
absorbable cloth and wipe with
stain remover used only for natural
leather.
- Chewing gum
Har
den the gum with ice and
remove gradually.
Cleaning the seat belt webbing
Clean the belt webbing with any
mild soap solution recommended for
cleaning upholstery or carpet. Follow
the instructions provided with the soap.
Do not bleach or re-dye the webbing
because this may weaken the seat belt.
Cleaning the interior window glass
If the interior glass surfaces of the
vehicle become fogged (that is, covered
with an oily, greasy or waxy film), they
should be cleaned with glass cleaner.
Follow the directions on the glass cleaner
container.
NOTICE
Do not scrape or scratch the inside of
the rear window. This may result in
damage to the rear window defroster
grid.
Page 613 of 630
Maintenance
9-66
Emission control systEm
The emission control system of your
vehicle is covered by a written limited
warranty. Please see the warranty
information contained in the Service
Passport in your vehicle.
Your vehicle is equipped with an
emission control system to meet all
applicable emission regulations. There
are three emission control systems, as
follows.
(1)
Crank
case emission control system
(2)
Ev
aporative emission control system
(3)
Exhaust emission con
trol system
In order to ensure the proper function
of the emission control systems, it
is recommended that you have your
vehicle inspected and maintained
by an authorized HYUNDAI dealer in
accordance with the maintenance
schedule in this manual.
NOTICE
For the Inspection and Maintenance
Test (with Electronic Stability Control
(ESC) system)
• To prevent the vehicle from misfiring
during dynamometer testing, turn
the Electronic Stability Control
(ESC) system off by pressing the ESC
switch (ESC OFF light illuminated).
• After dynamometer testing is
completed, turn the ESC system back
on by pressing the ESC switch again.
1. Crankcase emission control
sy
stem
The positive crankcase ventilation system
is employed to prevent air pollution
caused by blow-by gases being emitted
from the crankcase. This system supplies
fresh filtered air to the crankcase through
the air intake hose. Inside the crankcase,
the fresh air mixes with blow-by gases,
which then pass through the PCV valve
into the induction system.
2. Evaporative emission control
system
The Evaporative Emission Control System
is designed to prevent fuel vapors from
escaping into the atmosphere.
Canister
Fuel vapors generated inside the fuel
tank are absorbed and stored in the
onboard canister. When the engine is
running, the fuel vapors absorbed in the
canister are drawn into the surge tank
through the purge control solenoid valve.
Purge Control Solenoid Valve (PCSV)
The purge control solenoid valve
is controlled by the Engine Control
Module (ECM); when the engine coolant
temperature is low during idling, the
PCSV closes so that evaporated fuel
is not taken into the engine. After the
engine warms-up during ordinary
driving, the PCSV opens to introduce
evaporated fuel to the engine.
Page 620 of 630
I
I-3
A
Battery
........................................................................\
.........................................9-28
Before Jump Starting ........................................................................\
..................8-5
Jump Starting........................................................................\
..............................8-6
Before driving
........................................................................\
................................6-4
Before entering the vehicle ........................................................................\
........6-4
Before starting ........................................................................\
............................6-4
Blind-Spot Collision Warning (BCW)
................................................................7-23
System malfunction and limitations .................................................................7-28
System operation ........................................................................\
......................7-26
System settings ........................................................................\
.........................7-24
Blind-Spot Collision-Avoidance Assist (BCA)
...................................................7-32
System malfunction and limitations .................................................................7-41
System operation ........................................................................\
......................7-36
System settings ........................................................................\
.........................7-34
Blind-Spot View Monitor (BVM)
.......................................................................7-63
System malfunction ........................................................................\
..................7-64
System operation ........................................................................\
......................7-63
System settings ........................................................................\
.........................7-63
Brake fluid
........................................................................\
...................................9-20
Checking the brake fluid level ........................................................................\
.9-20
Braking system
........................................................................\
............................6-21
Anti-lock Brake System (ABS) ........................................................................\
6-30
Auto Hold ........................................................................\
.................................6-26
Disc brakes wear indicator ........................................................................\
.......6-22
Downhill Brake Control (DBC) ......................................................................6-36
Electronic Parking Brake (EPB) ......................................................................6-22
Electronic Stability Control (ESC) ...................................................................6-31
Good braking practices ........................................................................\
.............6-39
Hill-Start Assist Control (HAC) ......................................................................6-35
Power brakes ........................................................................\
............................6-21
Trailer Stability Assist (TSA) ........................................................................\
..6-36
Vehicle Stability Management (VSM) ............................................................6-34
Bulb wattage
........................................................................\
..................................2-9