2021 HYUNDAI TUCSON HYBRID air conditioning
[x] Cancel search: air conditioningPage 270 of 630
05
5-113
ClImaTe ConTrol addITIonal feaTUres
Auto Defogging System
on Models with Automatic
Temperature Control
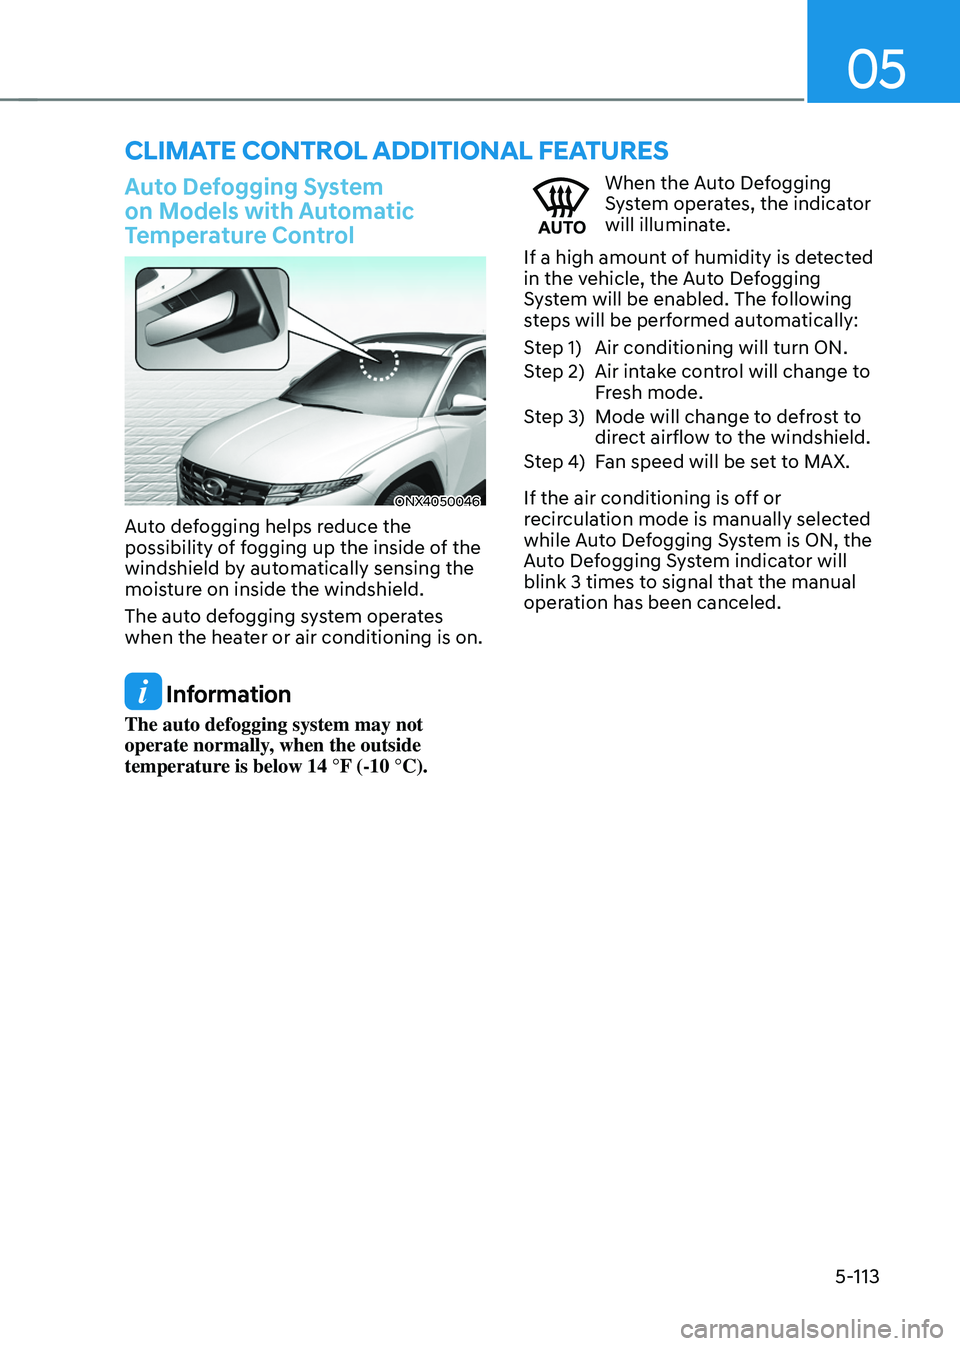
ONX4050046
Auto defogging helps reduce the
possibility of fogging up the inside of the
windshield by automatically sensing the
moisture on inside the windshield.
The auto defogging system operates
when the heater or air conditioning is on.
Information
The auto defogging system may not
operate normally, when the outside
temperature is below 14 °F (-10 °C).
When the Auto Defogging
System operates, the indicator
will illuminate.
If a high amount of humidity is detected
in the vehicle, the Auto Defogging
System will be enabled. The following
steps will be performed automatically:
Step 1) Air conditioning will turn ON.
Step 2) Air intake control will change to Fresh mode.
Step 3) Mode will change to defrost to direct airflow to the windshield.
Step 4) Fan speed will be set to MAX.
If the air conditioning is off or
recirculation mode is manually selected
while Auto Defogging System is ON, the
Auto Defogging System indicator will
blink 3 times to signal that the manual
operation has been canceled.
Page 271 of 630
Convenient features
5-114
Turning the Auto Defogging System
ON or OFF
Climate control system
Press the front windshield defroster
button for 3 seconds when the Engine
Start/Stop button is in the ON position.
When the Auto Defogging System is
turned off, the ADS OFF symbol will blink
3 times and ADS OFF will be displayed on
the climate control information screen.
When the Auto Defogging System is
turned on, the ADS OFF symbol will blink
6 times without a signal.
Infotainment system
Auto Defogging System can be turned
on
and o
ff
b
y
selecting ‘Se
tup
→ Vehicle Se
ttings
→ Clima
te
→ De
fog/
Defrost
Op
tions
→ A
uto
De
fog’
fr
om
the inf
otainment system screen.
For detailed information, refer to the
separately supplied infotainment
system manual.
Information
• When the air conditioning is turned
on by Auto Defogging System, if you
try to turn off the air conditioning, the
indicator will blink 3 times and the air
conditioning will not be turned off.
• To maintain the effectiveness and
efficiency of the Auto Defogging
System, do not select Recirculation
mode while the system is operating.
• When Auto Defogging System is
operating, fan speed adjustment,
temperature adjustment, and air intake
control selection are all disabled.
NOTICE
Do not remove the sensor cover located
on the upper end of the windshield
glass.
Damage to system parts could occur
and may not be covered by your vehicle
warranty.
Auto dehumidify (if equipped)
To increase cabin air quality and reduce
windshield misting, recirculation mode
switches off automatically after about 5
to 30 minutes, depending on the outside
temperature, and the air intake will
change to fresh mode.
Turning Auto Dehumidify ON or OFF
Climate control system
To turn the Auto Dehumidify feature
on or off, select Face level (
) mode
and press the air intake control ()
button at least five times within three
seconds. When Auto Dehumidify is
turned on, the air intake control button
indicator will blink 6 times. When turned
off, the indicator will blink 3 times.
Infotainment system
Auto Dehumidify can be turned on and
off
b
y
selecting ‘Se
tup
→ V
ehicle
Se
ttings
→ Clima
te
→ A
utomatic
V
entilation
→ Aut
o Dehumidify’ from the infotainment
system screen.
For detailed information, refer to the
separately supplied infotainment
system manual.
Page 298 of 630
06
6-11
NOTICE
To prevent damage to the vehicle:
Do not press the Engine Start/Stop
button for more than 10 seconds except
when the stop lamp fuse is blown.
When the stop lamp fuse is blown,
you cannot normally start the hybrid
system. Replace the fuse with a new
one. If you are not able to replace
the fuse, you can start the vehicle by
pressing and holding the Engine Start/
Stop button for 10 seconds with the
Engine Start/Stop button in the ACC
position.
For your safety always depress the
brake pedal before starting the vehicle.
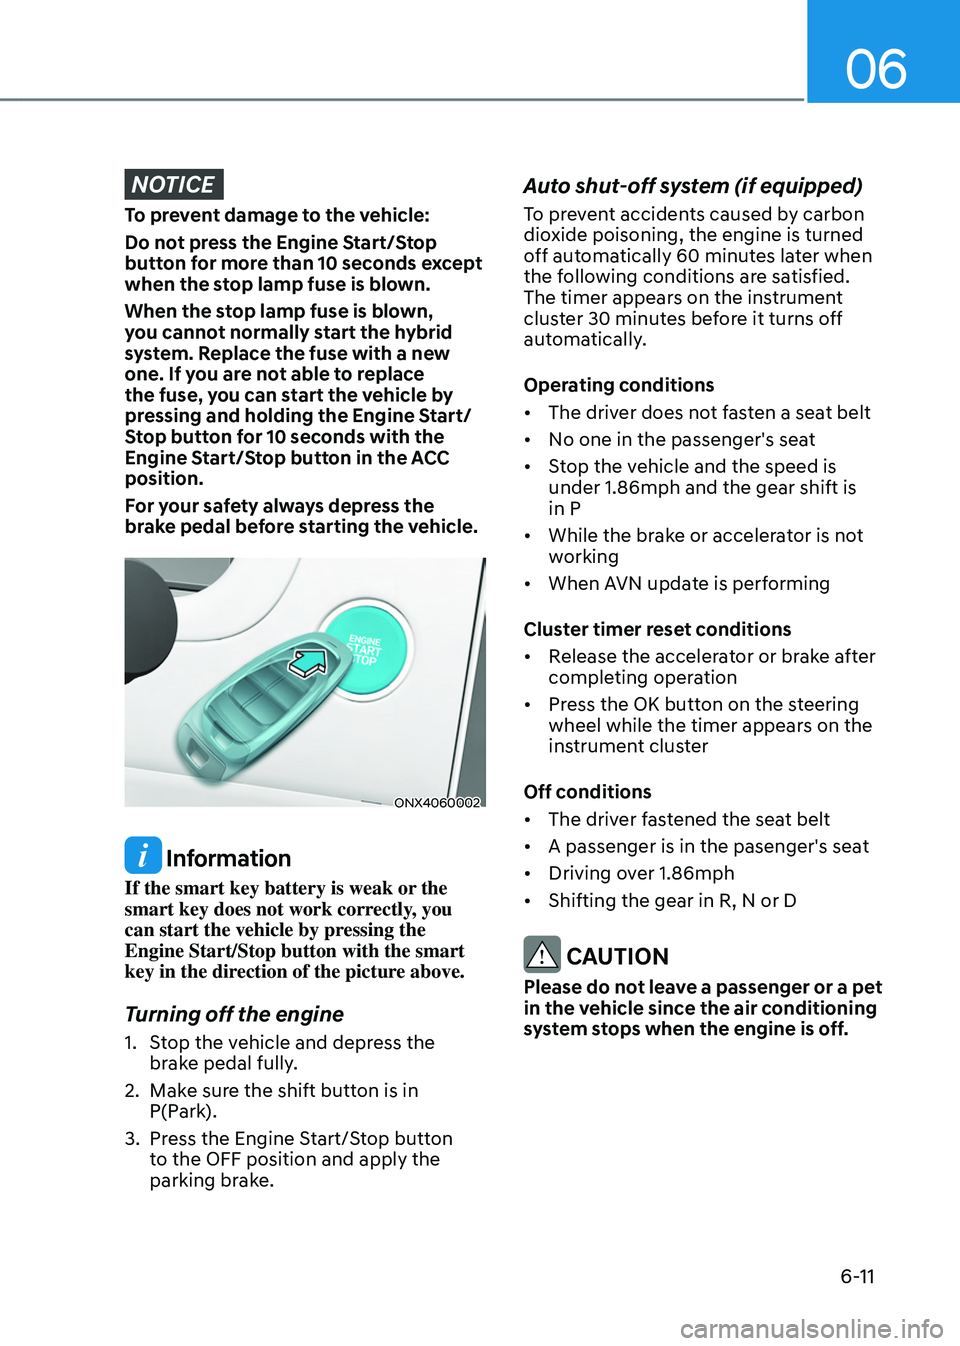
ONX4060002
Information
If the smart key battery is weak or the
smart key does not work correctly, you
can start the vehicle by pressing the
Engine Start/Stop button with the smart
key in the direction of the picture above.
Turning off the engine
1. Stop the vehicle and depress the
brake pedal fully.
2.
Make sur
e the shift button is in
P(Park).
3.
Press the E
ngine Start/Stop button
to the OFF position and apply the
parking brake.
Auto shut-off system (if equipped)
To prevent accidents caused by carbon
dioxide poisoning, the engine is turned
off automatically 60 minutes later when
the following conditions are satisfied.
The timer appears on the instrument
cluster 30 minutes before it turns off
automatically.
Operating conditions
• The driver does not fasten a seat belt
• No one in the passenger's seat
• Stop the vehicle and the speed is
under 1.86mph and the gear shift is
in P
• While the brake or accelerator is not
working
• When AVN update is performing
Cluster timer reset conditions
• Release the accelerator or brake after
completing operation
• Press the OK button on the steering
wheel while the timer appears on the
instrument cluster
Off conditions
• The driver fastened the seat belt
• A passenger is in the pasenger's seat
• Driving over 1.86mph
• Shifting the gear in R, N or D
CAUTION
Please do not leave a passenger or a pet
in the vehicle since the air conditioning
system stops when the engine is off.
Page 526 of 630
Emergency situations
8-6
NOTICE
External power source using 12V battery
The use of external power accessories
may reduce performance and function
of the vehicle. Especially, the use of
dash cameras may shut off the power of
the vehicle prior to the dash camera’s
automatic shut-down.
If the power of the vehicle is shut off,
start the vehicle as explained. (refer to
“Using the 12V Battery Reset Switch”)
Jump Starting
In the event vehicle still does not have a
functional 12V battery (check if interior
lights will not turn on) then you can try
a jump start to the engine compartment
jumper terminals using a 12V booster
pack or jumper cables from another
vehicle’s 12V battery according to the
following instructions.
CAUTION
Jump starting can be dangerous if
done incorrectly. Follow the jump
starting procedure in this section to
avoid serious injury or damage to
your vehicle. If in doubt about how to
properly jump start your vehicle, we
strongly recommend that you have a
service technician or towing service do
it for you.
1.
Position the v
ehicles close enough
that the jumper cables will reach, but
do not allow the vehicles to touch.
Avoid fans or any moving parts in the
engine compartment at all times, even
when the vehicles are turned off.
2.
Turn o
ff all electrical devices such as
radios, lights, air conditioning, etc.
Put the vehicles in P (Park) and set the
parking brake. Turn both vehicles OFF.
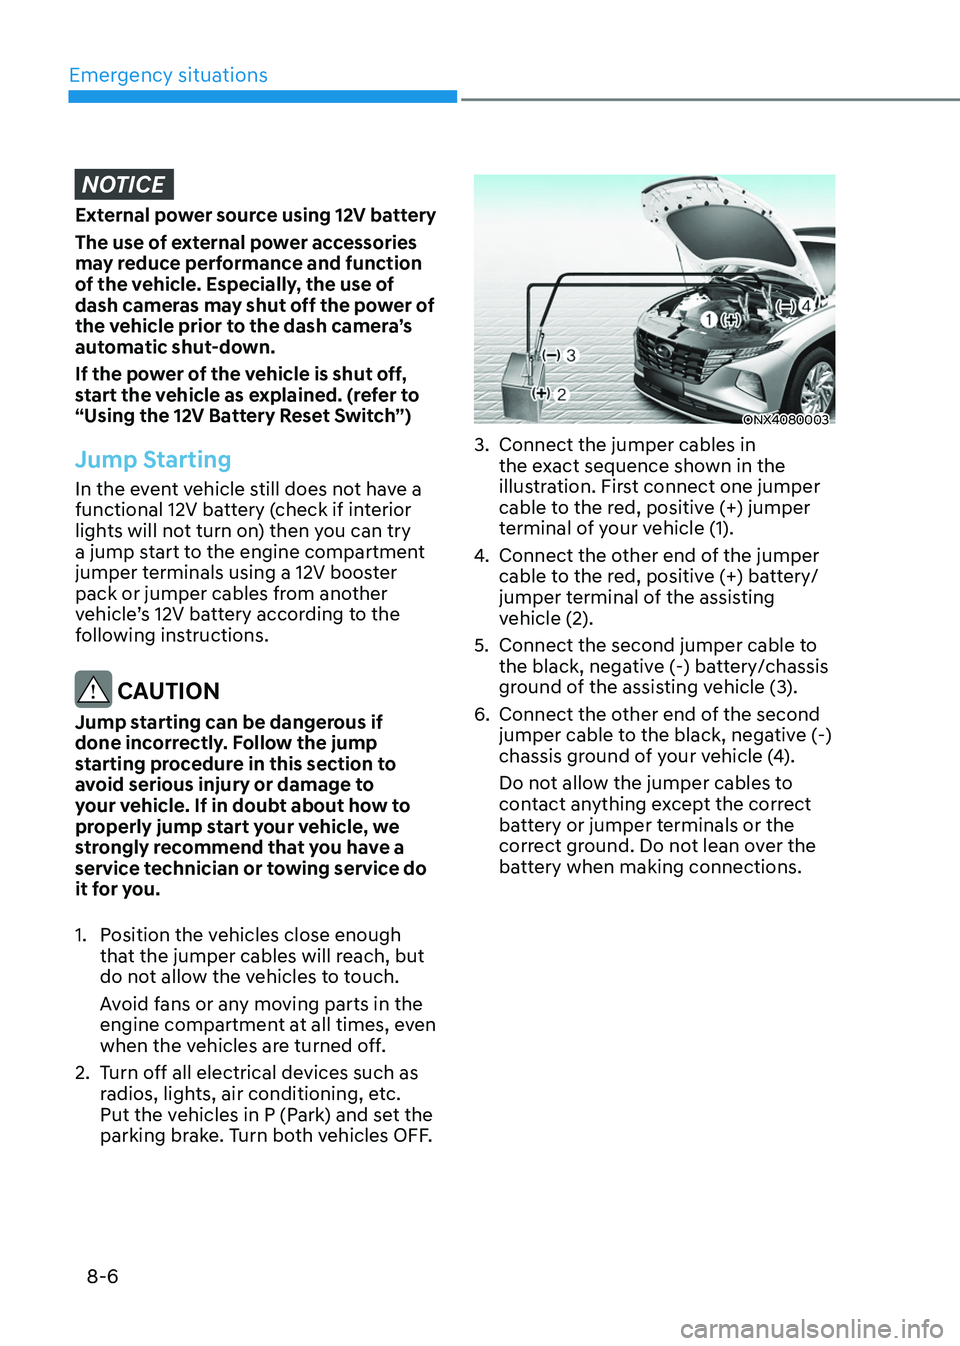
ONX4080003
3. Connect the jumper cables in
the ex act sequence shown in the
illustration. First connect one jumper
cable to the red, positive (+) jumper
terminal of your vehicle (1).
4.
Connect the other end o
f the jumper
cable to the red, positive (+) battery/
jumper terminal of the assisting
vehicle (2).
5.
Connect the second jumper cable to
the black, nega
tive (-) battery/chassis
ground of the assisting vehicle (3).
6.
Connect the other end o
f the second
jumper cable to the black, negative (-)
chassis ground of your vehicle (4).
Do not allow the jumper cables to
contact anything except the correct
battery or jumper terminals or the
correct ground. Do not lean over the
battery when making connections.
Page 553 of 630
Maintenance
9-6
While operating your vehicle:
• Note any changes in the sound of the
exhaust or any smell of exhaust fumes
in the vehicle.
• Check for vibrations in the steering
wheel. Notice if there is any increased
steering effort or looseness in the
steering wheel, or change in its
straight-ahead position.
• Notice if your vehicle constantly turns
slightly or “pulls” to one side when
traveling on smooth, level road.
• When stopping, listen and check for
unusual sounds, pulling to one side,
increased brake pedal travel or “hard-
to-push” brake pedal.
• If any slipping or changes in the
operation of your transmission occurs,
check the transmission fluid level.
• Check the automatic transmission P
(Park) function.
• Check the parking brake.
• Check for fluid leaks under your
vehicle (water dripping from the air
conditioning system during or after
use is normal).
At least monthly:
• Check coolant level in the engine
coolant reservoir.
• Check the operation of all exterior
lights, including the stoplights, turn
signals and hazard warning flashers.
• Check the inflation pressures of all
tires including the spare for tires that
are worn, show uneven wear, or are
damaged.
• Check for loose wheel lug nuts.
At least twice a year:
• Check radiator, heater and air
conditioning hoses for leaks or
damage.
• Check windshield washer spray and
wiper operation. Clean wiper blades
with a clean cloth dampened with
washer fluid.
• Check headlamp alignment.
• Check muffler, exhaust pipes, shields
and clamps.
• Check the seat belts for wear and
function.
At least once a year:
• Clean body and door drain holes.
• Lubricate door hinges and hood
hinges.
• Lubricate door and hood locks and
latches.
• Lubricate door rubber weather strips.
• Check the air conditioning system.
• Inspect and lubricate automatic
transmission linkage and controls.
• Clean the battery and terminals.
• Check the brake fluid level.
Page 561 of 630
Maintenance
9-14
Brake hoses and lines
Visually check for proper installation,
chafing, cracks, deterioration and any
leakage. Replace any deteriorated or
damaged parts immediately.
Brake fluid
Check the brake fluid level in the brake
fluid reservoir. The level should be
between the MIN and the MAX marks
on the side of the reservoir. Use only
hydraulic brake fluid conforming to DOT
4 specification.
Parking brake
Inspect the parking brake system.
Brake discs, pads, calipers and
rotors
Check the pads, the disc, and the rotor
for any excessive wear-out. Inspect
calipers for any fluid leakage
For more information on checking the
pads or lining wear limit, refer to the
HYUNDAI web site.
(http://service.hyundai-motor.com)
Exhaust pipe and muffler
Visually inspect the exhaust pipes,
muffler and hangers for cracks,
deterioration, or damage. Start
the engine and listen carefully for
any exhaust gas leakage. Tighten
connections or replace parts as
necessary.
Suspension mounting bolts
Check the suspension connections for
looseness or damage. Retighten to the
specified torque.
Steering gear box, linkage &
boots/lower arm ball joint
With the vehicle stopped and the hybrid
system off, check for excessive free-play
in the steering wheel. Check the linkage
for bends or damage. Check the dust
boots and ball joints for deterioration,
cracks, or damage.
Replace any damaged parts.
Air conditioning refrigerant
Check the air conditioning lines and
connections for leakage and damage.
Drive Shaft and Related
Check the drive shaft, boots, clamps,
rubber couplings and center-bearing
rubber for cracks, deterioration, or
damage. Replace any damaged parts
and if necessary, repack the grease.
Page 619 of 630
Index
I-2
A
Accessing your vehicle
........................................................................\
..................5-4
Hyundai Digital Key ........................................................................\
................5-16
Immobilizer system ........................................................................\
..................5-15
Remote key ........................................................................\
.................................5-4
Smart key ........................................................................\
....................................5-7
Air bag - supplemental restraint system
..............................................................3-44 Additional safety precautions ........................................................................\
...3-66
Air bag warning labels ........................................................................\
.............3-66
How does the air bags system operate? ............................................................3-50
Occupant Classification System (OCS) ...........................................................3-54
SRS care ........................................................................\
...................................3-65
What to expect after an air bag inflates ............................................................3-53
Where are the air bags? ........................................................................\
............3-46
Why didn’t my air bag go of f in a collision? ...................................................3-60
Air cleaner
........................................................................\
...................................9-22 Filter replacement ........................................................................\
.....................9-22
Air conditioner compressor label ........................................................................\
. 2-15
Air conditioning system
........................................................................\
...............2-11
All wheel drive (AWD)
........................................................................\
..............6-40
All Wheel Drive (AWD) operation ..................................................................6-41
Emergency precautions ........................................................................\
............6-45
Reducing the risk of a rollover ........................................................................\
.6-47
Appearance care ........................................................................\
........................... 9-59
Exterior care ........................................................................\
.............................9-59
Interior care ........................................................................\
..............................9-63
Automatic climate control system
.......................................................................5-96
Automatic heating and air conditioning ...........................................................5-97
Manual heating and air conditioning ................................................................5-98
Multi Air Mode........................................................................\
....................... 5-105
System maintenance ........................................................................\
...............5-108
System operation ........................................................................\
....................5-106
Automatic transmission
........................................................................\
...............6-13
Automatic transmission operation ....................................................................6-13
Good driving practices ........................................................................\
.............6-18
LCD display message ........................................................................\
...............6-17
Paddle shifter ........................................................................\
............................6-18
Parking ........................................................................\
.....................................6-16