2021 HYUNDAI SONATA HYBRID ABS
[x] Cancel search: ABSPage 478 of 527
08
8-29
WARNING
To reduce the risk of DEATH or
SERIOUS INJURY:
• Replace tires that are worn, show
uneven wear, or are damaged.
Worn tires can cause loss of
braking effectiveness, steering
control, and traction.
• Always replace tires with the
same size as each tire that was
originally supplied with this
vehicle. Using tires and wheels
other than the recommended
sizes could cause unusual
handling characteristics, poor
vehicle control, or negatively
affect your vehicle’s Anti-Lock
Brake System (ABS) resulting in a
serious accident.
• When replacing tires (or wheels),
it is recommended to replace
the two front or two rear tires (or
wheels) as a pair. Replacing just
one tire can seriously affect your
vehicle’s handling.
• Tires degrade over time, even
when they are not being used.
Regardless of the remaining
tread, HYUNDAI recommends
that tires be replaced after six (6)
years of normal service.
• Heat caused by hot climates or
frequent high loading conditions
can accelerate the aging process.
Failure to follow this warning
may cause sudden tire failure,
which could lead to a loss of
vehicle control resulting in an
accident. Compact spare tire replacement
(if equipped)
A compact spare tire has a shorter
tread life than a regular size tire.
Replace it when you can see the
tread wear indicator bars on the tire.
The replacement compact spare tire
should be the same size and design
tire as the one provided with your
new vehicle and should be mounted
on the same compact spare tire
wheel. The compact spare tire is
not designed to be mounted on a
regular size wheel, and the compact
spare tire wheel is not designed for
mounting a regular size tire.
WARNING
The original tire should be repaired
or replaced as soon as possible to
avoid failure of the spare and loss
of vehicle control resulting in an
accident.The compact spare tire
is for emergency use only. Do not
operate your vehicle over 50 mph
(80 km/h) when using the compact
spare tire.
Page 495 of 527
Maintenance
8-46
Tail lamp, stop lamp, turn signal
lamp, side marker (LED type)
If the LED lamp does not operate, have
the system checked by an authorized
HYUNDAI dealer.
The LED lamps cannot be replaced as
a single unit because it is an integrated
unit. The LED lamps has to be replaced
with the unit.
A skilled technician should check or
repair the LED lamp, for it may damage
related parts of the vehicle.
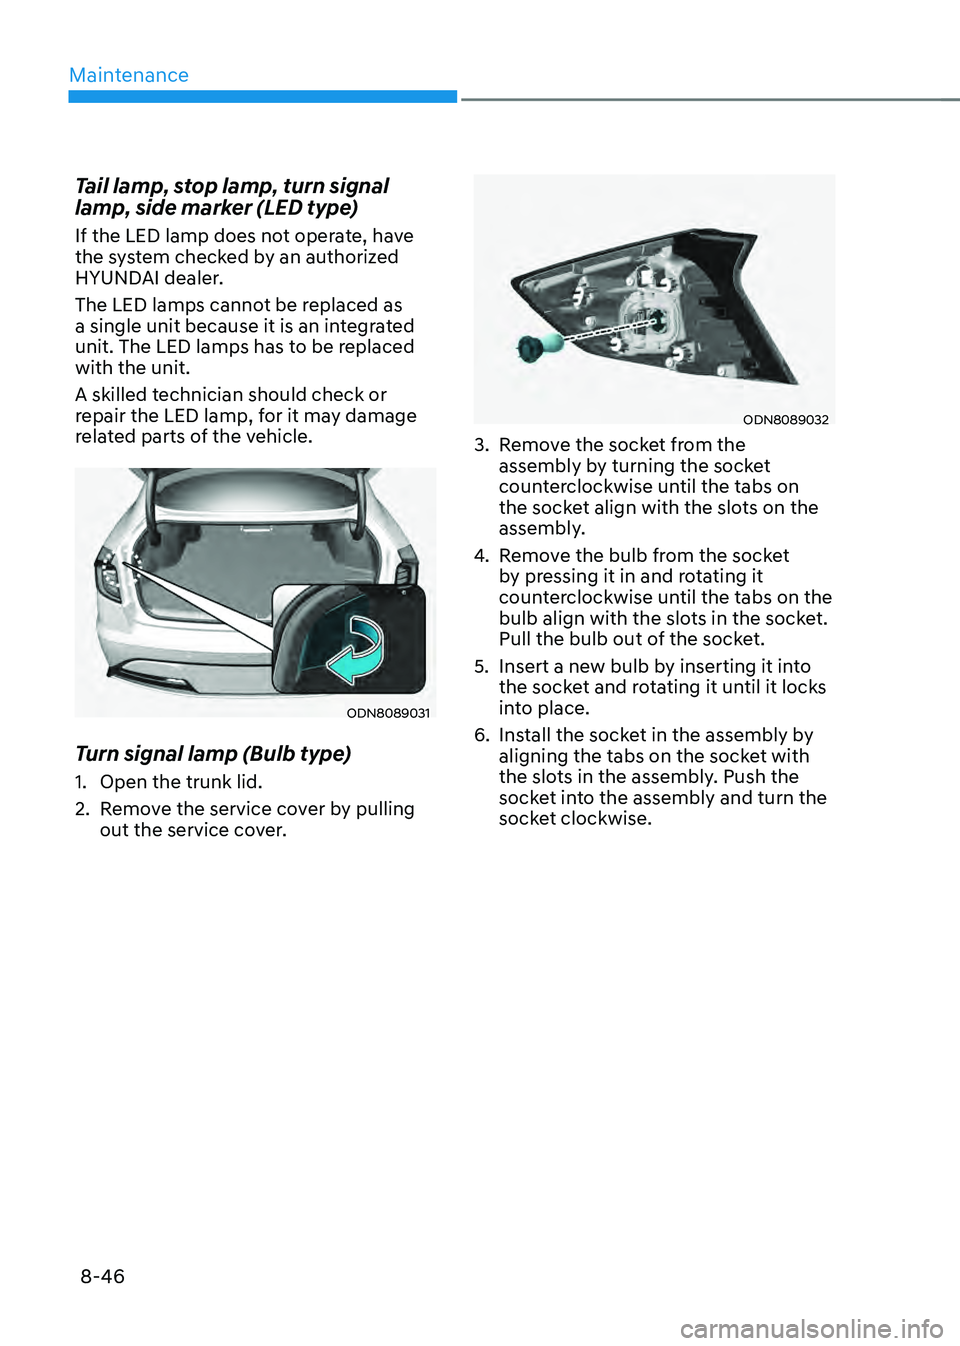
ODN8089031
Turn signal lamp (Bulb type)
1. Open the trunk lid.
2. Remove the service cover by pulling
out the service cover.
ODN8089032
3. Remove the socket from the
assembly by turning the socket
counterclockwise until the tabs on
the socket align with the slots on the
assembly.
4. Remove the bulb from the socket
by pressing it in and rotating it
counterclockwise until the tabs on the
bulb align with the slots in the socket.
Pull the bulb out of the socket.
5. Insert a new bulb by inserting it into
the socket and rotating it until it locks
into place.
6. Install the socket in the assembly by
aligning the tabs on the socket with
the slots in the assembly. Push the
socket into the assembly and turn the
socket clockwise.
Page 496 of 527
08
8-47
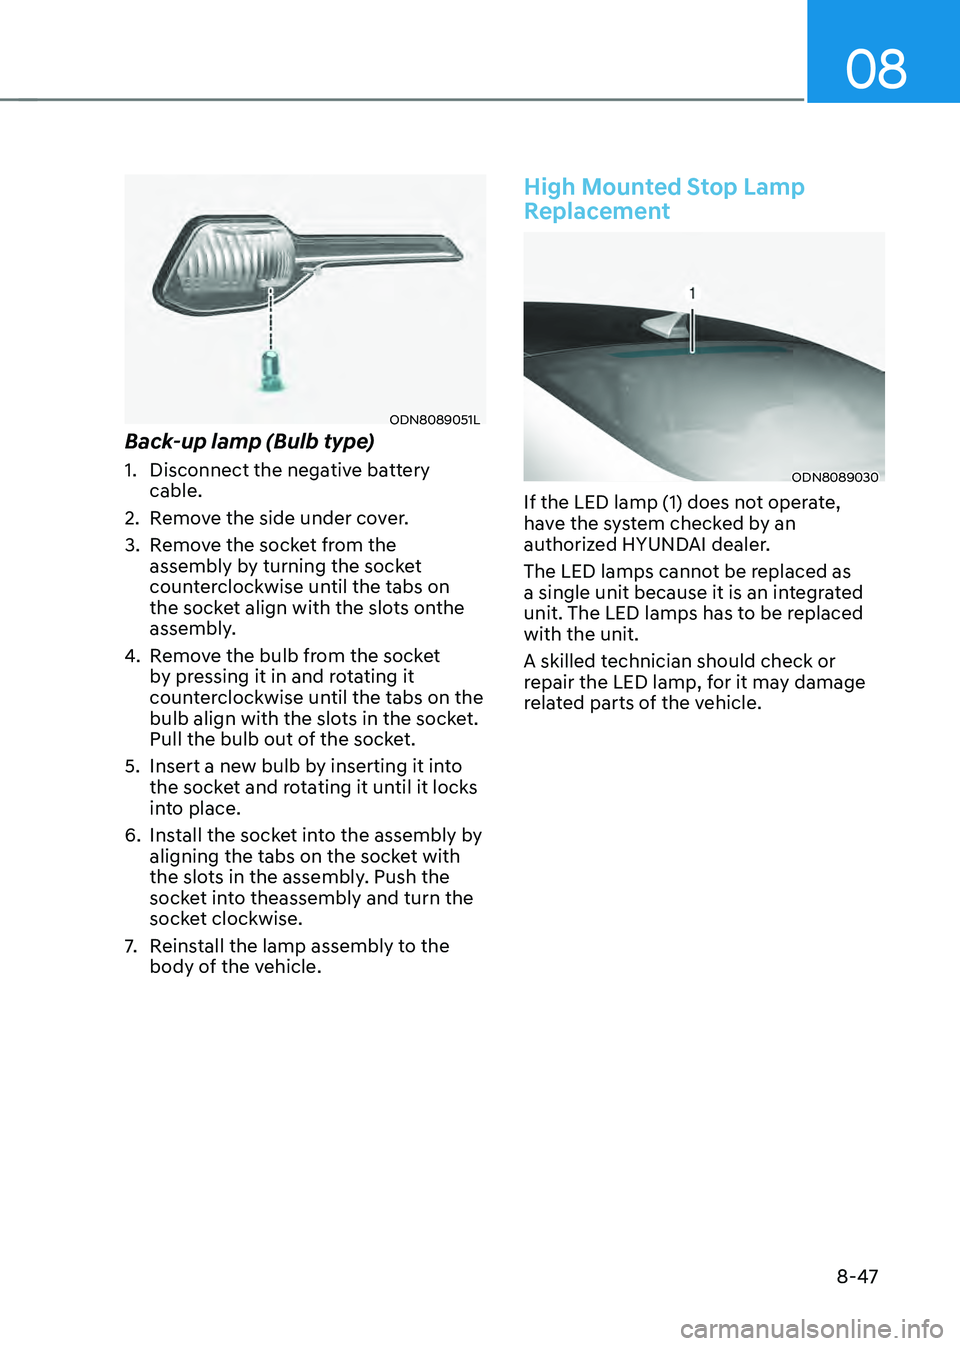
ODN8089051L
Back-up lamp (Bulb type)
1. Disconnect the negative battery
cable.
2. Remove the side under cover.
3. Remove the socket from the
assembly by turning the socket
counterclockwise until the tabs on
the socket align with the slots onthe
assembly.
4. Remove the bulb from the socket
by pressing it in and rotating it
counterclockwise until the tabs on the
bulb align with the slots in the socket.
Pull the bulb out of the socket.
5. Insert a new bulb by inserting it into
the socket and rotating it until it locks
into place.
6. Install the socket into the assembly by
aligning the tabs on the socket with
the slots in the assembly. Push the
socket into theassembly and turn the
socket clockwise.
7. Reinstall the lamp assembly to the
body of the vehicle.
High Mounted Stop Lamp
Replacement
ODN8089030
If the LED lamp (1) does not operate,
have the system checked by an
authorized HYUNDAI dealer.
The LED lamps cannot be replaced as
a single unit because it is an integrated
unit. The LED lamps has to be replaced
with the unit.
A skilled technician should check or
repair the LED lamp, for it may damage
related parts of the vehicle.
Page 497 of 527
Maintenance
8-48
License Plate Light Bulb
Replacement
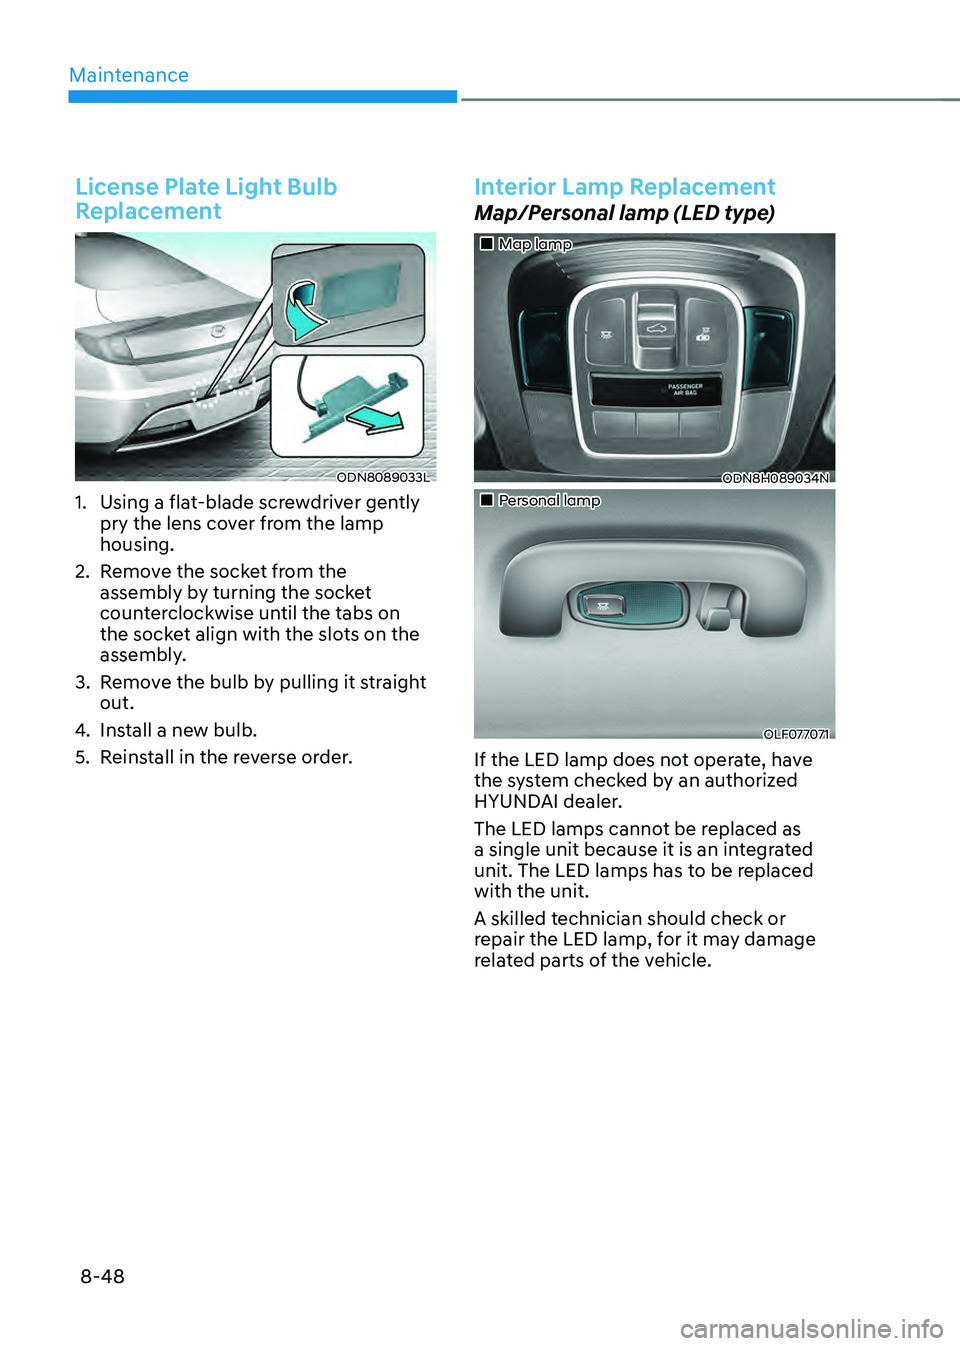
ODN8089033L
1. Using a flat-blade screwdriver gently
pry the lens cover from the lamp
housing.
2. Remove the socket from the
assembly by turning the socket
counterclockwise until the tabs on
the socket align with the slots on the
assembly.
3. Remove the bulb by pulling it straight
out.
4. Install a new bulb.
5. Reinstall in the reverse order.
Interior Lamp Replacement
Map/Personal lamp (LED type)
„„Map lamp
ODN8H089034N
„„Personal lamp
OLF077071
If the LED lamp does not operate, have
the system checked by an authorized
HYUNDAI dealer.
The LED lamps cannot be replaced as
a single unit because it is an integrated
unit. The LED lamps has to be replaced
with the unit.
A skilled technician should check or
repair the LED lamp, for it may damage
related parts of the vehicle.
Page 498 of 527
08
8-49
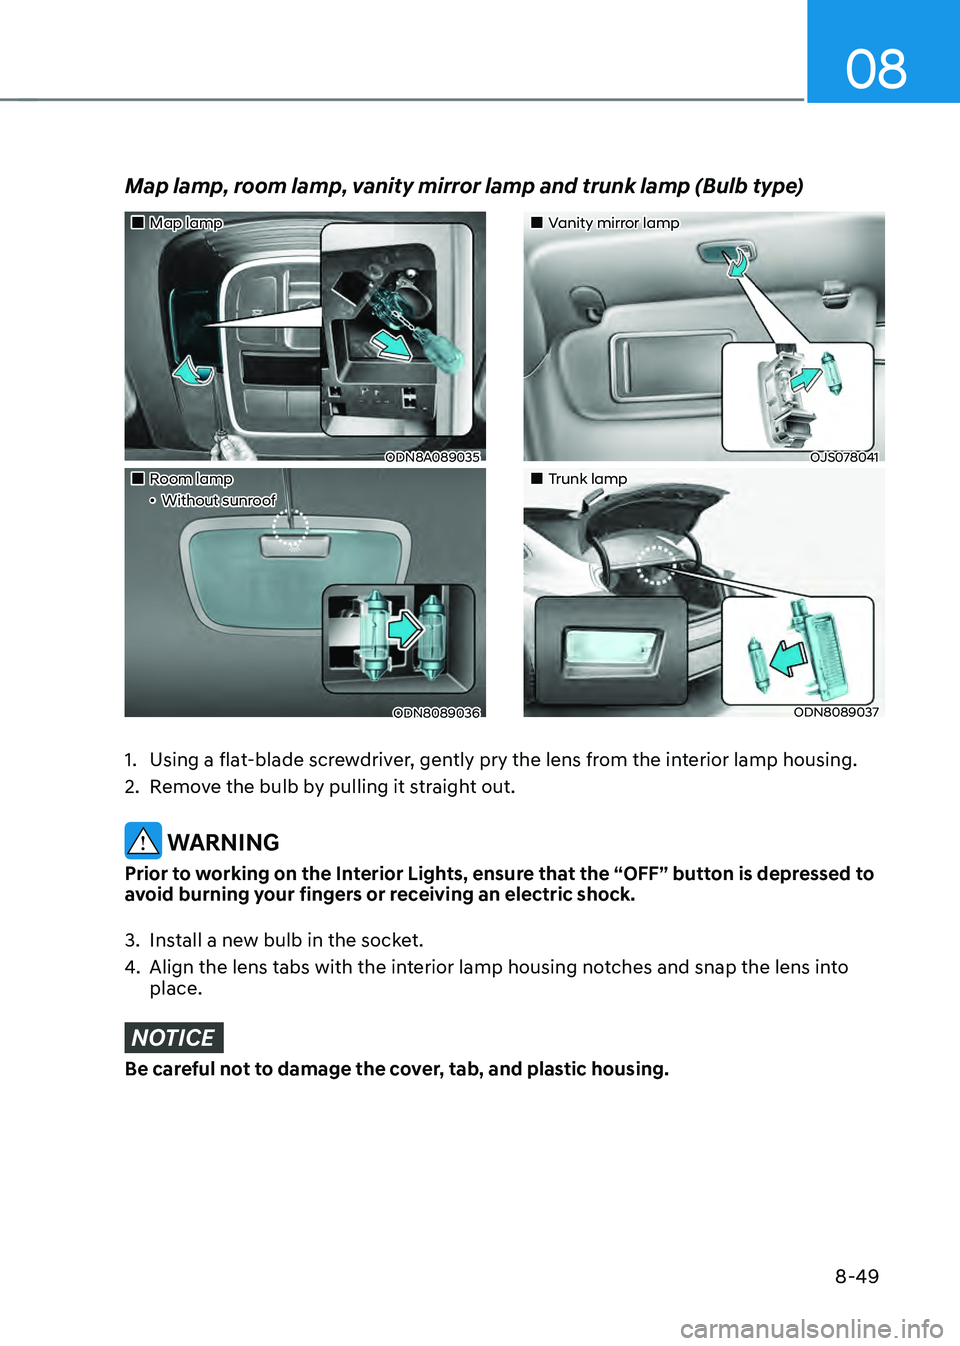
„„Map lamp
ODN8A089035
„„Room lamp„ǴWithout sunroof
ODN8089036
„„Vanity mirror lamp
OJS078041
„„Trunk lamp
ODN8089037
Map lamp, room lamp, vanity mirror lamp and trunk lamp (Bulb type)
1. Using a flat-blade screwdriver, gently pry the lens from the interior lamp housing.
2. Remove the bulb by pulling it straight out.
WARNING
Prior to working on the Interior Lights, ensure that the “OFF” button is depressed to
avoid burning your fingers or receiving an electric shock.
3. Install a new bulb in the socket.
4. Align the lens tabs with the interior lamp housing notches and snap the lens into
place.
NOTICE
Be careful not to damage the cover, tab, and plastic housing.
Page 505 of 527
Maintenance
8-56
• Caring for the leather seats
-Vacuum the seat periodically to
remove dust and sand on the seat. It
will prevent abrasion or damage of
the leather and maintain its quality.
-Wipe the natural leather seat cover
often with dry or soft cloth.
-Use of proper leather protector may
prevent abrasion of the cover and
helps maintain the color. Be sure to
read the instructions and consult
a specialist when using leather
coating or protective agent.
-Light colored (beige, cream beige)
leather is easily contaminated and
the stain is noticeable. Clean the
seats frequently.
-Avoid wiping with wet cloth. It may
cause the surface to crack.
• Cleaning the leather seats
-Remove all contaminations
instantly. Refer to instructions below
for removal of each contaminant.
-Cosmetic products (sunscreen,
foundation, etc.)
Apply cleansing cream on a cloth
and wipe the contaminated spot.
Wipe off the cream with a wet cloth
and remove water with a dry cloth.
-Beverages (coffee, soft drink, etc.)
Apply a small amount of neutral
detergent and wipe until
contaminations do not smear.
-Oil
Remove oil instantly with
absorbable cloth and wipe with
stain remover used only for natural
leather.
-Chewing gum
Harden the gum with ice and
remove gradually.
Cleaning the seat belt webbing
Clean the belt webbing with any
mild soap solution recommended for
cleaning upholstery or carpet. Follow
the instructions provided with the soap.
Do not bleach or re-dye the webbing
because this may weaken the seat belt.
Cleaning the interior window glass
If the interior glass surfaces of the
vehicle become fogged (that is, covered
with an oily, greasy or waxy film), they
should be cleaned with glass cleaner.
Follow the directions on the glass cleaner
container.
NOTICE
Do not scrape or scratch the inside of
the rear window. This may result in
damage to the rear window defroster
grid.
Page 506 of 527
08
8-57
The emission control system of your
vehicle is covered by a written limited
warranty. Please see the warranty
information contained in the Owner’s
Handbook & Warranty Information
booklet in your vehicle.
Your vehicle is equipped with an
emission control system to meet all
applicable emission regulations. There
are three emission control systems, as
follows.
(1) Crankcase emission control system
(2) Evaporative emission control system
(3) Exhaust emission control system
In order to ensure the proper function
of the emission control systems, it
is recommended that you have your
vehicle inspected and maintained
by an authorized HYUNDAI dealer in
accordance with the maintenance
schedule in this manual.
NOTICE
For the Inspection and Maintenance
Test (with Electronic Stability Control
(ESC) system)
• To prevent the vehicle from misfiring
during dynamometer testing, turn
the Electronic Stability Control
(ESC) system off by pressing the ESC
switch (ESC OFF light illuminated).
• After dynamometer testing is
completed, turn the ESC system back
on by pressing the ESC switch again.
1. Crankcase Emission Control
System
The positive crankcase ventilation system
is employed to prevent air pollution
caused by blow-by gases being emitted
from the crankcase. This system supplies
fresh filtered air to the crankcase through
the air intake hose. Inside the crankcase,
the fresh air mixes with blow-by gases,
which then pass through the PCV valve
into the induction system.
2. Evaporative Emission Control
System Including Onboard
Refueling Vapor Recovery
(ORVR)
The Evaporative Emission Control System
is designed to prevent fuel vapors from
escaping into the atmosphere. The
ORVR system is designed to allow the
vapors from the fuel tank to be loaded
into a canister while refueling at the gas
station, preventing the escape of fuel
vapors into the atmosphere.
Canister
Fuel vapors generated inside the fuel
tank are absorbed and stored in the
onboard canister. When the engine is
running, the fuel vapors absorbed in the
canister are drawn into the surge tank
through the purge control solenoid valve.
Purge Control Solenoid Valve (PCSV)
The purge control solenoid valve
is controlled by the Engine Control
Module (ECM); when the engine coolant
temperature is low during idling, the
PCSV closes so that evaporated fuel
is not taken into the engine. After the
engine warms-up during ordinary
driving, the PCSV opens to introduce
evaporated fuel to the engine.
EMISSION CONTROL SYSTEM
Page 510 of 527

Index
I-2
A
Air bag warning labels
........................................................................\
.................3-58
Air bag
........................................................................\
.........................................3-37
Driver’s air bag
........................................................................\
.......................3-39
Passenger’s front air bag
........................................................................\
.........3-39
Side air bags
........................................................................\
............................3-40
Curtain air bags
........................................................................\
.......................3-41
How does the air bags system operate? ...........................................................3-42
SRS warning light
........................................................................\
...................3-43
What to expect after an air bag inflates
...........................................................3-46
Occupant Classification System (OCS)
..........................................................3-47
Why didn’t my air bag go off in a collision
....................................................3-53
Air bag collision sensors
........................................................................\
.........3-54
Air bag inflation conditions
........................................................................\
....3-55
Air bag non-inflation conditions
.....................................................................3-55
SRS Care
........................................................................\
.................................3-57
Additional safety precautions
........................................................................\
..3-58
Air bag warning labels
........................................................................\
............3-58
Air cleaner
........................................................................\
...................................8-22
filter replacement
........................................................................\
...................8-22
Air conditioning system specification
................................................................2-10
Antenna
........................................................................\
......................................5-126
Anti-lock Brake System (ABS)
........................................................................\
..6-27
Appearance care ........................................................................\
........................... 8-50
Exterior care
........................................................................\
...........................8-50
Interior care
........................................................................\
............................8-54
Armrest
........................................................................\
.......................................3-11
Audio / Video / Navigation system
...................................................................5-129
Auto defogging system
........................................................................\
..............5-115
AUTO headlamp position
........................................................................\
...........5-72
Auto LOCK - Enable on shift
........................................................................\
.....5-31
Auto LOCK - Enable on speed
........................................................................\
...5-31
Auto UNLOCK - Enable on shift
.......................................................................5-31
Auto UNLOCK -Air bag deployment
................................................................5-31