Page 18 of 636

2-4
Vehicle Information, Consumer Information and Reporting Safety Defects
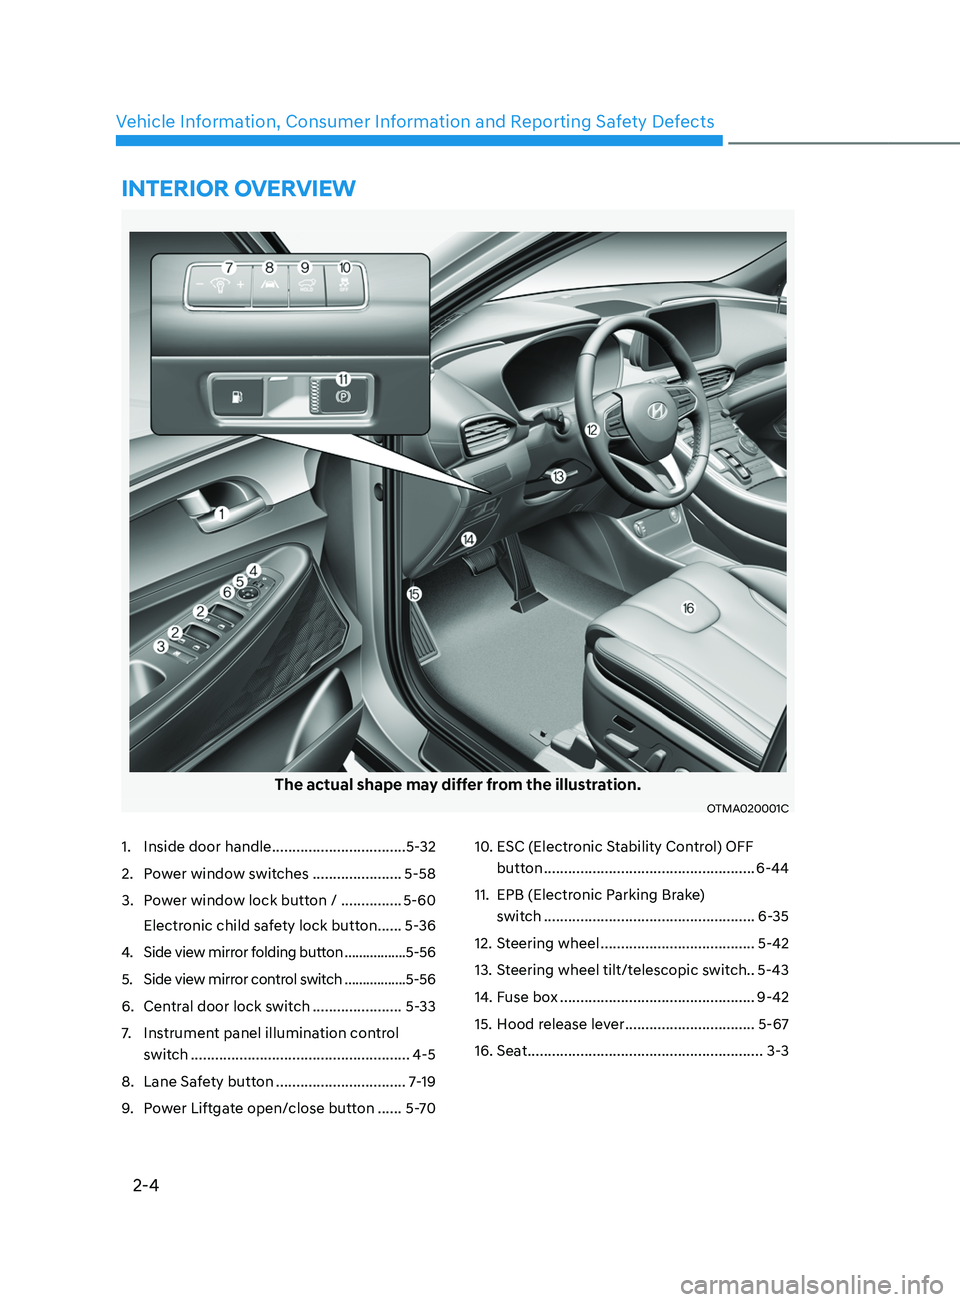
1. Inside door handle .................................
5- 32
2.
Po
wer window switches
...................... 5-58
3.
Po
wer window lock button /
............... 5-60
Electr
onic child safety lock button
......5-
36
4.
Side view mirr
or folding button
.................5-56
5.
Side view mirr
or control switch
.................5-56
6.
Centr
al door lock switch
...................... 5-
33
7.
Instrumen
t panel illumination control
switch
...................................................... 4-5
8.
Lane Saf
ety button
................................ 7
-19
9.
Po
wer Liftgate open/close button
......5-
7010. ESC (Electronic S
tability Control) OFF
button
.................................................... 6-44
11.
EPB (Electronic P
arking Brake)
switch
.................................................... 6-35
12.
St
eering wheel
......................................5-42
13.
St
eering wheel tilt/telescopic switch.. 5-43
14.
Fuse bo
x
................................................9-42
15.
Hood r
elease lever
................................5-67
16.
Seat .......................................................... 3-3
INTERIOR OVERVIEW
The actual shape may differ from the illustration.
OTMA020001C
Page 19 of 636

2-5
02
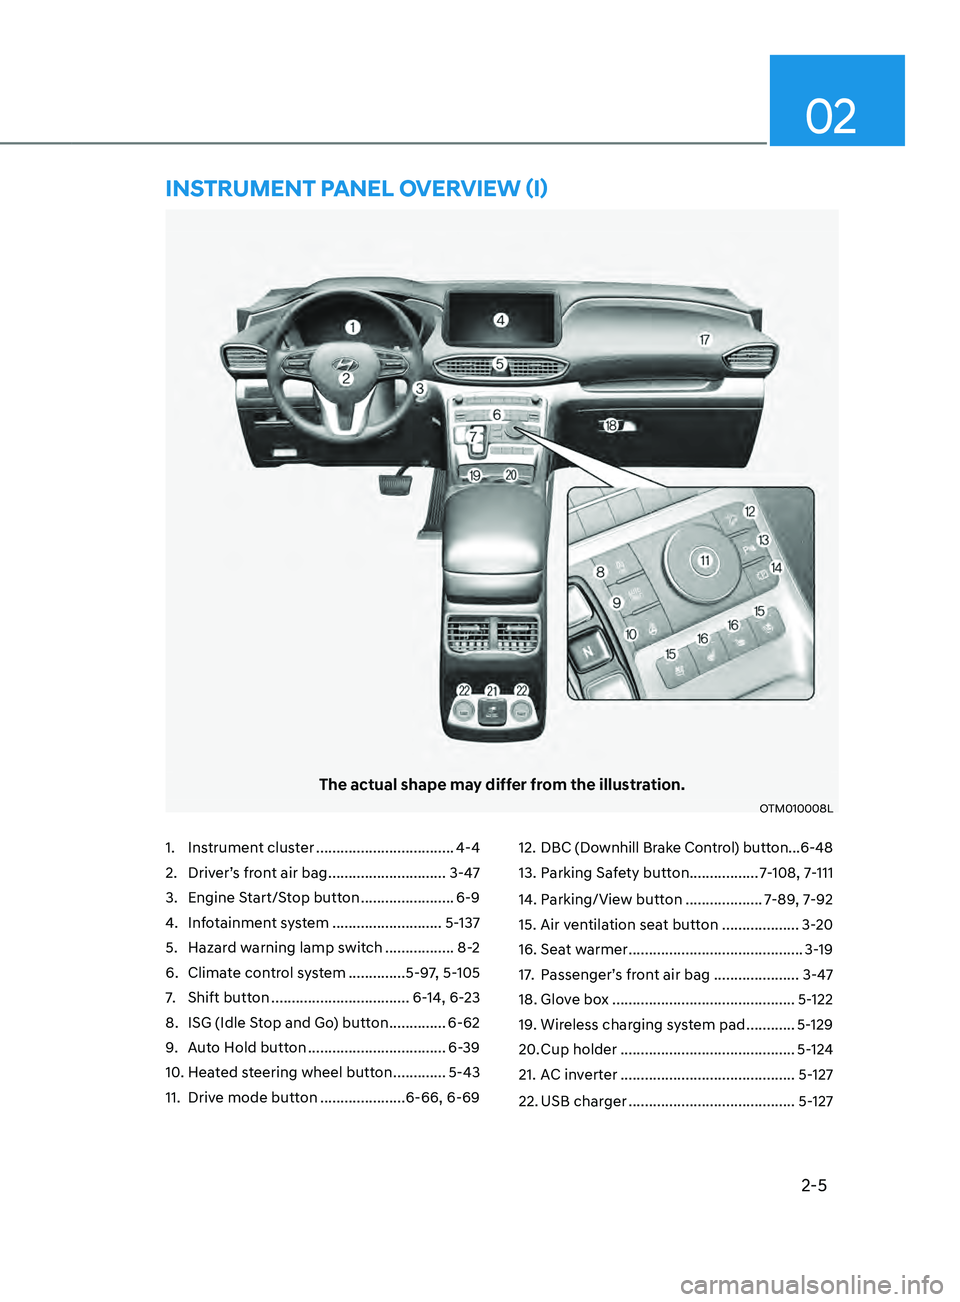
1. Instrument cluster ..................................4-4
2.
Driver’
s front air bag
............................. 3-4
7
3.
Engine S
tart/Stop button
....................... 6-9
4.
Inf
otainment system
........................... 5-
137
5.
Hazard w
arning lamp switch
.................8
-2
6.
Climat
e control system
..............5-9
7, 5-105
7.
Shift button .................................. 6-
14, 6-23
8.
ISG (Idle S
top and Go) button
..............6-62
9.
Aut
o Hold button
.................................. 6-
39
10.
Hea
ted steering wheel button
............. 5-43
11.
Drive mode butt
on
.....................6-66, 6-69 12.
DBC (Downhill Br
ake Control) button ...
6-48
13.
Parking Sa
fety button
.................7
-108, 7-111
14.
Parking/Vie
w button
...................7
-89, 7-92
15.
Air ven
tilation seat button
...................3-
20
16.
Seat w
armer
...........................................3-
19
17.
Passenger’
s front air bag
.....................
3-47
18.
Glov
e box
.............................................5-
122
19.
Wireless char
ging system pad
............5-
129
20.
Cup holder ........................................... 5-
124
21.
AC in
verter
...........................................5-
127
22.
USB charger ......................................... 5-
127
The actual shape may differ from the illustration.
OTM010008L
InsTRUmEnT pAnEL OVERVIEW (I)
Page 20 of 636
2-6
Vehicle Information, Consumer Information and Reporting Safety Defects
The actual shape may differ from the illustration.
OTM010005
1. Lighting control lever ...........................5-82
2.
Wiper and washer con
trol lever........... 5-93
3.
Voice r
ecognition button
.................... 5-
138
4.
Bluet
ooth® hands-free phone button
....5-
1395. LCD displa
y control ..............................
4- 29
6.
Driving Assist butt
on
.............................7
-54
7.
Smart cruise contr
ol Vehicle Distance
button
..................................................... 7-54
InsTRUmEnT pAnEL OVERVIEW (II)
Page 48 of 636
Seats & Safety System
3-16
NOTICE
OHI038136
If you recline the seatback towards the
front with the head restraint and seat
cushion raised, the head restraint may
come in contact with the sunvisor or
other parts of the vehicle.
„„Type A
OTM030058
„„Type B
OTM030059
Removal/Reinstall
To remove the head restraint:
1.
Recline the sea
tback (2) with the
seatback angle lever (1).
2.
Raise the head res
traint as far as it can
go.
3.
Press the head r
estraint release button
(3) while pulling the head restraint up
(4).
WARNING
NEVER allow anyone to travel in a seat
with the head restraint removed.
Page 49 of 636
03
3-17
„„Type A
OTM030061
„„Type B
OTM030063
To reinstall the head restraint :
1.
Recline the sea
tback.
2.
Put the head res
traint poles (2) into
the holes while pressing the release
button (1).
3.
Adjus
t the head restraint to the
appropriate height.
4.
Recline the sea
tback (4) with the
seatback angle lever (3).
WARNING
Always make sure the head restraint
locks into position after reinstalling and
adjusting it properly.
Rear seat head restraint
OOSEV038030L
The rear seats are equipped with head
restraint in all the seating positions for
the passenger’s safety and comfort.
OTM030070
Adjusting the height up and down
To raise the head restraint:
1.
Pull it up to the desir
ed position (1).
To lower the head restraint:
1.
Push and hold the release butt
on (2)
on the head restraint support.
2.
Lo
wer the head restraint to the
desired position (3).
Page 50 of 636

Seats & Safety System
3-18
OTM030071
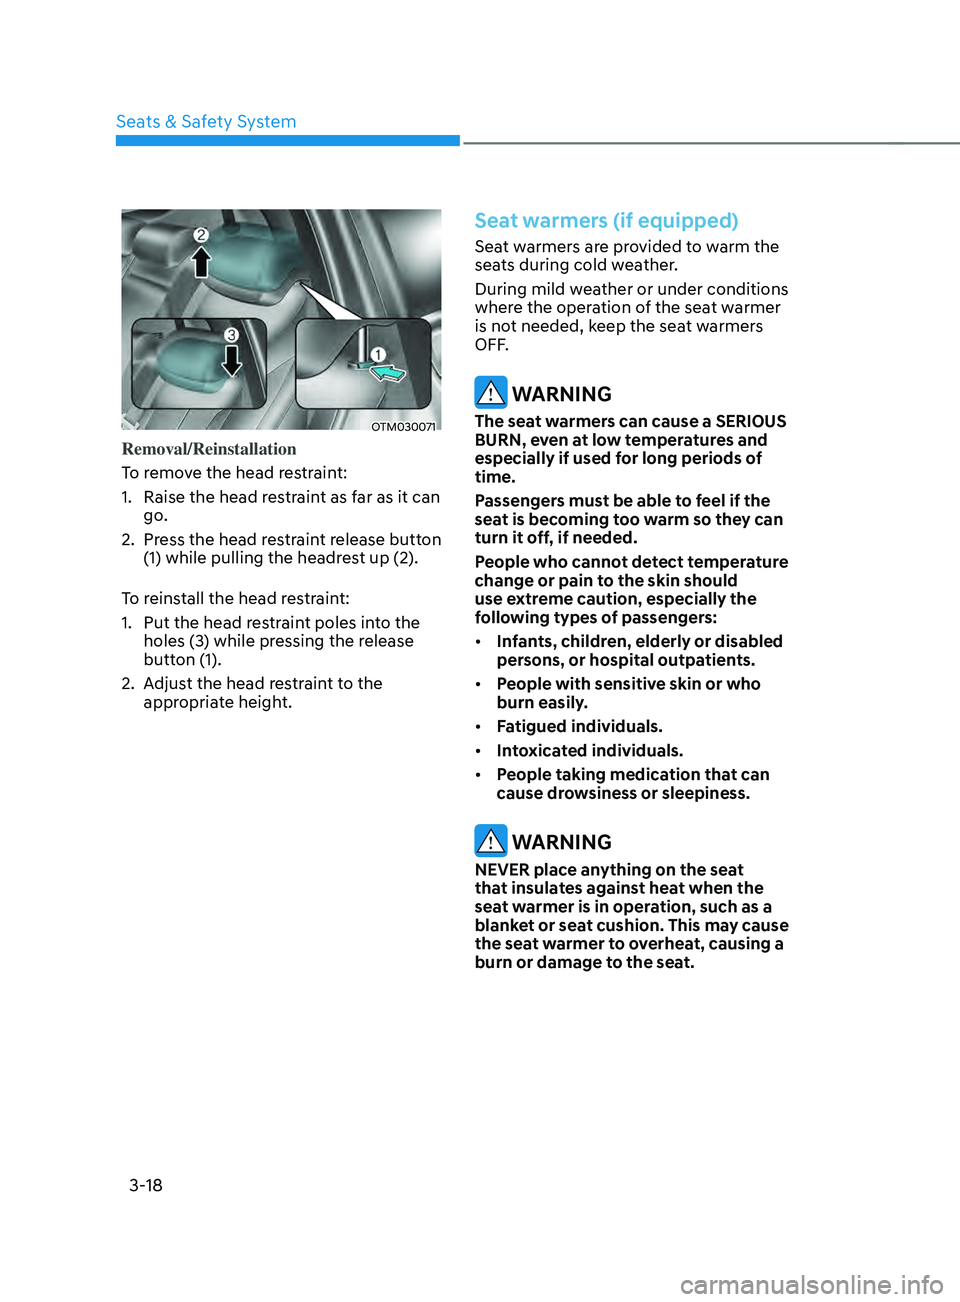
Removal/Reinstallation
To remove the head restraint:
1.
Raise the head res
traint as far as it can
go.
2.
Press the head r
estraint release button
(1) while pulling the headrest up (2).
To reinstall the head restraint:
1.
Put the head res
traint poles into the
holes (3) while pressing the release
button (1).
2.
Adjus
t the head restraint to the
appropriate height.
Seat warmers (if equipped)
Seat warmers are provided to warm the
seats during cold weather.
During mild weather or under conditions
where the operation of the seat warmer
is not needed, keep the seat warmers
OFF.
WARNING
The seat warmers can cause a SERIOUS
BURN, even at low temperatures and
especially if used for long periods of
time.
Passengers must be able to feel if the
seat is becoming too warm so they can
turn it off, if needed.
People who cannot detect temperature
change or pain to the skin should
use extreme caution, especially the
following types of passengers:
• Infants, children, elderly or disabled
persons, or hospital outpatients.
• People with sensitive skin or who
burn easily.
• Fatigued individuals.
• Intoxicated individuals.
• People taking medication that can
cause drowsiness or sleepiness.
WARNING
NEVER place anything on the seat
that insulates against heat when the
seat warmer is in operation, such as a
blanket or seat cushion. This may cause
the seat warmer to overheat, causing a
burn or damage to the seat.
Page 54 of 636

Seats & Safety System
3-22
System precautions
• Make sure that all the windows are
closed. If the window is open, the
alert may operate by the sensor
detecting an unintended movement
(e.g. wind or bugs).
• „„Cluster „„Steering wheel
OTM048165LOTM050216
If you do not want to use Rear
Occupant Alert, press the OK button
on the steering wheel when the first
alert is displayed on the cluster. Doing
so will deactivate the second alert one
time.
• An alert can occur if the there is an
impact on the roof.
• If boxes or objects are stacked in the
vehicle, the system may not detect
the boxes or objects. Or, the alert may
operate if the boxes or objects fall off.
• The sensor may not operate normally
if the senor is obscured by foreign
substances.
• The alert may operate if movement
in the driver or passenger seat is
detected.
• The alert may operate with the doors
locked due to car wash or surrounding
vibration or noise.
• If the vehicle is started remotely (if
equipped with Remote Start), inside
movement detection will stop.
WARNING
Even if your vehicle is equipped with
Rear Occupant Alert, always make sure
to check the rear seat before you leave
the vehicle.
Rear Occupant Alert may not operate
when:
• Movement does not continue for
a certain period of time or the
movement is small.
• The rear passenger is covered with
an object such as a blanket.
• Always be cautious of the
passenger’s safety as the detection
function and second alert may
not operate depending on the
surrounding environment and
certain conditions.
Page 58 of 636

Seats & Safety System
3-26
Information
If you are not able to smoothly pull
enough of the seat belt out from the
retractor, firmly pull the seat belt out and
release it. After release, you will be able to
pull the belt out smoothly.
Height adjustment
You can adjust the height of the shoulder
belt anchor to one of the four different
positions for maximum comfort and
safety.
The shoulder portion should be adjusted
so it lies across your chest and midway
over your shoulder nearest the door, not
over your neck.
„„Front seat
OTM030079
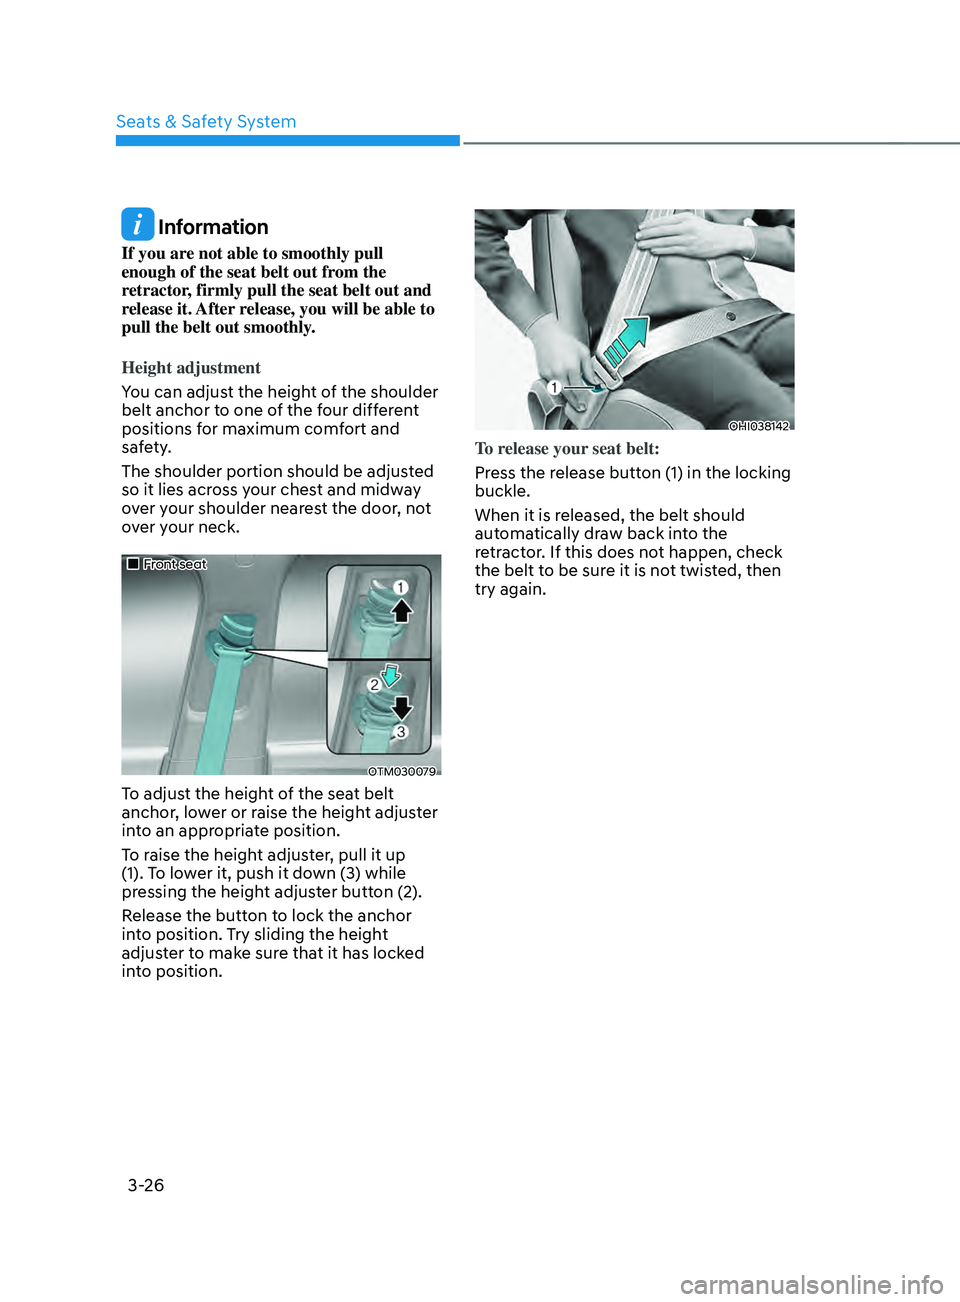
To adjust the height of the seat belt
anchor, lower or raise the height adjuster
into an appropriate position.
To raise the height adjuster, pull it up
(1). To lower it, push it down (3) while
pressing the height adjuster button (2).
Release the button to lock the anchor
into position. Try sliding the height
adjuster to make sure that it has locked
into position.
OHI038142
To release your seat belt:
Press the release button (1) in the locking
buckle.
When it is released, the belt should
automatically draw back into the
retractor. If this does not happen, check
the belt to be sure it is not twisted, then
try again.