2021 HYUNDAI SANTA FE engine overheat
[x] Cancel search: engine overheatPage 100 of 636

AUTO STOP indicator light ........................................................................\
..............4-20
T urn signal indicator light ........................................................................\
................. 4-
21
High beam indicator light
........................................................................\
................ 4-
21
High Beam Assist indicator light
........................................................................\
...... 4-
21
Cruise Indicator Light
........................................................................\
....................... 4-
21
SPORT Mode Indicator Light
........................................................................\
........... 4-
22
ECO Mode Indicator Light
........................................................................\
............... 4-
22
SMART Mode Indicator Light
........................................................................\
.......... 4-22
Mas
ter warning light
........................................................................\
........................ 4-
22
LCD display messages
........................................................................\
....................... 4-
23
Shift to P (for smart key system)
........................................................................\
..... 4-
23
Low key battery (for smart key system).................................................................. 4-23
Press START button while turning wheel (for smart key system)
......................... 4-
23
Check steering wheel lock system
(for smart key system)
........................................................................\
..................... 4-
23
Press brake pedal to start engine (for smart key system)
.................................... 4-
23
Key not in vehicle (for smart key system)
............................................................... 4-23
K
ey not detected (for smart key system)................................................................ 4-23
Press START button again (for smart key system)
................................................ 4-
23
Press START button with key (for smart key system)
........................................... 4
-24
Check BRAKE SWITCH fuse (for smart key system)
............................................. 4
-24
Shift to P or N to start engine (for smart key system)
.......................................... 4
-24
Battery discharging due to external electrical devices
......................................... 4
-24
Door, Hood, Liftgate open indicator
....................................................................... 4-25
Sunr
oof open indicator
........................................................................\
.................... 4-
25
Low tire pressure
........................................................................\
............................. 4-
25
Lights
........................................................................\
................................................ 4-
26
Wiper
........................................................................\
.....................................
...........4-26
Low washer fluid
........................................................................\
.............................. 4-
26
Low fuel
........................................................................\
.....................................
.......4-26
Low engine oil
........................................................................\
.................................. 4-
26
Engine overheated / Engine has overheated
......................................................... 4-
27
Check exhaust system
........................................................................\
..................... 4-
27
Check headlight
........................................................................\
............................... 4-
27
Check turn signal
........................................................................\
............................. 4-
27
Check headlamp LED
........................................................................\
...................... 4-
27
Check Forward Collision-Avoidance Assist system
............................................... 4-
28
Check Lane Keeping Assist system
........................................................................\
4-28
Check Blind-
Spot Collision Warning system..........................................................4-28
Check Driver Attention Warning system
................................................................ 4-
28
Check High Beam Assist system
........................................................................\
..... 4-
28
Check Smart Cruise Control system
....................................................................... 4-28
4
Page 104 of 636
Instrument cluster
4-6
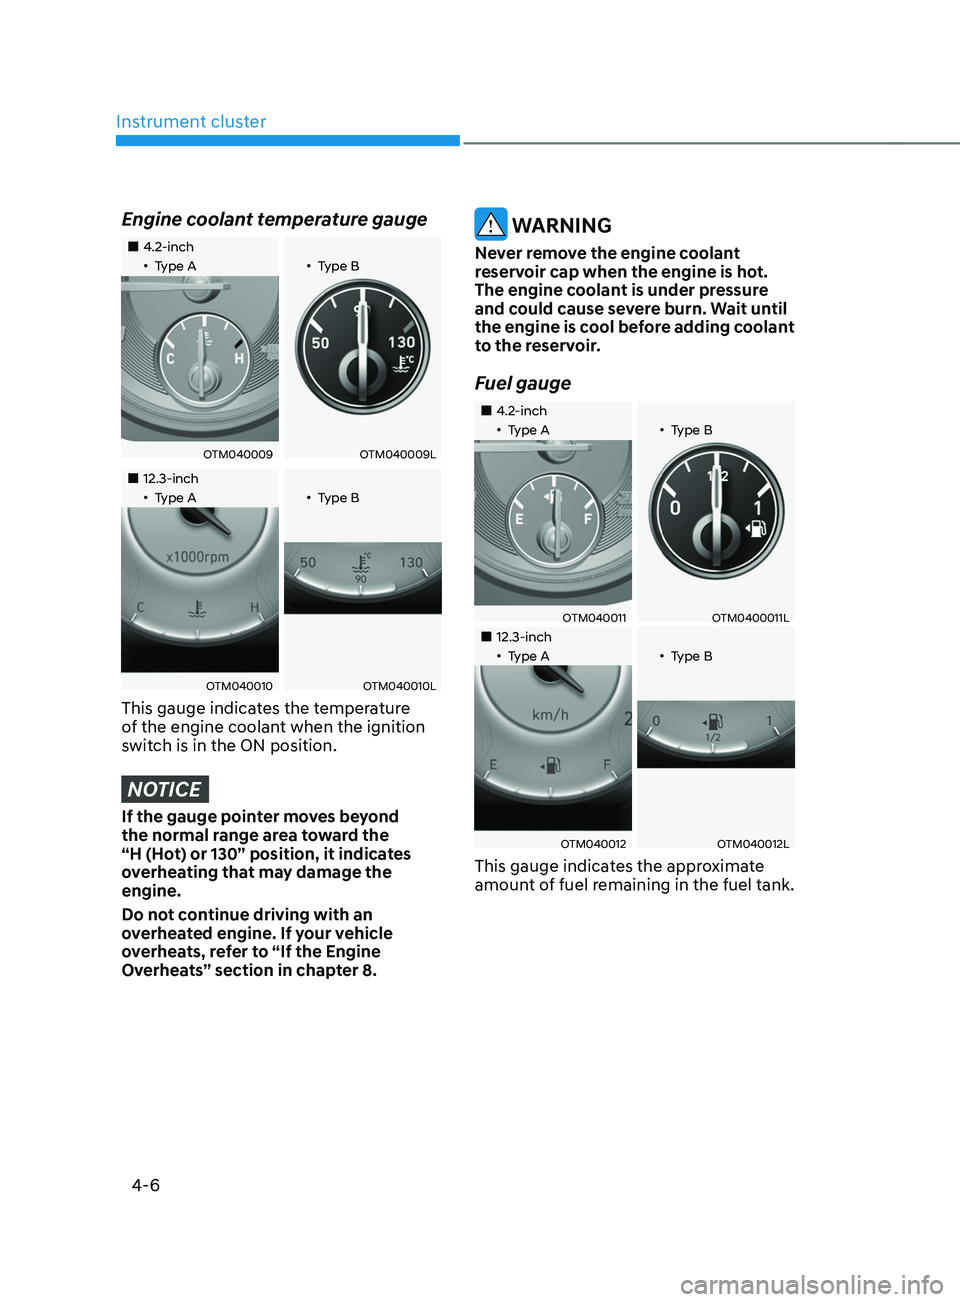
Engine coolant temperature gauge
„„4.2-inch„•Type A„•Type B
OTM040009OTM040009L
„„12.3-inch„•Type A„•Type B
OTM040010OTM040010L
This gauge indicates the temperature
of the engine coolant when the ignition
switch is in the ON position.
NOTICE
If the gauge pointer moves beyond
the normal range area toward the
“H (Hot) or 130” position, it indicates
overheating that may damage the
engine.
Do not continue driving with an
overheated engine. If your vehicle
overheats, refer to “If the Engine
Overheats” section in chapter 8.
WARNING
Never remove the engine coolant
reservoir cap when the engine is hot.
The engine coolant is under pressure
and could cause severe burn. Wait until
the engine is cool before adding coolant
to the reservoir.
Fuel gauge
„„4.2-inch„•Type A„•Type B
OTM040011OTM0400011L
„„12.3-inch„•Type A„•Type B
OTM040012OTM040012L
This gauge indicates the approximate
amount of fuel remaining in the fuel tank.
Page 125 of 636
04
4-27
Engine overheated / Engine has
overheated (if equipped)
This message is displayed when the
engine coolant temperature is above
248°F (120°C). This means that the
engine is overheated and may be
damaged.
If your vehicle is overheated, refer to
“Overheating” section in chapter 8.
Check exhaust system (if equipped)
This message is displayed if there is a
problem with the GPF system. At this
time, the GPF warning light will also
blink. If this occurs, we recommend that
you have the GPF system checked by an
authorized HYUNDAI dealer.
GPF : Gasoline Particulate Filter
Check headlight (if equipped)
This warning message is displayed if the
headlamps are not operating properly.
In addition, if a specific lamp(turn signal
lamp etc.) is not operating properly, the
warning message according to a specific
lamp (turn signal lamp etc.) is displayed.
A corresponding bulb may need to be
replaced.
Make sure to replace the burned out
bulb with a new one of the same wattage
rating.
Check turn signal (if equipped)
This message is displayed if the turn
signal lamps are not operating properly.
A lamp may need to be replaced.
Make sure to replace the burned out
bulb with a new one of the same wattage
rating.
Check headlamp LED (if equipped)
This message is displayed if there is a
problem with the LED headlamp. We
recommend that you have the vehicle
inspected by an authorized HYUNDAI
dealer.
Page 246 of 636
Convenient features
5-102
Air conditioning
HYUNDAI Air Conditioning Systems are
filled with R-134a or R-1234yf refrigerant.
1.
Start the engine. Push the air
conditioning butt
on.
2.
Set the mode t
o the
position.
3.
Set the air in
take control to the
outside air or recirculated air position.
4.
Adjus
t the fan speed control and
temperature control to maintain
maximum comfort.
Information
Your vehicle is filled with R-134a or
R-1234yf according to the regulation in
your country at the time of production.
You can find out which air conditioning
refrigerant is applied to your vehicle on
the label located inside of the hood. Refer
to chapter 8 for the location of the air
conditioning refrigerant label.
NOTICE
• The refrigerant system should only
be serviced by trained and certified
technicians to insure proper and safe
operation.
• The refrigerant system should be
serviced in a well-ventilated place.
• The air conditioning evaporator
(cooling coil) shall never be repaired
or replaced with one removed from
a used or salvaged vehicle and new
replacement MAC evaporators shall
be certified (and labeled) as meeting
SAE Standard J2842.
NOTICE
• When using the air conditioning
system, monitor the temperature
gauge closely while driving up
hills or in heavy traffic when
outside temperatures are high.
Air conditioning system operation
may cause engine overheating.
Continue to use the fan but turn the
air conditioning system off if the
temperature gauge indicates engine
overheating.
• When opening the windows in humid
weather air conditioning may create
water droplets inside the vehicle.
Since excessive water droplets
may cause damage to electrical
equipment, air conditioning should
only be used with the windows
closed.
Page 256 of 636
Convenient features
5-112
Air conditioning
HYUNDAI Air Conditioning Systems are
filled with R-1234yf refrigerant.
1.
Start the engine. Push the air
conditioning butt
on.
2.
Set the mode t
o the
position.
3.
Set the air in
take control to the
outside air or recirculated air position.
4.
Adjus
t the fan speed control and
temperature control to maintain
maximum comfort.
Information
Your vehicle is filled with R-134a or
R1234yf according to the regulation in
your country at the time of production.
You can find out which air conditioning
refrigerant is applied to your vehicle on
the label located inside of the hood. Refer
to chapter 8 for the location of the air
conditioning refrigerant label.
NOTICE
• The refrigerant system should only
be serviced by trained and certified
technicians to insure proper and safe
operation.
• The refrigerant system should be
serviced in a well-ventilated place.
• The air conditioning evaporator
(cooling coil) shall never be repaired
or replaced with one removed from
a used or salvaged vehicle and new
replacement MAC evaporators shall
be certified (and labeled) as meeting
SAE Standard J2842.
NOTICE
• When using the air conditioning
system, monitor the temperature
gauge closely while driving up
hills or in heavy traffic when
outside temperatures are high.
Air conditioning system operation
may cause engine overheating.
Continue to use the fan but turn the
air conditioning system off if the
temperature gauge indicates engine
overheating.
• When opening the windows in humid
weather air conditioning may create
water droplets inside the vehicle.
Since excessive water droplets
may cause damage to electrical
equipment, air conditioning should
only be used with the windows
closed.
Page 270 of 636
Convenient features
5-126
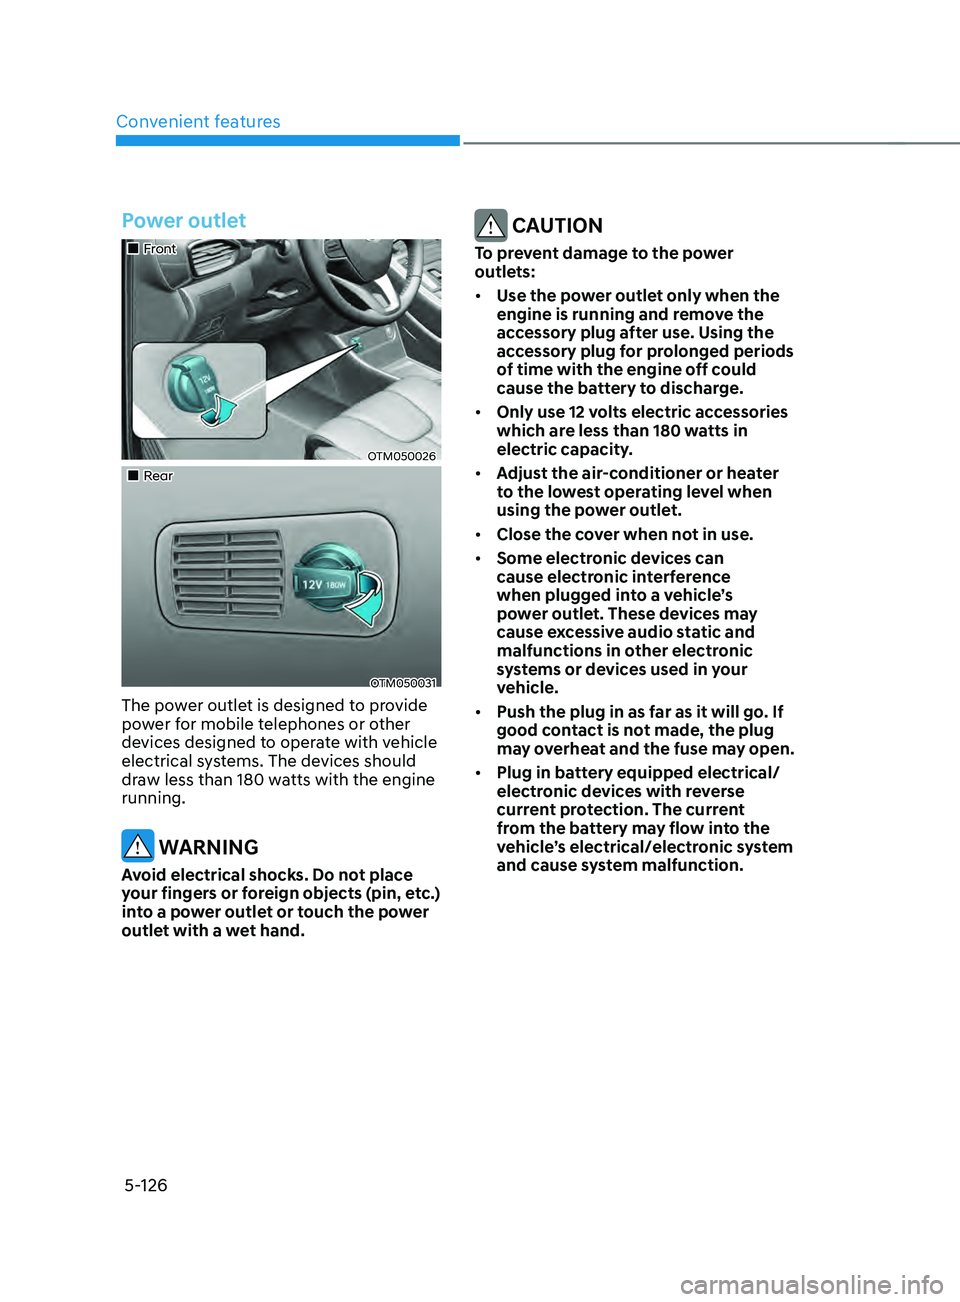
Power outlet
„„Front
OTM050026
„„Rear
OTM050031
The power outlet is designed to provide
power for mobile telephones or other
devices designed to operate with vehicle
electrical systems. The devices should
draw less than 180 watts with the engine
running.
WARNING
Avoid electrical shocks. Do not place
your fingers or foreign objects (pin, etc.)
into a power outlet or touch the power
outlet with a wet hand.
CAUTION
To prevent damage to the power
outlets:
• Use the power outlet only when the
engine is running and remove the
accessory plug after use. Using the
accessory plug for prolonged periods
of time with the engine off could
cause the battery to discharge.
• Only use 12 volts electric accessories
which are less than 180 watts in
electric capacity.
• Adjust the air-conditioner or heater
to the lowest operating level when
using the power outlet.
• Close the cover when not in use.
• Some electronic devices can
cause electronic interference
when plugged into a vehicle’s
power outlet. These devices may
cause excessive audio static and
malfunctions in other electronic
systems or devices used in your
vehicle.
• Push the plug in as far as it will go. If
good contact is not made, the plug
may overheat and the fuse may open.
• Plug in battery equipped electrical/
electronic devices with reverse
current protection. The current
from the battery may flow into the
vehicle’s electrical/electronic system
and cause system malfunction.
Page 306 of 636
Driving your vehicle
6-18
Shift-lock system
For your safety, the automatic
transmission has a shift-lock system
which prevents shifting the transmission
from P (Park) into R (Reverse) unless the
brake pedal is depressed.
To shift the transmission from P (Park)
into R (Reverse):
1.
Depress and hold the br
ake pedal.
2.
Start the engine or place the ignition
s
witch in the ON position.
3.
Depress the br
ake pedal and push the
R (Reverse) button. (button type)
Ignition key interlock system
(if equipped)
The ignition key cannot be removed
unless the shift lever is in the P (Park)
position.
When the battery is discharged:
The shift buttons will not function when
the battery is discharged.
In emergencies, do the following to
move the shift button to N (Neutral) on a
level ground.
1.
Connect the batt
ery cables from
another vehicle or from a another
battery to the jump-starting terminals
inside the engine compartment.
For more details, refer to “Jump
Starting” in chapter 7.
2.
Release the parking br
ake with the
ignition switch in the ON position.
3.
Shift the gear to the N(N
eutral)
position refer to the “Stay in Neutral
when vehicle is Off” in this chapter.
Parking
Always come to a complete stop and
continue to depress the brake pedal.
Move the shift lever/button into the P
(Park) position, apply the parking brake,
and place the ignition switch in the
LOCK/OFF position. Take the Key with
you when exiting the vehicle.
WARNING
When you stay in the vehicle with
the engine running, be careful not to
depress the accelerator pedal for a long
period of time. The engine or exhaust
system may overheat and start a fire.
The exhaust gas and the exhaust system
are very hot. Keep away from the
exhaust system components.
Do not stop or park over flammable
materials, such as dry grass, paper or
leaves. They may ignite and cause a fire.
Page 309 of 636
06
6-21
The manual shift mode also changes
back to automatic shift mode in one of
following situations
- When the accelera
tor pedal is gently
depressed for more than 6 seconds
while driving
- When the vehicle s
tops
Information
If the [+] and [-] paddle shifters are pulled
at the same time, gear shift may not occur.
Good driving practices
• Never move the shift button from
P (Park) or N (Neutral) to any other
position with the accelerator pedal
depressed.
• Never move the shift lever/button into
P (Park) when the vehicle is in motion.
Be sure the vehicle is completely
stopped before you attempt to shift
into R (Reverse) or D (Drive).
• Do not move the shift button to N
(Neutral) when driving. Doing so
may result in an accident because
of a loss of engine braking and the
transmission could be damaged.
• Driving uphill or downhill, Shift
to D (Drive) to drive forward or R
(Reverse) to drive backwards, and
check the gear position indicated
on the cluster before driving. If you
drive in the opposite direction of the
selected gear, the engine will turn
off and a serious accident might be
occurred due to the degraded brake
performance.
• Do not drive with your foot resting
on the brake pedal. Even light, but
consistent pedal pressure can result
in the brakes overheating, brake wear
and possibly even brake failure.
• When driving with shifter paddles,
slow down before shifting to a lower
gear. Otherwise, the lower gear may
not be engaged if the engine rpms are
outside of the allowable range.
• Always apply the parking brake when
leaving the vehicle. Do not depend on
placing the transmission in P (Park) to
keep the vehicle from moving.